前言:
最近做了个活动需求大致类似于一个拼图游戏,非常接近于咱们日常app拖动排序的场景。所以想着好好梳理一下,改造改造干脆在此基础上来写一篇实现app拖动排序的文章,跟大家分享下这个大家每天都要接触的场景,到底是怎么样的一个实现的过程。
思路梳理:
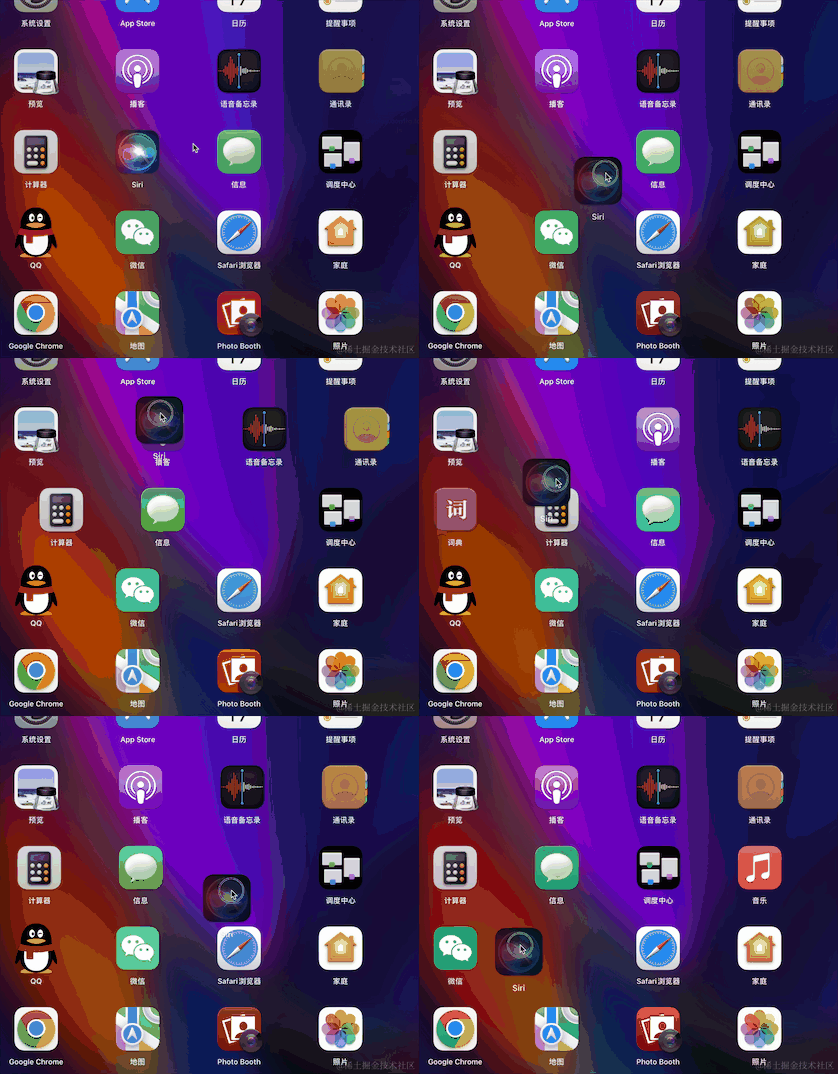
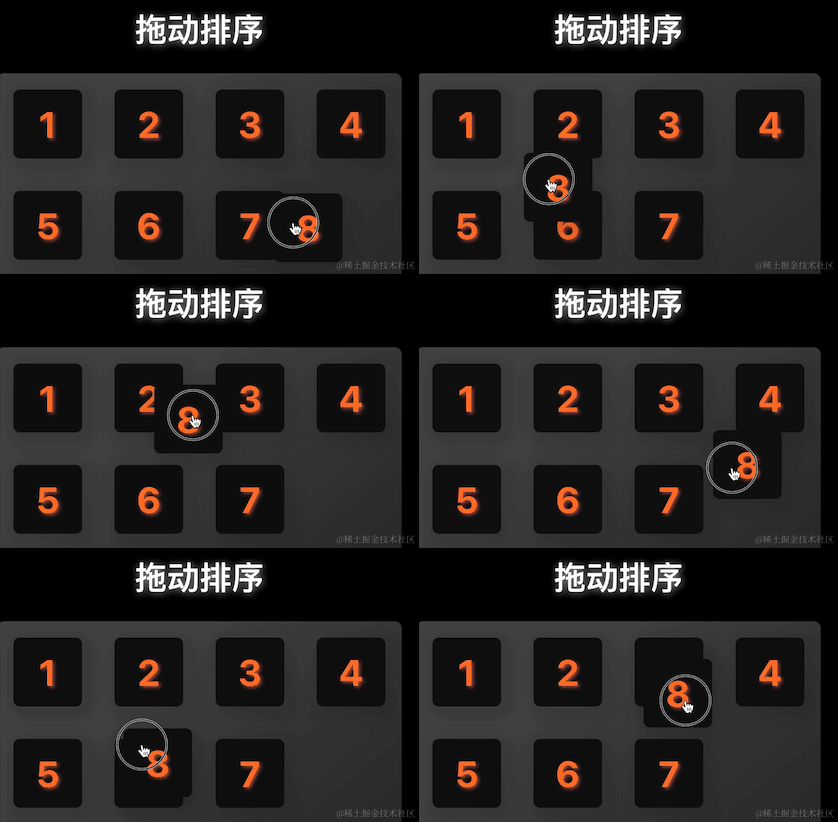
按照老惯例,做之前先分析下要实现什么功能点,并预先思考下大致如何去实现。 先随便找个参考图分析分析,如下,得出要解决的逻辑点:
-
首当其冲,app(后文称之为方格)要能按住、拖动,根据鼠标/触摸位置来变化(低代码基本操作)
-
无论何时方块之间应该不留空位置,总是向前铺满
-
当一个方块拖动到另一个方块重叠到一定程度才触发排序,重叠程度需要计算
-
非拖动方块的移动逻辑是什么样的,何时移动、何时停止?需要总结出规律
-
排序不是拖动一开始就触发的,拖动的开始和停止需要做判定
PS:在做之前就想到了细节可能会很多,其中的包含了不少有意思的逻辑,实际远不止上述的几点,且看后续展开。
实现
一、创建模拟App宫格布局
首先创建一下类似于桌面图标的n*n宫格布局基本结构,这里我将宫格数量设置为了一个变量,便于代码更加灵活通用以支持不同的图标数;
另外也创建了些后面会用到的state,详细见注释。
const defaultNum = 16 // 默认格子数
const marginValue = 20 // 格子边距
// 移动方向,前进、静止、后退
const moveDirectionMap = {
    forward:'forward',
    static:'static',
    backwards:'backwards'
}

export function UseDragSort() {
    const containerRef = useRef(null) //格子的父容器
    const [row] = useState(Math.sqrt(defaultNum)) // 行列数
    const [imgArr] = useState(new Array(defaultNum).fill(demoImg))
    const [positionArr, setPositionArr] = useState([]) // 每个块的位置数据
    const [draggingStop, setDraggingStop] = useState(false) //是否停止拖动动作
    const [currNode,setCurrNode] = useState(Object) //当前被拖动的元素
    const [dragStartPosition,setDragStartPosition] = useState([])
    const [blockWidth,setBlockWidth] = useState(0) //单块宽度
    const [aimPosition,setAimPosition] = useState([]) //目标落地点
    const [onMouseUp,setOnMouseUp] = useState(false) //鼠标是否落下
    useEffect(() => {
        countPosition()
    }, []);
  }
1.1现在思考一下,如何来生成有n*n个格子的宫格?
-
先算算每个格子的尺寸,假设父级容器的宽高是x,容易想到那么每格的「理想尺寸」就应该是x/n,可以生成一个二维矩阵的数据结构来表达宫格的结构关系。
-
根据每个格子的x、y轴比较容易就可以计算出每个宫格的绝对定位位置。但实际上格子之间还有边距,这个也之前也定义了变量marginValue来存储。在计算的时候扣除即可,详细可见countPosition()实现:
/**
- 根据宫格数量生成每个宫格的绝对定位位置
- @returns {[{top: number, left: number}]} 位置坐标
*/
function countPosition() {
// 生成一个2维矩阵
let _positionArr = Array(row).fill(Array(row).fill({top: 0, left: 0, width: 0}))
_positionArr = JSON.parse(JSON.stringify(_positionArr))
// 获取容器尺寸
const containerSize = containerRef.current.clientWidth
// 单格宽度
const blockWidth = containerSize / row
setBlockWidth(blockWidth)
let idx = 0
for (let x = 0; x < _positionArr.length; x++) { //横坐标
for (let y = 0; y < _positionArr[x].length; y++) { // 纵坐标
// 根据位置计算每个位置的top和left
_positionArr[x][y].top = blockWidth * x
_positionArr[x][y].left = blockWidth * y
// 宽度扣除margin的值保证刚好填满格子
_positionArr[x][y].width = blockWidth - marginValue * 2
_positionArr[x][y].margin = marginValue
initAniStyle(_positionArr[x][y], idx)
idx++
}
}
setPositionArr(_positionArr)
}
最后将计算出的位置数据存储到之前定义的positionArr变量,这个变量记录了每个块的位置,是相当重要的,后面的逻辑基本都会围绕这个变量来展开。
打印一下更直观:
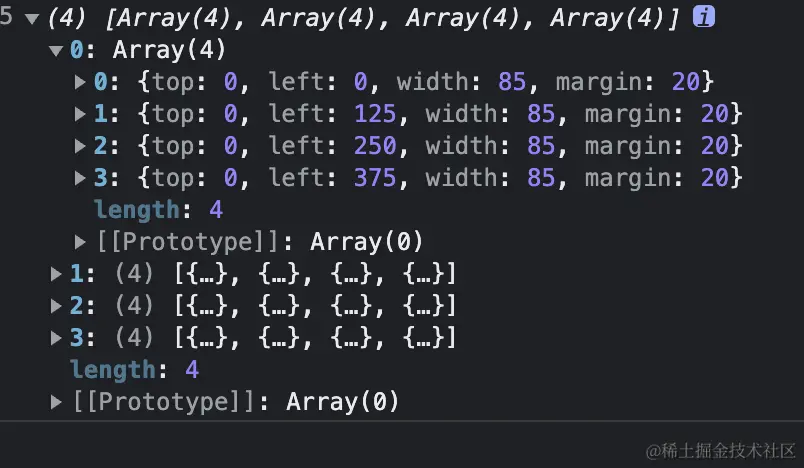
现在有了位置信息,就可以根据位置信息来生成格子的具体位置并渲染到页面了。 监听到位置信息生成完毕,开始初始化宫格:
useEffect(() => {
    if (positionArr.length) {
        initBlockSort().then()
    }
}, [positionArr])

/**
 * 初始化每个方块的位置
 */
async function initBlockSort() {
    // log("初始化")
    // 全部方块节点
    const childNodes = containerRef.current.childNodes
    // 开始根据数据,初始化方块位置和尺寸
    const formatChildNodes = Array(row).fill(Array(row).fill({top: 0, left: 0}))
    let idx = 0
    for (let x = 0; x < positionArr.length; x++) {
        for (let y = 0; y < positionArr[x].length; y++) {
            // 设置每个方块的初始位置
            childNodes[idx].style.width = positionArr[x][y].width + 'px'
            childNodes[idx].style.height = positionArr[x][y].width + 'px'
            await executeInitAni(childNodes[idx], idx, positionArr[x][y].width)
            childNodes[idx].style.left = positionArr[x][y].left + 'px'
            childNodes[idx].style.top = positionArr[x][y].top + 'px'
            childNodes[idx].style.margin = positionArr[x][y].margin + 'px'
            // 给每个方块加上鼠标按下事件监听
            childNodes[idx].addEventListener('mousedown', clickDown.bind(null, childNodes[idx]), false)
            // 这里顺便把节点转为跟位置数据一致的n维矩阵形式,用于处理后续的拖动排序操作
            formatChildNodes[x][y] = childNodes[idx]
            idx++
            // 给最后一个格子添加动画执行完成监听
            if (idx === defaultNum - 1) {
                childNodes[idx].addEventListener('webkitAnimationEnd', () => {
                    // 动画完成后清除掉animation类,否则会导致拖动的坐标设置失效
                    for (const node of childNodes) {
                        node.style.animation = ''
                    }
                })
            }
        }
    }

}
注意这里要给最后一个格子添加动画执行完成监听,用于清除设置的动画属性,防止后续的拖动设置坐标与动画自带的坐标移动产生冲突
渲染:
return (
    <div className={"drag-box"}>
        <h1>拖动排序</h1>
        <div ref={containerRef} className={'block-box'}>
            {
                imgArr.map((item, index) => {
                    return (
                        <div className={'block-img'} id={`${index}`} key={index}>{index+1}</div>
                    )
                })
            }
        </div>
    </div>
)
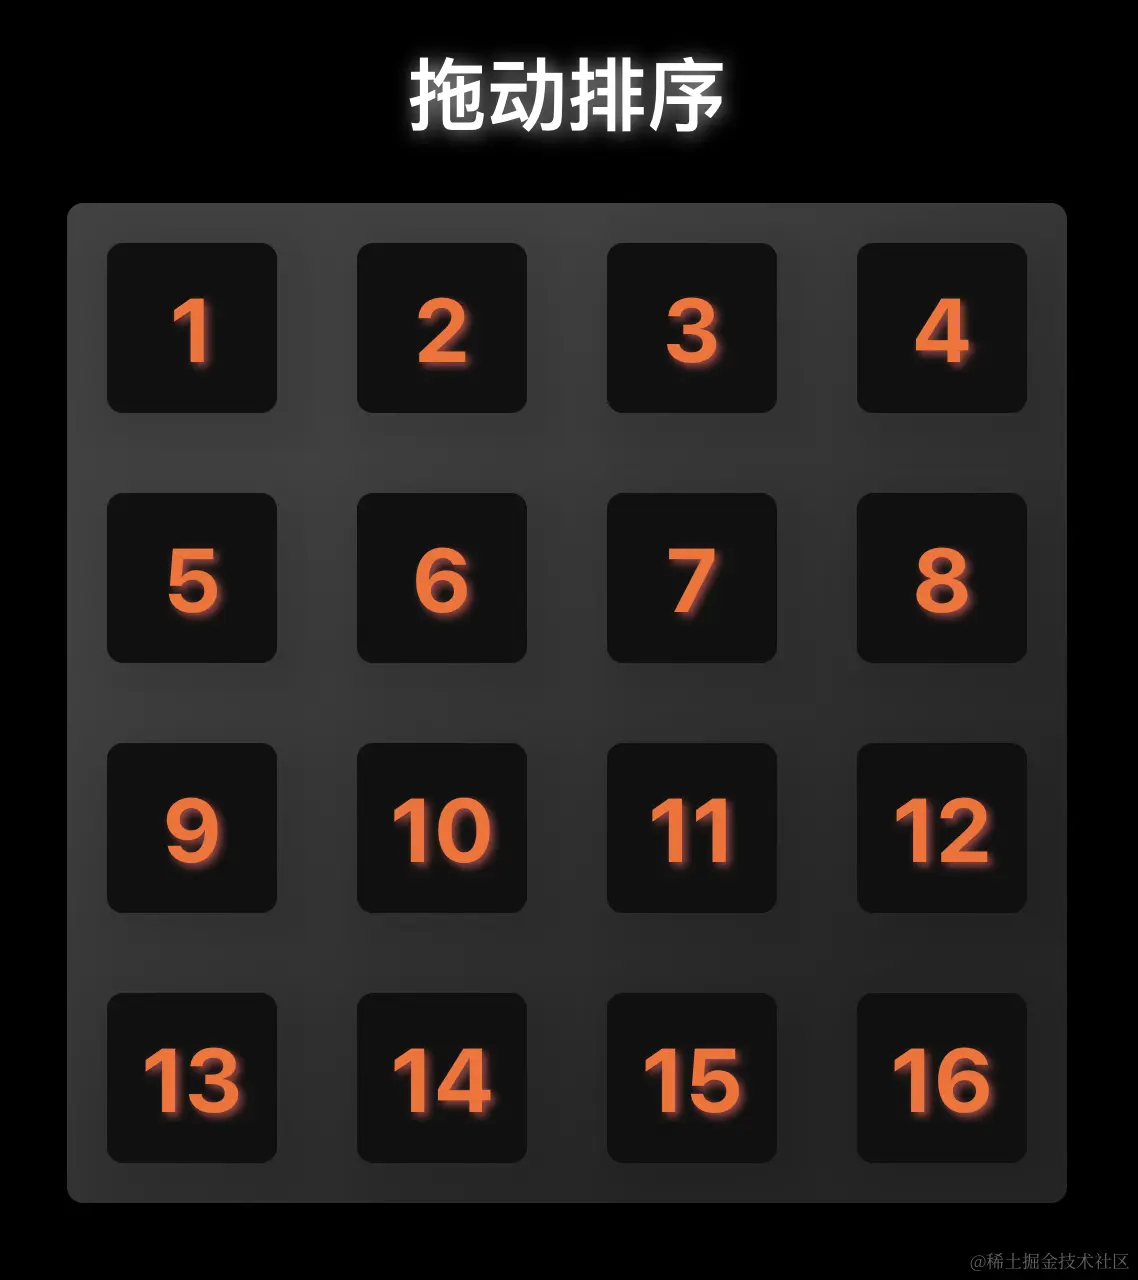
最后,再简单添加一些css,就得到了一个带位置标记的n宫格,来模拟app桌面。
1.2初始化小动画
可以注意到在之前生成位置信息时,countPosition()顺便触发了一个initAniStyle(_positionArr[x][y], idx)函数,并传入了格子的横、纵坐标和索引。并且给最后一个格子添加了动画执行完成监听。
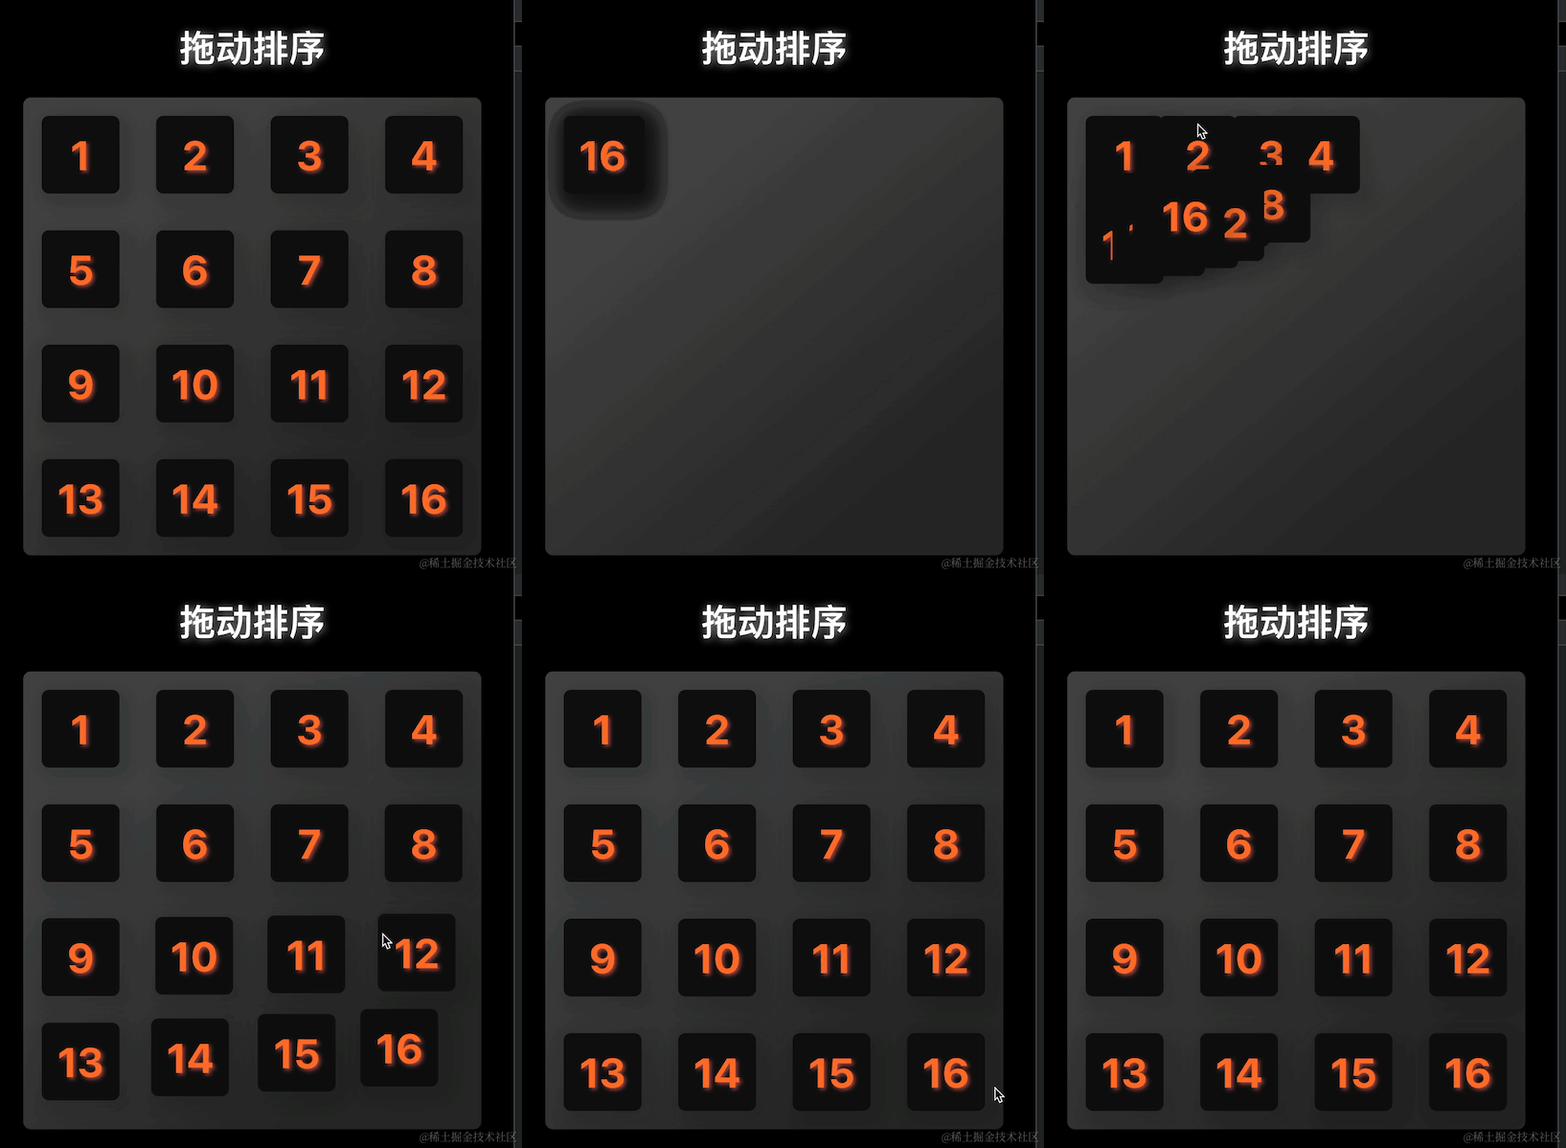
这是为初始化添加一个小动画,类似于发牌的效果.(至于为什么要加,只能说之前需求写了就顺便讲一讲~~~)
/**
 * 生成初始化动画,根据每个方块生成一个动画keyframes,
 * 其实也可以动态修改同一个动画再赋值,没必要影响不大,
 * 都是从(0,0)起始移动到指定位置
 * @param nodePosition 位置数据
 * @param index 索引,用于绑定动画
 */
const initAniStyle = (nodePosition, index) => {
    document.styleSheets[0].insertRule(`
      @-webkit-keyframes ani${index}{ from{ left:0px;top:0px } to { left:${nodePosition.left}px;top:${nodePosition.top}px; }}
    `, 0)
}
在上面的initBlockSort()中我们又同步调用了下方的executeInitAni函数对动画进行了执行,该函数返回了一个promise,10ms后调用resolve,以实现了每间隔10ms执行一个块的动画。
这里的场景也是很常见的一个面试题,如何使for循环慢下来?答案之一就是promise啦。
/**
 * 执行单个块动画
 * @param targetNode 块节点
 * @param index 块序号
 * @param width 宽度
 * @returns {Promise<unknown>}
 */
const executeInitAni = async (targetNode, index, width) => {
    return new Promise((resolve) => {
        const sizeStyle = `width:${width}px;height:${width}px`
        const animStyle = `ani${index} 0.8s ease-in-out forwards`
        targetNode.setAttribute('style', `animation:${animStyle};-webkit-animation:${animStyle};${sizeStyle}`)
        setTimeout(() => {
            // 意味着动画之间的间隔
            resolve()
        }, 10)
    })

}
现在,我们得到了一个简单而流畅的初始化动画
顺便一提,由于本文代码主要是用于演示讲解,为了方便理解、最大程度展现逻辑,并没有对例如动画、style等进一步封装。
二、实现元素的拖拽
经过之前的步骤,只算是初步完成了准备,现在进入正题。
在之前初始化的函数中,我们还同时给每个方块添加了鼠标按下的监听事件,现在派上用场了,我们将通过这个事件,来实现拖拽的核心逻辑。
通过对鼠标移动位置的获取,来设置元素的绝对位置,即可实现元素的拖拽效果,另外也需要处理下元素被"松开"之后的逻辑,不然元素会一直黏在光标上,完整函数如下:
let timer = null
let movePixel = [-999, -999]
const clickDown = (targetNode, e) => {
    setCurrNode(targetNode)
    // 记录被拖拽元素的起始位置
    const _left = Number(targetNode.style.left.replace('px',''))
    const _top = Number(targetNode.style.top.replace('px',''))
    const _margin = Number(targetNode.style.margin.replace('px',''))
    const dragPositionLeft = _left+_margin
    const dragPositionTop = _top+_margin
    setDragStartPosition([dragPositionLeft,dragPositionTop])
    // 写个定时器判断拖动是否停止
    if (!timer) {
        timer = setInterval(() => {
            if (movePixel[0] === targetNode.style.left && movePixel[1] === targetNode.style.top) {
                // 一定时间内拖动间隔不再更新就判定停止
                setDraggingStop(true)
            } else {
                // 拖动中就一直更新坐标,并且更新拖动味停止状态
                [movePixel[0], movePixel[1]] = [targetNode.style.left, targetNode.style.top]
                setDraggingStop(false)
            }
        }, 200)
    }
    targetNode.style.cursor = 'pointer';
    let offsetX = parseInt(targetNode.style.left) // 获取当前的x轴距离
    let offsetY = parseInt(targetNode.style.top) // 获取当前的y轴距离
    let innerX = e.clientX - offsetX // 获取鼠标在方块内的x轴距
    let innerY = e.clientY - offsetY // 获取鼠标在方块内的y轴距
    targetNode.style.zIndex = '700'
    // 根据鼠标的移动轨迹修改目标节点的位置
    document.onmousemove = (e) => {
        targetNode.style.left = e.clientX - innerX + 'px'
        targetNode.style.top = e.clientY - innerY + 'px'
        // 出界判断
        if (parseInt(targetNode.style.left) <= 0) {
            targetNode.style.left = '0px'
        }
        // 为了避免篇幅过长这里我省略了部分边界的判定,参照上面即可
        ·························
    }
松开清除事件逻辑:
    // 鼠标抬起时后清除一系列事件
    document.onmouseup = () => {
        // log('鼠标抬起,清除事件')
        clearInterval(timer)
        timer = null
        // 如果不悬停直接松开鼠标,要判定停止拖动
        // 如果已经被悬停计时器判定了未松开鼠标的拖动停止(会触发拖动停止的监听事件),再松开鼠标的时候就应该不再认为是拖动停止,所以取反
        setDraggingStop(prevState => !prevState)
        document.onmousemove = null
        document.onmouseup = null
        targetNode.style.zIndex = '2'
        setOnMouseUp(true)

    }
}
在这个函数中,我们还记录了这些信息,在后面的覆盖检测、非拖动元素排序会使用到:
1.当前是哪个元素被拖动;
2.当前元素的起始坐标信息
3.通过定时器判定拖动是否停下来
现在可以看看拖动的效果了
三、元素自动排序
好了,到这一步被拖动的目标元素可以自由移动,接下来就解决其他元素该如何找到自己的位置呢?还有就是目标元素如何知道自己该落在哪里?
首先分析下相关动作执行的时机:
- 在元素拖动的过程中,没有必要做出排序行为,而是等拖动停止一定时间后,再开始排序
- 在排序的过程中不应该再触发排序
- 即使鼠标被按住还没松开,也应该预览排序,而不是松开鼠标后再统一排序(这样简单但不够好)
- 排序只针对没有拖动的元素,否则目标元素会从没有松开的光标'溜走',体验很奇怪
- 等到鼠标松开释放目标元素后,再执行目标元素的最后落位
现在开始正式思考排序的核心逻辑
拖动一个元素到一个位置的本质是什么?交换位置?
实际上要分情况:
- 如果元素往前拖动,那就是目标位置------元素位置之间的元素都往后移动一个单位;
- 如果元素往后拖动,那就是目标位置------元素位置之间的元素都往前移动一个单位。
由此引申出一个关键点,如何判定一个元素应该占据一个元素的位置了?
因为如果a元素只是有一个1px的角碰到了b元素,很明显此时a元素是不应该占据b元素的位置的。那么定义元素重叠了多少应该占据位置呢?三分之一?二分之一?这种思路实际不好计算而且繁琐,因为a元素很可能是从斜上方或者各种四面八方来覆盖b元素的。
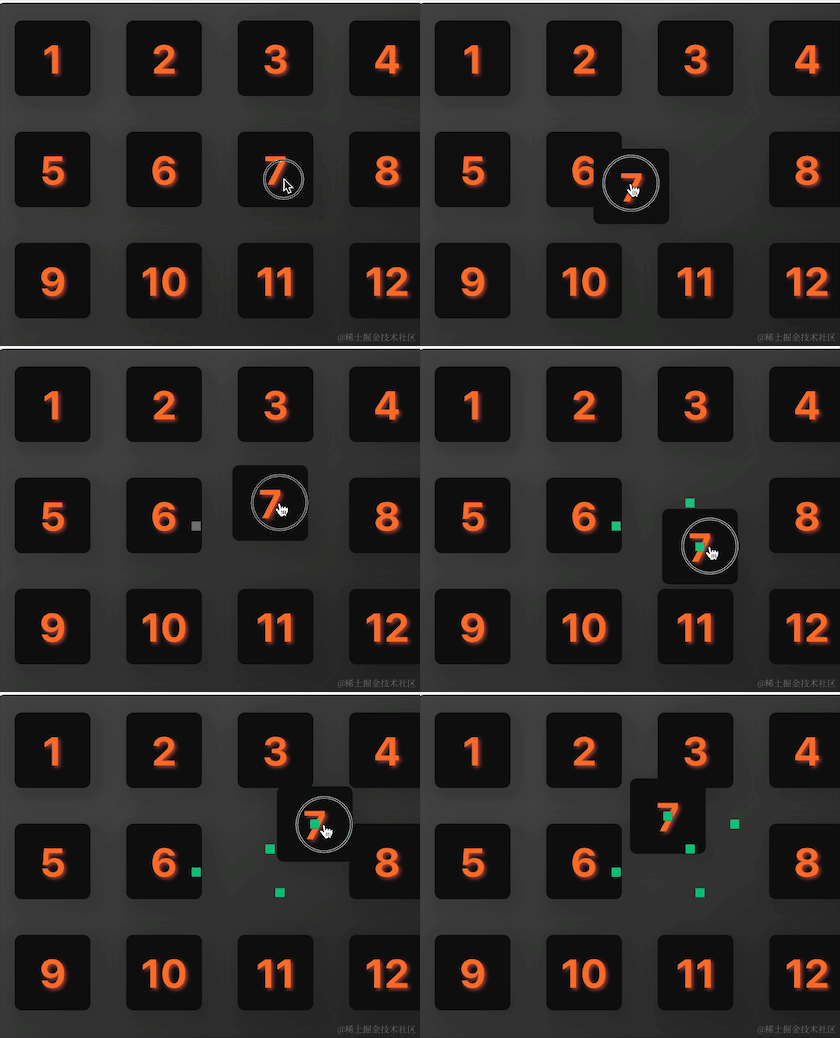
为了解决这个问题后来我琢磨出了一个了中心点检测的思路。
即当a元素的中心点出现在了b元素之上的时候,就表明a应该占据b的位置了,后来也证明这种思路非常有效。
思路明确,编码开始:
// 监听拖拽开始
useEffect(() => {
    if (draggingStop) {
        log('拖拽起始:'+dragStartPosition)
        // 拖拽暂时停止了,检测目标元素归属
        coverCheck()
    }
}, [draggingStop])

// 模拟绘制中心点
function mockDrawCenterDot(centerDot){
    const newDiv = document.createElement("div")
    // 要注意中心点本身的宽高,不然会绘制偏差
    const width = 10
    newDiv.style.width = width+'px'
    newDiv.style.height = width+'px'
    newDiv.style.position = 'absolute'
    newDiv.style.left = centerDot.left-width/2+'px'
    newDiv.style.top = centerDot.top-width/2+'px'
    newDiv.style.zIndex = '700'
    newDiv.style.backgroundColor = '#00c175'
    containerRef.current.appendChild(newDiv)
}
为了更直观看效果,我把中心点简单绘制出来了,如图每一次拖动就会标注出中心点:
中心点检测函数,注意对无效落点(比如拖动到两个元素中间)的处理:
// 中心点检测:当被拖动的元素A的中心点位于另一个元素B之上的时候,就判定A应该占据B的位置了
const coverCheck = async ()=>{
    // 计算当前拖动元素的中心点:元素的宽高的一半再加上顶部和左边的距离就是中心点坐标
    const width = Number(currNode.style.width.replace('px','')/2)
    const margin = Number(currNode.style.margin.replace('px',''))
    //中心点坐标
    const centerDot = {
        left:Number(currNode.style.left.replace('px',''))+width+margin,
        top:Number(currNode.style.top.replace('px',''))+width+margin,
    }
    mockDrawCenterDot(centerDot)
    // mockBorder()
    // 计算每个块的覆盖坐标区间,例如第一个块{left:[20,85],top:[20,85]},中心点坐标左边距在20-85px,顶部距离在20-85内即判定进入该块区间
    // const coverRate = []
    // 是向前移动还是向后移动
    let moveTo = ''
    let validArea = false // 是否落到有效位置
    for(const v of positionArr){
        const row = [] // 一行的数据
        for(const child of v){
            // 左边起点,左边终点,顶部起点,顶部终点
            const leftBegin = child.left+child.margin
            const leftEnd = child.left+child.margin+child.width
            const topBegin = child.top+child.margin
            const topEnd = child.top+child.margin+child.width
            // 根据上面四个起点就可以当前单个块的覆盖范围
            const currRate = {left:[leftBegin,leftEnd],top:[topBegin,topEnd]}
            row.push(currRate)
            // 判定中心点坐标是否落入当前方块覆盖区间
            if(centerDot.left>=leftBegin && centerDot.left<=leftEnd && centerDot.top>=topBegin && centerDot.top <= topEnd){
                validArea = true
                // 存储落地点
                setAimPosition([currRate.left[0]-marginValue,currRate.top[0]-marginValue])
                log('有效落点-坐标区间:'+JSON.stringify(currRate))
                // 根据落点区间和初始拖动元素的位置关系来判断moveTo,原地、前进、后退
                if(leftBegin === dragStartPosition[0] && topBegin === dragStartPosition[1]){
                    // 原块区间
                    moveTo = moveDirectionMap.static
                }else if(topBegin > dragStartPosition[1] || (topBegin === dragStartPosition[1] && leftBegin > dragStartPosition[0])){
                    // 落点区间在原位置下面,或者同一高度但比原位置距离左边更远,一定是前进
                    moveTo = moveDirectionMap.backwards
                }else{
                    // 后退
                    moveTo = moveDirectionMap.forward
                }
                // 重排开始
                moveBlockSort(dragStartPosition,[currRate.left[0],currRate.top[0]],moveTo,currNode).then()
            }
        }
        // coverRate.push(row)
    }
    if(!validArea){
        log('无效落点-归位')
        // 无效位置的落地点就是起始点
        setAimPosition([dragStartPosition[0]-marginValue,dragStartPosition[1]-marginValue])
        // await moveBlockSort(dragStartPosition,dragStartPosition,'static',currNode)
    }
    log(moveTo)
}
执行重排
经历上一步,已经确定了哪个元素被占据,哪个元素被拖动,接下来就可以对其他【应当移动的】元素进行移动操作,即上一步的moveBlockSort().
/**
 *
 * @param beginPosition 起始位置
 * @param aimPosition 目标落地位置
 * @param moveDirection 移动方向
 * @param node 当前节点
 */
// 移动逻辑,循环每一个节点,获取它的坐标,如果这个坐标属于被移动的范围,就给这个节点加上移动动画函数让它动起来
// 如何确定是否属于被移动的范围,根据移动块和被占据块的左右关系来判定,计算出大于某个坐标值的块都需要被移动
// 具体怎么动?每一个块只会移动一格,而且要么是向前要么是向后,比较简单(即使换行,对于positionArr来说也是前后一个坐标的含义)
async function moveBlockSort(beginPosition,aimPosition,moveDirection,node){
    // 先将位置的二维数组扁平化,格子的布局都是固定的,便于获取前后的位置
    const sortMap = positionArr.flat()
    // 全部节点
    const nodes = new Array(...containerRef.current.childNodes).filter(v=>{return Boolean(v.id)})
    // 根据节点位置计算一个节点的绝对排序,即属于n个节点中的第几个
    const nodeIndex = (_node)=>{
        for(let i=0;i<sortMap.length;i++){
            if(sortMap[i].left+'px' === _node.style.left && sortMap[i].top+'px' === _node.style.top){
                return i
            }
        }
        return -1

    }
    // 需要被移动的元素和它的物理顺序位置
    const moveIndexArr = []
    const isForward = moveDirection === moveDirectionMap.forward
    if(moveDirection === moveDirectionMap.static){
        // 原地移动,将被拖动的元素放回起始点即可
        onceAniBind(node,beginPosition[0]-marginValue,beginPosition[1]-marginValue).then()
    }else{
        for(let i=0;i<nodes.length;i++){
            // 排除当前节点
            if(nodes[i].id === node.id)continue
            // 循环所有节点
            const margin = Number(currNode.style.margin.replace('px',''))
            const nodeLeft = Number(nodes[i].style.left.replace('px',''))+margin
            const nodeTop = Number(nodes[i].style.top.replace('px',''))+margin
            // 基于起始位置向前移动,那么确定需要移动的块(称为活动块):起始点(不包括)之前到落地点(包括)之间的所有块;向后移动一格
            if(isForward){
                // 当前节点是否位于起始点之前
                const isBeforeBegin = nodeTop < beginPosition[1] || (nodeTop === beginPosition[1] && nodeLeft < beginPosition[0])
                // 当前节点是否位于目标点之后或者处于目标点
                const isAimAfter = nodeTop > aimPosition[1] || (nodeTop === aimPosition[1] && nodeLeft >= aimPosition[0])
                if(isBeforeBegin && isAimAfter){
                    // 这是一个活动块,获取他的顺序位置
                    const currNodeIndex = nodeIndex(nodes[i])
                    // 它应该去的位置就是后退一格
                    moveIndexArr.push([sortMap[currNodeIndex+1],nodes[i]])
                }
            }else{
                // 基于起始位置向后移动,那么确定需要移动的块(称为活动块):起始点(不包括)之前到落地点(包括)之间的所有块;向前移动一格
                // 当前节点是否位于起始点之后
                const isAfterBegin = nodeTop > beginPosition[1] || (nodeTop === beginPosition[1] && nodeLeft > beginPosition[0])
                // 当前节点是否位于目标点之前或者处于目标点
                const isAimBefore = nodeTop < aimPosition[1] || (nodeTop === aimPosition[1] && nodeLeft <= aimPosition[0])
                if(isAfterBegin && isAimBefore){
                    // 这是一个活动块,获取他的顺序位置
                    const currNodeIndex = nodeIndex(nodes[i])
                    // 它应该去的位置就是前进一格
                    moveIndexArr.push([sortMap[currNodeIndex-1],nodes[i]])
                }

            }
        }
    }
    // 根据moveIndexArr数据,依次对需要移动的元素绑定移动动画
    for(const v of moveIndexArr){
        onceAniBind(v[1],v[0].left,v[0].top).then()
    }
}
为了元素的排序更优雅,简单封装了一个一次性动画绑定函数,来移动每一个元素,即上面最后的onceAniBind()函数。
/**
 *  为一个元素绑定并执行一个一次性移动动画
 * @param el 元素
 * @param left 位置
 * @param top
 */
const onceAniBind = async (el, left, top) => {
    // 创造个30位左右的随机数当类名
    const timeStampSign = String(Math.random()).slice(2,20)+String(Math.random()).slice(2,20)
    const aniLen = 0.5 //动画时长s
    // 以随机戳为标识创建一个动画帧
    document.styleSheets[0].insertRule(`
      @-webkit-keyframes ani${timeStampSign}{ from{ left:${el.style.left};top:${el.style.top} } to { left:${left}px;top:${top}px; }}
    `, 0)
    // 为目标元素绑定创建的动画,使用promise可以方便兼容需要依次执行动画的场景
    return new Promise((aniEnd) => {
        const animStyle = `ani${timeStampSign} ${aniLen}s ease-in-out forwards`
        el.setAttribute('style', `animation:${animStyle};-webkit-animation:${animStyle};`)
        el.addEventListener('webkitAnimationEnd', () => {
            // 动画完成后清除掉animation类,否则会导致拖动的坐标设置失效
            el.style.animation = ''
            // 固定动画终点位置
            el.style.left = left + 'px'
            el.style.top = top + 'px'
            el.style.width = blockWidth-marginValue*2 + 'px'
            el.style.height = blockWidth-marginValue*2 + 'px'
            el.style.margin = marginValue + 'px'
            aniEnd()
        })
    })
}
复制代码
最后根据鼠标松开监听,完成对拖拽元素本身的最终落位
useEffect( () => {
    async function setLastBlock(){
        if(onMouseUp && aimPosition.length){
            log(currNode.id)
            // 将当前拖拽块落地
            await onceAniBind(currNode,aimPosition[0],aimPosition[1]).then()
            setOnMouseUp(false)
            setAimPosition([])
        }
    }
    setLastBlock().then()
}, [onMouseUp,aimPosition]);
最终效果:
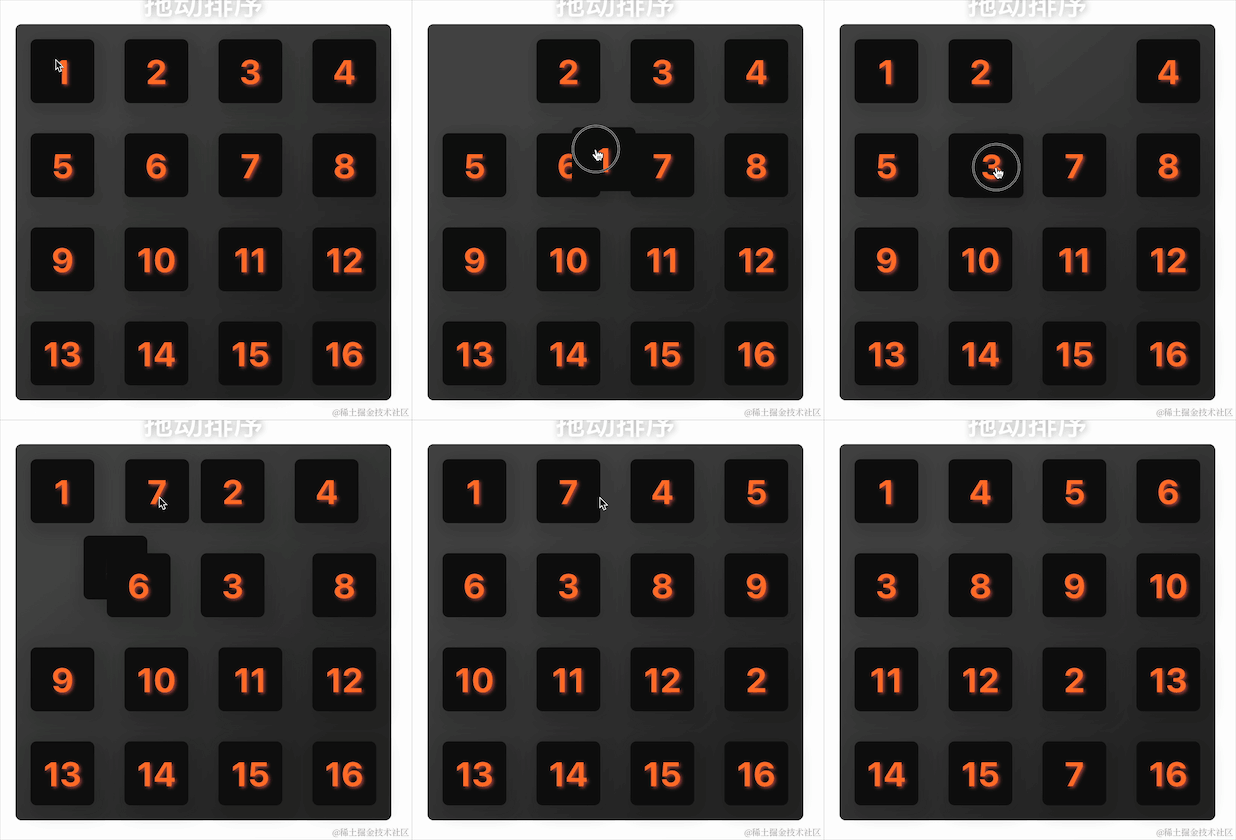
至此,所有元素都可以正常自动排序了,不知不觉写了很多代码,希望能让大家有所收获~~~
源码github地址:github.com/bokhuang/ap...
附送250套精选项目源码
源码截图

源码获取:关注公众号「码农园区」,回复 【源码】,即可获取全套源码下载链接
