操作系统 :CentOS 7.6_x64
FreeSWITCH版本 :1.10.9
FreeSWITCH里面有个mod_tts_commandline模块,可以用来对接http协议的tts服务,今天整理下这方面的笔记,并提供相关演示效果及资源下载。
我将从以下几个方面进行展开:
- 自建tts服务模拟测试环境
- 编译及配置mod_tts_commandline模块
- 测试验证tts效果
- 模块代码分析
- 向特定通道播放tts音频
- 配套资源下载
一、自建tts服务模拟测试环境
如果已经有http协议的tts服务,该部分可以跳过。
这里使用pytts3在Windows10环境下,实现简单的tts服务。
整体结构如下:

示例代码如下:
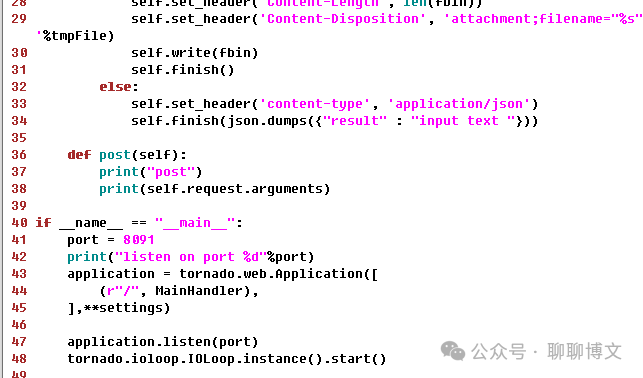
完整源码可从如下渠道获取:
关注微信公众号(聊聊博文,文末可扫码)后回复 20240811 获取。
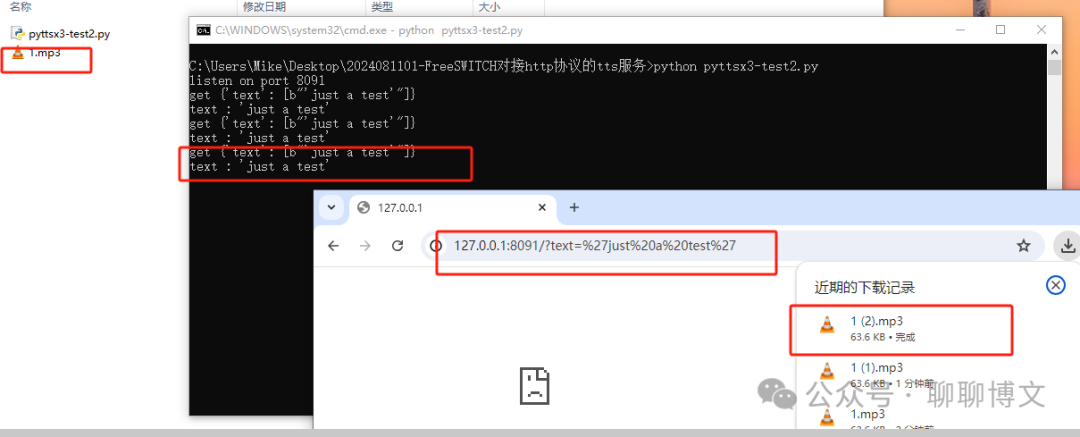
测试url:
http://127.0.0.1:8091/?text='just a test'
运行效果如下:
更多信息请参考如下文章:
https://www.cnblogs.com/MikeZhang/p/pyttsx3test20220404.html
二、编译及配置mod_tts_commandline模块
1、编译mod_tts_commandline模块
文件 : freeswitch-1.10.9.-release/modules.conf
开启或添加如下内容:
asr_tts/mod_tts_commandline编译及安装:
./rebootstrap.sh
#CFLAGS="-O3 -fPIC" ./configure --disable-signalwire (可选)
CFLAGS="-O3 -fPIC" ./configure
make -j
make install
这里描述下关键信息,更多FreeSWITCH源码编译的信息,请参考如下文章:
https://www.cnblogs.com/MikeZhang/p/centos7InstallFs20221007.html
2、配置mod_tts_commandline模块
2.1 开启模块
首先需要在配置文件中开启mod_tts_commandline模块,文件路径:
/usr/local/freeswitch/conf/autoload_configs/modules.conf.xml
配置内容:
<load module="mod_tts_commandline"/>2.2 配置模块
配置文件路径: /usr/local/freeswitch/conf/autoload_configs/tts_commandline.conf.xml
配置示例:
<configuration name="tts_commandline.conf" description="TextToSpeech Commandline configuration">
    <settings>
    <!--
    Some variables will be replaced :
    ${text}: input text (quoted)
    ${rate}: sample rate (example: 8000)
    ${voice}: voice_name passed to TTS(quoted)
    ${file}: output file (quoted, including .wav extension)

    Example commands can be found at:
    https://freeswitch.org/confluence/display/FREESWITCH/mod_tts_commandline#mod_tts_commandline-Examplecommands
    -->
    <!--param name="command" value="echo ${text} | text2wave -f ${rate} > ${file}"/-->
    <param name="command" value="/bin/bash /root/test/tts1.sh ${text} ${file}" />
    </settings>
</configuration>
bash脚本内容(/root/test/tts1.sh):
#! /bin/bash

content=$1
file=$2
echo $content
echo $file
#wget http://192.168.137.1:8091/?text='just a test' -O /tmp/tts1.wav
wget http://192.168.137.1:8091/?text="$content" -O $file
说明:
fs机器地址: 192.168.137.32
tts机器地址: 192.168.137.1
三、测试验证tts效果
这里演示下tts效果。
1、配置拨号方案
dialplan配置(default.xml):
<extension name="ttsTest1">
<condition field="destination_number" expression="^654321$">
  <action application="log" data="INFO dialed 654321."/>
  <action application="lua" data="ttsTest1.lua"/>
</condition>
</extension>
2、添加lua脚本
lua脚本内容(/usr/local/freeswitch/scripts/ttsTest1.lua):
session:answer()
session:setVariable("tts_engine", "tts_commandline")
session:setVariable("tts_voice", "girl")
--session:execute("speak", "just test!")
session:execute("speak", "今天天气不错!")
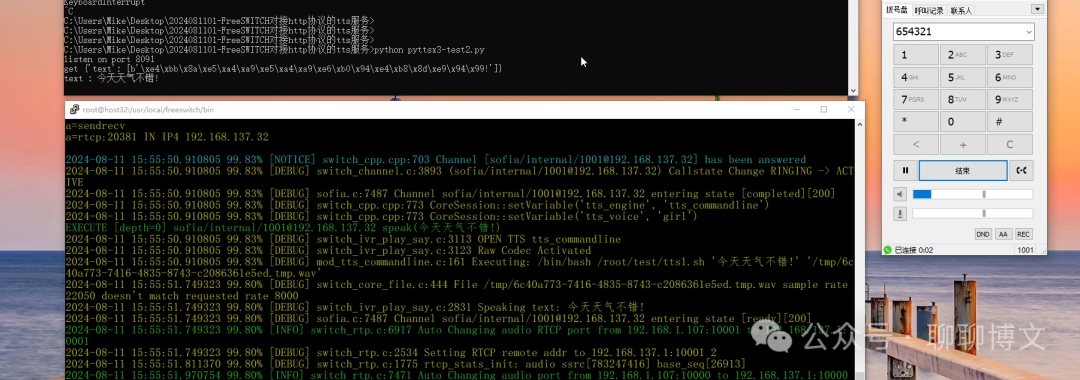
3、注册分机拨打验证
注册分机: 1001
拨打号码: 654321
测试效果如下:
运行效果视频可从如下渠道获取:
关注微信公众号(聊聊博文,文末可扫码)后回复 2024081101 获取。
四、模块代码分析
模块路径: freeswitch-1.10.9.-release\src\mod\asr_tts\mod_tts_commandline
模块代码文件: mod_tts_commandline.c
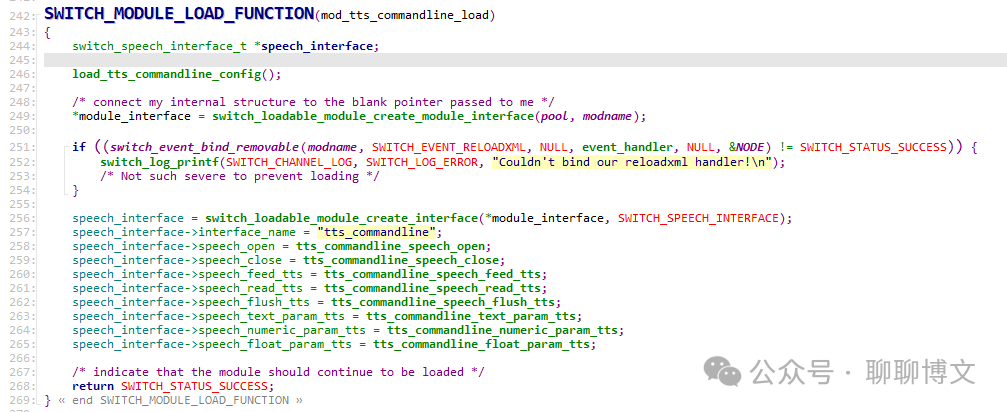
1、mod_tts_commandline_load函数
模块入口函数,主要做的事情就是初始化tts资源,绑定回调函数。
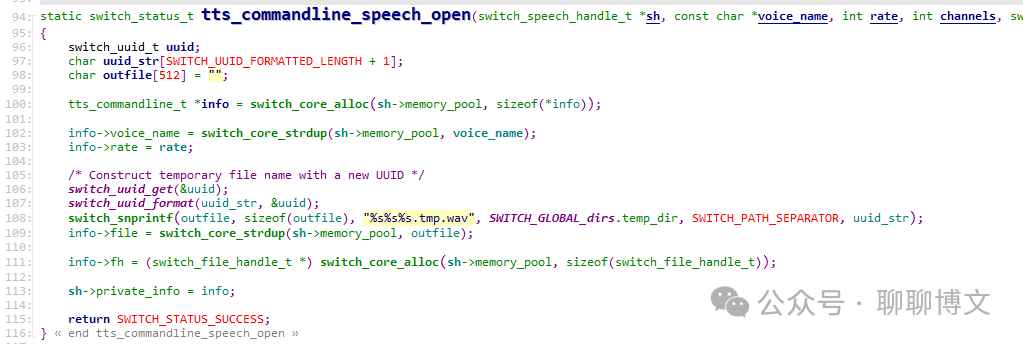
2、tts_commandline_speech_open 函数
用于生成临时音频文件名称。
3、tts_commandline_speech_close函数
删除之前生成的临时音频文件。

更多模块函数分析可从如下渠道获取:
关注微信公众号(聊聊博文,文末可扫码)后回复 20240811 获取。
五、向特定通道播放tts音频及fire播放完成事件
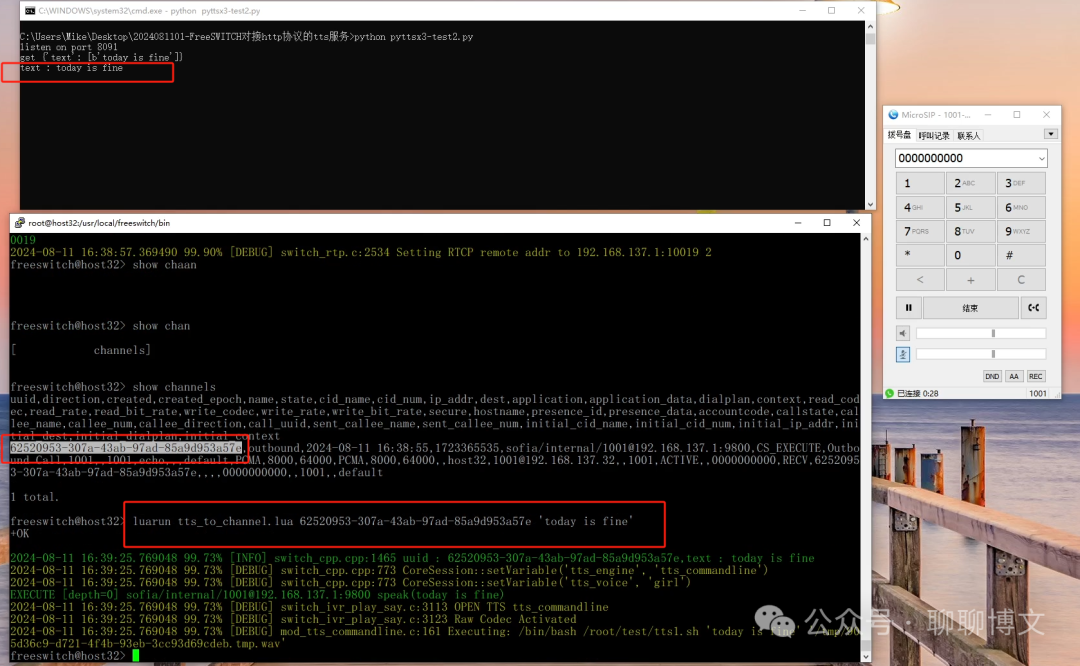
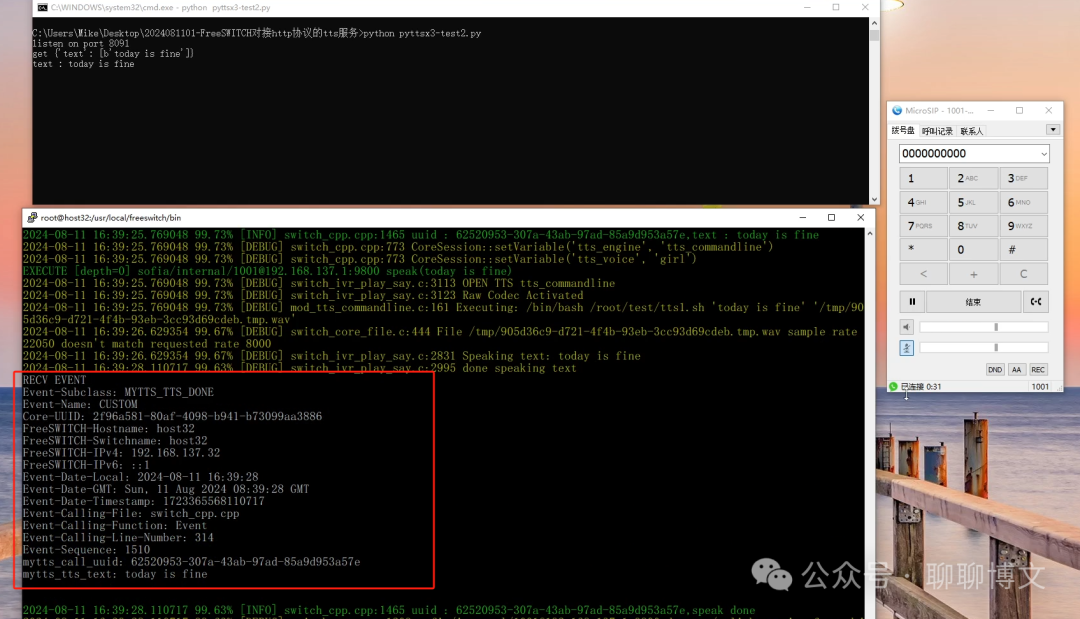
如果要构建更上层应用(比如机器人服务),需要提供向特定通道播放tts声音的功能,播放完毕需要产生事件通知调用方,这里进行简单的示例。
脚本名称: tts_to_channel.lua
文件内容可从如下渠道获取:
关注微信公众号(聊聊博文,文末可扫码)后回复 20240811 获取。
使用格式:
tts_to_channel.lua {channel_uuid} {text}参数说明:
channel_uuid => 需要播放通道的uuid
text => 播放的文本内容
事件订阅:
/event plain CUSTOM MYTTS_TTS_DONE运行效果:
事件效果:
运行效果视频可从如下渠道获取:
关注微信公众号(聊聊博文,文末可扫码)后回复 2024081102 获取。
六、资源下载
本文涉及源码及相关文件,可从如下途径获取:
关注微信公众号(聊聊博文,文末可扫码)后回复 20240811 获取。
