参考文章链接:https://www.cnblogs.com/liangtao999/p/16719534.html
官方的链接:https://developers.weixin.qq.com/miniprogram/dev/platform-capabilities/extended/component-plus/wxml-to-canvas.html
一、引入组件:
1、方法一:直接文件夹导入(我用的这种)
完整的包:https://github.com/ThaneYang/uniapp-wxml-to-canvas/tree/main/wxcomponents
① 方式一:
(1)在程序根目录下新建wxcomponents文件夹
(2)将上面的链接中 wxcomponents 的内容复制进来
② 方式二:
下载资源文件,将文件中的内容直接放在项目的根目录
资源文件链接:https://download.csdn.net/download/Y1914960928/90456850
2、方法二:npm 安装
npm install wxml-to-canvas
二、配置:
pages.json 文件:
typescript
"globalStyle": {
		"usingComponents": {
		      "wxml-to-canvas": "/wxcomponents/wxml-to-canvas/index"
		}
	},
三、使用:
1、新建 domData.js 文件:
每个标签元素必须要设置宽高
typescript
const wxml = (detailData) => {
	let html = `
	<view class="canvasBox">
		<view class="viewBox">
			<text class="text1">页面ID:</text><text class="text2">${detailData.orderId}</text>
		</view>
		<image src="` + detailData.pic + `"  class="pic"/>
	`

	for(let i =0; i < detailData.textArr.length; i++) {
		html+=`<text class="content">` + detailData.textArr[i] + `</text>`
	}
	html+=`</view>`
	return html
}

/**
 * @param {*} screenWidth 屏幕宽度
 * @param {*} canvasWidth  画布宽度
 * @param {*} canvasHeight  画布高度
 */
const style = (screenWidth, canvasWidth, canvasHeight) => {
    return {
        "canvasBox": {
            width: canvasWidth,
            height: canvasHeight,
            position: 'relative',
            overflow: 'hidden',
            backgroundColor: '#ffffff',
        },
		"viewBox": {
			width: canvasWidth - 50,
			height: 40,
			flexDirection: 'row',
            textAlign: 'right',
		},

		"text1": {
		    fontSize: 14,
		    color: '#333',
		    width: 80,
		    height: 40,
		},

		"text2": {
		    fontSize: 14,
		    color: '#333',
		    width: 80,
		    height: 40,
			color: '#FF0000',
		},
        "content": {
            fontSize: 14,
            color: '#333',
            width: canvasWidth * 0.84,
            height: screenWidth * 0.15,
            marginLeft: 20,
        },
        "pic": {
            width: 56,
            height: 56,
            marginTop: 20,
            marginLeft: 50,
            marginBottom: 20,
            overflow: 'hidden',
        },
    }
}

module.exports = {
    wxml,
    style
}
2、在 xx.vue 页面中写入:
typescript
<template>
<view class="container">
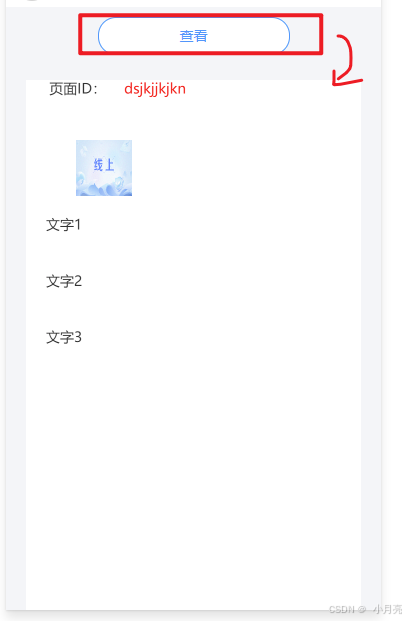
<view class="btn" @click="showCanvas">查看</view>
<view v-if="canvasVisiable">
<scroll-view scroll-y="true" class="share-page-box" id="box" :style="{width: canvasWidth + 'px', height: canvasHeight + 'px' ,margin: '30rpx auto',}">
<wxml-to-canvas class="widget" :width="canvasWidth" :height="canvasHeight"></wxml-to-canvas>
</scroll-view>
</view>
</view>
</template>
<script>
const { wxml, style } = require('./domData.js')
export default {
data() {
return {
canvasVisiable: false,
canvasWidth: 320, // 默认canvas宽高
canvasHeight: 480,
screenWidth: null, // 设备宽度
screenHeight: null, // 设备宽度
detailData: {},
widget: null,
};
},
methods: {
showCanvas() {
this.canvasVisiable = true
this.detailData = {
orderId: 'dsjkjjkjkn',
pic: 'https://bkimg.cdn.bcebos.com/pic/a8014c086e061d950a7bebb265ac1dd162d9f3d35cba',
textArr: ['文字1','文字2','文字3']
}
// 获取设备信息
wx.getSystemInfo({
success: (res) => {
console.log("设备信息",res);
this.screenWidth = res.screenWidth
this.screenHeight = res.screenHeight // 高度建议计算得出或写死。如使用res.screenHeight,文字过长时无法生成
// this.canvasWidth = this.screenWidth
// this.canvasHeight = this.screenHeight
this.canvasWidth = this.screenWidth - 40
this.canvasHeight = 1000
this.show = true
// 数字容器宽度 动态设置
setTimeout(() => {
wx.showLoading({
title: '图片生成中...'
})
this.widget = this.selectComponent('.widget')
this.renderToCanvas()
}, 1000)
}
});
},
renderToCanvas() {
const _wxml = wxml(this.detailData) // 拿到html代码
const _style = style(this.screenWidth, this.canvasWidth, this.canvasHeight)
const p1 = this.widget.renderToCanvas({
wxml: _wxml,
style: _style
})
p1.then((res) => {
console.log('图片生成成功');
wx.hideLoading()
}).catch((err) => {
console.log('图片生成失败')
})
},
}
};
</script>
<style>
.btn {
width: 380rpx;
height: 72rpx;
background: #FFFFFF;
margin: 20rpx auto;
border-radius: 36rpx;
border: 2rpx solid #3898FD;
text-align: center;
font-weight: 400;
font-size: 28rpx;
line-height: 72rpx;
color: #3898FD;
}
</style>四、最终效果: