1. Watch 的 deep 属性
只要监听对象中的某个属性值发生了变化,就会触发对应的回调函数,如何只监听需要属性或者排除某些不需要监听的属性呢,实现如下:
js
data() {
    return {
        obj: {
            name: '前端代码仔',
            age: 18,
            sex: '男',
        }
    }
},

// 常规 watch 方式
watch: {
    obj: {
        handler(newValue, oldValue) {
            console.log('watch obj', 'newValue:', newValue, 'oldValue:', oldValue)
        },
        deep: true
    },
},例如我们不监听name属性
js
mounted() {
    const excludeKeys = ['name'];
    Object.keys(this.obj).filter(key => !excludeKeys.includes(key)).forEach(key => {
        this.$watch((vm) => vm.obj[key], (newValue, oldValue) => {
            console.log('$watch', 'newValue:', newValue, 'oldValue:', oldValue)
        }, {deep: true});
    })
},
2. 依赖注入 provide、inject
在 Vue2中, provide 和 inject 默认不保持响应式,但可以通过以下方式实现响应式数据:
js
<template>
    <div id="app">
        <el-button type="primary" size="small" @click="handleChangeData">changData</el-button>

        <child></child>
    </div>
</template>

<script>

import Child from "@/components/child.vue";

export default {
    name: "App",
    components: {
        Child
    },
    provide() {
        return {
            name: this.name,
            info: this.msg,
            injectDescriptionString: this.handleChangeDescriptionStr,
            main: this,
        }
    },
    data() {
        return {
            name: '张三',
            msg: {
                str: 'hello world'
            },
            descriptionStr: '111'
        }
    },
    methods: {
        handleChangeData() {
            this.name = 'lisi'
            this.msg.str = 'hello vue'
            this.descriptionStr = '222'
        },
        handleChangeDescriptionStr() {
            return this.descriptionStr
        }
    }
};
</script>

// child.vue
<template>
    <div class="child-wrapper">
        <div>
            name: {{ name }}
        </div>
        <div>
            info: {{ info }}
        </div>
        <div>injectDescriptionString: {{ injectDescriptionString() }}</div>
    </div>
</template>

<script>
export default {
    name: 'Child',
    inject: ['name', 'info', 'injectDescriptionString'],
}

</script>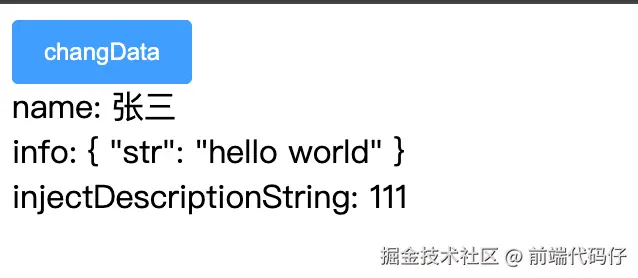
点击按钮后: 
vue3中可以使用 computed() 函数提供一个计算属性
js
provide() {
    return {
        // 显式提供一个计算属性
        name: computed(() => this.name)
    }
}
总结:
- 提供方法(Getter/Setter): 通过方法动态获取和设置数据
- 提供响应式对象的引用: 直接注入响应式对象
- 提供 Vue 实例: 将当前组件实例提供给后代组件
3. 自定义组件的 v-model
一个组件上的 v-model 默认会利用名为 value 的 prop 和名为 input 的事件,但是像单选框、复选框等类型的输入控件可能会将 value attribute 用于不同的目的,model 选项可以用来避免这样的冲突,eg:
js
// App.vue
<template>
    <div id="app">
        <child v-model="name"></child>
    </div>
</template>

<script>

import Child from "@/components/child.vue";

export default {
    name: "App",
    components: {
        Child
    },
    data() {
        return {
            name: '张三',
        }
    },
};
</script>

// Child.vue
<template>
    <div class="child-wrapper">
        <p>{{ val }}</p>
        <el-button type="primary" size="small" @click="handleInput">handleInput</el-button>
        <el-button type="primary" size="small" @click="handleChange">handleChange</el-button>
    </div>
</template>

<script>
export default {
    name: 'Child',
    model: {
        prop: 'val',
        event: 'change'
    },
    props: {
        val: {
            type: String,
            default: ''
        },
    },
    methods: {
        handleInput() {
            this.$emit('input', 'input')
        },
        handleChange() {
            this.$emit('change', 'change')
        }
    }
}

</script>
4. computed 计算属性传参
js
<template>
    <div id="app">
        {{ descStr('名字是:')}}

        <el-button type="primary" size="small" @click="handleChangeData">changeName</el-button>
    </div>
</template>

<script>


export default {
    name: "App",
    computed: {
        descStr() {
            return function (params) {
                return params + this.name
            }
        }
    },
    data() {
        return {
            name: '张三',
        }
    },
    methods: {
        handleChangeData() {
            this.name = 'lisi'
        }
    }
};
</script>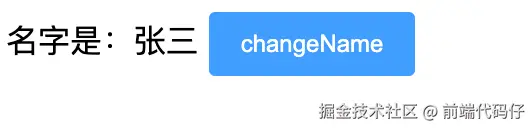
5. Vue hook 的使用
a. 同一组件中使用
有时创建了定时器,需要在销毁的时候进行清除,我们还需要创建一个全局的 data 属性,下面是较为普通的写法:
JS
<template>
    <div id="app">
        {{ count }}
        <el-button type="primary" size="small" @click="handleDestroy">销毁</el-button>
    </div>
</template>

<script>


export default {
    name: "App",
    data() {
        return {
            count: 0,
            timer: null
        }
    },
    created() {
        this.timer = setTimeout(() => {
            this.count += 100
        }, 3000)
    },
    methods: {
        handleDestroy() {
            this.$destroy()
        }
    },
    beforeDestroy() {
        console.log('beforeDestroy')
        if (this.timer) {
            this.timer = null
        }
    }
};
</script>

<template>
    <div id="app">
        {{ count }}
        <el-button type="primary" size="small" @click="handleDestroy">销毁</el-button>
    </div>
</template>

<script>
使用 hook 的写法:
JS
<template>
    <div id="app">
        {{ count }}
        <el-button type="primary" size="small" @click="handleDestroy">销毁</el-button>
    </div>
</template>

<script>


export default {
    name: "App",
    data() {
        return {
            count: 0,
        }
    },
    created() {
        let timer = setTimeout(() => {
            this.count += 100
        }, 3000)
        this.$once('hook:beforeDestroy', () => {
            console.log('hook:beforeDestroy')
            timer = null
        })
    },
    methods: {
        handleDestroy() {
            this.$destroy()
        }
    },
};
</script>
b. 父子组件中
有时需要在子组件挂载的时候,需要通知到父组件
JS
// App.vue
<template>
    <div id="app">
       <child @childMounted="handleChildMounted"></child>
    </div>
</template>
<script>

import Child from "@/components/child.vue";

export default {
    name: "App",
    components: {
        Child
    },
    methods: {
        handleChildMounted() {
            console.log('handleChildMounted')
        }
    },
};
</script>

// Child.vue
<template>
    <div class="child-wrapper"></div>
</template>

<script>
export default {
    name: 'Child',
    mounted() {
        console.log('child mounted')
        this.$emit('childMounted')
    }
}
</script>
使用 hook 的写法:
js
// App.vue
<template>
   <div id="app">
      <child @hook:mounted="handleChildMounted"></child>
   </div>
</template>
<script>

import Child from "@/components/child.vue";

export default {
   name: "App",
   components: {
       Child
   },
   methods: {
       handleChildMounted() {
           console.log('handleChildMounted')
       }
   },
};
</script>

// Child.vue
<template>
   <div class="child-wrapper"></div>
</template>

<script>
export default {
   name: 'Child',
   mounted() {
       console.log('child mounted')
   }
}
</script>
6. 混入 (mixin)
a. 同名钩子函数将合并为一个数组,因此都将被调用。另外,混入对象的钩子将在组件自身钩子之前 调用。
b. 选项合并
当组件和混入对象含有同名选项时,这些选项将以恰当的方式进行"合并"。eg,数据对象在内部会进行递归合并,并在发生冲突时以组件数据优先。
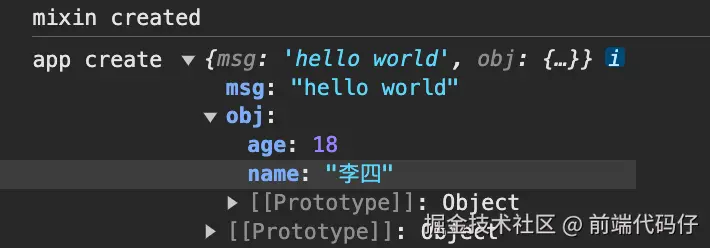
c. 值为对象的选项,例如 methods、components 和 directives,将被合并为同一个对象。两个对象键名冲突时,取组件对象的键值对。
7. vue中scoped的原理,以及样式穿透是如何实现
当 <style> 标签带有 scoped attribute 的时候(给组件的每个元素添加唯一的 【data-v-xxx】 属性,然后在编译时将样式选择器修改为包含这个属性的选择器),它的 CSS 只会影响当前组件的元素;
子组件的根元素
使用 scoped 后,父组件的样式将不会渗透到子组件中。不过,子组件的根节点会同时被父组件的作用域样式和子组件的作用域样式影响。这样设计是为了让父组件可以从布局的角度出发,调整其子组件根元素的样式
html
<!-- 1. 原始模板 -->
<template>
  <div class="container">
    <p>Hello World</p>
  </div>
</template>

<style scoped>
.container { color: red; }
</style>


<!-- 2. 最终渲染结果  -->

<!-- 编译后的 HTML -->
<div class="container" data-v-7ba5bd90>
  <p data-v-7ba5bd90>Hello World</p>
</div>

/* 编译后的 CSS */
<style>
.container[data-v-7ba5bd90] { color: red; }
p[data-v-7ba5bd90] { /* 样式也会被转换 */ }
</style>
深度选择器
处于 scoped 样式中的选择器如果想要做更"深度"的选择,也即:影响到子组件,可以使用 :deep() 这个伪类:
css
<style scoped>
.a :deep(.b) {
  /* ... */
}
</style>
上面的代码会被编译成:
css
.a[data-v-f3f3eg9] .b {
  /* ... */
}
8. 异步组件优化 ------ 代码分割,实现按需加载,提升首屏性能
js
const AsyncComponent = () => import('./AsyncComponent.vue')

// 或结合 Webpack 魔法注释
const BigComponent = () => import(/* webpackChunkName: "group-big" */ './BigComponent.vue')