1. 引言
在Android蓝牙开发过程中,"设备已配对却连不上"、"有时需要配对有时不需要"等问题经常困扰开发者。这些困惑往往源于对蓝牙配对与连接机制理解的不足。
本文将理清蓝牙配对与连接的关系,解析经典蓝牙和BLE的连接机制差异,并提供实用的代码示例和解决方案,帮助开发者构建稳定可靠的蓝牙应用。

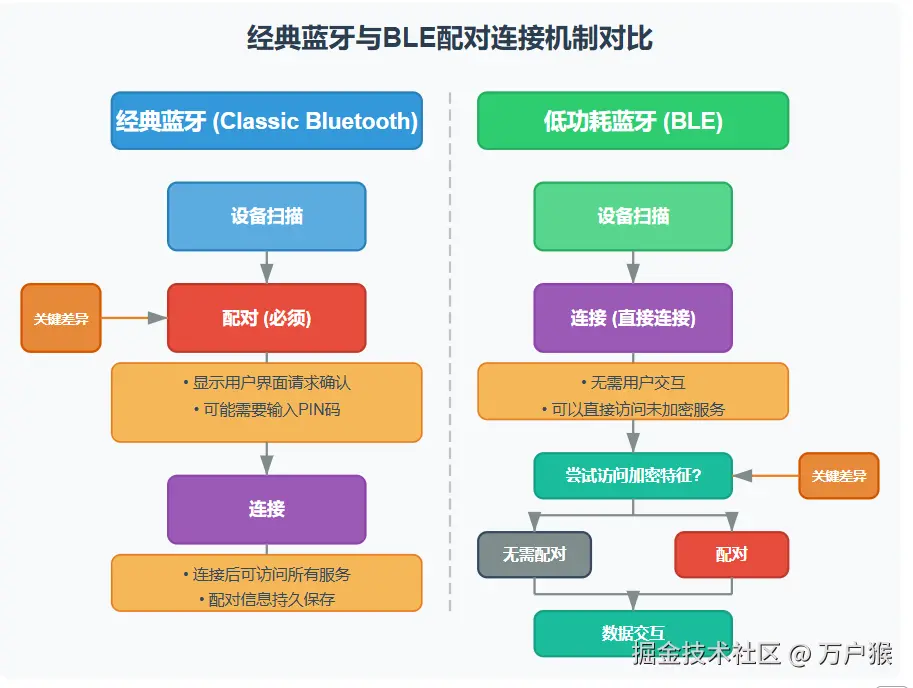
上图展示了从设备扫描→连接→配对/绑定→服务发现→特征交互的完整路径,帮助开发者精准定位问题所在环节。不同类型的蓝牙设备在这个流程中各有差异,正是这些差异导致了许多开发困扰。
2. 配对与连接:概念理清
2.1 核心概念对比
配对(Pairing) 和 连接(Connection) 是两个截然不同但又密切相关的概念:
- 配对:建立加密通信所需的安全密钥交换过程
- 绑定(Bonding) :将配对信息永久存储,供将来使用
- 连接:建立实际的数据通信通道
类比来看:配对提供的是长期信任关系(凭证),而连接代表临时的通道建立。在某些场景中,两者缺一不可,而在其他场景中则可以单独存在。
arduino
// 检查设备是否已配对
boolean isPaired = device.getBondState() == BluetoothDevice.BOND_BONDED;

// 配对状态并不等同于连接状态
// 设备可以已配对但未连接,也可以未配对但已连接(部分BLE设备)
2.2 为何分离设计?安全与灵活性的平衡
蓝牙协议将配对与连接分离设计有其深层考量:
- 安全分层:将身份验证(配对)与数据传输(连接)解耦,符合网络安全分层原则
- 资源优化:不是所有连接都需要加密,避免不必要的安全开销
- 用户体验与功耗平衡:允许设备快速连接(无需每次都配对),同时保留安全通信能力
- 适应性:满足从高度安全(如支付设备)到低安全需求(如温度传感器)的不同场景
这种分离设计为开发者提供了更大的灵活性,但也带来了状态管理的复杂性。
2.3 经典蓝牙与BLE中的差异
经典蓝牙和BLE在配对与连接的关系上存在明显差异:
经典蓝牙:
- 通常需要先配对后连接
- 配对过程会显示用户界面
- 连接成功后可访问所有服务
BLE:
- 可以不配对直接连接(无加密特征的情况下)
- 安全服务可能需要配对才能访问
- 配对通常在首次访问加密特征时自动触发
ini
// 经典蓝牙连接(需要先配对)
BluetoothSocket socket = device.createRfcommSocketToServiceRecord(MY_UUID);
socket.connect(); // 如果未配对,可能引发安全异常

// BLE连接(可以不配对直接连接)
bluetoothGatt = device.connectGatt(context, false, gattCallback);
// 但读写某些特征时可能触发配对请求
3. 蓝牙安全配对机制
3.1 配对触发时机差异
配对流程的触发时机在经典蓝牙和BLE中有明显不同:
经典蓝牙:
- 通常在尝试建立连接时立即触发
- 开发者可手动调用
createBond()方法主动触发配对 - 配对完成前,连接尝试会被阻塞或失败
BLE:
- 默认情况下不自动触发配对
- 尝试读写加密特征时自动触发
- 也可使用
createBond()方法主动触发 - 连接和配对可以是完全独立的过程
了解这一差异对于设计连接流程至关重要。在BLE应用中,通常应先建立连接,仅在需要访问安全特征时才处理配对请求。
3.2 三种配对模式及设计考量
蓝牙提供三种主要的配对方式,不同模式有着明确的设计目标和应用场景:
-
Just Works:无需用户交互,自动完成配对
- 设计目标:最大化便利性,适用于无界面或低安全需求场景
- 安全性考量:容易受到中间人攻击,但在物理接近场景下风险可控
- 适用设备:传感器、健身设备、简单IoT设备
- 被广泛采用原因:设备资源限制、用户体验优先、产品风险评估
-
Passkey Entry:需要用户输入PIN码
- 设计目标:提供有效的中间人攻击防护
- 交互要求:至少一端需要输入界面,一端需要显示或预设密钥
- 适用设备:键盘、手机配对音箱
-
Numeric Comparison:两端显示相同数字,用户确认是否匹配
- 设计目标:结合安全性与便捷用户体验
- 优势:无需记忆密码,仅需目视比对
- 要求:双方都需要显示界面
- 适用设备:智能手表、智能手机间配对
3.3 Android中处理配对请求
在Android中,处理配对请求需要注册广播接收器来捕获和处理配对事件:
ini
private final BroadcastReceiver pairingReceiver = new BroadcastReceiver() {
    @Override
    public void onReceive(Context context, Intent intent) {
        String action = intent.getAction();
        if (BluetoothDevice.ACTION_PAIRING_REQUEST.equals(action)) {
            BluetoothDevice device = intent.getParcelableExtra(BluetoothDevice.EXTRA_DEVICE);
            int type = intent.getIntExtra(BluetoothDevice.EXTRA_PAIRING_VARIANT,
                                         BluetoothDevice.ERROR);

            switch (type) {
                case BluetoothDevice.PAIRING_VARIANT_PIN:
                    // 处理PIN码输入
                    String pin = "1234"; // 预设PIN码
                    device.setPin(pin.getBytes());
                    break;
                case BluetoothDevice.PAIRING_VARIANT_PASSKEY_CONFIRMATION:
                    // 处理数字比对确认
                    device.setPairingConfirmation(true);
                    break;
                // 其他类型处理...
            }
        } else if (BluetoothDevice.ACTION_BOND_STATE_CHANGED.equals(action)) {
            // 监控配对状态变化
            int state = intent.getIntExtra(BluetoothDevice.EXTRA_BOND_STATE,
                                          BluetoothDevice.ERROR);
            if (state == BluetoothDevice.BOND_BONDED) {
                // 配对成功,可以继续连接流程
                proceedWithConnection();
            } else if (state == BluetoothDevice.BOND_NONE) {
                // 配对失败或已解除配对
                handlePairingFailure();
            }
        }
    }
};

// 注册广播接收器
IntentFilter filter = new IntentFilter();
filter.addAction(BluetoothDevice.ACTION_PAIRING_REQUEST);
filter.addAction(BluetoothDevice.ACTION_BOND_STATE_CHANGED);
registerReceiver(pairingReceiver, filter);
3.4 定制配对流程
在某些场景下,可能需要定制配对流程以提升用户体验:
scss
// 主动触发配对过程
public void initiateSecurePairing(BluetoothDevice device) {
    if (device.getBondState() != BluetoothDevice.BOND_BONDED) {
        device.createBond();
    } else {
        // 设备已配对,继续后续操作
        proceedWithSecureOperations();
    }
}

// 自动响应配对请求(适用于特定场景,如企业应用)
public void autoPairWithPredefinedKey(Intent intent) {
    BluetoothDevice device = intent.getParcelableExtra(BluetoothDevice.EXTRA_DEVICE);
    int variant = intent.getIntExtra(BluetoothDevice.EXTRA_PAIRING_VARIANT,
                                    BluetoothDevice.ERROR);

    // 根据不同配对模式自动响应
    if (variant == BluetoothDevice.PAIRING_VARIANT_PIN) {
        // 自动输入预设PIN码
        byte[] pinBytes = getPredefinedPin(device.getAddress()).getBytes();
        device.setPin(pinBytes);
        abortBroadcast(); // 阻止系统配对对话框显示
    }
}
4. 经典蓝牙连接实现
经典蓝牙主要通过BluetoothSocket建立连接,适用于音频传输、文件共享等场景。
4.1 连接流程
java
public void connectClassicBluetooth(BluetoothDevice device) {
    BluetoothSocket socket = null;

    try {
        // 创建RFCOMM Socket
        socket = device.createRfcommSocketToServiceRecord(MY_UUID);

        // 取消发现过程,提高连接成功率
        bluetoothAdapter.cancelDiscovery();

        // 建立连接(阻塞调用)
        socket.connect();

        // 连接成功,获取输入输出流
        InputStream inputStream = socket.getInputStream();
        OutputStream outputStream = socket.getOutputStream();

        // 开始数据传输...

    } catch (IOException e) {
        // 连接失败处理
        try {
            if (socket != null) socket.close();
        } catch (IOException closeException) {
            Log.e(TAG, "Could not close socket", closeException);
        }
        return;
    }

    // 保存连接的socket用于通信和之后的关闭操作
    this.mmSocket = socket;
    startCommunication();
}
4.2 断线检测与重连
经典蓝牙需要自行实现断线检测机制:
scss
private void startConnectionMonitor() {
    new Thread(() -> {
        while (isMonitoringEnabled) {
            if (mmSocket != null && mmSocket.isConnected()) {
                try {
                    // 尝试读取数据验证连接状态
                    // 如果连接断开,这里会抛出异常
                    mmSocket.getInputStream().available();
                    Thread.sleep(MONITOR_INTERVAL);
                } catch (Exception e) {
                    // 连接已断开,尝试重连
                    reconnect();
                    break;
                }
            }
        }
    }).start();
}
5. BLE连接状态建模与管理机制
5.1 连接状态转换模型
BLE连接遵循明确的状态转换模型,理解这一模型对于正确实现连接管理至关重要:
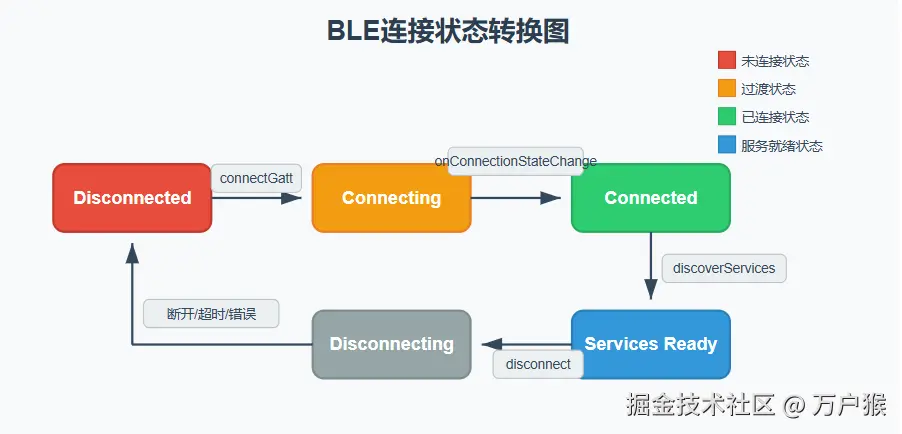
这些状态通过BluetoothGattCallback回调进行管理:
java
private final BluetoothGattCallback gattCallback = new BluetoothGattCallback() {
    @Override
    public void onConnectionStateChange(BluetoothGatt gatt, int status, int newState) {
        if (status == BluetoothGatt.GATT_SUCCESS) {
            if (newState == BluetoothProfile.STATE_CONNECTED) {
                Log.i(TAG, "Connected to GATT server");
                // 连接成功,开始发现服务
                gatt.discoverServices();
            } else if (newState == BluetoothProfile.STATE_DISCONNECTED) {
                Log.i(TAG, "Disconnected from GATT server");
                // 处理断开连接
                handleDisconnection();
            }
        } else {
            // 连接操作失败
            Log.w(TAG, "GATT operation failed with status: " + status);
            handleConnectionError(status);
        }
    }

    @Override
    public void onServicesDiscovered(BluetoothGatt gatt, int status) {
        if (status == BluetoothGatt.GATT_SUCCESS) {
            // 服务发现成功,可以开始与设备交互
            processGattServices(gatt.getServices());
        }
    }

    // 其他回调方法...
};
5.2 GATT连接管理
服务发现与特征操作
在BLE开发中,建立GATT连接后的服务发现和特征操作是核心环节。有效管理这些过程能显著提升应用的稳定性和用户体验。
typescript
private void connectToBleDevice(BluetoothDevice device) {
    // autoConnect参数行为说明:
    // autoConnect=true: 系统会在背景等待设备变为可用状态才连接
    //                  初次连接可能需要等待很久甚至失败
    //                  断开后会尝试自动重连
    // autoConnect=false: 立即尝试连接,但不会自动重连
    //                   对于初次连接更可靠,但需自行实现重连逻辑

    bluetoothGatt = device.connectGatt(
        context,
        false,  // 建议初次连接用false,然后手动管理重连
        gattCallback,
        BluetoothDevice.TRANSPORT_LE  // 明确指定LE传输方式
    );
}服务发现是所有GATT操作的前提。在连接状态变为CONNECTED后,应立即调用discoverServices()并在回调中处理发现的服务和特征:
scss
@Override
public void onConnectionStateChange(BluetoothGatt gatt, int status, int newState) {
    if (newState == BluetoothProfile.STATE_CONNECTED) {
        Log.i(TAG, "连接成功,开始发现服务");
        // 重要:必须先发现服务才能操作特征
        gatt.discoverServices();
    } else if (newState == BluetoothProfile.STATE_DISCONNECTED) {
        Log.i(TAG, "连接已断开");
        // 处理断开逻辑
    }
}

@Override
public void onServicesDiscovered(BluetoothGatt gatt, int status) {
    if (status == BluetoothGatt.GATT_SUCCESS) {
        processGattServices(gatt.getServices());
    } else {
        Log.w(TAG, "服务发现失败: " + status);
    }
}

private void processGattServices(List<BluetoothGattService> services) {
    for (BluetoothGattService service : services) {
        // 查找目标服务
        if (SERVICE_UUID.equals(service.getUuid())) {
            // 找到目标特征
            BluetoothGattCharacteristic characteristic =
                 service.getCharacteristic(CHARACTERISTIC_UUID);

            if (characteristic != null) {
                // 启用通知(如果需要)
                enableNotification(characteristic);

                // 或者读取特征值
                bluetoothGatt.readCharacteristic(characteristic);
            }
        }
    }
}
特征操作需要注意的要点:
-
顺序执行:GATT操作是串行的,必须等上一个操作完成才能启动下一个
-
特征属性验证:在读写特征前检查其属性,确保支持预期操作
-
MTU协商:对于大数据传输,应考虑请求更大的MTU值,这个由主从设备共同决定协商后的值
scssbluetoothGatt.requestMtu(512); // 默认为23字节,可请求更大值,如果从设备不支持,你设置再打也没用
保持连接的关键因素
GATT连接的稳定性受多种因素影响,以下是保持连接稳定的关键策略:
1. 连接参数合理设置
Android的GATT连接参数包含连接间隔、从机延迟和超时时间,这些参数对稳定性有直接影响:
scss
// 在Android 8.0+可以请求特定的连接参数
if (Build.VERSION.SDK_INT >= Build.VERSION_CODES.O) {
    BluetoothGattConnectionParameterRequest request = new BluetoothGattConnectionParameterRequest.Builder()
        .setConnectionPriority(BluetoothGatt.CONNECTION_PRIORITY_BALANCED)
        .build();
    bluetoothGatt.requestConnectionParameterUpdate(request);
} else {
    // 旧版本使用优先级设置
    bluetoothGatt.requestConnectionPriority(BluetoothGatt.CONNECTION_PRIORITY_BALANCED);
}
2. 实现可靠的重连机制
自动重连策略是维持长期连接的关键:
typescript
private void setupReconnection() {
    // 创建重连Handler
    reconnectHandler = new Handler(Looper.getMainLooper());
    reconnectRunnable = new Runnable() {
        @Override
        public void run() {
            if (connectionState == STATE_DISCONNECTED && shouldAutoReconnect) {
                Log.d(TAG, "尝试重新连接...");
                connect(lastDeviceAddress);
            }
        }
    };
}

private void startReconnection() {
    stopReconnection(); // 避免重复的重连尝试
    shouldAutoReconnect = true;
    reconnectHandler.postDelayed(reconnectRunnable, RECONNECT_DELAY);
}

private void stopReconnection() {
    shouldAutoReconnect = false;
    reconnectHandler.removeCallbacks(reconnectRunnable);
}
3. 定期数据交换保活
长期空闲连接可能被系统或设备终止,定期发送"心跳"数据可维持连接:
typescript
private void startKeepAlive() {
    keepAliveHandler.postDelayed(new Runnable() {
        @Override
        public void run() {
            if (connectionState == STATE_CONNECTED) {
                // 读取一个常用特征作为保活信号
                bluetoothGatt.readCharacteristic(keepAliveCharacteristic);
            }
            keepAliveHandler.postDelayed(this, KEEP_ALIVE_INTERVAL);
        }
    }, KEEP_ALIVE_INTERVAL);
}
功耗与稳定性平衡策略
BLE应用面临功耗与连接稳定性的平衡问题,以下策略可以在两者间取得最佳平衡:
1. 连接优先级动态调整
根据应用状态动态调整连接优先级,在需要高响应时提高优先级,空闲时降低:
csharp
// 需要快速数据交换时
public void setHighPriority() {
    if (bluetoothGatt != null) {
        bluetoothGatt.requestConnectionPriority(BluetoothGatt.CONNECTION_PRIORITY_HIGH);
    }
}

// 数据交换完成后恢复平衡模式
public void setBalancedPriority() {
    if (bluetoothGatt != null) {
        bluetoothGatt.requestConnectionPriority(BluetoothGatt.CONNECTION_PRIORITY_BALANCED);
    }
}

// 长时间无交互时设为低功耗模式
public void setLowPowerPriority() {
    if (bluetoothGatt != null) {
        bluetoothGatt.requestConnectionPriority(BluetoothGatt.CONNECTION_PRIORITY_LOW_POWER);
    }
}
2. 批量数据传输策略
对于大量数据传输,采用批处理模式可减少连接次数和功耗:
ini
// 批量写入数据
private void writeInBatches(byte[] data, int batchSize) {
    int offset = 0;
    while (offset < data.length) {
        int length = Math.min(batchSize, data.length - offset);
        byte[] batch = Arrays.copyOfRange(data, offset, offset + length);

        // 准备特征值写入
        dataCharacteristic.setValue(batch);

        // 写入特征
        boolean success = bluetoothGatt.writeCharacteristic(dataCharacteristic);

        // 等待写入完成后再继续(实际应用中需在回调中处理)
        // onCharacteristicWrite回调中处理下一批次

        offset += length;
    }
}
通过合理配置GATT连接参数、实现可靠的重连机制、采用适当的数据交换策略,可以在保证连接稳定的同时优化功耗表现,为用户提供流畅且节能的蓝牙体验。
6. 实用重连策略
智能退避算法
在BLE开发中,连接失败后的重连策略直接影响用户体验和电池寿命。智能退避算法提供了一种平衡重连尝试频率和系统资源消耗的方法。
指数退避算法是最常用的智能重连策略之一。它的核心思想是随着尝试次数增加,逐渐延长重连间隔。这样可以在初期快速尝试恢复连接,而在连续失败后减少尝试频率,避免消耗过多资源。
典型的指数退避模式从1秒开始,然后依次增加到2秒、4秒、8秒、16秒等。这种方式特别适合临时性连接问题,如短暂的信号干扰或设备重启。
场景自适应连接管理
不同使用场景需要不同的重连策略,一个灵活的重连系统应当能够根据具体环境进行自适应调整:
- 前台应用场景:用户正在主动使用应用时,可采用更积极的重连策略,缩短首次尝试间隔,提高最大尝试次数,以提供更好的即时响应体验。
- 后台运行场景:应用在后台运行时,应使用更保守的策略,延长重试间隔,减少尝试次数,降低电池消耗。
- 周期性连接场景:对于定期数据同步的应用,可结合系统闹钟或工作管理器实现定时连接尝试,而不是持续保持连接。
- 特定环境感知:结合位置服务、活动识别等感知用户环境,例如检测到用户回到家中或办公室时才主动尝试连接已知设备。
完整示例:BLE连接管理器
以下是基于策略模式设计的BLE连接管理器框架:
java
// 重连策略接口
public interface ReconnectStrategy {
    void scheduleReconnect(Runnable reconnectTask, int attemptCount);
    boolean shouldContinueRetrying(int attemptCount);
}

// 指数退避策略实现
public class ExponentialBackoffStrategy implements ReconnectStrategy {
    private static final int BASE_DELAY_MS = 1000;
    private static final int MAX_ATTEMPTS = 5;

    @Override
    public void scheduleReconnect(Runnable reconnectTask, int attemptCount) {
        int delay = BASE_DELAY_MS * (int) Math.pow(2, attemptCount);
        new Handler().postDelayed(reconnectTask, delay);
    }

    @Override
    public boolean shouldContinueRetrying(int attemptCount) {
        return attemptCount < MAX_ATTEMPTS;
    }
}

// 重连管理器
public class ReconnectionManager {
    private ReconnectStrategy strategy;
    private int attemptCount = 0;
    private BluetoothDevice targetDevice;

    public ReconnectionManager(ReconnectStrategy strategy) {
        this.strategy = strategy;
    }

    public void startReconnection(BluetoothDevice device) {
        this.targetDevice = device;
        attemptReconnect();
    }

    private void attemptReconnect() {
        if (!strategy.shouldContinueRetrying(attemptCount)) {
            Log.w(TAG, "Max reconnection attempts reached");
            resetAttempts();
            return;
        }

        strategy.scheduleReconnect(() -> {
            Log.i(TAG, "Attempting reconnect #" + (attemptCount + 1));
            // 尝试重新连接
            connectToBleDevice(targetDevice);
            attemptCount++;
        }, attemptCount);
    }

    public void resetAttempts() {
        attemptCount = 0;
    }
}
策略模式的核心优势在于允许根据不同场景动态切换重连策略,而无需修改连接管理的核心逻辑。例如,可以实现以下场景特定策略:
- 渐进式退避策略:初期快速尝试,长期失败后逐渐降低频率
- 定时重连策略:在特定时间间隔(如每小时)尝试重连
- 条件触发策略:只在特定条件满足时(如网络状态变化)才尝试重连
通过这种抽象设计,应用可以针对不同的使用场景和设备特性选择最合适的重连策略:
java
// 在高稳定性场景中使用指数退避策略
ReconnectionManager reconnectionManager =
    new ReconnectionManager(new ExponentialBackoffStrategy());

// 或者自定义其他策略
ReconnectionManager linearReconnectManager =
    new ReconnectionManager(new LinearBackoffStrategy());
实际应用中,重连管理器应与连接状态监听器紧密集成,在检测到意外断开时自动触发重连流程,并在成功连接后重置尝试计数器。这种集成可以提供近乎无缝的连接体验,同时避免不必要的资源消耗。
此外,应当考虑添加用户手动触发重连的机制,以及提供连接状态和重连进度的可视化反馈,增强用户对连接过程的掌控感和理解。
7. 常见问题解决方案
7.1 设计限制导致的问题
- BLE同时连接设备数限制
BLE规范限制同时连接的设备数量,大多数手机支持4-7个同时连接:
java
// 使用连接队列管理多设备连接
public class BleConnectionQueue {
    private Queue<BluetoothDevice> deviceQueue = new LinkedList<>();
    private boolean isConnecting = false;
    private int connectedDeviceCount = 0;
    private static final int MAX_CONNECTED_DEVICES = 5; // 保守估计

    public void queueConnection(BluetoothDevice device) {
        deviceQueue.add(device);
        processQueue();
    }

    private synchronized void processQueue() {
        if (isConnecting || deviceQueue.isEmpty() ||
            connectedDeviceCount >= MAX_CONNECTED_DEVICES) return;

        isConnecting = true;
        BluetoothDevice nextDevice = deviceQueue.poll();

        // 连接设备,在连接回调中调用connectionComplete()
        connectToBleDevice(nextDevice);
    }

    public void connectionComplete(boolean success) {
        isConnecting = false;
        if (success) connectedDeviceCount++;
        processQueue(); // 处理队列中的下一个设备
    }

    public void deviceDisconnected() {
        if (connectedDeviceCount > 0) connectedDeviceCount--;
        processQueue(); // 断开连接后可以连接队列中的下一个设备
    }
}- "已配对但无法连接"问题
这个问题通常由以下设计限制导致:
java
// 解决方案:先解除配对再重新配对
public void refreshPairing(BluetoothDevice device) {
    try {
        // 先检查当前配对状态
        if (device.getBondState() == BluetoothDevice.BOND_BONDED) {
            // 使用反射调用removeBond方法
            Method removeBondMethod = device.getClass().getMethod("removeBond");
            boolean success = (boolean) removeBondMethod.invoke(device);

            if (success) {
                // 等待配对状态变更,然后重新配对
                // 通过广播接收器监听ACTION_BOND_STATE_CHANGED
            }
        }
    } catch (Exception e) {
        Log.e(TAG, "Error removing bond", e);
    }
}
7.2 实现不当引发的问题
- 忘记取消扫描导致连接失败
scss
// 正确的做法是连接前停止扫描
@Override
public void onScanResult(int callbackType, ScanResult result) {
    // 找到目标设备后
    if (TARGET_DEVICE_NAME.equals(result.getDevice().getName())) {
        // 停止扫描后再连接
        bluetoothLeScanner.stopScan(scanCallback);
        connectToBleDevice(result.getDevice());
    }
}- 未在主线程处理GATT回调
java
// 确保GATT回调在主线程处理
private Handler mainHandler = new Handler(Looper.getMainLooper());

@Override
public void onCharacteristicRead(BluetoothGatt gatt,
                                BluetoothGattCharacteristic characteristic,
                                int status) {
    mainHandler.post(() -> {
        if (status == BluetoothGatt.GATT_SUCCESS) {
            // 处理读取结果
            processReadResult(characteristic.getValue());
        }
    });
}- Android权限问题:Android 12+需要精确位置权限
arduino
// Android 12+需要的权限
private final String[] BLE_PERMISSIONS = new String[]{
    Manifest.permission.BLUETOOTH_SCAN,
    Manifest.permission.BLUETOOTH_CONNECT,
    Manifest.permission.ACCESS_FINE_LOCATION
};

// 检查并请求权限
private boolean checkAndRequestPermissions() {
    if (Build.VERSION.SDK_INT >= Build.VERSION_CODES.S) {
        for (String permission : BLE_PERMISSIONS) {
            if (ContextCompat.checkSelfPermission(context, permission)
                != PackageManager.PERMISSION_GRANTED) {
                ActivityCompat.requestPermissions(activity, BLE_PERMISSIONS,
                                                REQUEST_BLE_PERMISSIONS);
                return false;
            }
        }
    }
    return true;
}
8. 工程调试技巧与连接成功率优化手段
8.1 系统日志分析
启用蓝牙HCI日志是排查配对失败和断连问题的核心手段:
bash
# 开启完整蓝牙日志捕获
adb shell setprop persist.bluetooth.btsnooplogmode full
adb shell setprop persist.bluetooth.hci.logmode full

# 重启设备后,获取日志
adb bugreport
HCI日志分析关键点:
- 检查配对过程中的密钥交换是否成功
- 识别连接参数协商过程
- 观察连接间隔和监督超时值
- 确认GATT操作序列的正确性
8.2 提高首次连接成功率的工程技巧
-
连接前停止扫描
scssbluetoothAdapter.stopLeScan(leScanCallback); // 然后再连接 -
添加连接超时机制
scssnew Handler().postDelayed(() -> { if (connectionState != STATE_CONNECTED) { // 连接超时,断开当前尝试 if (bluetoothGatt != null) { bluetoothGatt.disconnect(); bluetoothGatt.close(); bluetoothGatt = null; } // 可以尝试重连 reconnect(); } }, CONNECTION_TIMEOUT); -
优化MTU请求时机
java@Override public void onConnectionStateChange(BluetoothGatt gatt, int status, int newState) { if (newState == BluetoothProfile.STATE_CONNECTED) { // 连接成功后请求更大的MTU以提高传输效率 gatt.requestMtu(512); } } @Override public void onMtuChanged(BluetoothGatt gatt, int mtu, int status) { if (status == BluetoothGatt.GATT_SUCCESS) { Log.i(TAG, "MTU changed to: " + mtu); // MTU设置成功后再发现服务 gatt.discoverServices(); } else { // MTU请求失败,直接发现服务 gatt.discoverServices(); } } -
关闭自动重传机制,自主控制重连
java// 获取反射类以设置底层参数 // 注意:这是一种高级技巧,可能在不同Android版本上有差异 try { Field connectField = bluetoothGatt.getClass().getDeclaredField("mAutoConnect"); connectField.setAccessible(true); connectField.setBoolean(bluetoothGatt, false); } catch (Exception e) { Log.e(TAG, "Could not modify autoConnect flag", e); }