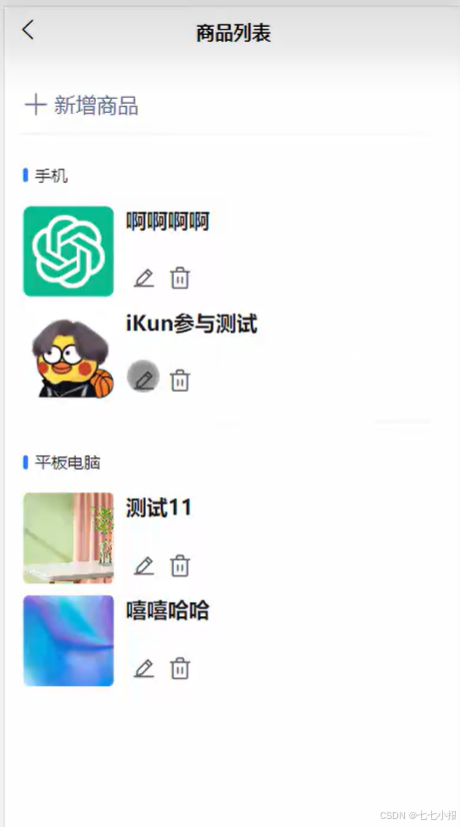
商品列表中的数据需要进行状态管理,如上架、下架、删除和修改等操作。对于存在错误或后期需要重新上传的商品,可以通过删除操作进行处理。
具体到商品删除功能的实现,其基本流程如下:用户在前端页面点击删除按钮后,系统会调用后端接口,将对应商品数据从数据库中移除。
文章介绍了商品列表状态管理的实现,特别是商品删除功能的具体流程。用户在前端点击删除按钮后,系统调用后端接口,从数据库中移除对应商品数据。删除操作包括确认提示和权限验证,确保只有具有管理权限的用户才能执行删除。删除后,页面会更新商品列表,避免频繁调用数据库。此外,文章还提到了未来可能添加上架和下架按钮,进一步完善商品管理功能。代码部分展示了删除和修改按钮的实现,以及相关的云对象数据处理逻辑。整体设计旨在提升商品管理的灵活性和安全性。
1、页面布局
存在 删除和修改,以后还可以添加上架和下架的按钮。
2、代码删除和修改的按钮
<view class="info">
<!-- 编辑修改 -->
<view class="icon" @click="clickEdit(row._id)">
<u-icon name="edit-pen" size="25"></u-icon>
</view>
<!-- 删除该商品 -->
<view class="icon" @click="clickRemove(row._id)">
<u-icon name="trash" size="25"></u-icon>
</view>
</view>
3、删除动作:clickRemove
3.1、给出删除的确认判断
javascript
            //删除某一个商品
			clickRemove(id){
				uni.showModal({
					title:"是否确认删除",
					success:res=>{
						if(res.confirm){
							this.removeGoods(id)
						}
					}
				})

			},

			//删除数据
			async removeGoods(id){
				let res =await goodsCloudObj.remove(id);
				if(res.code==-1){
					uni.showToast({
						title:res.msg,
						icon:"error"
					})
					return;
				}
				this.getGoodsList();
			},
3.2 调用删除数据的云对象 数据处理
let res =await goodsCloudObj.remove(id);
const goodsCloudObj = uniCloud.importObject("green-mall-goods")
4、云对象数据处理
const goodsCloudObj = uniCloud.importObject("green-mall-goods")
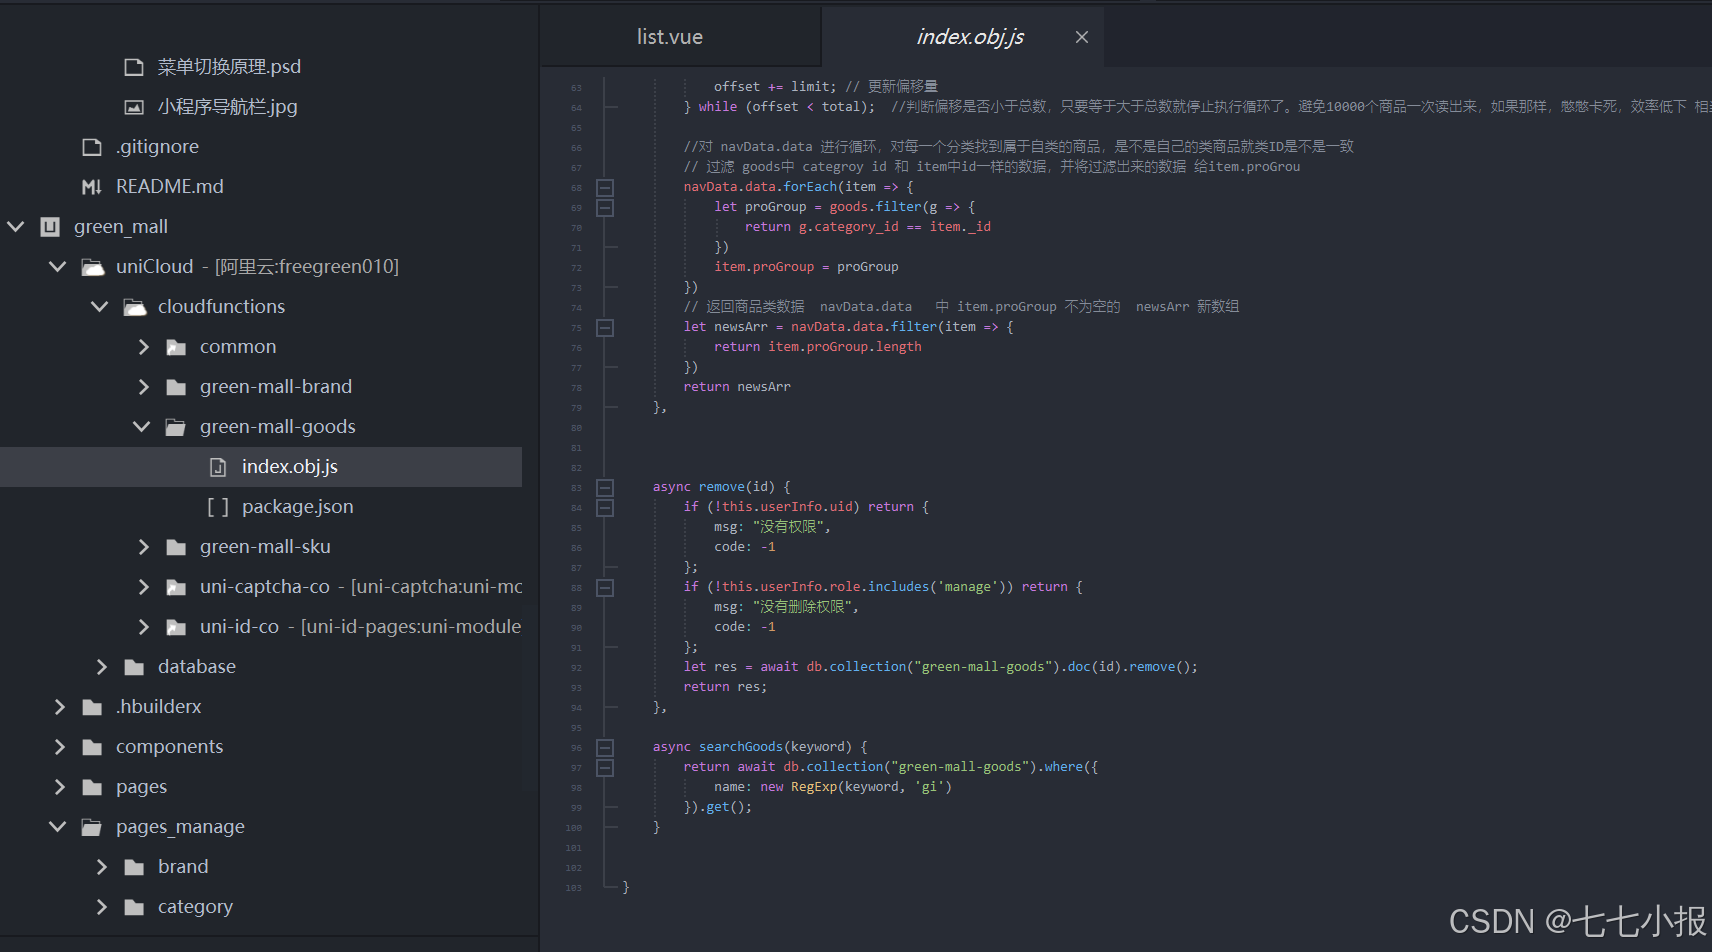
4.1 代码分析
javascript
	// 接收传来的参数 id,对该id删除
	async remove(id) {
		if (!this.userInfo.uid) return {
			msg: "没有权限",
			code: -1
		};
		if (!this.userInfo.role.includes('manage')) return {
			msg: "没有删除权限",
			code: -1
		};
		let res = await db.collection("green-mall-goods").doc(id).remove();
		return res;
	},
5、页面逻辑代码
html
<template>
<view class="goodsList">
<!-- 添加一个增加按钮,通过这里也可以跳转到新增商品的页面 -->
<navigator url="./add" class="row add">
<view class="left">
<!-- 一个按钮 u-icon + -->
<u-icon name="plus" color="#576b95" size="22"></u-icon>
<text class="text">新增商品</text>
</view>
</navigator>
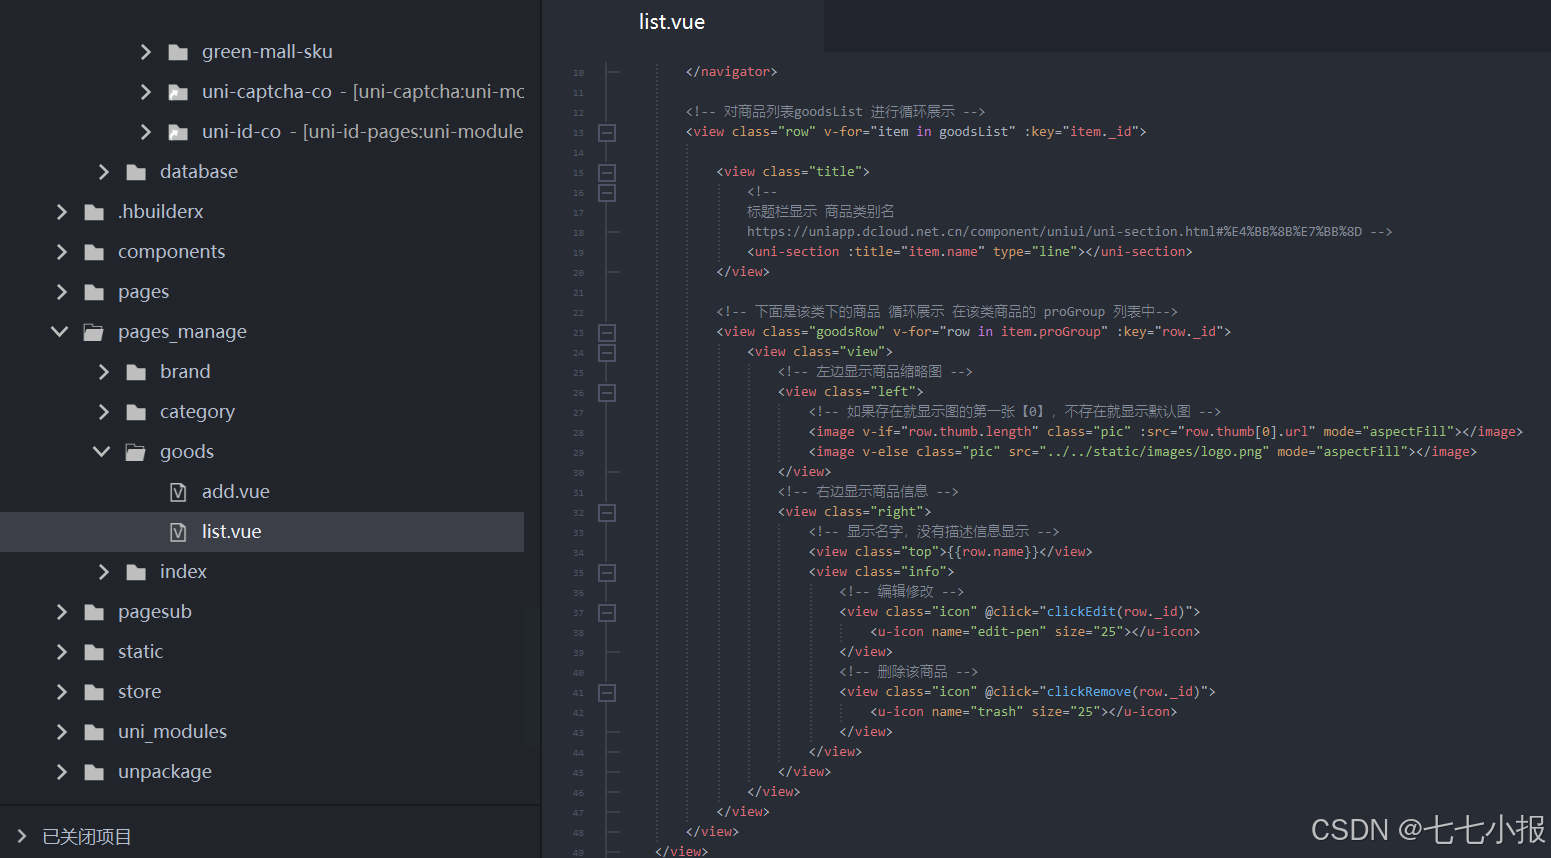
<!-- 对商品列表goodsList 进行循环展示 -->
<view class="row" v-for="item in goodsList" :key="item._id">
<view class="title">
<!--
标题栏显示 商品类别名
https://uniapp.dcloud.net.cn/component/uniui/uni-section.html#%E4%BB%8B%E7%BB%8D -->
<uni-section :title="item.name" type="line"></uni-section>
</view>
<!-- 下面是该类下的商品 循环展示 在该类商品的 proGroup 列表中-->
<view class="goodsRow" v-for="row in item.proGroup" :key="row._id">
<view class="view">
<!-- 左边显示商品缩略图 -->
<view class="left">
<!-- 如果存在就显示图的第一张【0】,不存在就显示默认图 -->
<image v-if="row.thumb.length" class="pic" :src="row.thumb[0].url" mode="aspectFill"></image>
<image v-else class="pic" src="../../static/images/logo.png" mode="aspectFill"></image>
</view>
<!-- 右边显示商品信息 -->
<view class="right">
<!-- 显示名字,没有描述信息显示 -->
<view class="top">{{row.name}}</view>
<view class="info">
<!-- 编辑修改 -->
<view class="icon" @click="clickEdit(row._id)">
<u-icon name="edit-pen" size="25"></u-icon>
</view>
<!-- 删除该商品 -->
<view class="icon" @click="clickRemove(row._id)">
<u-icon name="trash" size="25"></u-icon>
</view>
</view>
</view>
</view>
</view>
</view>
</view>
</template>
<script>
const goodsCloudObj = uniCloud.importObject("green-mall-goods")
export default {
data() {
return {
goodsList:[]
};
},
onShow() {
this.isManage();
this.getGoodsList();
},
methods: {
//点击跳转到修改页面
clickEdit(id){
uni.navigateTo({
url:"./add?id="+id
})
},
//删除某一个商品
clickRemove(id){
uni.showModal({
title:"是否确认删除",
success:res=>{
if(res.confirm){
this.removeGoods(id)
}
}
})
},
//删除数据
async removeGoods(id){
let res =await goodsCloudObj.remove(id);
if(res.code==-1){
uni.showToast({
title:res.msg,
icon:"error"
})
return;
}
this.getGoodsList();
//删除后,还要更新表,间接更新页面的展示,但最好的是更新表,不要去拉数据库的值,避免多次使用云数据库 要钱呀。
},
//获取商品列表
async getGoodsList() {
let res =await goodsCloudObj.getList();
console.log(res);
this.goodsList = res
}
}
}
</script>
<style lang="scss" scoped>
.goodsList {
padding: 30rpx;
.row {
border-bottom: 1px solid #ededed;
padding: 25rpx 0;
.title {
margin-left: -20rpx;
}
.goodsRow {
.view {
display: flex;
padding: 10rpx 0;
@include flex-box();
.left {
width: 150rpx;
height: 150rpx;
.pic {
width: 100%;
height: 100%;
border-radius: 10rpx;
}
}
.right {
flex: 1;
padding-left: 20rpx;
display: flex;
justify-content: space-between;
flex-direction: column;
height: 150rpx;
.top {
font-size: 36rpx;
font-weight: 600;
}
.info {
display: flex;
.icon {
padding: 6rpx;
}
}
}
}
}
}
.row.add {
.left {
color: $brand-theme-color-aux;
@include flex-box-set(start);
.text {
font-size: 36rpx;
padding-left: 10rpx;
}
}
}
}
</style>