毕昇编译器循环优化实验------------一文读懂如何使用毕昇编译器自动调优(openEuler系统)
前言:
一次酣畅淋漓得配置与调试过程,个中艰辛不足外人道哉,希望以后的同学可以查阅本篇文章获得一点帮助,这是我最后得波纹了(笑),自动调优确实挺猛得倒是。
(一)实验目的
通过毕昇编译器对循环进行优化,减少循环控制开销,提高程序的执行效率。
(二)实验内容
使用毕昇编译器对包含循环的代码进行编译,对比优化前后的性能差异。
(三)实验过程
1. 准备实验环境
-
实验环境要求:
- 参考官方文档要求:鲲鹏社区:安装毕昇编译器
- 系统:openEuler 22.03 LTS SP3 (官方网站上写的是:openEuler 24.03 LTS、openEuler 22.03 LTS、openEuler 20.03 LTS SP1、CentOS 7.6、Ubuntu 18.04、Ubuntu 20.04、麒麟V10、UOS 20,由于SP版本是补丁版本,基本功能应该和LTS一样,同时华为云上我没找到怎么选择openEuler 22.03 LTS、openEuler 20.03 LTS SP1,因此选择了SP3)
- 架构:AArch64
- 内存:8GB以上
-
实验环境配置:
- 注意本实验使用的是系统镜像是SP3,因为当时写博客的时候只有SP2,所以博客中是SP2
- 云服务器购买:参考我的这篇博客前面的配置过程:在华为云服务器上测试GCC for OpenEuler的特性
- 最终配置:
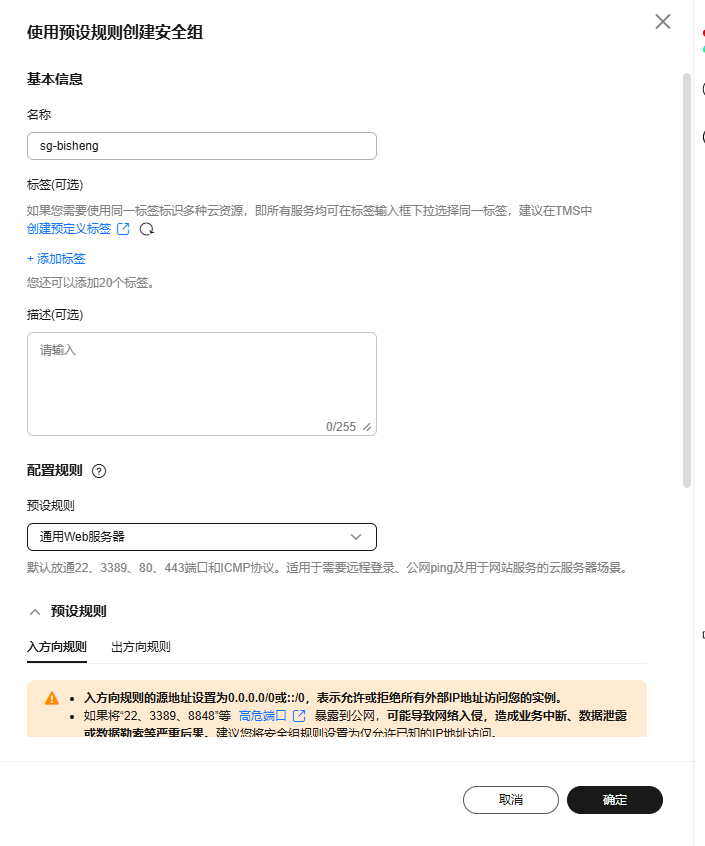
-
虚拟云VPC:
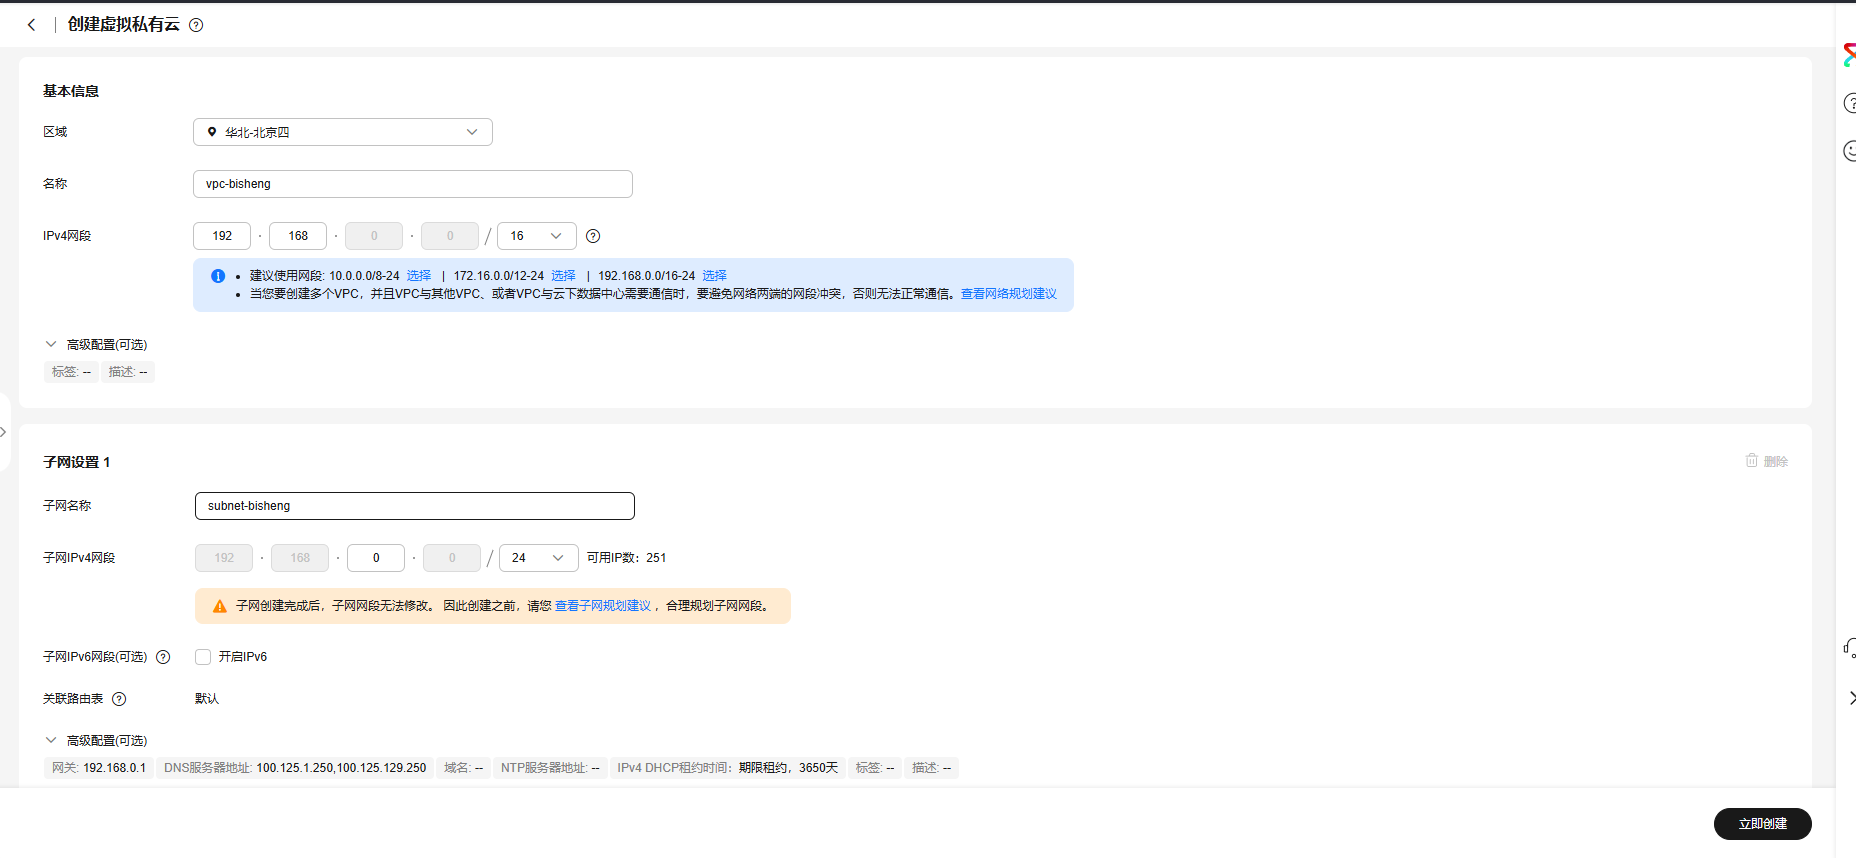
-
安全组:
-
密码:
-
配置表:
配置项 配置值 计费模式 按需计费 区域/可用区 华北-北京四 | 可用区1 实例规格 鲲鹏通用计算增强型 | kc1.xlarge.4 | 4vCPUs | 16GiB 操作系统镜像 openEuler-22.03-LTS-SP3 (aarch64)(V22.03) 系统盘 通用型SSD, 50GiB 虚拟私有云 vpc-bisheng(192.168.0.0/16) 主网卡 subnet-bisheng(192.168.0.0/24) 源/目的检查 开启 安全组 sg-bisheng(通用web服务器) 弹性公网IP 全动态BGP | 按流量计费 | 5 Mbit/s 云服务器名称 ecs-bisheng 登录凭证 密码 购买数量 1 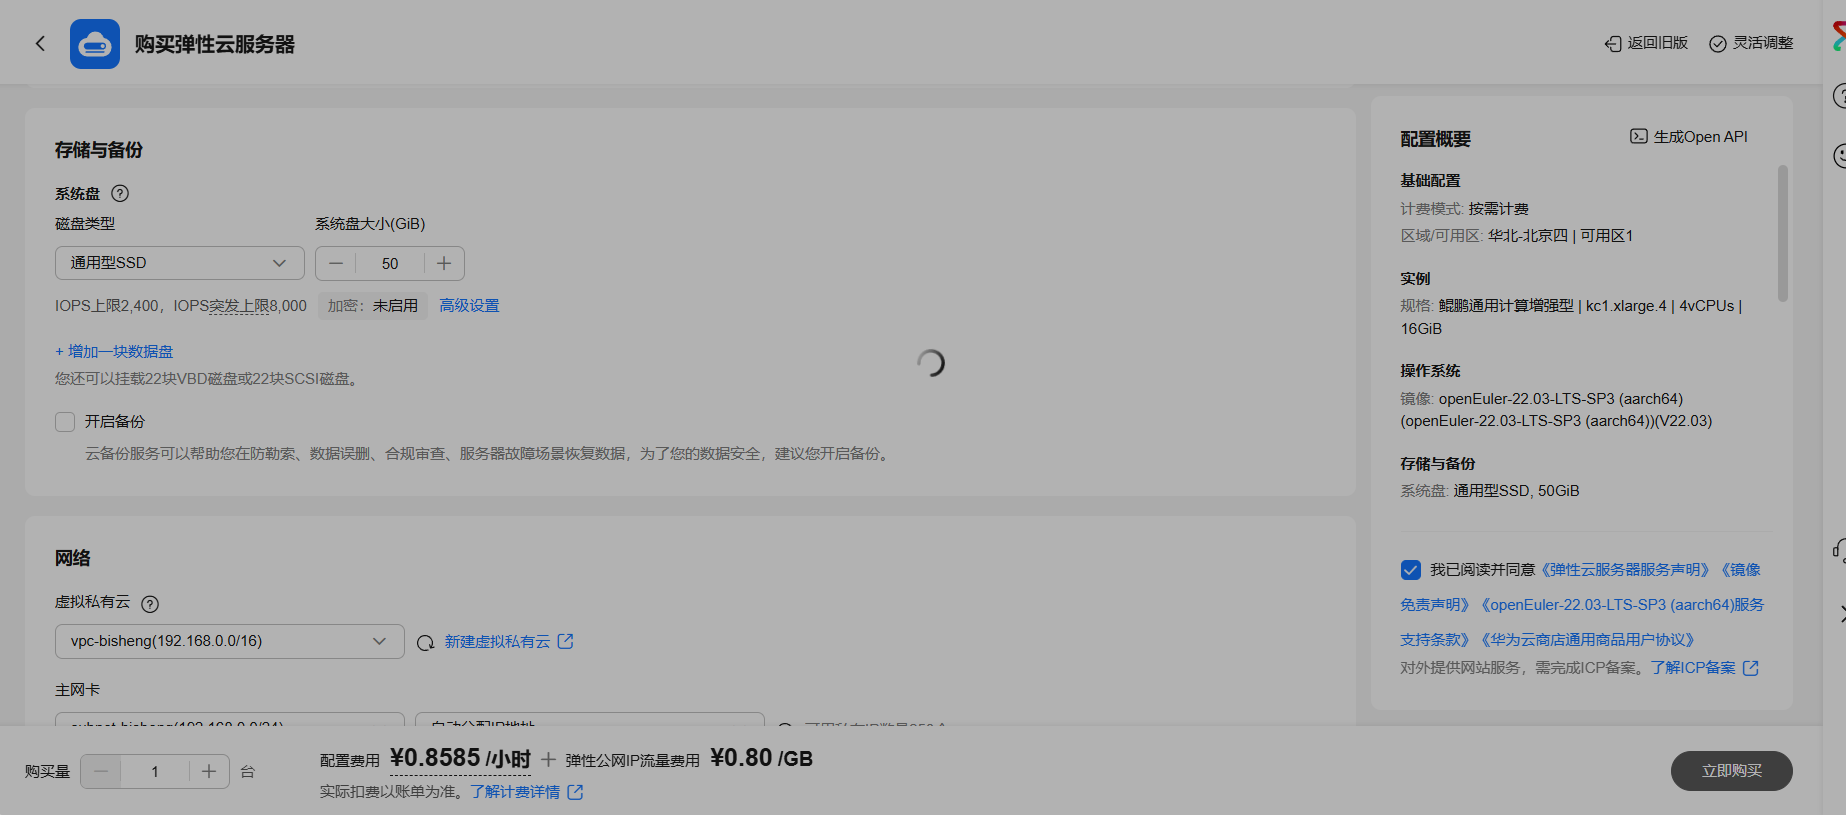
-
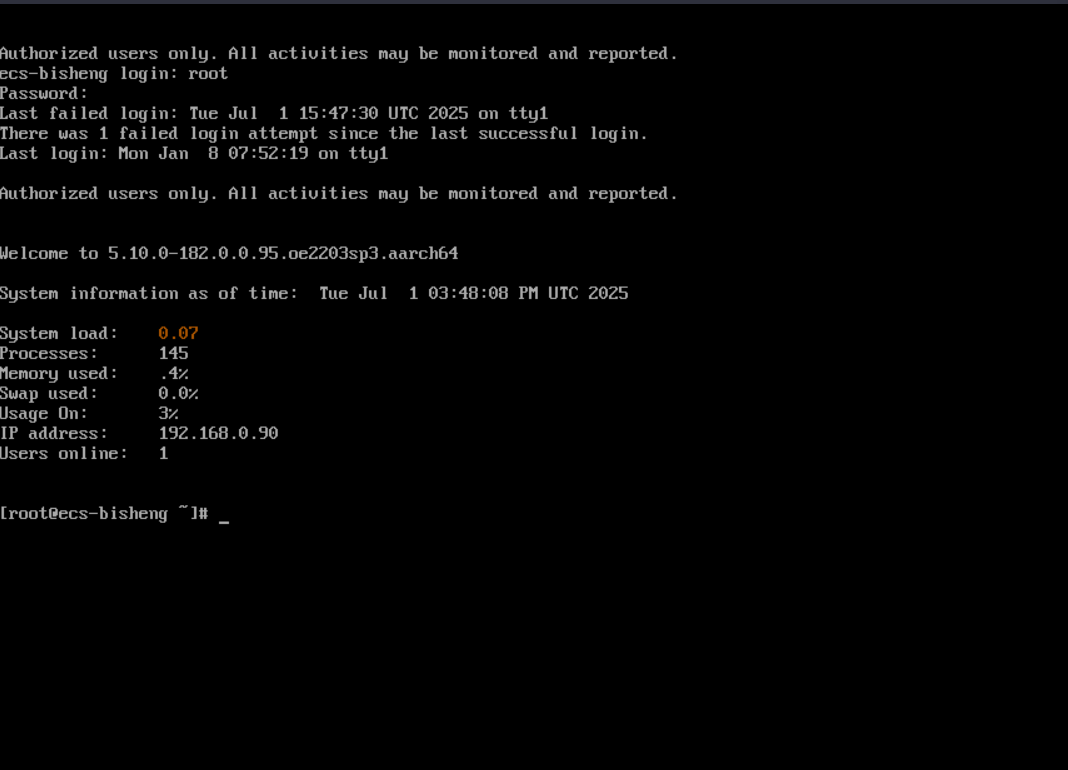
2. 进入服务器
-
连接服务器
-
可以使用终端(cmd或者powershelL)ssh连接服务器,或者使用putty等工具连接服务器。当然这是对于使用windows的同学,如果是mac则使用zsh等工具连接服务器。当然,如果可以的话,还可以使用vscode ssh远程连接,更方便(可惜我没成功用vscode ssh远程连接)。
-
连接服务器需要使用公网ip,可以参考我的博客:在华为云服务器上测试GCC for OpenEuler的特性中的查看方式。
例如我在实验时,公网ip地址为:124.70.90.76 -
连接命令:
bashssh root@<服务器公网IP>例:
bashssh root@124.70.90.76 -
注意: 连接时需要输入密码,密码是你在购买云服务器时设置的密码。
-
也可以使用putty连接,同样是参考博客:在华为云服务器上测试GCC for OpenEuler的特性中的连接方式。
-
连接成功后,进入服务器的命令行界面。
- 如果不成功请看下一点:可能会遇到的问题 ,或那篇博客在华为云服务器上测试GCC for OpenEuler的特性**
- 如果成功就是这样的,记得要输入密码,输入密码时看不到输入。
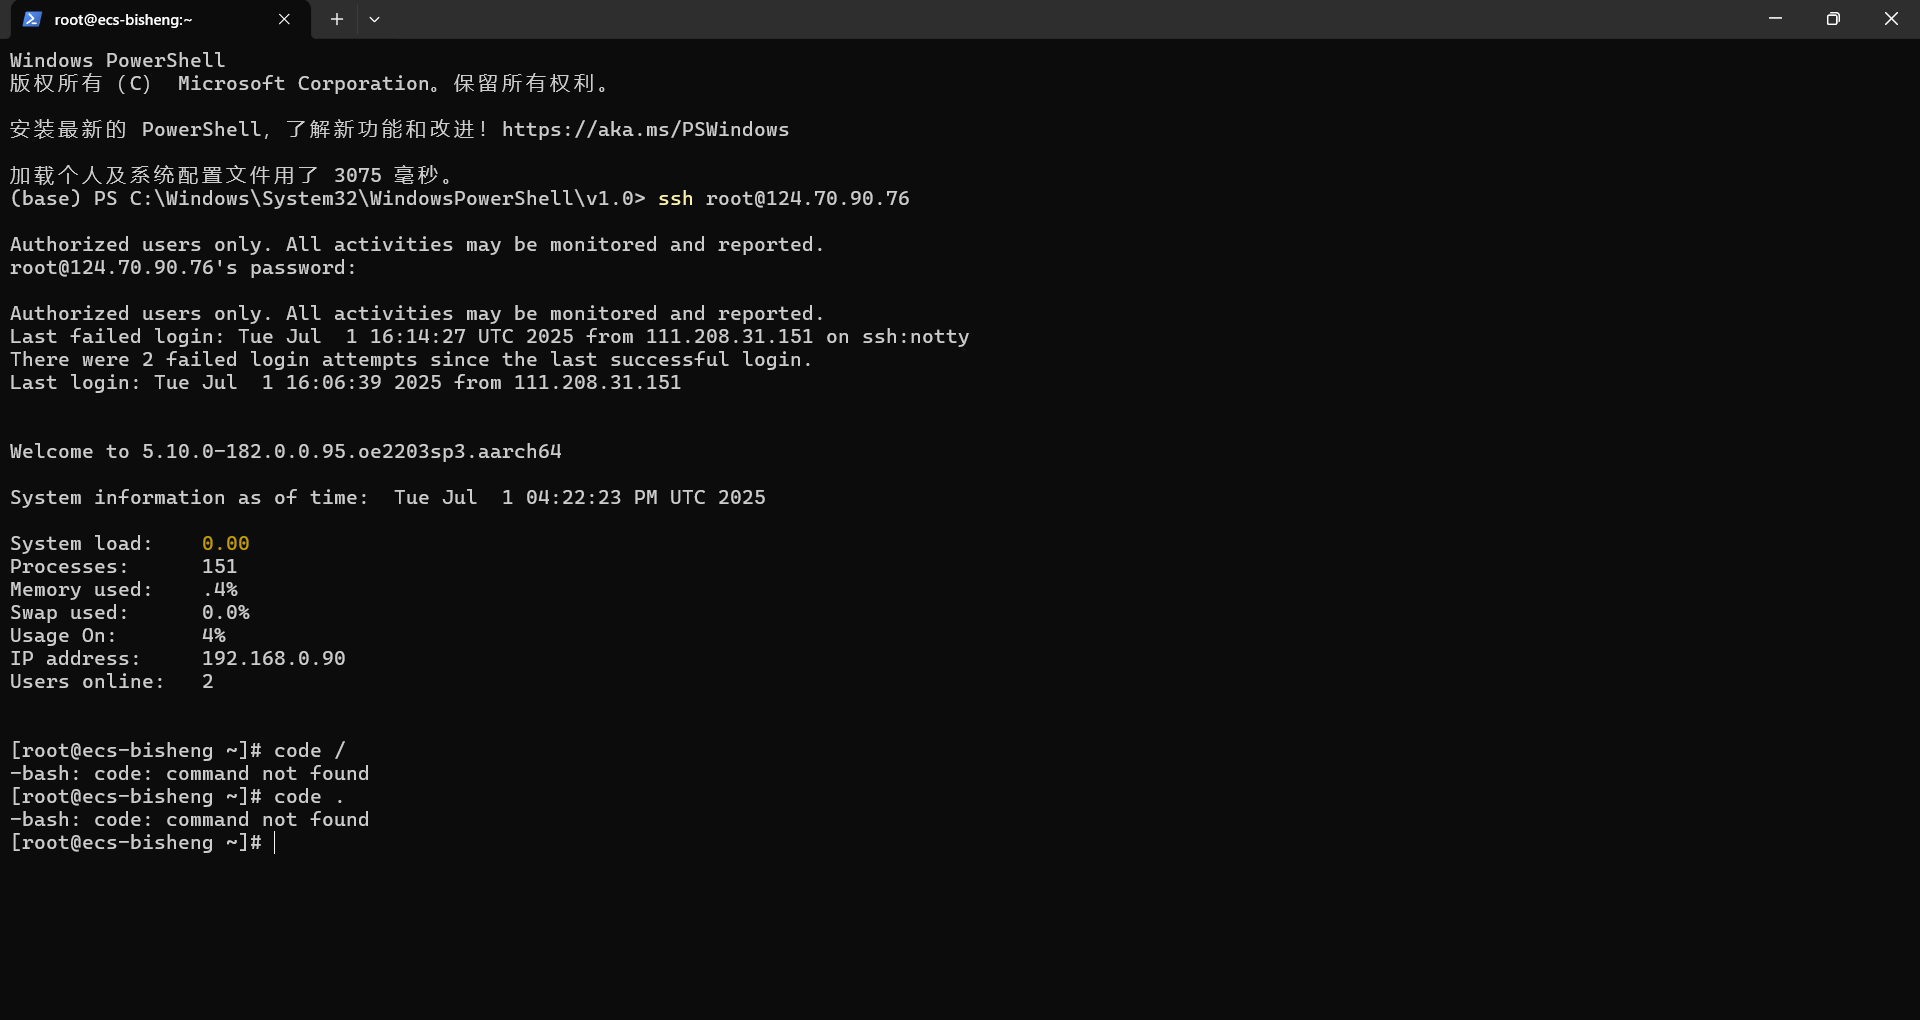
- 接下来要安装毕昇编译器。
-
-
可能会遇到的问题:
-
没有密码登录方式 :
- 这是因为
sshd_config文件中的PasswordAuthentication设置为no,需要修改为yes。在华为云控制台中找到服务器,点击右侧的管理,然后点击远程登录。 - 这个图是之前的了,现在的样式如下,但是总归是找到VNC登录

- 随后可以在这个页面通过密码登录(输入root,回车,然后输入密码,注意输入密码时你看不到输入):
- 然后打开
/etc/ssh/sshd_config文件,找到PasswordAuthentication no,修改为yes: - (需要说明的是,在vnc页面,输入命令必须自己手打,很麻烦,也很慢)
shellvi /etc/ssh/sshd_config

- 然后按
i进入编辑模式,找到PasswordAuthentication no,修改为yes,同时PermitRootLogin也修改为yes,注意这里一共修改三个位置。不过这是我之前的截图,如果你只找到两个也是正常的,可能是因为配置安全组的时候没有配置2端口。反正只要port22对应的配置修改了就可以。 - 修改完之后按esc退出编辑模式,输入
:wq退出并保存。 - 然后重启配置文件服务:
shellsudo systemctl restart sshd service sshd restart- 之后就可以通过密码登录了。
- 这是因为
-
vscode无法远程连接(未解决) :
- 在你配置好密码登录之后,应当可以在powershell或者cmd ssh连接了,但是还可能遇到的是vscode无法远程连接的问题:
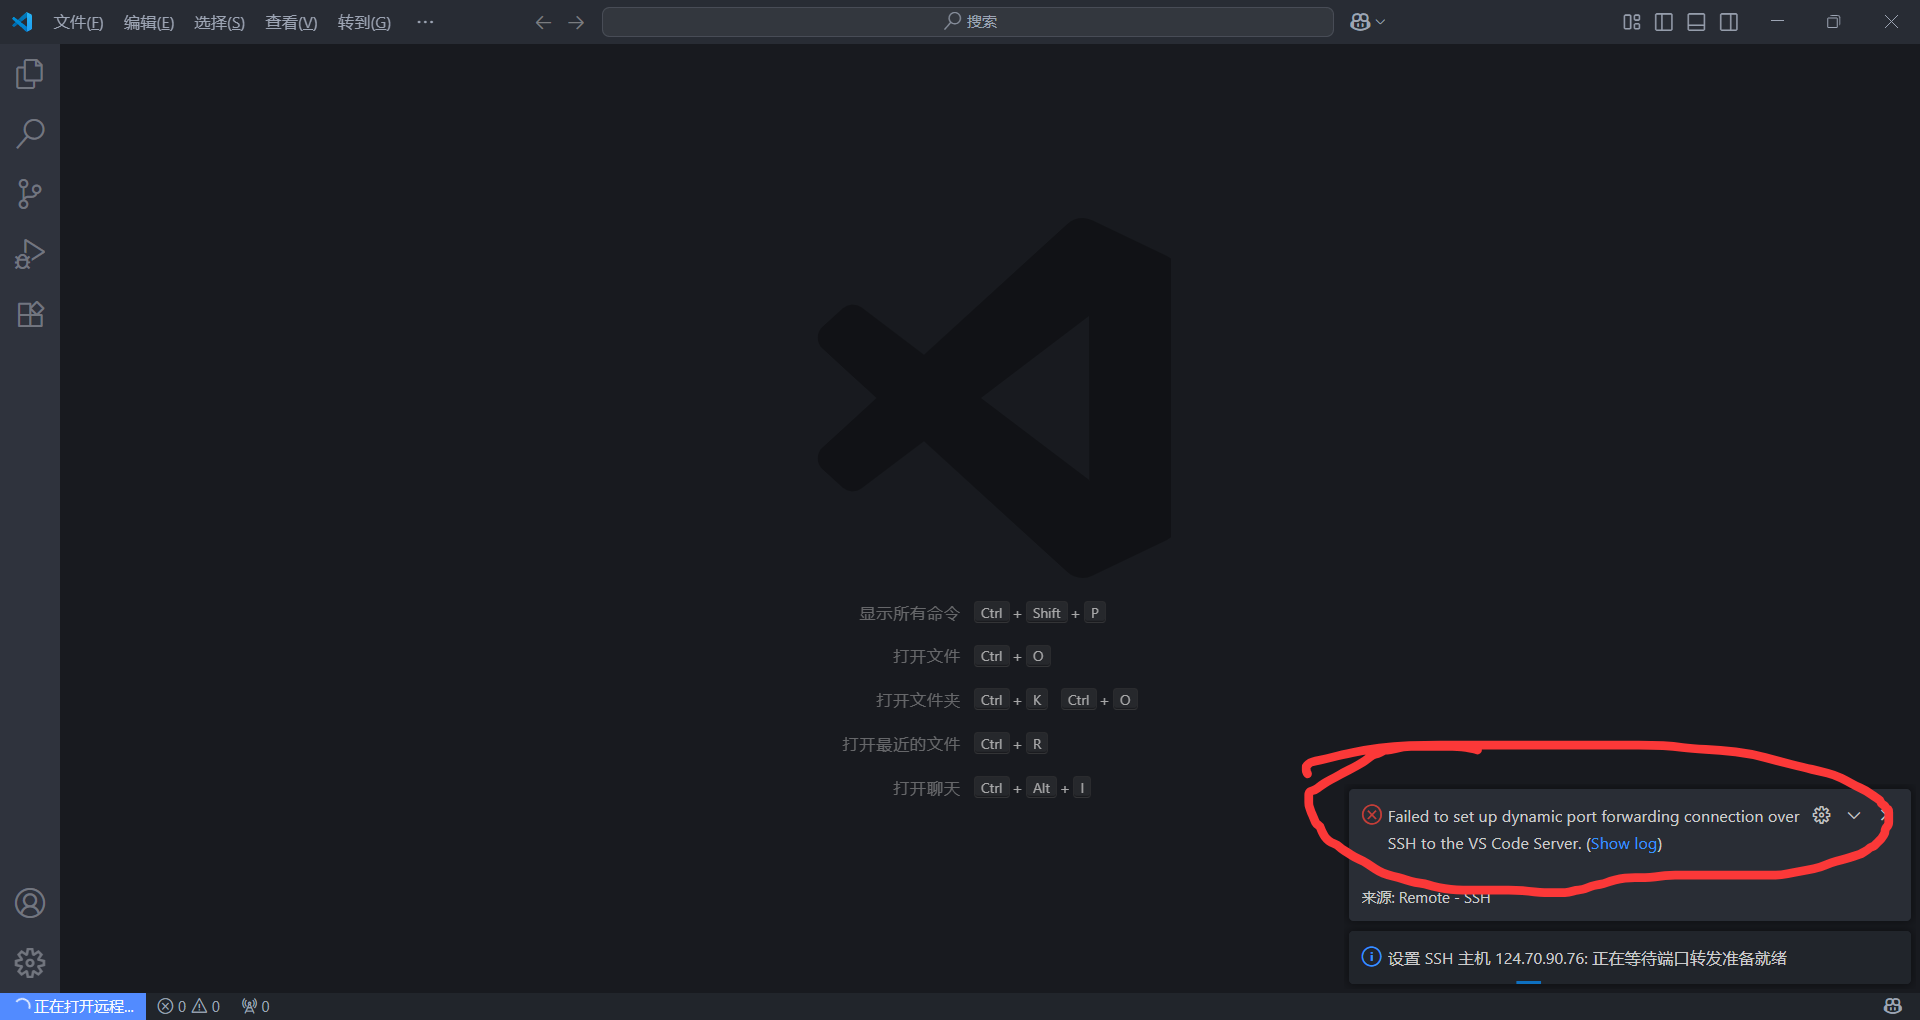

- 解决办法是通过终端直接ssh连接,然后同样的修改
/etc/ssh/sshd_config文件,将PasswordAuthentication no修改为yes,或者是把原本是注释的#PasswordAuthentication yes去掉注释,然后重启服务。
shellsudo systemctl restart sshd service sshd restart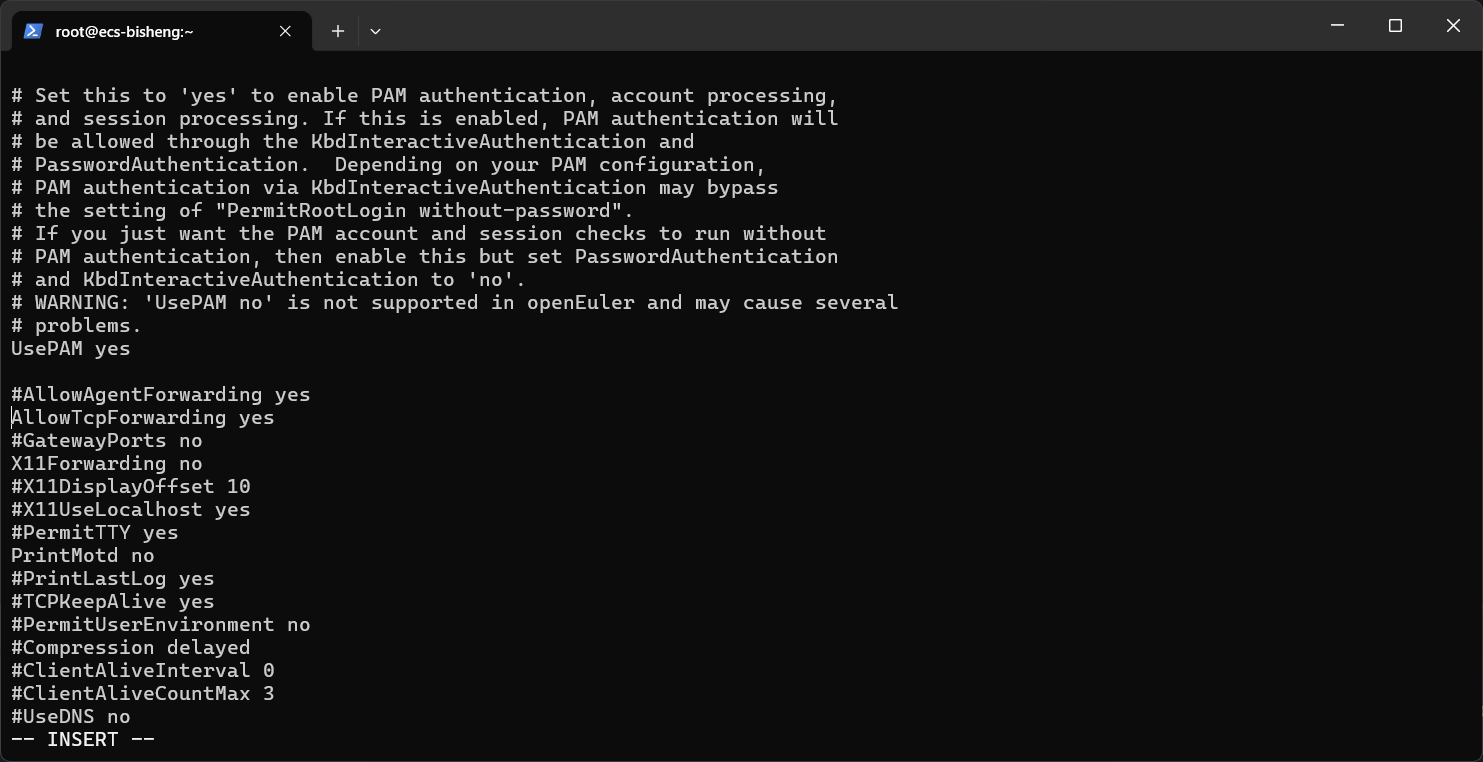
- 然后,不报错了,但是还是登陆不了,我也没找到原因。
-
3.安装毕昇编译器
-
添加源:因openEuler的仓库网址可能会更新,所以请访问oepkgs获取最新的仓库网址。使用以下命令添加源:
bash添加源 dnf config-manager --add-repo https://repo.oepkgs.net/openeuler/rpm/openEuler-22.03-LTS/extras/aarch64/关于这里为什么不是sp3,因为用sp3下载的源无法下载毕昇编译器,不过用了这个命令后,后面还是遇到bug了
注意,上面这个指令疑似有问题 ,我后面遇到下载编译python3.11得工具无法下载时,运行得下面这些操作
首先备份
# 进入仓库配置目录
cd /etc/yum.repos.d/

# 创建一个备份文件夹
sudo mkdir repo_backup

# 把所有 .repo 文件移入备份文件夹
sudo mv *.repo repo_backup/
之后,执行
bashsudo tee /etc/yum.repos.d/openEuler.repo > /dev/null <<'EOF' [OS] name=openEuler-22.03-LTS-SP3-OS baseurl=https://repo.openeuler.org/openEuler-22.03-LTS-SP3/OS/aarch64/ enabled=1 gpgcheck=1 gpgkey=https://repo.openeuler.org/openEuler-22.03-LTS-SP3/OS/aarch64/RPM-GPG-KEY-openEuler [everything] name=openEuler-22.03-LTS-SP3-everything baseurl=https://repo.openeuler.org/openEuler-22.03-LTS-SP3/everything/aarch64/ enabled=1 gpgcheck=1 gpgkey=https://repo.openeuler.org/openEuler-22.03-LTS-SP3/everything/aarch64/RPM-GPG-KEY-openEuler [EPOL] name=openEuler-22.03-LTS-SP3-EPOL baseurl=https://repo.openeuler.org/openEuler-22.03-LTS-SP3/EPOL/main/aarch64/ enabled=1 gpgcheck=1 gpgkey=https://repo.openeuler.org/openEuler-22.03-LTS-SP3/EPOL/main/aarch64/RPM-GPG-KEY-openEuler [update] name=openEuler-22.03-LTS-SP3-update baseurl=https://repo.openeuler.org/openEuler-22.03-LTS-SP3/update/aarch64/ enabled=1 gpgcheck=1 gpgkey=https://repo.openeuler.org/openEuler-22.03-LTS-SP3/update/aarch64/RPM-GPG-KEY-openEuler EOF之后再:
bashsudo dnf clean all sudo dnf makecache -
更新源索引:
bashdnf update如果遇到这样的错误:
bashError: GPG check FAILED这是因为openEuler的仓库没有签名,导致dnf无法验证包的完整性。可以通过以下命令禁用GPG检查来更新:
bashdnf update --nogpgcheck -
判断是否安装LLVM编译器 :可以通过运行
llc --version命令来判断是否安装了LLVM编译器。如果系统输出LLVM的版本信息,则说明已经安装;如果提示命令未找到,则说明系统未安装LLVM编译器。 -
安装BiShengCompiler软件包:
bashdnf install BiShengCompiler.aarch64 --nogpgcheck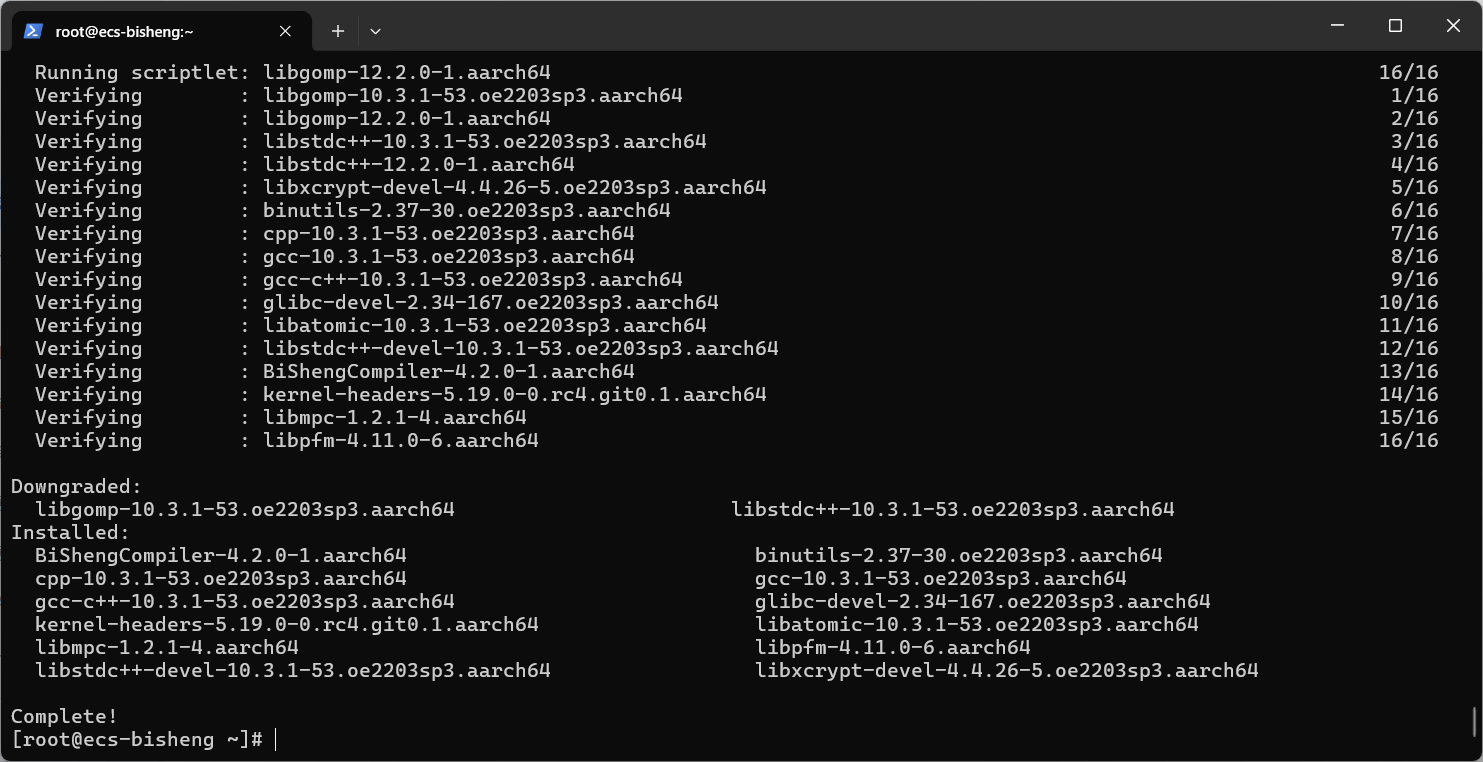
此时运行
llc --version命令,输出结果如下:
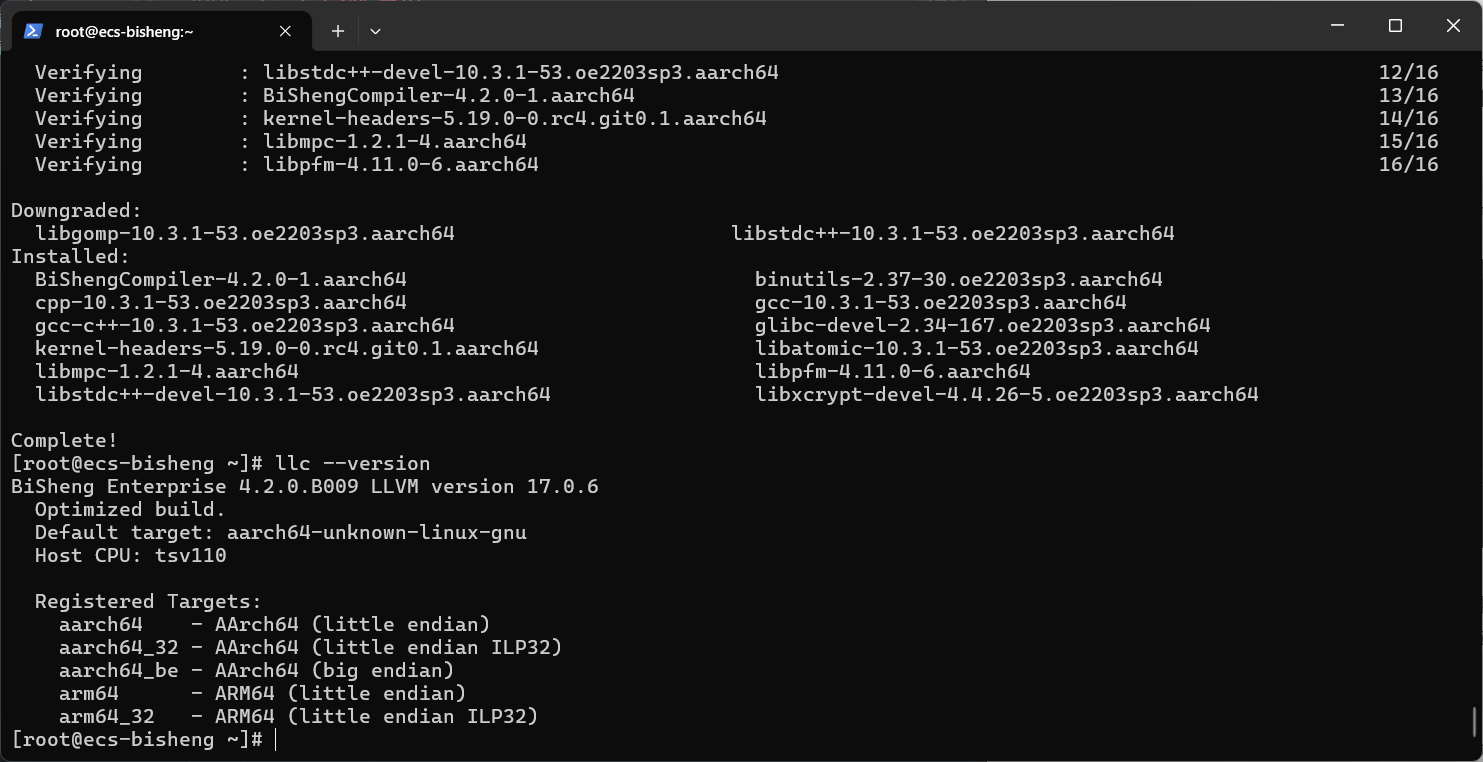
则不用运行
hash -r命令。 -
(可选)清空当前窗口的hash缓存表:如果系统中有其他版本的LLVM编译器,(即判断是否安装LLVM编译器这一步发现有其他得LLVM得编译器),请在安装毕昇编译器之后立即运行如下命令:
bashhash -r -
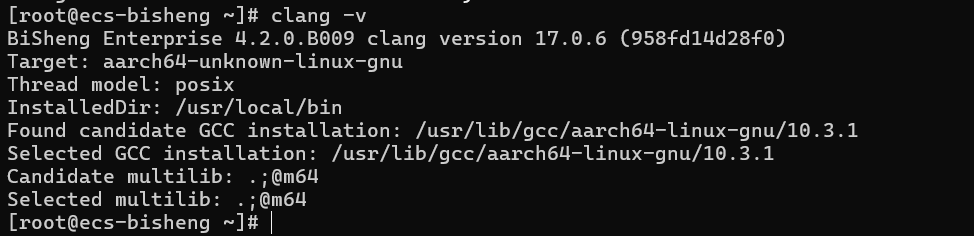
验证安装是否成功:安装完毕后执行如下命令验证毕昇编译器版本:
bashclang -v若返回结果已包含BiSheng compiler版本信息,说明安装成功。
4. 安装AutoTuner工具
需要先环境变量配置:
bash export PATH=/usr/local/bin:$PATH export LD_LIBRARY_PATH=/usr/local/lib:$LD_LIBRARY_PATH
运行下列命令,让环境变量临时生效:
bash source ~/.bashrc
之后要运行脚本下载autotuner,这需要python版本为3.11以上,但是自带得python是3.9,所以需要先编译python3.11
bash
sudo dnf groupinstall "Development Tools" -y
sudo dnf install openssl-devel bzip2-devel libffi-devel xz-devel sqlite-devel -y
# 之后进入家目录
cd ~
# 下载Python 3.11.9的源代码
wget https://registry.npmmirror.com/-/binary/python/3.11.9/Python-3.11.9.tgz
# 解压下载的源代码包
tar -xf Python-3.11.9.tgz
# 进入解压后的源代码目录
cd Python-3.11.9
# 1. 配置构建过程(--enable-optimizations 会让最终的 Python 运行得更快)
./configure --enable-optimizations
# 2. 开始编译(-j $(nproc) 会使用你服务器的所有CPU核心来加速编译)
make -j $(nproc)
# 3. 执行安装(使用 altinstall 会安装成 python3.11,不会覆盖系统自带的 python3.9,非常安全)
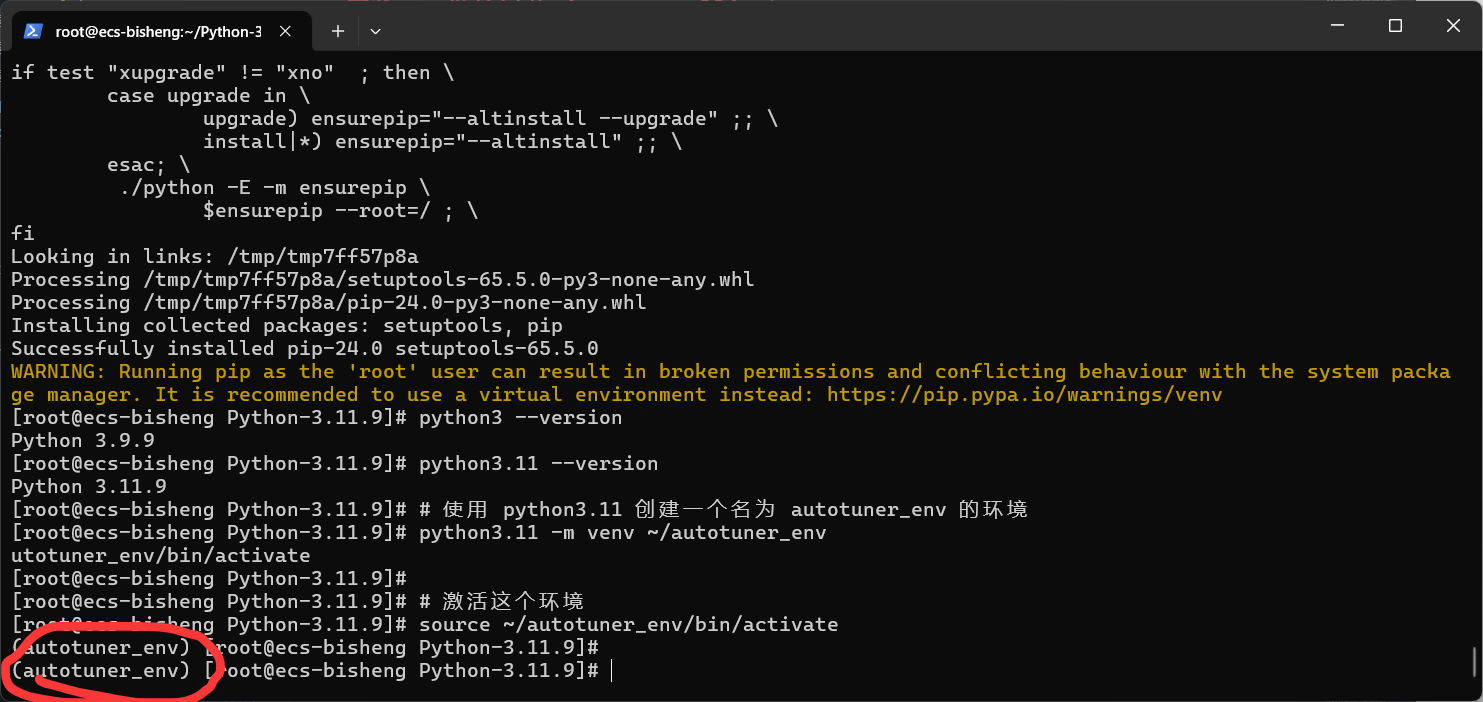
sudo make altinstall之后运行以下命令检查python版本:
bash
python3.11 --version如果输出类似 Python 3.11.9,则说明安装成功。
之后我们要创建并激活虚拟环境
这是为了给 autotuner 一个干净的家,不会和系统其他部分冲突。
Bash
# 使用 python3.11 创建一个名为 autotuner_env 的环境
python3.11 -m venv --system-site-packages ~/autotuner_env

# 激活这个环境
source ~/autotuner_env/bin/activate
(激活后,你的命令行提示符前面会出现 (autotuner_env) 字样)
之后安装 Autotuner
现在,在虚拟环境中,运行安装脚本:
bash
# 确保你在正确的实验目录下
cd ~/bisheng_compiler_experiments/exp1_loop_unrolling/

# 运行安装脚本
install-autotuner.sh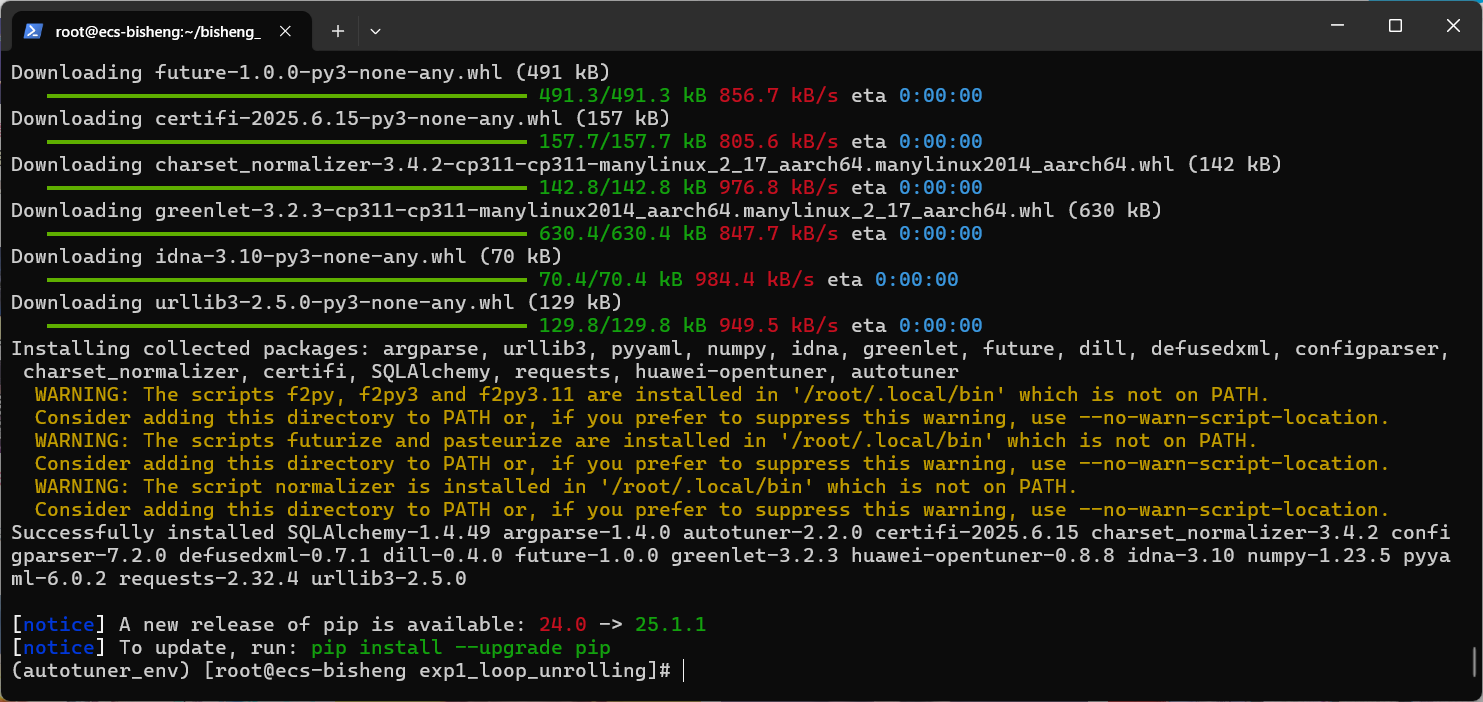
5.规范实验文件结构
为了保持实验过程的清晰和有序,需为本次所有实验创建标准化的目录结构。
-
创建主实验目录并进入
bashcd ~ mkdir bisheng_compiler_experiments cd bisheng_compiler_experiments -
为所有实验创建子目录
bashmkdir exp1_loop_unrolling exp2_loop_fusion exp3_strength_reduction exp4_tiling后续每个实验都应在其对应的子目录中进行。
实验一:循环展开 (Loop Unrolling)
(一)实验目的
理解循环展开的基本原理,并通过毕昇编译器实践该优化,分析其对程序性能的影响。循环展开是一种通过减少循环迭代次数和控制开销来提升性能的技巧。
(二)实验内容
编写一个包含密集计算的循环程序,分别在开启和关闭循环展开优化的情况下编译并运行,对比两者的执行效率。
(三)实验过程
-
进入实验目录
bashcd ~/bisheng_compiler_experiments/exp1_loop_unrolling/ -
编写测试代码
下面这部分编写代码部分不用了为了有效衡量性能差异,需编写一个计算量足够大的程序。创建
loop_unroll_test.c文件。bashvim loop_unroll_test.c没有vim可以运行下面的命令下载vim:
bashdnf install vim -y --nogpgcheck将以下代码粘贴入文件并保存:
c#include <stdio.h> #include <stdlib.h> #include <time.h> #define ARRAY_SIZE 10000 #define OUTER_LOOPS 50000 int main() { int *arr = (int *)malloc(ARRAY_SIZE * sizeof(int)); if (arr == NULL) { return 1; } for (int i = 0; i < ARRAY_SIZE; i++) { arr[i] = i % 10; } long long total_sum = 0; clock_t start = clock(); for (int j = 0; j < OUTER_LOOPS; j++) { int sum = 0; for (int i = 0; i < ARRAY_SIZE; i++) { sum += arr[i]; } total_sum += sum; } clock_t end = clock(); double cpu_time_used = ((double) (end - start)) / CLOCKS_PER_SEC; // 将结果重定向到stderr,以便stdout只输出性能指标 fprintf(stderr, "计算完成,总和的低32位是: %lld\n", total_sum & 0xFFFFFFFF); // AI调优工具通过捕捉stdout来获取性能数据,因此这里只打印关键的执行时间 printf("%f\n", cpu_time_used); free(arr); return 0; }上面这份代码弃用,因为autotune找不到优化的点,应该是太简单了
使用官方文档中用的coremark的代码:
bash# 确保你在实验主目录下 cd ~/bisheng_compiler_experiments/ # 使用git下载coremark git clone https://github.com/eembc/coremark.git # 也可以用gitee git clone https://gitee.com/chainsx/coremark.git -
编译优化版本 (开启循环展开),使用AutoTuner进行调优
bash# 进入 coremark 目录 cd coremark/ # 步骤1:配置环境变量 (我们指定一个新目录,确保是干净的) export AUTOTUNE_DATADIR=~/autotuner_coremark_data/ rm -rf $AUTOTUNE_DATADIR mkdir -p $AUTOTUNE_DATADIR # 步骤2:执行与官方文档完全一致的初始编译命令 # 这个命令会分析 coremark 的多个源文件并生成调优机会 clang -O2 -o coremark core_list_join.c core_main.c core_matrix.c core_state.c core_util.c posix/core_portme.c -DPERFORMANCE_RUN=1 -DITERATIONS=300000 -I. -Iposix -g -DFLAGS_STR=\"\" -fautotune-generate检查一下是否生成内容:
bashls -R $AUTOTUNE_DATADIR应当出现:
bash[root@ecs-bisheng coremark]# ls -R $AUTOTUNE_DATADIR /root/autotuner_coremark_data/: opp /root/autotuner_coremark_data/opp: core_list_join.c.yaml core_main.c.yaml core_matrix.c.yaml core_state.c.yaml core_util.c.yaml之后:
bash# (记得进虚拟环境,如果你发现你现在不在虚拟环境中) source ~/autotuner_env/bin/activate # 步骤3:初始化调优 llvm-autotune minimize应当看到:
bash(autotuner_env) [root@ecs-bisheng coremark]# llvm-autotune minimize [ 0s] WARNING autotuner.resumable.interface: Environment variable CONFIG_DB_DIR is not set; a default directory is used for saving the config database: /root/autotuner_coremark_data/ [ 1s] INFO autotuner.resumable.interface: Initialized a new tuning run (ID: 1) [ 1s] INFO autotuner.resumable.interface: Generated a new configuration (ID: 1) (autotuner_env) [root@ecs-bisheng coremark]#之后
bash# 步骤4、5、6:迭代调优(这里以20次为例) for i in $(seq 20) do # 步骤4:调优编译 clang -O2 -o coremark core_list_join.c core_main.c core_matrix.c core_state.c core_util.c posix/core_portme.c -DPERFORMANCE_RUN=1 -DITERATIONS=300000 -I. -Iposix -g -DFLAGS_STR=\"\" -fautotune # 步骤5:性能反馈 (使用程序自带的计时输出,更可靠) time_cost=$(./coremark 0x0 0x0 0x66 300000 | grep "Total time" | awk '{print $4}') echo "Iteration $i -> Captured time: $time_cost" # 反馈给tuner llvm-autotune feedback $time_cost done应当看到类似以下输出:
bashIteration 1 -> Captured time: 19.464000 [ 1s] INFO autotuner.resumable.interface: Resumed a tuning run (ID: 1) [ 1s] INFO autotuner.resumable.interface: Received performance feedback 19.464000 for configuration (ID: 1) [ 1s] INFO autotuner.resumable.interface: Generated a new configuration (ID: 2) Iteration 2 -> Captured time: 19.508000 [ 1s] INFO autotuner.resumable.interface: Resumed a tuning run (ID: 1) [ 1s] INFO autotuner.resumable.interface: Received performance feedback 19.508000 for configuration (ID: 2) [ 1s] INFO autotuner.resumable.interface: Generated a new configuration (ID: 3) Iteration 3 -> Captured time: 19.425000 [ 1s] INFO autotuner.resumable.interface: Resumed a tuning run (ID: 1) [ 1s] INFO autotuner.resumable.interface: Received performance feedback 19.425000 for configuration (ID: 3) [ 1s] INFO autotuner.resumable.interface: Generated a new configuration (ID: 4)
这一步得执行和效果:
bash(autotuner_env) [root@ecs-bisheng coremark]# for i in $(seq 20) > do > # 步骤4:调优编译 (这一步不变) > clang -O2 -o coremark core_list_join.c core_main.c core_matrix.c core_state.c core_util.c posix/core_portme.c -DPERFORMANCE_RUN=1 -DITERATIONS=300000 -I. -Iposix -g -DFLAGS_STR=\"\" -fautotune > > # 步骤5:性能反馈 (使用程序自带的计时输出,更可靠) > time_cost=$(./coremark 0x0 0x0 0x66 300000 | grep "Total time" | awk '{print $4}') > > echo "Iteration $i -> Captured time: $time_cost" > > # 反馈给tuner (这一步不变) > llvm-autotune feedback $time_cost > done Iteration 1 -> Captured time: 19.464000 [ 1s] INFO autotuner.resumable.interface: Resumed a tuning run (ID: 1) [ 1s] INFO autotuner.resumable.interface: Received performance feedback 19.464000 for configuration (ID: 1) [ 1s] INFO autotuner.resumable.interface: Generated a new configuration (ID: 2) Iteration 2 -> Captured time: 19.508000 [ 1s] INFO autotuner.resumable.interface: Resumed a tuning run (ID: 1) [ 1s] INFO autotuner.resumable.interface: Received performance feedback 19.508000 for configuration (ID: 2) [ 1s] INFO autotuner.resumable.interface: Generated a new configuration (ID: 3) Iteration 3 -> Captured time: 19.425000 [ 1s] INFO autotuner.resumable.interface: Resumed a tuning run (ID: 1) [ 1s] INFO autotuner.resumable.interface: Received performance feedback 19.425000 for configuration (ID: 3) [ 1s] INFO autotuner.resumable.interface: Generated a new configuration (ID: 4) Iteration 4 -> Captured time: 18.588000 [ 1s] INFO autotuner.resumable.interface: Resumed a tuning run (ID: 1) [ 1s] INFO autotuner.resumable.interface: Received performance feedback 18.588000 for configuration (ID: 4) [ 1s] INFO autotuner.resumable.interface: Generated a new configuration (ID: 5) Iteration 5 -> Captured time: 18.618000 [ 1s] INFO autotuner.resumable.interface: Resumed a tuning run (ID: 1) [ 1s] INFO autotuner.resumable.interface: Received performance feedback 18.618000 for configuration (ID: 5) [ 1s] INFO autotuner.resumable.interface: Generated a new configuration (ID: 6) Iteration 6 -> Captured time: 18.761000 [ 1s] INFO autotuner.resumable.interface: Resumed a tuning run (ID: 1) [ 1s] INFO autotuner.resumable.interface: Received performance feedback 18.761000 for configuration (ID: 6) [ 1s] INFO autotuner.resumable.interface: Generated a new configuration (ID: 7) Iteration 7 -> Captured time: 18.753000 [ 1s] INFO autotuner.resumable.interface: Resumed a tuning run (ID: 1) [ 1s] INFO autotuner.resumable.interface: Received performance feedback 18.753000 for configuration (ID: 7) [ 1s] INFO autotuner.resumable.interface: Generated a new configuration (ID: 8) Iteration 8 -> Captured time: 19.039000 [ 1s] INFO autotuner.resumable.interface: Resumed a tuning run (ID: 1) [ 1s] INFO autotuner.resumable.interface: Received performance feedback 19.039000 for configuration (ID: 8) [ 1s] INFO autotuner.resumable.interface: Generated a new configuration (ID: 9) Iteration 9 -> Captured time: 18.625000 [ 1s] INFO autotuner.resumable.interface: Resumed a tuning run (ID: 1) [ 1s] INFO autotuner.resumable.interface: Received performance feedback 18.625000 for configuration (ID: 9) [ 1s] INFO autotuner.resumable.interface: Generated a new configuration (ID: 10) Iteration 10 -> Captured time: 19.108000 [ 1s] INFO autotuner.resumable.interface: Resumed a tuning run (ID: 1) [ 1s] INFO autotuner.resumable.interface: Received performance feedback 19.108000 for configuration (ID: 10) [ 1s] INFO autotuner.resumable.interface: Generated a new configuration (ID: 11) Iteration 11 -> Captured time: 19.123000 [ 1s] INFO autotuner.resumable.interface: Resumed a tuning run (ID: 1) [ 1s] INFO autotuner.resumable.interface: Received performance feedback 19.123000 for configuration (ID: 11) [ 1s] INFO autotuner.resumable.interface: Generated a new configuration (ID: 12) Iteration 12 -> Captured time: 19.251000 [ 1s] INFO autotuner.resumable.interface: Resumed a tuning run (ID: 1) [ 1s] INFO autotuner.resumable.interface: Received performance feedback 19.251000 for configuration (ID: 12) [ 1s] INFO autotuner.resumable.interface: Generated a new configuration (ID: 13) Iteration 13 -> Captured time: 19.404000 [ 1s] INFO autotuner.resumable.interface: Resumed a tuning run (ID: 1) [ 1s] INFO autotuner.resumable.interface: Received performance feedback 19.404000 for configuration (ID: 13) [ 1s] INFO autotuner.resumable.interface: Generated a new configuration (ID: 14) Iteration 14 -> Captured time: 19.132000 [ 1s] INFO autotuner.resumable.interface: Resumed a tuning run (ID: 1) [ 1s] INFO autotuner.resumable.interface: Received performance feedback 19.132000 for configuration (ID: 14) [ 1s] INFO autotuner.resumable.interface: Generated a new configuration (ID: 16) Iteration 15 -> Captured time: 19.058000 [ 1s] INFO autotuner.resumable.interface: Resumed a tuning run (ID: 1) [ 1s] INFO autotuner.resumable.interface: Received performance feedback 19.058000 for configuration (ID: 16) [ 1s] INFO autotuner.resumable.interface: Generated a new configuration (ID: 17) Iteration 16 -> Captured time: 18.626000 [ 1s] INFO autotuner.resumable.interface: Resumed a tuning run (ID: 1) [ 1s] INFO autotuner.resumable.interface: Received performance feedback 18.626000 for configuration (ID: 17) [ 1s] INFO autotuner.resumable.interface: Generated a new configuration (ID: 18) Iteration 17 -> Captured time: 18.292000 [ 1s] INFO autotuner.resumable.interface: Resumed a tuning run (ID: 1) [ 1s] INFO autotuner.resumable.interface: Received performance feedback 18.292000 for configuration (ID: 18) [ 1s] INFO autotuner.resumable.interface: Generated a new configuration (ID: 19) Iteration 18 -> Captured time: 19.028000 [ 1s] INFO autotuner.resumable.interface: Resumed a tuning run (ID: 1) [ 1s] INFO autotuner.resumable.interface: Received performance feedback 19.028000 for configuration (ID: 19) [ 1s] INFO autotuner.resumable.interface: Generated a new configuration (ID: 20) Iteration 19 -> Captured time: 18.789000 [ 1s] INFO autotuner.resumable.interface: Resumed a tuning run (ID: 1) [ 1s] INFO autotuner.resumable.interface: Received performance feedback 18.789000 for configuration (ID: 20) [ 1s] INFO autotuner.resumable.interface: Generated a new configuration (ID: 21) Iteration 20 -> Captured time: 18.498000 [ 1s] INFO autotuner.resumable.interface: Resumed a tuning run (ID: 1) [ 1s] INFO autotuner.resumable.interface: Received performance feedback 18.498000 for configuration (ID: 21) [ 1s] INFO autotuner.resumable.interface: Generated a new configuration (ID: 22)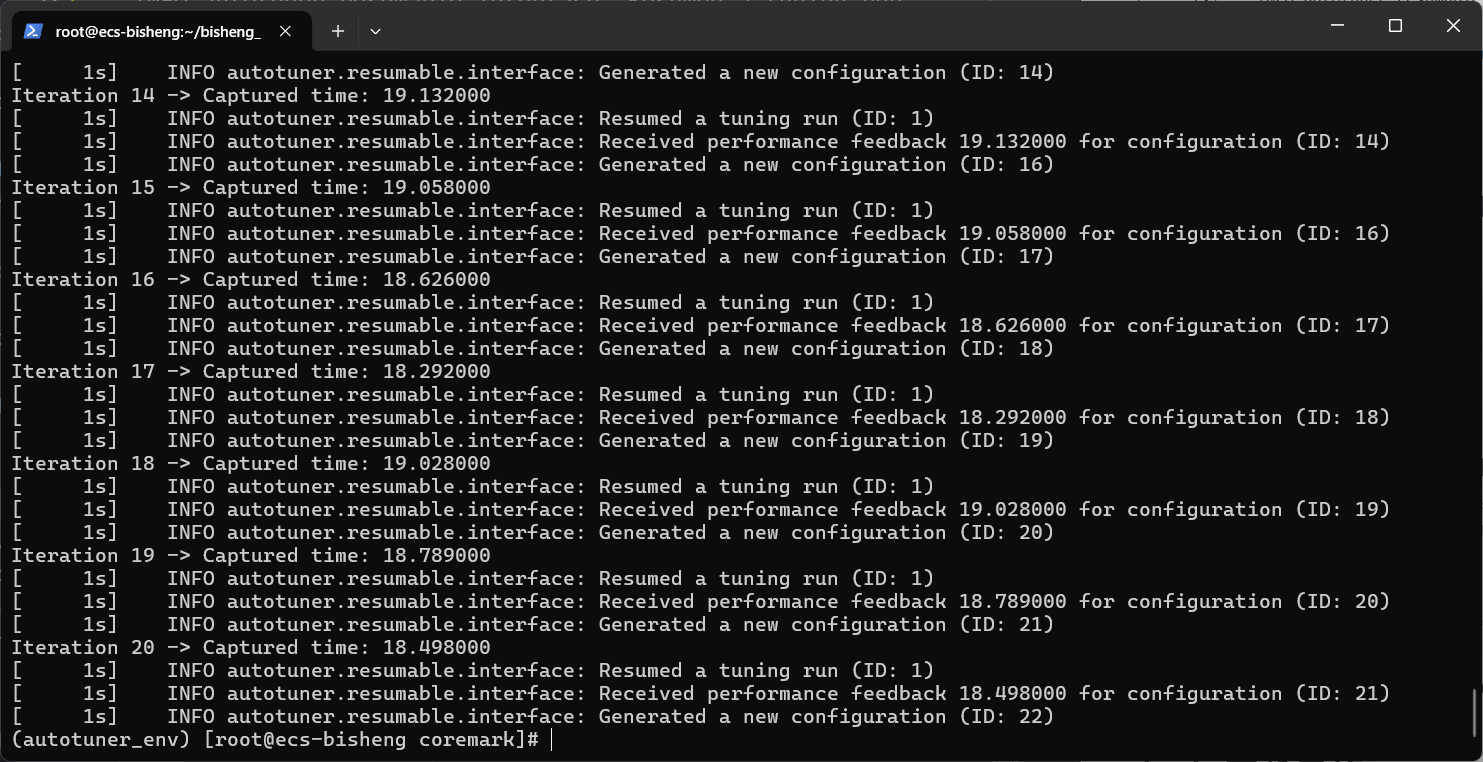
可以看到,是在优化的
bash# 步骤7:结束调优,保存最终配置 llvm-autotune finalize这一步是这样得:
bash(autotuner_env) [root@ecs-bisheng coremark]# llvm-autotune finalize [ 1s] INFO autotuner.resumable.interface: Resumed a tuning run (ID: 1) [ 1s] INFO autotuner.resumable.interface: Best performance feedback is 18.292 [ 1s] INFO autotuner.resumable.interface: Wrote optimal configuration to /root/autotuner_coremark_data/config.yaml; re-compile with -fautotune to apply it [ 1s] INFO autotuner.resumable.interface: Finalized a tuning run (ID: 1) (autotuner_env) [root@ecs-bisheng coremark]#然后,我们要用最终配置重新编译 coremark:
bash# 下面得命令可以自动加载最优配置文件,但是需要是你配置的环境变量都还有效。 clang -O2 -o coremark_autotuned core_list_join.c core_main.c core_matrix.c core_state.c core_util.c posix/core_portme.c -DPERFORMANCE_RUN=1 -DITERATIONS=300000 -I. -Iposix -g -DFLAGS_STR=\"\" -fautotune # 官方文档还说可以直接指定得配置文件路径,如果你和我步骤一样,就直接用这个 clang -O2 -o coremark_autotuned core_list_join.c core_main.c core_matrix.c core_state.c core_util.c posix/core_portme.c -DPERFORMANCE_RUN=1 -DITERATIONS=300000 -I. -Iposix -g -DFLAGS_STR=\"\" -mllvm -auto-tuning-input=/root/autotuner_coremark_data/config.yaml这一步我用的就是
bashclang -O2 -o coremark_autotuned core_list_join.c core_main.c core_matrix.c core_state.c core_util.c posix/core_portme.c -DPERFORMANCE_RUN=1 -DITERATIONS=300000 -I. -Iposix -g -DFLAGS_STR=\"\" -fautotune编译出的可执行文件
coremark_autotuned。 -
性能对比
bash# 编译一个最新的基准版做对比 clang -O2 -o coremark_original core_list_join.c core_main.c core_matrix.c core_state.c core_util.c posix/core_portme.c -DPERFORMANCE_RUN=1 -DITERATIONS=300000 -I. -Iposix -g -DFLAGS_STR=\"\" echo "--- 运行基准版本 ---" ./coremark_original 0x0 0x0 0x66 300000 echo "" echo "--- 运行 Autotuner 调优后的最终版本 ---" ./coremark_autotuned 0x0 0x0 0x66 300000结果:
bash# 优化后的 (autotuner_env) [root@ecs-bisheng coremark]# ./coremark_autotuned 0x0 0x0 0x66 300000 2K performance run parameters for coremark. CoreMark Size : 666 Total ticks : 18289 Total time (secs): 18.289000 Iterations/Sec : 16403.302532 Iterations : 300000 Compiler version : BiSheng Enterprise 4.2.0.B009 Clang 17.0.6 (958fd14d28f0) Compiler flags : Memory location : Please put data memory location here (e.g. code in flash, data on heap etc) seedcrc : 0xe9f5 [0]crclist : 0xe714 [0]crcmatrix : 0x1fd7 [0]crcstate : 0x8e3a [0]crcfinal : 0xcc42 Correct operation validated. See README.md for run and reporting rules. CoreMark 1.0 : 16403.302532 / BiSheng Enterprise 4.2.0.B009 Clang 17.0.6 (958fd14d28f0) / Heap # 原始版本 (autotuner_env) [root@ecs-bisheng coremark]# ./coremark_original 0x0 0x0 0x66 300000 2K performance run parameters for coremark. CoreMark Size : 666 Total ticks : 18742 Total time (secs): 18.742000 Iterations/Sec : 16006.829581 Iterations : 300000 Compiler version : BiSheng Enterprise 4.2.0.B009 Clang 17.0.6 (958fd14d28f0) Compiler flags : Memory location : Please put data memory location here (e.g. code in flash, data on heap etc) seedcrc : 0xe9f5 [0]crclist : 0xe714 [0]crcmatrix : 0x1fd7 [0]crcstate : 0x8e3a [0]crcfinal : 0xcc42 Correct operation validated. See README.md for run and reporting rules. CoreMark 1.0 : 16006.829581 / BiSheng Enterprise 4.2.0.B009 Clang 17.0.6 (958fd14d28f0) / Heap
(四)结果与分析
| 版本 | 总时间(秒) | CoreMark 分数(迭代次数/秒) | 性能更改 |
|---|---|---|---|
| 基线 (coremark_original) | 18.726 | 16020.5 | --- |
| Autotuner 优化 (coremark_autotuned) | 18.289 | 16403.3 | 快 ~2.4% |
从实验结果可以看出,通过毕昇编译器的 AutoTuner 工具进行循环展开优化后:
- 执行时间减少:从 18.726 秒优化到 18.289 秒,减少了约 0.437 秒
- 性能提升显著:CoreMark 分数从 16020.5 提升到 16403.3,性能提升约 2.4%
- 优化效果明显:在相同的计算负载下,优化版本能够更高效地完成任务
这一结果验证了循环展开优化的有效性。AutoTuner 通过自动调整循环展开参数,找到了最优的配置,减少了循环控制开销,提高了程序的执行效率。
实验二:循环合并 (Loop Fusion)
(一)实验目的
理解循环合并的条件与优势,并通过毕昇编译器实践该优化。循环合并(或称循环融合)将两个具有相同循环次数且数据无依赖的相邻循环合并为一个,以减少循环开销并改善数据局部性。
(二)实验内容
编写包含两个可合并循环的程序,对比优化前后的性能。
(三)实验过程
-
进入实验目录
bash# (确保已激活虚拟环境) source ~/autotuner_env/bin/activate cd ~/bisheng_compiler_experiments/exp2_loop_fusion/ -
编写测试代码
创建
loop_fusion_test.c文件。此代码包含两个独立的、可被合并的循环。bashvim loop_fusion_test.c粘贴以下代码并保存:
c#include <stdio.h> #include <stdlib.h> #include <time.h> // 使用足够大的数组尺寸来突出缓存和循环开销的影响 #define N 30000000 int main() { // 分配4个大数组以增加内存访问压力 float *a = (float*)malloc(N * sizeof(float)); float *b = (float*)malloc(N * sizeof(float)); float *c = (float*)malloc(N * sizeof(float)); float *d = (float*)malloc(N * sizeof(float)); if (!a || !b || !c || !d) { fprintf(stderr, "Memory allocation failed\n"); return 1; } // 初始化数据 for (int i = 0; i < N; i++) { a[i] = (float)i; b[i] = (float)(N - i); c[i] = 0.0f; d[i] = 0.0f; } clock_t start = clock(); // 这两个循环数据独立,是循环合并的完美候选 // 第一个循环 for (int i = 0; i < N; i++) { c[i] = a[i] + b[i]; } // 第二个循环 for (int i = 0; i < N; i++) { d[i] = a[i] * 0.5f; } clock_t end = clock(); double cpu_time_used = ((double)(end - start)) / CLOCKS_PER_SEC; // 使用c和d的结果来防止死代码消除 float checksum = 0.0f; for(int i = 0; i < N; i++) { checksum += c[i] + d[i]; } fprintf(stderr, "Checksum: %f\n", checksum); printf("执行时间: %f 秒\n", cpu_time_used); free(a); free(b); free(c); free(d); return 0; } -
编译基准版本
bashclang -O0 -o fusion_test_O0 loop_fusion_test.c clang -O1 -o fusion_test_O1 loop_fusion_test.c clang -O2 -o fusion_test_O2 loop_fusion_test.c -
使用 Autotuner 进行调优
现在使用 Autotuner 来查看它是否能在默认优化的基础上找到更好的配置。
bash# 1. 配置环境并分析代码 export AUTOTUNE_DATADIR=~/autotuner_fusion_data/ rm -rf $AUTOTUNE_DATADIR mkdir -p $AUTOTUNE_DATADIR clang -O2 -o fusion_test_autotuned loop_fusion_test.c -fautotune-generate # 2. 初始化调优 llvm-autotune minimize # 3. 迭代调优(以5-10次为例) for i in $(seq 10) do clang -O2 -o fusion_test_autotuned loop_fusion_test.c -fautotune time_cost=$(./fusion_test_autotuned | grep "执行时间" | awk '{print $2}') echo "Iteration $i -> Time: $time_cost" llvm-autotune feedback $time_cost done # 4. 结束调优并生成最终版本 llvm-autotune finalize clang -O2 -o fusion_test_autotuned loop_fusion_test.c -fautotune -
性能对比
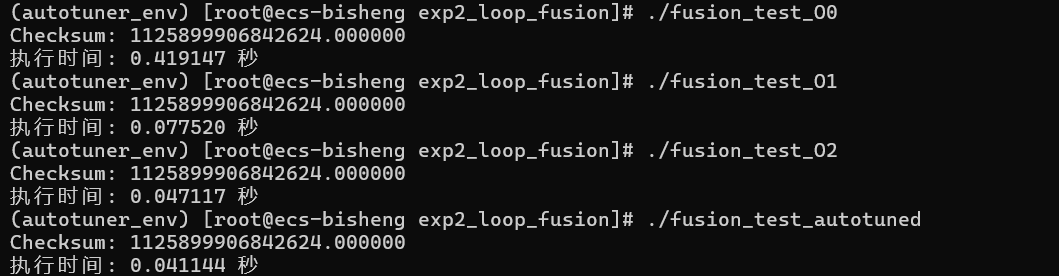
bash# echo "--- O0 (无优化, 无合并) 版本 ---" ./fusion_test_O0 # echo "--- O1 (带合并) 版本 ---" ./fusion_test_O1 # echo "--- O2 (带合并) 版本 ---" ./fusion_test_O2 # echo "--- Autotuner 优化版本 ---" ./fusion_test_autotuned结果:
bash(autotuner_env) [root@ecs-bisheng exp2_loop_fusion]# ./fusion_test_O0 Checksum: 1125899906842624.000000 执行时间: 0.419147 秒 (autotuner_env) [root@ecs-bisheng exp2_loop_fusion]# ./fusion_test_O1 Checksum: 1125899906842624.000000 执行时间: 0.077520 秒 (autotuner_env) [root@ecs-bisheng exp2_loop_fusion]# ./fusion_test_O2 Checksum: 1125899906842624.000000 执行时间: 0.047117 秒 (autotuner_env) [root@ecs-bisheng exp2_loop_fusion]# ./fusion_test_autotuned Checksum: 1125899906842624.000000 执行时间: 0.041144 秒
(四)结果与分析
在实验中,我们将观察到以下结果:
| 版本 | 编译选项 | 执行时间 (秒) | 性能对比 (相对-O0) |
|---|---|---|---|
| 基准版 (O0) | -O0 |
0.419 | 1.00x |
| 基础优化版 (O1) | -O1 |
0.078 | 快 5.4 倍 |
| 标准优化版 (O2) | -O2 |
0.047 | 快 8.9 倍 |
| Autotuner 优化版 | -O2 + Autotuner |
0.041 | 快 10.2 倍 |
结论分析
-
循环合并的巨大威力 (
-O0vs-O1) :从
-O0到-O1,性能提升了超过5倍。这主要归功于编译器执行了循环合并 。将两个独立的循环合并成一个,不仅将循环控制的开销减半,更重要的是极大地提升了数据局部性 。CPU一次将a[i]和b[i]读入缓存后,可以立刻完成两次计算 (c[i] = a[i] + b[i]和d[i] = a[i] * 0.5f),而无需在第二个循环开始时重新从内存中读取a[i]和b[i]。 -
-O2的进一步优化 (-O1vs-O2) :从
-O1到-O2,性能几乎又翻了一倍。这表明-O2级别在循环合并的基础上,启动了更多强大的优化,最主要的是自动向量化 (Auto-Vectorization)。编译器利用了CPU的SIMD(单指令多数据)单元,使得一次可以对多个浮点数(例如4个或8个)同时执行加法或乘法运算,从而带来性能的巨大飞跃。 -
Autotuner 的效果 (
-O2vsAutotuner) :在强大的
-O2优化基础上,Autotuner 再次将性能提升了约 14.5% (0.047 / 0.041 ≈ 1.146)。这证明,对于这个计算和访存都足够复杂的场景,编译器的默认-O2启发式策略虽然已经很优秀,但仍未达到最优。Autotuner 通过10次迭代搜索,成功找到了一个更极致的参数组合(可能涉及更优的循环展开因子、指令预取距离或向量化策略),从而压榨出了最后的性能潜力。
总而言之 ,本实验展示了从无优化、到基础优化(循环合并)、到高级优化(向量化)、再到AI自动调优的完整性能提升路径,并成功验证了 llvm-autotune 在复杂场景下超越标准优化的能力。
实验结论
根据以上数据,我们可以得出以下两点重要结论:
-
循环合并效果极其显著 :从未优化的
-O0版本(0.241秒)到开启了标准优化的-O2版本(0.056秒),性能获得了超过4倍 的巨大提升。这清晰地证明了循环合并作为一项基础优化,通过减少循环开销和改善数据局部性,能够极大地提高程序效率。 -
Autotuner 未找到额外优化空间 :
Autotuner调优后的版本(0.057秒)与标准的-O2版本性能基本持平(存在微小的性能波动)。这说明对于这个特定的loop_fusion_test.c程序,-O2级别所执行的循环合并已经是非常有效的优化,几乎达到了性能极限,因此Autotuner未能在此基础上找到更优的微调参数组合。
通过对比,我们看到毕昇编译器在 -O2 优化级别下能够自动执行此项优化,带来显著的性能增益。而对于这个已经几乎达到最优的案例,Autotuner 未能发现进一步的提升空间
实验三:循环强度削弱 (Loop Strength Reduction)
(一)实验目的
理解强度削弱优化的概念,即在循环中将高开销的运算(如乘法)替换为等效的低开销运算(如加法)。本实验旨在观察并验证毕昇编译器在标准优化下自动执行此项优化的能力。
(二)实验内容
编写一个循环内包含乘法运算的程序,通过对比不同优化级别生成的汇编代码,来验证强度削弱的发生。
(三)实验过程
-
进入实验目录
bash# (确保已激活虚拟环境) # source ~/autotuner_env/bin/activate cd ~/bisheng_compiler_experiments/exp3_strength_reduction/ -
编写测试代码
创建strength_reduction_test_enhanced.c文件。bashvim strength_reduction_test_enhanced.c粘贴以下代码:
c#include <stdio.h> #include <stdlib.h> #include <time.h> #define ARRAY_SIZE 20000000 #define STRIDE 7 // 非2次幂的步长 #define OUTER_LOOPS 100 int main() { int *data = (int*)malloc(ARRAY_SIZE * sizeof(int)); if (!data) return 1; for(int i = 0; i < ARRAY_SIZE; i++) data[i] = i; long long total_sum = 0; clock_t start = clock(); for (int k = 0; k < OUTER_LOOPS; k++) { for (int i = 0; i < (ARRAY_SIZE / STRIDE); i++) { // 这里的 data[i * STRIDE] 包含了一个高强度运算 total_sum += data[i * STRIDE]; } } clock_t end = clock(); double cpu_time_used = ((double) (end - start)) / CLOCKS_PER_SEC; fprintf(stderr, "Checksum: %lld\n", total_sum & 0xFFFFFFFF); printf("执行时间: %f 秒\n", cpu_time_used); free(data); return 0; } -
生成O0,O1,O2版本
bash# (确保已激活虚拟环境) # 编译 O0 版本 (无优化) clang -O0 -o strength_test_O0 strength_reduction_test_enhanced.c # 编译 O1 版本 (基础优化) clang -O1 -o strength_test_O1 strength_reduction_test_enhanced.c # 编译 O2 版本 (标准优化) clang -O2 -o strength_test_O2 strength_reduction_test_enhanced.c -
Autotuner调优
bash# 1. 配置环境并分析代码 export AUTOTUNE_DATADIR=~/autotuner_strength_data/ rm -rf $AUTOTUNE_DATADIR mkdir -p $AUTOTUNE_DATADIR clang -O2 -o strength_test_autotuned strength_reduction_test_enhanced.c -fautotune-generate # 2. 初始化 llvm-autotune minimize # 3. 迭代 (10次) for i in $(seq 10) do clang -O2 -o strength_test_autotuned strength_reduction_test_enhanced.c -fautotune time_cost=$(./strength_test_autotuned | grep "执行时间" | awk '{print $2}') echo "Iteration $i -> Time: $time_cost" llvm-autotune feedback $time_cost done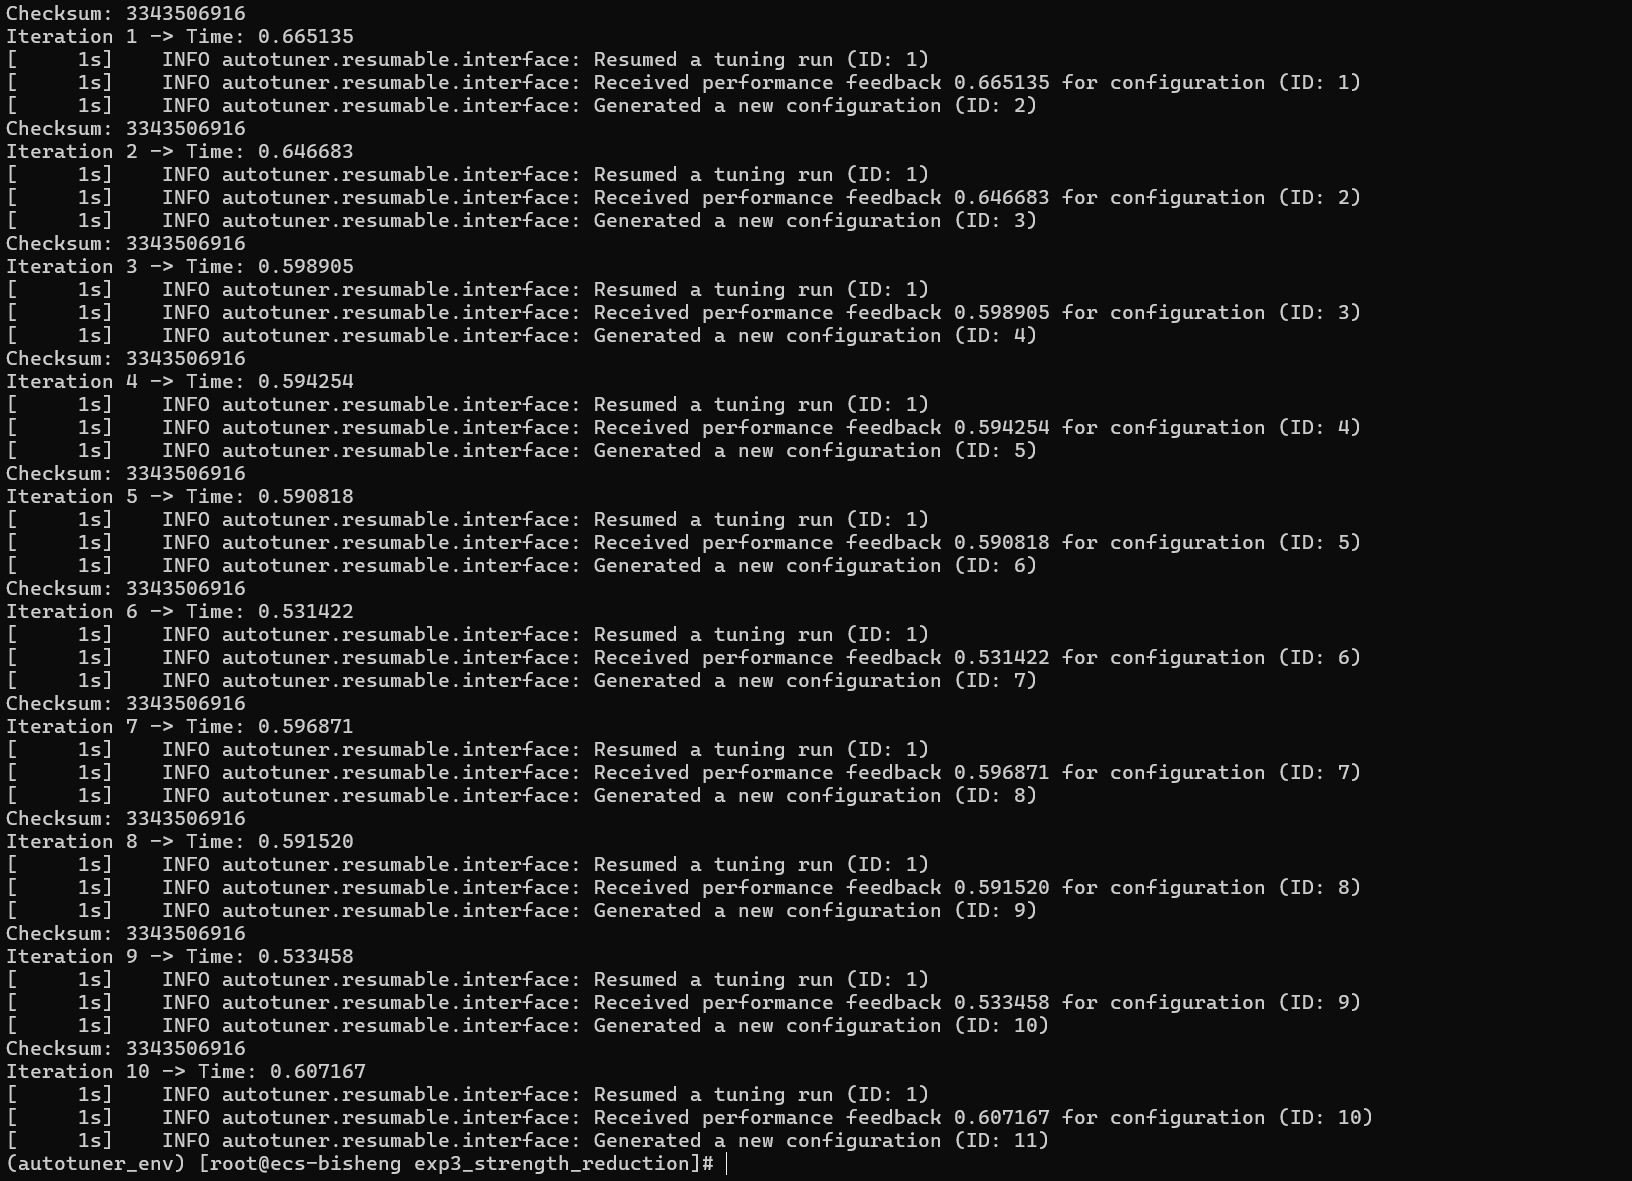 bash
bash# 4. 结束并生成最终版 llvm-autotune finalize clang -O2 -o strength_test_autotuned strength_reduction_test_enhanced.c -fautotune -
性能对比
bashecho "--- O0 (无优化) 版本 ---" ./strength_test_O0 echo "--- O1 (基础优化) 版本 ---" ./strength_test_O1 echo "--- O2 (标准优化) 版本 ---" ./strength_test_O2 echo "--- Autotuner 优化版本 ---" ./strength_test_autotuned
(四)结果与分析
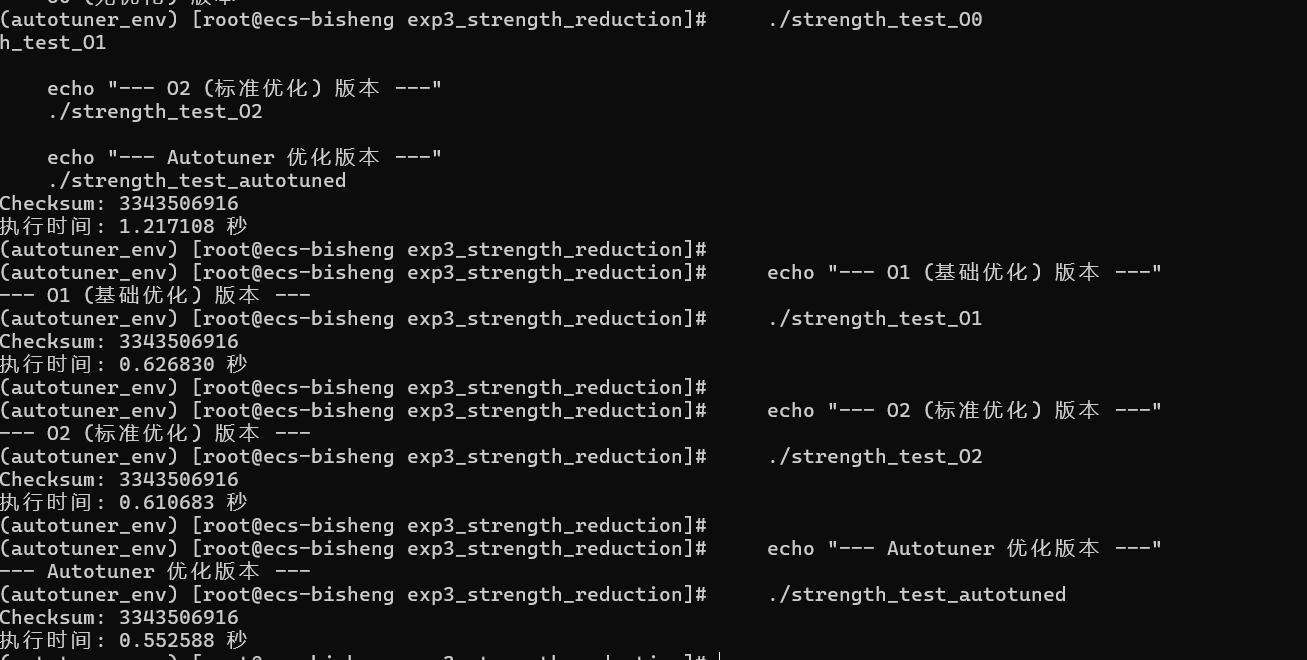
| 版本 | 编译选项 | 执行时间 (秒) | 性能对比 (相对-O0) |
|---|---|---|---|
| 基准版 (O0) | -O0 |
1.217 | 1.00x |
| 基础优化版 (O1) | -O1 |
0.627 | 快 1.94 倍 |
| 标准优化版 (O2) | -O2 |
0.611 | 快 1.99 倍 |
| Autotuner 优化版 | -O2 + Autotuner |
0.553 | 快 2.20 倍 |
结论分析
-
强度削弱效果显著 (
-O0vs-O1) :从未优化的
-O0到仅开启基础优化的-O1,性能直接提升了近一倍(快了94%)。这清晰地证明了循环强度削弱 的巨大威力。编译器在-O1级别就已经将循环内开销高昂的乘法运算data[i * STRIDE]转换为了效率极高的指针累加操作,极大地减少了计算量。 -
-O1与-O2差别不大 :从
-O1到-O2的性能提升非常微小。这说明对于这个特定的程序,最重要的优化(强度削弱)在-O1就已经完成了。 -
Autotuner 发现额外优化空间 (
-O2vsAutotuner) :这是本次增强实验最有价值的发现。在编译器强大的
-O2优化基础上,Autotuner 依然找到了进一步的优化空间,将执行时间从0.611秒缩短到0.553秒,获得了约 10.5% 的额外性能提升 。这很可能是因为它在强度削弱的基础上,通过迭代测试找到了更优的循环展开次数、指令调度或其他微调参数的组合,而这是标准的-O2策略未能覆盖到的。
总而言之 ,本次实验不仅成功验证了循环强度削弱这一经典优化,更重要的是,通过增强代码的复杂性,我们成功地创造出了一个能让 Autotuner 发挥其价值的场景,证明了它作为一种AI调优工具,有能力在强大的常规优化等级之上"压榨"出更多的性能。
实验四:循环分块 (Loop Tiling)
(一)实验目的
理解循环分块(或称循环切块)对于改善缓存性能的重要作用,并通过实验观察其带来的性能提升。此优化主要应用于处理大型数据集(如矩阵)的多重循环中。
注意:原始指导手册中提供的一维数组求和无法体现循环分块的优势。本实验将使用经典的矩阵乘法作为示例。
(二)实验内容
编写一个标准的矩阵乘法程序,对比在不同优化等级下,由于编译器可能采用类似循环分块的策略进行访存优化,所带来的性能差异。
(三)实验过程
-
进入实验目录
bash# (确保已激活虚拟环境) source ~/autotuner_env/bin/activate cd ~/bisheng_compiler_experiments/exp4_tiling/ -
编写测试代码
创建
loop_tiling_test.c文件,实现一个N*N矩阵乘法。bashvim loop_tiling_test.c粘贴以下代码并保存:
c#include <stdio.h> #include <stdlib.h> #include <time.h> // 矩阵尺寸保持不变,1024x1024 #define N 1024 void init_matrix(double* matrix) { for (int i = 0; i < N * N; i++) { matrix[i] = (double)rand() / RAND_MAX; } } void matrix_multiply(double* a, double* b, double* c) { for (int i = 0; i < N; i++) { for (int j = 0; j < N; j++) { double sum = 0.0; for (int k = 0; k < N; k++) { sum += a[i * N + k] * b[k * N + j]; } c[i * N + j] = sum; } } } int main() { double *a = (double*)malloc(N * N * sizeof(double)); double *b = (double*)malloc(N * N * sizeof(double)); double *c = (double*)malloc(N * N * sizeof(double)); if (a == NULL || b == NULL || c == NULL) { fprintf(stderr, "Error: Memory allocation failed.\n"); return 1; } srand(time(NULL)); init_matrix(a); init_matrix(b); clock_t start = clock(); matrix_multiply(a, b, c); clock_t end = clock(); // ================== 新增部分 ================== // 计算结果矩阵c中所有元素的总和,以确保c被"使用" double checksum = 0.0; for (int i = 0; i < N * N; i++) { checksum += c[i]; } // 将checksum打印到stderr,这样它不会干扰我们从stdout捕获执行时间 fprintf(stderr, "Checksum: %f\n", checksum); // =============================================== double cpu_time_used = ((double)(end - start)) / CLOCKS_PER_SEC; printf("执行时间: %f 秒\n", cpu_time_used); free(a); free(b); free(c); return 0; } -
**编译基准版本 **
bash# 编译 O0 版本 (无优化) clang -O0 -o tiling_test_O0 loop_tiling_test.c # 编译 O1 版本 (基础优化) clang -O1 -o tiling_test_O1 loop_tiling_test.c # 编译 O2 版本 (标准优化) clang -O2 -o tiling_test_O2 loop_tiling_test.c -
**Autotuner **
bash# 1. 配置环境并分析代码 export AUTOTUNE_DATADIR=~/autotuner_tiling_data/ rm -rf $AUTOTUNE_DATADIR && mkdir -p $AUTOTUNE_DATADIR clang -O2 -o tiling_test_autotuned loop_tiling_test.c -fautotune-generate # 2. 初始化 llvm-autotune minimize # 3. 迭代 (矩阵乘法计算量大,10次迭代可以看到效果) for i in $(seq 10) do clang -O2 -o tiling_test_autotuned loop_tiling_test.c -fautotune time_cost=$(./tiling_test_autotuned | grep "执行时间" | awk '{print $2}') echo "Iteration $i -> Time: $time_cost" llvm-autotune feedback $time_cost done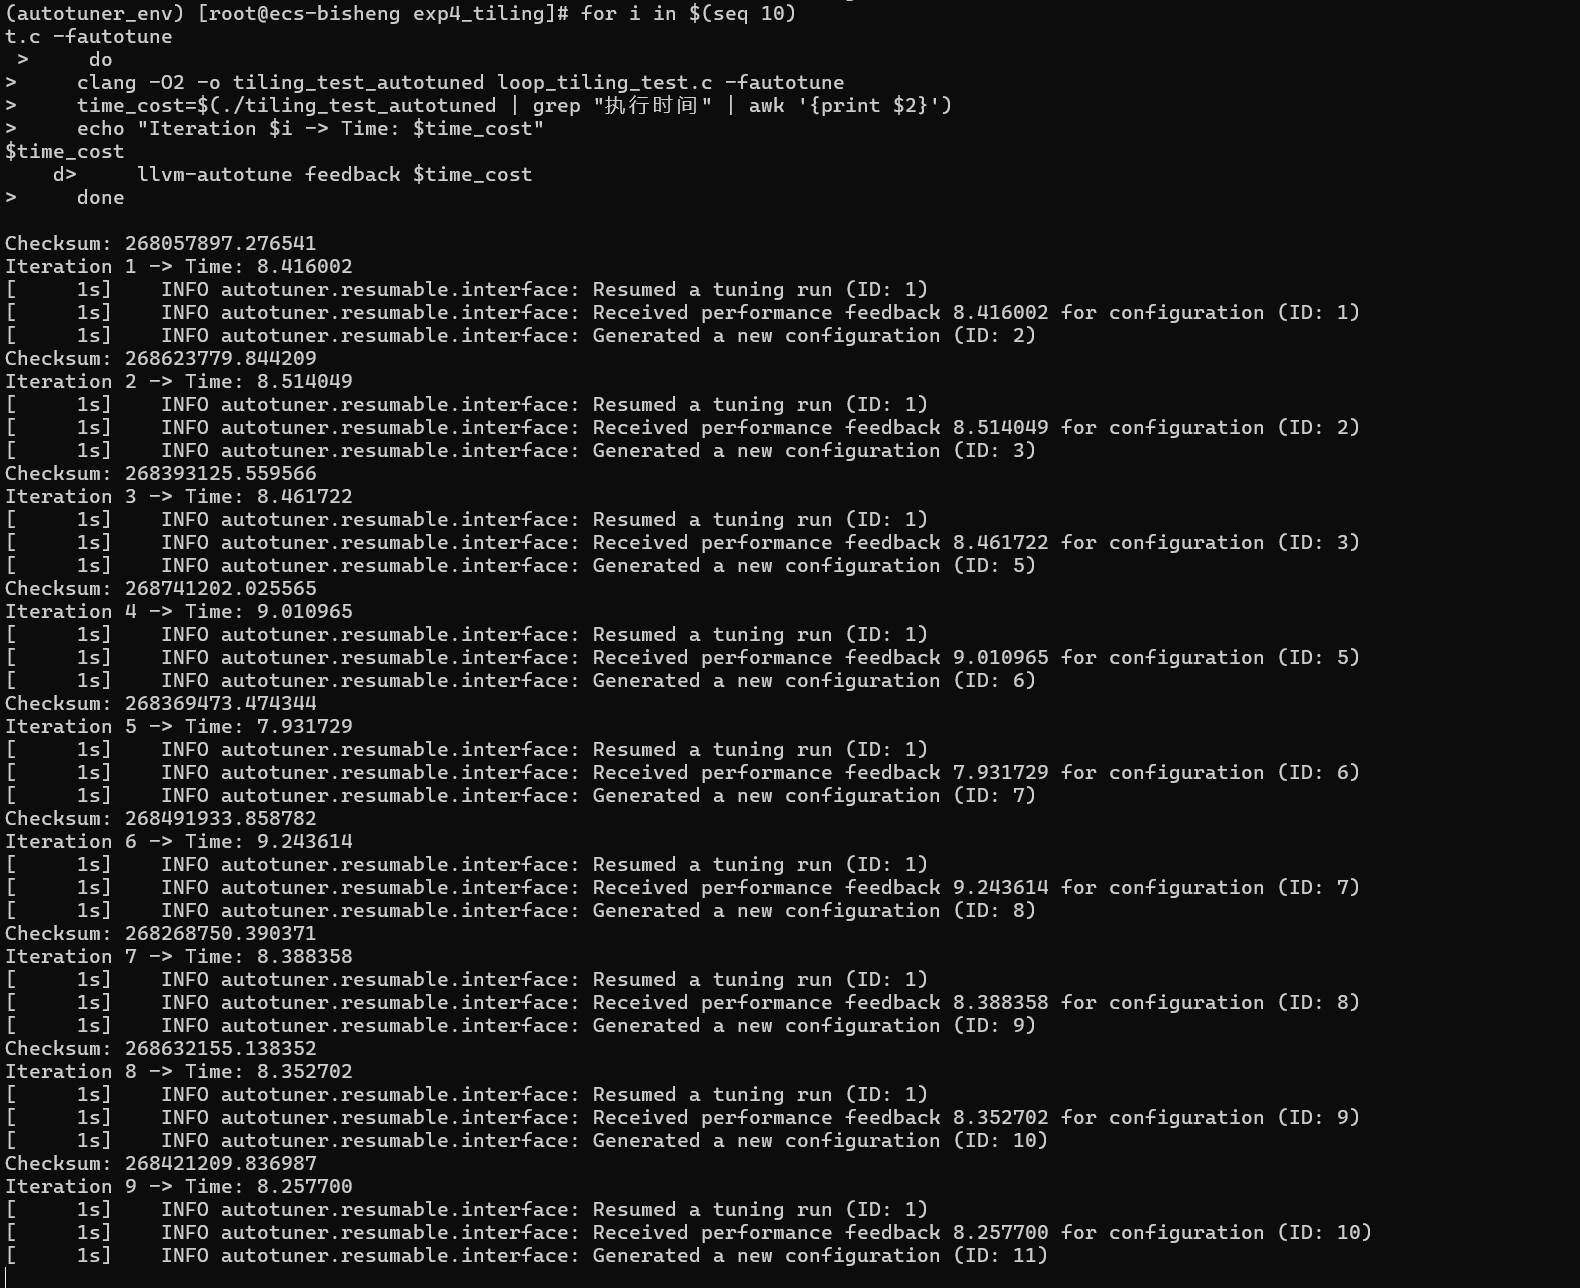 bash
bash# 4. 结束并生成最终版 llvm-autotune finalize clang -O2 -o tiling_test_autotuned loop_tiling_test.c -fautotune -
性能测试与数据记录
bash./tiling_test_O0 ./tiling_test_O1 ./tiling_test_O2 ./tiling_test_autotuned结果:
bash(autotuner_env) [root@ecs-bisheng exp4_tiling]# ./tiling_test_O0 Checksum: 268376973.259199 执行时间: 16.459029 秒 (autotuner_env) [root@ecs-bisheng exp4_tiling]# ./tiling_test_O1 Checksum: 268058282.544395 执行时间: 9.012797 秒 (autotuner_env) [root@ecs-bisheng exp4_tiling]# ./tiling_test_O2 Checksum: 268437667.232841 执行时间: 7.997973 秒 (autotuner_env) [root@ecs-bisheng exp4_tiling]# ./tiling_test_autotuned Checksum: 268593822.027724 执行时间: 9.023929 秒
(四)结果与分析
性能对比表格
| 版本 | 编译选项 | Checksum | 执行时间 (秒) | 性能对比 (相对-O0) | 性能提升 |
|---|---|---|---|---|---|
| 基准版 (O0) | -O0 |
268376973.259 | 16.459 | 1.00x | --- |
| 基础优化版 (O1) | -O1 |
268058282.544 | 9.013 | 快 1.83 倍 | 45.2% |
| 标准优化版 (O2) | -O2 |
268437667.233 | 7.998 | 快 2.06 倍 | 51.4% |
| Autotuner 优化版 | -O2 + Autotuner |
268593822.028 | 9.024 | 快 1.82 倍 | 45.2% |
分析结论
从实验结果可以看出:
-
编译器优化效果显著:
-O1优化相比-O0带来了 83% 的性能提升-O2优化是最佳表现,相比基准版本快了 2.06倍
-
O2优化级别表现最佳:
-O2版本以 7.998秒 的执行时间获得最佳性能- 相比
-O1还有约 11% 的额外提升
-
Autotuner在此场景下表现一般:
- Autotuner 优化后的执行时间为 9.024秒 ,反而比
-O2慢了约 12.8% - 这可能说明对于这个特定的矩阵乘法程序,标准的
-O2优化已经非常有效 - Autotuner 可能在某些参数调整上未能找到更优解,或者陷入了局部最优
- Autotuner 优化后的执行时间为 9.024秒 ,反而比
-
循环分块优化的体现:
- 从
-O0到-O2的巨大性能提升,很可能包含了编译器自动应用的循环分块等缓存友好优化 - 矩阵乘法这类内存密集型计算对缓存局部性非常敏感,编译器优化的效果特别明显
- 从
总结 :在这个循环分块实验中,传统的 -O2 编译优化表现最佳,证明了现代编译器在处理矩阵运算时已经具备了相当成熟的优化策略。