从零开始实现简易版Netty(六) MyNetty ByteBuf实现
1. jdk Buffer介绍
在上一篇博客中,lab5版本的MyNetty中实现了FastThreadLocal,为后续实现池化内存分配功能打下了基础。池化内存分配是netty中非常核心也非常复杂的一个功能,没法在一次迭代中完整的实现,MyNetty打算分为4个迭代逐步的将其实现。按照计划,本篇博客中,lab6版本的MyNetty需要实现一个非常基础的,非池化的ByteBuf作为后续迭代的基础。
由于本文属于系列博客,读者需要对之前的博客内容有所了解才能更好地理解本文内容。
- lab1版本博客:从零开始实现简易版Netty(一) MyNetty Reactor模式
- lab2版本博客:从零开始实现简易版Netty(二) MyNetty pipeline流水线
- lab3版本博客:从零开始实现简易版Netty(三) MyNetty 高效的数据读取实现
- lab4版本博客:从零开始实现简易版Netty(四) MyNetty 高效的数据写出实现
- lab5版本博客:从零开始实现简易版Netty(五) MyNetty FastThreadLocal实现
在前面的实验中,MyNetty中用来承载消息的容器一直是java中nio包下的ByteBuffer。与FastThreadLocal类似,Netty同样不满足于jdk自带的ByteBuffer,而是基于ByteBuffer实现了性能更好,功能更强大的ByteBuf容器。
但在学习Netty的ByteBuf容器之前,我们还是需要先了解jdk中的ByteBuffer工作原理。只有在理解了jdk原生的ByteBuffer的实现原理和优缺点后,我们才能更好的理解Netty中的ByteBuf和它的优势。
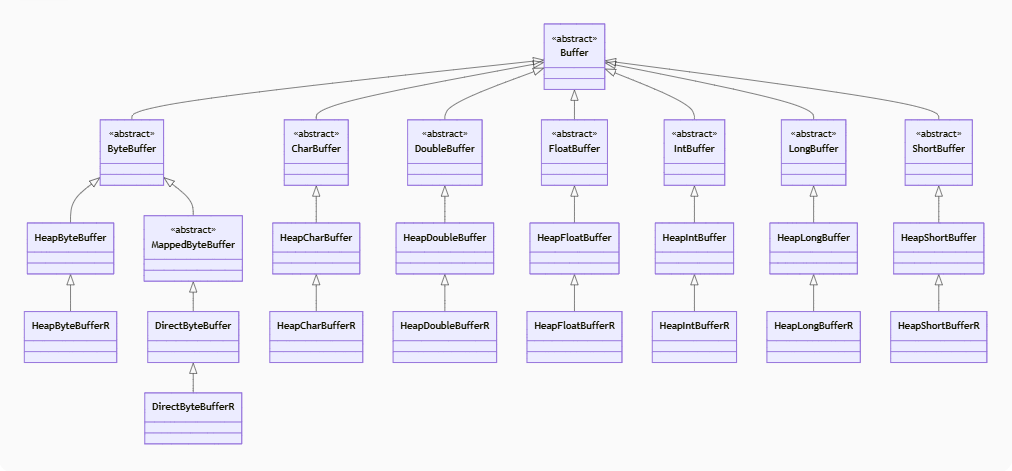
jdk中的Buffer是一个巨大的多维层次体系,按照所存储的数据类型可以分为byte、int、short等,按照底层承载数据的内存区域的不同可以分为基于堆内存(heap)的和基于堆外内存(direct),按照是否仅可读可以分为普通可读可写的buffer和只读buffer。
Buffer按照类的继承关系将这几个维度以多层的子类继承关系组织起来,其中java.nio.Buffer是最顶层的抽象类。
第二层按照所存储的数据类型可以分为ByteBuffer、IntBuffer和ShortBuffer等直接子类;按照底层承载数据的内存区域可以进一步分为HeapByteBuffer、DirectByteBuffer、HeapIntBuffer等;更进一步的对于只读的Buffer容器又有HeapByteBufferR、DirectByteBufferR、HeapIntBufferR等子类实现(结尾的R是ReadOnly的意思)。
Buffer主要子类示意图

计算机中数据底层基本都是以Byte字节维度存储的,而Int、Short、Double等数据类型都是基于字节的,因此整个Buffer体系中最核心的就是ByteBuffer。
限于篇幅,本文中将只重点分析最重要的ByteBuffer以及其直接子类HeapByteBuffer的工作原理,相信在理解了整个Buffer体系中最核心的机制后,读者能对jdk的ByteBuffer体系能有一个大致的理解,有利于后续理解Netty的ByteBuf容器。
Buffer类
首先我们先看看最顶层的Buffer类,在Buffer类中共定义了四个非常关键的int类型的属性,分别是capacity、limit、position和mark。
-
capacity属性代表着当前Buffer容器的可容纳的最大总元素个数,不能为负数并且不可变。capacity=10,对于ByteBuffer代表着最多能存放10个字节的数据;而对于IntBuffer则代表着最多能存放是10个整型的数据。可以简单的将Buffer逻辑上视为有着一个长度为capacity的底层数组,数组的类型与当前Buffer的类型一致(实际也可能是用Byte数组模拟Int数组)。
-
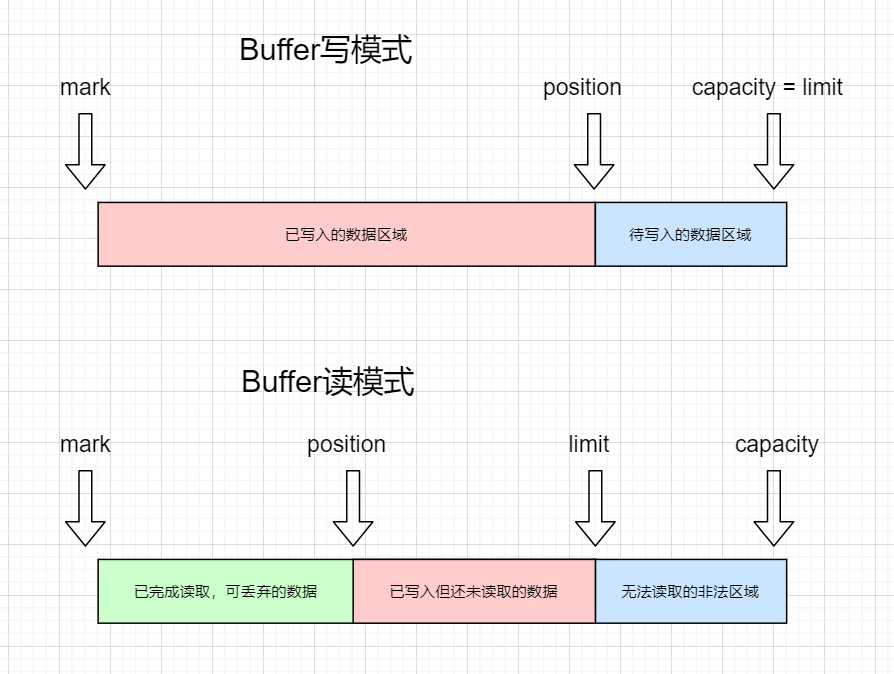
jdk中的Buffer分为两种模式,一种是写模式,一种是读模式。写模式下只能往Buffer中put写入数据,不能读取数据;读模式下只能从Buffer中get读出数据,不能写入数据。
Buffer在刚被创建初始化时,是空的,属于写模式。在写入数据后,可以通过flip方法将Buffer容器切换为读模式(具体的原理下面会分析)。 -
position属性在写模式下代表着当前的写指针,下一次写入的数据将会被写入底层数组中index=position的位置;而在读模式下,则代表着当前的读指针,即下一次读取的数据将会是底层数组中index=position的位置。
-
limit属性用于校验以防止越界,在写模式下代表着第一个不可写的位置,默认情况下写模式中limit的值等于capacity。
而在读模式下,代表着第一个不可读的位置。举个例子,一个capacity=10的ByteBuffer,在写入了8个字节后,limit=8;通过flip方法转为读模式后,limit就由写模式下的10,转变为了8,代表着最多只能读取8个字节。因为再往后读,就相当于数组下标越界了,读取了从未写过的数据。 -
mark属性用于临时记录一下当前position的位置,比如处理拆包黏包问题时可以尝试着向后读取更多的数据,但未获取到完整包时可以通过mark指针退回到初始的位置,等待完整的包来临。
-
四个指针属性之间存在着严格的大小关系,即mark <= position <= limit <= capacity。
capacity用于控制整个Buffer的大小,任意的读写都不可越过capacity的限制。
limit用于规范不可读写的位置,防止越界,其不会超过capacity;其无论是在写模式还是读模式下作为position的边界值,都一定大于或等于position。
position用于记录当前的相对读写位置,其无法超过limit。
mark用于记录当前position的位置,其不会超过position。当limit或者position因为某些原因而缩小,导致其小于当前的mark时,mark会被废弃被还原为初始值-1。 -
Buffer类中还提供了三个用于切换容器形态的重要方法,分别是flip、rewind和clear方法。
-
flip方法用于在写入完成后,令Buffer转换到读模式。flip操作会将position归零,而limit被设置为之前写模式下的position以避免读取越界。
-
rewind方法一般用于在读取数据后,重置读指针以方便重复的读取。rewind操作中只会简单的将position归零,但不修改limit的值。
-
clear方法用于清空Buffer容器,重新写入新的数据。clear操作会将position设置为0,而limit设置为等于capacity。设置完成后的指针位置与Buffer刚被创建时一样。
Buffer结构图

java
/**
 * 基本copy自jdk的Buffer类,但做了简化
 * */
public abstract class MyBuffer {

    /**
     * buffer的capacity代表着总容量大小限制,不能为负数并且不可变
     * */
    private int capacity;

    /**
     * buffer的limit标识着第一个不可读或者写的index位置,不能为负数并且不能大于capacity
     * */
    private int limit;

    /**
     * buffer的position标识着下一个读或者写的元素的index位置,不能为负数并且不能大于limit
     * */
    private int position = 0;

    /**
     * buffer的mark是用于reset方法(重置)被调用时,将position的值重试为mark对应下标.
     * mark并不总是被定义,但当它被定义时,它不会为负数,并且不会超过position
     * 如果mark被定义了,则它将会在position或者limit被调整为小于mark时被废弃(变成未定义的状态)
     * 如果mark没有被定义,则在调用reset方法时将会抛出InvalidMarkException
     * */
    private int mark = -1;

    // Used only by direct buffers
    // NOTE: hoisted here for speed in JNI GetDirectBufferAddress
    /**
     * 有两种Buffer,分别基于堆内内存和堆外内存
     * 堆外内存中,这个属性标示堆外内存具体的起始地址, MyNetty中暂时用不到
     * */
    long address;

    MyBuffer(int mark, int pos, int lim, int cap) {       // package-private
        if (cap < 0) {
            // The capacity of a buffer is never negative
            throw new IllegalArgumentException("Negative capacity: " + cap);
        }
        this.capacity = cap;
        setLimit(lim);
        setPosition(pos);
        if (mark >= 0) {
            // The mark is not always defined, but when it is defined it is never negative and is never greater than the position.
            if (mark > pos) {
                throw new IllegalArgumentException("mark > position: (" + mark + " > " + pos + ")");
            }
            this.mark = mark;
        }
    }

    public int getCapacity() {
        return capacity;
    }

    public int getPosition() {
        return position;
    }

    public int getLimit() {
        return limit;
    }

    public int getMark() {
        return mark;
    }

    final void discardMark() {
        mark = -1;
    }

    /**
     * 是否是只读的
     * */
    public abstract boolean isReadOnly();

    public final MyBuffer setLimit(int newLimit) {
        if ((newLimit > capacity) || (newLimit < 0)) {
            throw new IllegalArgumentException();
        }

        // 给limit赋值
        limit = newLimit;
        if (position > newLimit) {
            // 确保position不能大于limit
            position = newLimit;
        }
        if (mark > newLimit) {
            // 如果mark被定义了,则它将会在position被调整为小于mark时被废弃(变成未定义的状态)
            mark = -1;
        }

        return this;
    }

    public final MyBuffer setPosition(int newPosition) {
        if ((newPosition > limit) || (newPosition < 0)) {
            throw new IllegalArgumentException("invalid newPosition=" + newPosition + " limit=" + limit);
        }
        if (mark > newPosition) {
            // 如果mark被定义了,则它将会在limit被调整为小于mark时被废弃(变成未定义的状态)
            mark = -1;
        }
        // 给position赋值
        position = newPosition;
        return this;
    }

    public final MyBuffer mark() {
        // 将mark记录为当前position的位置
        this.mark = this.position;
        return this;
    }

    /**
     * buffer的mark是用于reset方法(重置)被调用时,将position的值重试为mark对应下标.
     * */
    public final MyBuffer reset() {
        int m = mark;
        if (m < 0) {
            // 如果mark没有被定义,则在调用reset方法时将会抛出InvalidMarkException
            throw new InvalidMarkException();
        }
        position = m;
        return this;
    }

    /**
     * 令buffer准备好作为一个新的序列用于channel读操作或者说让channel将数据put进来
     * 设置limit为capacity并且将position设置为0
     *
     * 注意:clear并没有真正的将buffer里的数据完全清零,而仅仅是通过修改关键属性的方式逻辑进行了逻辑上的clear,这样性能更好
     * */
    public final MyBuffer clear() {
        position = 0;
        limit = capacity;
        mark = -1;
        return this;
    }

    /**
     * 令buffer准备好作为一个新的序列用于channel写操作或者说让channel将写进去的数据get走:
     * 设置limit为当前的position的值,并且将position设置为0
     * */
    public final MyBuffer flip() {
        limit = position;
        position = 0;
        mark = -1;
        return this;
    }

    /**
     * 让一个buffer准备好重新读取数据,即在limit不变的情况下,将position设置为0
     * 因为读取操作会不断地推进position的位置,重置position为0,相当于允许读取重头读(类似磁带进行了倒带,即rewind)
     * */
    public final MyBuffer rewind() {
        position = 0;
        mark = -1;
        return this;
    }

    /**
     * 返回当前buffer还剩余可用的元素个数(即limit-position)
     * */
    public final int remaining() {
        int rem = limit - position;
        return Math.max(rem, 0);
    }

    /**
     * 是否还有剩余可用的元素个数
     * */
    public final boolean hasRemaining() {
        return position < limit;
    }

    static void checkBounds(int off, int len, int size) {
        if ((off | len | (off + len) | (size - (off + len))) < 0) {
            throw new IndexOutOfBoundsException();
        }
    }

    final int nextGetIndex() {
        int p = position;
        if (p >= limit) {
            throw new BufferUnderflowException();
        }
        position = p + 1;
        return p;
    }

    final int nextGetIndex(int nb) {
        int p = position;
        if (limit - p < nb){
            throw new BufferUnderflowException();
        }
        position = p + nb;
        return p;
    }

    final int nextPutIndex() {
        int p = position;
        if (p >= limit) {
            // 相比nextGetIndex,抛出的异常不同
            throw new BufferOverflowException();
        }
        position = p + 1;
        return p;
    }

    final int nextPutIndex(int nb) {
        int p = position;
        if (limit - p < nb) {
            throw new BufferOverflowException();
        }
        position = p + nb;
        return p;
    }

    final int checkIndex(int i) {
        if ((i < 0) || (i >= limit)) {
            throw new IndexOutOfBoundsException();
        }
        return i;
    }

    final int checkIndex(int i, int nb) {
        if ((i < 0) || (nb > limit - i)) {
            throw new IndexOutOfBoundsException();
        }
        return i;
    }
}
ByteBuffer类
- ByteBuffer类顾名思义,是承载Byte类型的数据的Buffer容器。前面提到Buffer承载底层数组的内存分为两种类型,一种是位于jvm堆内存的HeapXXXBuffer,一种是位于堆外的直接内存的DirectXXXBuffer。
HeapByteBuffer中底层数组直接就是成员变量byte[] hb。而DirectByteBuffer中的底层数组位于堆外,数组的内存起始地址由父类ByteBuffer中的address维护,访问时通过Unsafe方法address与实际的偏移量来访问对应位置的数据。
在本篇博客中,限于篇幅只介绍基于堆内存的ByteBuffer实现HeapByteBuffer,因为作为Buffer其基本的工作原理上HeapByteBuffer与DirectByteBuffer并没有特别大的不同,都是在底层数组上读写对应的数据。 - ByteBuffer提供了基于各种数据类型的读(get)与写(put)方法,其中分为相对操作与绝对操作之分,绝对操作与相对操作的区别在于多了一个index参数,比如相对操作get()和绝对操作get(int index)。
绝对操作很好理解,就是在底层数组指定的index位置读取或者写入对应的数据。而相对操作其实也需要一个index指针,而这个index指针就是前面介绍过的位于Buffer内部的position指针。相对操作在进行了读或者写操作后,会增加或者说推进position的值。
绝大多数情况下,我们都是使用相对操作来读写操作Buffer的,因为可以让Buffer内部自行维护读或者写指针,比较方便。 - ByteBuffer因为其存储的是最基础的Byte类型,因此其很容易拓展转换为其它数据类型的Buffer容器。
ByteBuffer除了提供byte类型的读写方法外,也提供了getInt、putInt、getShort、putLong等等其它数据类型读写的方法。其底层本质上是将1或N个字节看做一个完整的特定数据类型进行写入或读取。
比如通过相对写操作putInt将一个int类型的数据写入Buffer等价于一次写入了4个byte,position自增4。读取操作则是从特定位置开始,将包含自身在内的共四个byte视作一个int类型返回。
同时ByteBuffer也提供了诸如asCharBuffer、asIntBuffer等等将自身转换成逻辑上等价的其它类型Buffer的方法方便使用。
Buffer容器中,特别是关于堆外内存的使用还有很多细节值得研究,但这不是MyNetty系列博客的重点,感兴趣的读者可以自行阅读jdk的对应源码或者相关资料,限于个人能力这里就不再展开了。
大端法与小端法
- 前面我们提到,Buffer对于int或者long等多个byte字节构成的数据,是通过将多个字节合并在一起视为整体来实现的。而实际上这里面存在一个问题,即从前到后的哪个字节代表高位,哪个字节代表低位。如果网络传输等场景下两边的表示方式不一致,则读取到的字节流可能会被错误的解析。
- 内存地址的示意图一般是从左到右,从低到高排列的。作为普通人来说,看数字时也习惯了高位在左(前),低位在右(后)的模式(1024,千位在前,个位在后)。这种低位内存的字节代表高位,高位内存的字节代表低位的表示方法叫做大端法。与之相对的,低位内存代表低位,高位内存代表高位的表示方法则被叫做小端法。
- 读者可能会有疑问,既然大端法符合人们的直观理解,为什么不让所有的软硬件系统都统一使用大端法存储数据呢?免得还要互相之间各种约定,避免转换错误。
这是因为小端法在做一些强制类型转换等基础的底层操作时,硬件性能更好。举个例子,有一个占4字节的int数据,想要强制转换成一个short类型。对于小端法而言,只需要从起始位置开始寻址找到两个字节返回即可,因为低位字节代表低位,强转时忽略高位即可。而大端法必须基于起始位置四个字节中的后两个字节才能转换成功。
在性能重于一切的底层硬件或操作系统层面,这种效率上的差异不能完全的忽略。所以时至今日,依然有很多的硬件和操作系统使用小端法维护int等类型的数据。 - 因此,jdk的ByteBuffer中支持指定以小端法或者大端法来存储数据,这样可以在网络传输等需要将内存数据编码为字节流的场景下,让用户能自由的转换为约定好的,统一的表示方式。
java
/**
 * 基本copy自jdk的ByteBuffer类,但做了简化
 * */
public abstract class MyByteBuffer extends MyBuffer {

    // These fields are declared here rather than in Heap-X-Buffer in order to
    // reduce the number of virtual method invocations needed to access these
    // values, which is especially costly when coding small buffers.
    //
    final byte[] hb;                  // Non-null only for heap buffers
    final int offset;
    boolean isReadOnly;                 // Valid only for heap buffers

    MyByteBuffer(int mark, int pos, int lim, int cap, byte[] hb, int offset) {
        super(mark, pos, lim, cap);

        this.hb = hb;
        this.offset = offset;
    }

    /**
     * 创建一个指定了capacity的堆内ByteBuffer
     * */
    public static MyByteBuffer allocate(int capacity) {
        if (capacity < 0) {
            throw new IllegalArgumentException();
        }

        // 简单起见,只支持基于堆内存的HeapByteBuffer
        return new MyHeapByteBuffer(capacity, capacity);
    }

    /**
     * 相对读操作
     * */
    public abstract byte get();

    /**
     * 绝对读操作
     * */
    public abstract byte get(int index);

    /**
     * 相对写操作
     * */
    public abstract MyByteBuffer put(byte b);

    public final MyByteBuffer put(byte[] src) {
        return put(src, 0, src.length);
    }

    public MyByteBuffer put(byte[] src, int offset, int length) {
        checkBounds(offset, length, src.length);
        if (length > remaining()) {
            throw new BufferOverflowException();
        }
        int end = offset + length;
        for (int i = offset; i < end; i++) {
            // 循环put写入整个字节数组
            this.put(src[i]);
        }
        return this;
    }

    /**
     * 绝对写操作
     * */
    public abstract MyByteBuffer put(int index, byte b);

    /**
     * 相对的批量读操作
     * 将当前buffer的length个字节,写入指定dst数组。写入的起始下标位置是offset
     * */
    public MyByteBuffer get(byte[] dst, int offset, int length) {
        checkBounds(offset, length, dst.length);
        if (length > remaining()) {
            // 所要读取的字节数不能超过当前buffer总的剩余可读取数量
            throw new BufferUnderflowException();
        }
        int end = offset + length;
        for (int i = offset; i < end; i++) {
            dst[i] = get();
        }
        return this;
    }

    /**
     * 相对的批量读操作
     * 将当前buffer中的数据写入指定dst数组。写入的起始下标是0,length为dst的总长度
     * */
    public MyByteBuffer get(byte[] dst) {
        return get(dst, 0, dst.length);
    }

    /**
     * 压缩操作(也算写操作)
     * */
    public abstract MyByteBuffer compact();

    /**
     * 默认是大端
     * */
    boolean bigEndian = true;

    public final ByteOrder order() {
        return bigEndian ? ByteOrder.BIG_ENDIAN : ByteOrder.LITTLE_ENDIAN;
    }

    public final MyByteBuffer order(ByteOrder bo) {
        bigEndian = (bo == ByteOrder.BIG_ENDIAN);

        return this;
    }

    // 简单起见省略掉别的数据类型,仅支持int类型

    public abstract int getInt();

    public abstract int getInt(int index);

    public abstract MyByteBuffer putInt(int value);

    public abstract MyByteBuffer putInt(int index, int value);

    abstract byte _get(int i);                          // package-private
    abstract void _put(int i, byte b);                  // package-private

}
java
/**
 * 基本copy自jdk的HeapByteBuffer,但做了简化
 * */
public class MyHeapByteBuffer extends MyByteBuffer{

    MyHeapByteBuffer(int cap, int lim) {
        super(-1, 0, lim, cap, new byte[cap], 0);
    }

    protected int ix(int i) {
        return i + offset;
    }

    @Override
    public byte get() {
        // 获得position的位置(相对操作,有副作用,会推进position)
        int nextGetIndex = nextGetIndex();
        // 加上offset偏移量获得最终的index值
        int finallyIndex = ix(nextGetIndex);
        return hb[finallyIndex];
    }

    @Override
    public byte get(int index) {
        // 检查index的合法性,必须是0 <= index < limit,避免越界
        checkIndex(index);
        // 加上offset偏移量获得最终的index值
        int finallyIndex = ix(index);
        return hb[finallyIndex];
    }

    @Override
    public MyByteBuffer put(byte b) {
        // 获得position的位置(相对操作,有副作用,会推进position)
        int nextPutIndex = nextPutIndex();
        // 加上offset偏移量获得最终的index值
        int finallyIndex = ix(nextPutIndex);

        // 将b放入对应的index处
        hb[finallyIndex] = b;
        return this;
    }

    @Override
    public MyByteBuffer put(int index, byte b) {
        // 检查index的合法性,必须是0 <= index < limit,避免越界
        checkIndex(index);

        // 加上offset偏移量获得最终的index值
        int finallyIndex = ix(index);

        // 将b放入对应的index处
        hb[finallyIndex] = b;
        return this;
    }

    @Override
    byte _get(int i) {
        return hb[i];
    }

    @Override
    void _put(int i, byte b) {
        hb[i] = b;
    }

    @Override
    public MyByteBuffer compact() {
        // 把底层数组中(position+offset)到(limit+offset)之间的内容整体往前挪,挪到数组起始处(0+offset), 实际内容的长度=remaining
        System.arraycopy(hb, ix(getPosition()), hb, ix(0), remaining());

        // 要理解下面position和limit的变化,需要意识到compact是一次从读模式切换到写模式的操作(之前读完了,就把剩下的还没有读完的压缩整理一下)

        // 压缩后实际内容的长度=remaining,所以压缩完后position,也就是后续开始写的位置就是从remaining开始
        setPosition(remaining());

        // 写模式下,limit当然就变成了capacity了
        setLimit(getCapacity());

        // 压缩后,mark没意义了,就直接丢弃掉
        discardMark();
        return this;
    }

    @Override
    public int getInt() {
        // 相比get方法获得1个字节,getInt一次要读取4个字节,所以position一次性推进4字节
        int nextGetIndex = nextGetIndex(4);
        int finallyIndex = ix(nextGetIndex);

        // 从指定的index处读取4个字节,构造成1个int类型返回(基于bigEndian,决定如何解析这4个字节(大端还是小端))
        return BitsUtil.getInt(this, finallyIndex, bigEndian);
    }

    @Override
    public int getInt(int index) {
        // 检查index的合法性,必须是0 <= index < limit-4,避免越界
        checkIndex(index,4);
        // 加上offset偏移量获得最终的index值
        int finallyIndex = ix(index);

        // 从指定的index处读取4个字节,构造成1个int类型返回(基于bigEndian,决定如何解析这4个字节(大端还是小端))
        return BitsUtil.getInt(this, finallyIndex, bigEndian);
    }

    @Override
    public MyByteBuffer putInt(int value) {
        // 获得position的位置(相对操作,有副作用,会推进position)
        // 相比put方法写入1个字节,putInt一次要读取4个字节,所以position一次性推进4字节

        int nextPutIndex = nextPutIndex(4);
        // 加上offset偏移量获得最终的index值
        int finallyIndex = ix(nextPutIndex);

        // 向指定的index处写入大小为4个字节的1个int数据(基于bigEndian,决定写入字节的顺序(大端还是小端))
        BitsUtil.putInt(this, finallyIndex, value, bigEndian);
        return this;
    }

    @Override
    public MyByteBuffer putInt(int index, int value) {
        // 检查index的合法性,必须是0 <= index < limit-4,避免越界
        checkIndex(index,4);

        // 加上offset偏移量获得最终的index值
        int finallyIndex = ix(index);

        // 向指定的index处写入大小为4个字节的1个int数据(基于bigEndian,决定写入字节的顺序(大端还是小端))
        BitsUtil.putInt(this, finallyIndex, value, bigEndian);
        return this;
    }

    @Override
    public boolean isReadOnly() {
        // 可读/可写
        return false;
    }
}
jdk中Buffer的体系是一个非常强大而又复杂的体系,上面介绍的关于Buffer体系的内容只是其中比较核心的部分内容。除此之外还有很多关于Buffer内存映射、零拷贝、切片视图、堆外内存回收等等更多的内容限于篇幅在本文中完全没有涉及。
但对于帮助读者理解为什么Netty要在jdk的ByteBuffer基础上再封装一个ByteBuf,个人认为这些内容已经足够了。
2. Netty ByteBuf介绍
前面一节中对jdk的Buffer容器的核心工作原理进行了介绍。Buffer容器是一个设计精巧又功能强大的工具,但其还是存在着以下明显缺点:
- 由于存在读写两种模式,在使用时需要时刻关注当前的模式,并通过flip、rewind、compact、clear等方法转换模式,一旦搞错模式就会酿成大错。在面对较为复杂的频繁切换模式的场景时,开发者的心智负担会很重。
- 不支持自动的扩容。Buffer容器通过一个底层数组来存储元素,其自身与数组一样不支持动态的扩容,一旦在创建时指定了capacity,后续无法再扩大。
不支持扩容的Buffer,要么在创建时预设一个非常大的capacity,要么就需要在容量不足时手动的将Buffer中的数据转移到新的更大空间的Buffer中。前者会浪费内存,后者则非常麻烦且性能不高。 - jdk的DirectBuffer中的堆外底层数组的内存回收基于PhantomReference,在gc时触发回收动作。因此在内存回收上存在一定的延时性,在需要大量创建并销毁Buffer容器的场景下,性能较差。
- 没有支持池化复用的机制。每个Buffer在需要时都需要临时的分配内存空间,并在不需要时进行释放。在Buffer被大量使用的场景下,反复的创建和销毁基于Buffer会对GC造成很大压力,而对于基于堆外内存的DirectBuffer来说由于堆外内存回收机制的延迟也会对堆外内存的使用带来不小的压力。
当然,缺点都是比较出来的,相比起Netty中更强大的ByteBuf,jdk中Buffer的缺点远不止此。相信读者在理解了Netty中ByteBuf体系后,会加深对其的理解。
ByteBuf层次体系
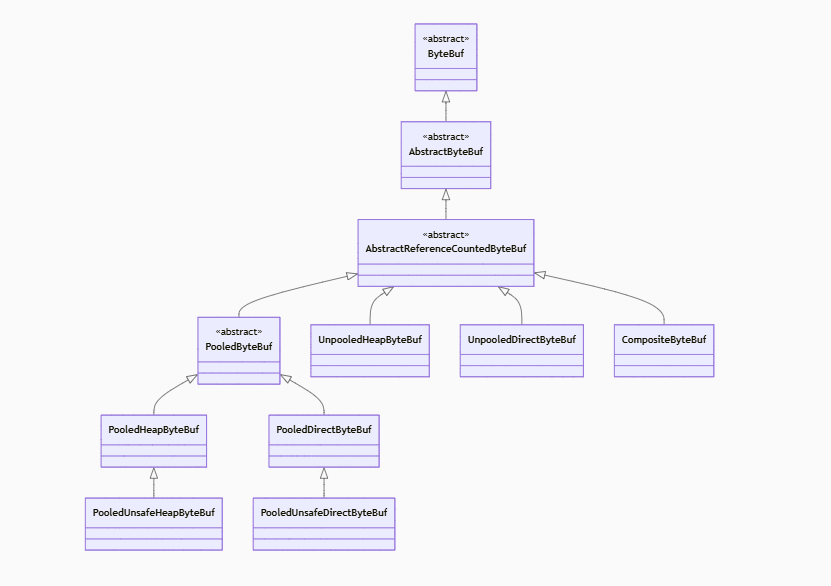
与jdk的Buffer体系类似,Netty中的ByteBuf同样是通过不同层次子类的组合来实现不同属性的各种ByteBuf。
- Netty作为一个网络框架,其只专注于最通用的Byte类型元素的容器存储,所以底层的容器类直接就是ByteBuf,没有IntBuf、ShortBuf这些子类。
- Netty支持基于引用计数的自动容器回收机制,可以在容器不再被使用时,即时的将容器所占用的内存回收掉,所以抽象出了AbstractReferenceCountedByteBuf类。
- Netty支持池化容器,因此设计了PooledByteBuf子类。
- Netty同样支持堆内和堆外两种不同内存类型,因此更进一步的抽象出了PooledHeapByteBuf、PooledDirectByteBuf、UnpooledHeapByteBuf和UnpooledDirectByteBuf这四个核心子类。
- 除此之外,Netty还提供了注入绕过数组越界检查的基于Unsafe的PooledUnsafeHeapByteBuf、PooledUnsafeDirectByteBuf;也提供了基于切片,逻辑视图的零拷贝的CompositeByteBuf,以及各种功能强大,用处各异的子类实现。
ByteBuf主要子类示意图

下面我们来看看netty是如何优化上述jdk的Buffer容器的缺点的。
允许同时进行读和写
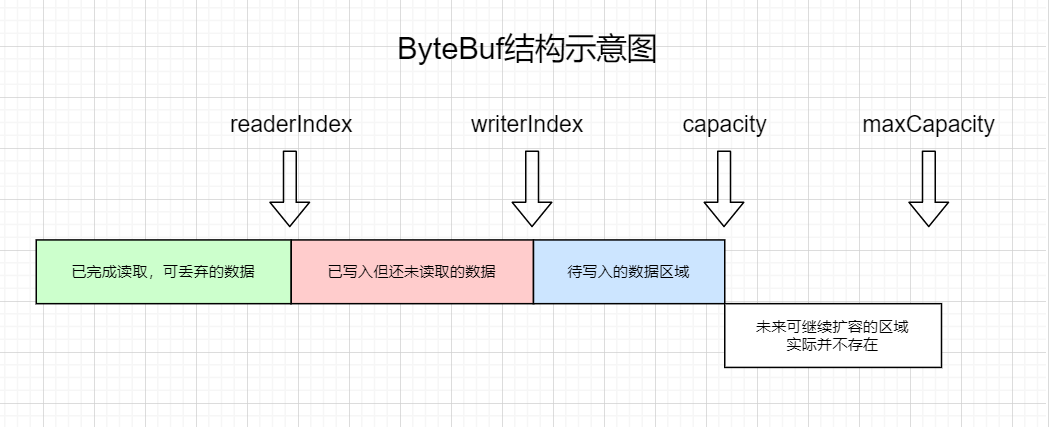
- 首先针对Buffer中读写模式无法共存,需要时刻注意当前模式的问题。Netty中的ByteBuf设计中引入了读写两个指针(AbstractByteBuf中的readerIndex和writerIndex),而非只有一个position指针。
ByteBuf同样支持相对读写(比如readByte、writeByte)与参数中指定index下标位置的绝对读写(比如getByte、setByte)。在相对读操作会自动的推进读指针readerIndex,而在相对写操作中则会自动推进写指针writerIndex。
因为同时维护了读写指针的原因,netty的ByteBuf可以同时的进行读和写,而不用关心当前是属于什么模式,也无需使用flip等方法切换形态。 - 与ByteBuffer类似,netty的ByteBuf内部的指针属性同样有一个严格的大小关系,用于防止写操作超过容量,也防止读操作读取到未实际写入的非法区域。即readerIndex <= writerIndex <= capacity <= maxCapacity。
支持自动扩容
- maxCapacity代表最大容量,与ByteBuffer中capacity类似,是ByteBuf的最大容量限制。但与ByteBuffer不同的是,netty的ByteBuf中的maxCapacity不等于其底层数组实际的容量,很多情况下只是起到一个阈值的作用。
- capacity才代表ByteBuf实际底层数组的大小(capacity方法),在写入数据时,会检查当前的capacity是否足以满足写入的要求。如果发现capacity不足时,会触发自动扩容。
自动扩容的capacity无论如何不能扩容到超过maxCapacity,如果超过maxCapacity依然无法放入新写入的数据则会报错(IndexOutOfBoundsException)。
未超过maxCapacity时,但写入的数据量超过当前底层数组容量时则会进行扩容。扩容时,如果当前底层数组的大小低于阈值(4M)时,则会较为激进的2倍数扩容,以减少未来可能继续扩容的次数;当超过阈值时,则以较为保守的方式进行扩容,以尽量的节约内存。(ByteBufAllocator.calculateNewCapacity方法) - 通过maxCapacity和capacity两个不同容量属性的设计,ByteBuf在能控制最大内存使用量的前提下,能够不一口气申请一个极大的数组,而是按需的使用内存。
ByteBuf结构图

支持基于引用计数的手动内存释放
- Netty的ByteBuf能够基于引用计数机制来实现手动的内存资源释放(AbstractReferenceCountedByteBuf)。在ByteBuf容器被创建时,其被引用数被初始化为1。当使用者认为不需要再使用容器时,就将被引用数自减1(release方法)。当容器的被引用数被设置为0时,则会触发ByteBuf容器的销毁流程,释放掉底层数组所占用的内存空间。
当ByteBuf容器需要交给其它线程会处理时,需要通过retain方法增加被引用数,避免其因为其它使用者release而被提前销毁。 - 因为ByteBuf本身不会互相引用而出现循环依赖,所以引用计数的内存管理机制是非常高效的。比起依赖jvm的gc机制,在确定不再使用ByteBuf时主动的释放,虽然略微的增加了开发者的心智负担,但却可以大幅的减轻gc的压力。
Netty作为一个高性能网络框架,实际工作中都是通过ByteBuf容器来进行通信,往往会在短时间内大量创建并销毁ByteBuf。如果完全依靠gc周期性的回收,那么会给系统带来巨大的压力。
基于引用计数的内存管理能够主动和实时的进行内存回收,将内存回收的动作较为均匀的分摊到每一个时间段内,大大增强了系统的稳定性。 - 其实就像需要手动进行对象回收的语言(比如C语言)在内存回收上比自动垃圾回收的语言(java)性能通常更好一样,自动的gc虽然解放了开发者的心智负担,但比起精细的手工管理、实时的释放,其在性能上还是略逊一筹。
支持ByteBuf容器的池化存储
- 池化的ByteBuf容器在创建时,底层数组所需要的内存在绝大多数情况下都能从已经预先申请好的内存区域中获得,实际使用中仅需要进行一些标记即可,无需jvm或者操作系统进行真实的内存分配。而在ByteBuf容器不再使用而被释放时,也仅仅需要修改一些针对内存区域控制权的即可,不需要进行实际的内存回收操作。
池化的容器机制对gc非常友好,与平常接触到的各种连接池、对象池一样,通过避免大量初始化与销毁的开销,极大的提高了使用特定对象的吞吐量。 - ByteBuf容器池化存储相关的工作原理比较复杂,我们在MyNetty后续的迭代中会逐一实现并在博客中介绍其工作原理。本期关于ByteBuf的介绍仅限于Unpooled非池化的实现。
java
public abstract class MyAbstractByteBuf extends MyByteBuf {
    // 。。。 仅保留核心逻辑

    int readerIndex;
    int writerIndex;
    private int markedReaderIndex;
    private int markedWriterIndex;
    private int maxCapacity;

    /**
     * 是否在编辑读/写指针的时候进行边界校验
     * 默认为true,设置为false可以不进行校验从而略微的提高性能,但可能出现内存越界的问题
     */
    private static final boolean checkBounds = SystemPropertyUtil.getBoolean("my.netty.check.bounds",true);

    protected MyAbstractByteBuf(int maxCapacity) {
        if (maxCapacity < 0) {
            throw new IllegalArgumentException("maxCapacity must > 0");
        }
        this.maxCapacity = maxCapacity;
    }

    @Override
    public int maxCapacity() {
        return maxCapacity;
    }

    protected final void maxCapacity(int maxCapacity) {
        this.maxCapacity = maxCapacity;
    }

    @Override
    public int readerIndex() {
        return readerIndex;
    }

    @Override
    public MyByteBuf readerIndex(int readerIndex) {
        if (checkBounds) {
            checkIndexBounds(readerIndex, writerIndex, capacity());
        }
        this.readerIndex = readerIndex;
        return this;
    }

    @Override
    public int writerIndex() {
        return writerIndex;
    }

    @Override
    public MyByteBuf writerIndex(int writerIndex) {
        if (checkBounds) {
            checkIndexBounds(readerIndex, writerIndex, capacity());
        }
        this.writerIndex = writerIndex;
        return this;
    }

    @Override
    public MyByteBuf markReaderIndex() {
        markedReaderIndex = readerIndex;
        return this;
    }

    @Override
    public MyByteBuf markWriterIndex() {
        markedWriterIndex = writerIndex;
        return this;
    }

    @Override
    public byte getByte(int index) {
        checkIndex(index,1);
        return _getByte(index);
    }

    @Override
    public byte readByte() {
        // 检查是否可以读1个字节
        checkReadableBytes0(1);
        int i = readerIndex;
        byte b = _getByte(i);
        // 和jdk的实现一样,在getByte的基础上,推进读指针
        readerIndex = i + 1;
        return b;
    }

    protected abstract byte _getByte(int index);

    @Override
    public MyByteBuf setByte(int index, int value) {
        checkIndex(index,1);
        _setByte(index, value);
        return this;
    }

    protected abstract void _setByte(int index, int value);

    public abstract MyByteBufAllocator alloc();

    @Override
    public MyByteBuf writeByte(int value) {
        ensureWritable0(1);
        _setByte(writerIndex++, value);
        return this;
    }

    @Override
    public MyByteBuf writeBytes(byte[] src) {
        return writeBytes(src, 0, src.length);
    }

    @Override
    public MyByteBuf readBytes(byte[] dst) {
        readBytes(dst, 0, dst.length);
        return this;
    }

    @Override
    public boolean isReadable() {
        return writerIndex > readerIndex;
    }
}
java
/**
 * 参考自netty的UnpooledHeapByteBuf,在其基础上做了简化(只实现了最基础的一些功能以作参考)
 * */
public class MyUnPooledHeapByteBuf extends MyAbstractReferenceCountedByteBuf{

    private final MyByteBufAllocator alloc;

    private ByteBuffer tmpNioBuf;

    public static final byte[] EMPTY_BYTES = {};
    private byte[] array;

    public MyUnPooledHeapByteBuf(MyByteBufAllocator alloc, int initialCapacity, int maxCapacity) {
        super(maxCapacity);

        if (initialCapacity > maxCapacity) {
            throw new IllegalArgumentException(String.format(
                    "initialCapacity(%d) > maxCapacity(%d)", initialCapacity, maxCapacity));
        }

        this.alloc = alloc;
        this.array = new byte[initialCapacity];
        setIndex(0, 0);
    }

    @Override
    public int capacity() {
        // heapByteBuf的capacity就是内部数组的长度
        return array.length;
    }

    @Override
    public MyByteBuf capacity(int newCapacity) {
        checkNewCapacity(newCapacity);

        byte[] oldArray = array;
        int oldCapacity = oldArray.length;
        if (newCapacity == oldCapacity) {
            // 特殊情况,如果与之前的容量一样则无事发生
            return this;
        }

        int bytesToCopy;
        if (newCapacity > oldCapacity) {
            // 如果新的capacity比之前的大,那么就将原来内部数组中的内容整个copy到新数组中
            bytesToCopy = oldCapacity;
        } else {
            // 如果新的capacity比之前的小,那么可能需要截断之前的数组内容
            if (writerIndex() > newCapacity) {
                // 写指针大于newCapacity,确定需要截断
                this.readerIndex = Math.min(readerIndex(), newCapacity);
                this.writerIndex = newCapacity;
            }
            bytesToCopy = newCapacity;
        }

        // 将原始内部数组中的内容copy到新数组中
        byte[] newArray = new byte[newCapacity];
        System.arraycopy(oldArray, 0, newArray, 0, bytesToCopy);
        this.array = newArray;
        return this;
    }

    @Override
    public int readBytes(GatheringByteChannel out, int length) throws IOException {
        int readBytes = getBytes(readerIndex, out, length, true);
        readerIndex += readBytes;
        return readBytes;
    }

    @Override
    public int getBytes(int index, GatheringByteChannel out, int length) throws IOException {
        return getBytes(index, out, length, false);
    }

    @Override
    public int setBytes(int index, ScatteringByteChannel in, int length) throws IOException {
        try {
            return in.read((ByteBuffer) internalNioBuffer().clear().position(index).limit(index + length));
        } catch (ClosedChannelException ignored) {
            return -1;
        }
    }

    @Override
    public byte[] array() {
        return this.array;
    }

    @Override
    public int arrayOffset() {
        // 非Pool的,没有偏移量
        return 0;
    }

    @Override
    public MyByteBuf getBytes(int index, MyByteBuf dst, int dstIndex, int length) {
        // 带上dst的偏移量
        getBytes(index, dst.array(), dst.arrayOffset() + dstIndex, length);
        return this;
    }

    @Override
    public MyByteBuf getBytes(int index, byte[] dst, int dstIndex, int length) {
        System.arraycopy(array, index, dst, dstIndex, length);
        return this;
    }

    @Override
    public MyByteBuf setBytes(int index, MyByteBuf src, int srcIndex, int length) {
        // 带上src的偏移量
        setBytes(index, src.array(), src.arrayOffset() + srcIndex, length);
        return this;
    }


    @Override
    public MyByteBuf setBytes(int index, byte[] src, int srcIndex, int length) {
        System.arraycopy(src, srcIndex, array, index, length);
        return this;
    }

    @Override
    protected byte _getByte(int index) {
        return array[index];
    }

    @Override
    protected void _setByte(int index, int value) {
        this.array[index] = (byte) value;
    }

    @Override
    public MyByteBufAllocator alloc() {
        return alloc;
    }

    @Override
    protected int _getInt(int index) {
        return BitsUtil.getInt(this.array,index);
    }

    @Override
    protected int _getIntLE(int index) {
        return BitsUtil.getIntLE(this.array,index);
    }

    @Override
    protected void deallocate() {
        // heapByteBuf的回收很简单,就是清空内部数组,等待gc回收掉原来的数组对象即可
        array = EMPTY_BYTES;
    }

    @Override
    public ByteBuffer internalNioBuffer(int index, int length) {
        checkIndex(index, length);
        return (ByteBuffer) internalNioBuffer().clear().position(index).limit(index + length);
    }

    private ByteBuffer internalNioBuffer() {
        ByteBuffer tmpNioBuf = this.tmpNioBuf;
        if (tmpNioBuf == null) {
            this.tmpNioBuf = tmpNioBuf = ByteBuffer.wrap(array);
        }
        return tmpNioBuf;
    }

    private int getBytes(int index, GatheringByteChannel out, int length, boolean internal) throws IOException {
        ByteBuffer tmpBuf;
        if (internal) {
            tmpBuf = internalNioBuffer();
        } else {
            tmpBuf = ByteBuffer.wrap(array);
        }
        return out.write((ByteBuffer) tmpBuf.clear().position(index).limit(index + length));
    }
}
java
/**
 * 参考最初版本的netty AbstractReferenceCountedByteBuf实现(4.16.Final)
 * 高版本的netty进行了性能上的优化,但是细节太多,太复杂。我们这个netty学习的demo更关注netty整体的结构,细节上的优化先放过
 * 具体原理可以参考大佬的博客:https://www.cnblogs.com/binlovetech/p/18369244
 * */
public abstract class MyAbstractReferenceCountedByteBuf extends MyAbstractByteBuf{

    /**
     * 原子更新refCnt字段
     * */
    private static final AtomicIntegerFieldUpdater<MyAbstractReferenceCountedByteBuf> refCntUpdater =
            AtomicIntegerFieldUpdater.newUpdater(MyAbstractReferenceCountedByteBuf.class, "refCnt");

    /**
     * 被引用的次数
     *
     * 主要用于实现ReferenceCounted接口相关的逻辑
     * */
    private volatile int refCnt;

    protected MyAbstractReferenceCountedByteBuf(int maxCapacity) {
        super(maxCapacity);
        // 被创建就说明被引用了,被引用数初始化为1
        refCntUpdater.set(this, 1);
    }

    @Override
    public int refCnt() {
        return this.refCnt;
    }

    protected final void setRefCnt(int refCnt) {
        refCntUpdater.set(this, refCnt);
    }

    public MyByteBuf retain() {
        return this.retain0(1);
    }

    public MyByteBuf retain(int increment) {
        if(increment <= 0){
            throw new IllegalArgumentException("increment must > 0");
        }

        return this.retain0(increment);
    }

    private MyByteBuf retain0(int increment) {
        int refCnt;
        int nextCnt;
        do {
            refCnt = this.refCnt;
            // 先算出更新后预期的值,用于cas
            nextCnt = refCnt + increment;
            if (nextCnt <= increment) {
                // 参数有问题
                throw new IllegalArgumentException("illegal retain refCnt=" + refCnt + ", increment=" + increment);
            }
            // cas原子更新,如果compareAndSet返回false,则说明出现了并发更新
            // doWhile循环重新计算过,直到更新成功
        } while(!refCntUpdater.compareAndSet(this, refCnt, nextCnt));

        return this;
    }

    public boolean release() {
        return this.release0(1);
    }

    public boolean release(int decrement) {
        if(decrement <= 0){
            throw new IllegalArgumentException("decrement must > 0");
        }

        return this.release0(decrement);
    }

    private boolean release0(int decrement) {
        int refCnt;
        do {
            refCnt = this.refCnt;
            if (refCnt < decrement) {
                // 参数有问题,减的太多了
                throw new IllegalArgumentException("illegal retain refCnt=" + refCnt + ", decrement=" + decrement);
            }
        } while(!refCntUpdater.compareAndSet(this, refCnt, refCnt - decrement));

        if (refCnt == decrement) {
            // refCnt减为0了,释放该byteBuf(具体释放方式由子类处理)
            this.deallocate();
            // 返回true,说明当前release后,成功释放了
            return true;
        } else {
            // 返回false,说明当前release后还有别的地方仍然在引用该ByteBuf
            return false;
        }
    }

    protected abstract void deallocate();
}
总结
- 在本篇博客中,先对jdk的Buffer容器体系进行了介绍,并基于Buffer容器的一些缺点引出了Netty的ByteBuf容器。ByteBuf容器在jdk的Buffer容器基础上,做了非常多的拓展以改进Buffer容器的缺点。
- 限于个人水平,博客中对jdk的Buffer和Netty的ByteBuf容器的工作原理介绍都是点到即止,仅仅分析了一些最基础和核心的点。要想更好的理解其底层原理,还是需要读者仔细的阅读资料和源码才行。
- lab6中实现的非池化ByteBuf机制虽然非常简单,但为后续迭代中真正核心且复杂的PooledByteBuf即池化内存管理的实现打下了基础。后续的lab7-lab9中,MyNetty将会参考netty逐步的实现一个简化版的池化内存管理体系,帮助读者更好的理解netty。
博客中展示的完整代码在我的github上:https://github.com/1399852153/MyNetty (release/lab6_bytebuf 分支),内容如有错误,还请多多指教。