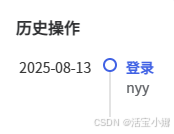
效果如下图所受,但是element ui提供的时间轴组件只有内容在右侧的,不满足需求,因此需要手动写内部时间轴
html代码如下
html
<el-timeline>
    <div v-for="(item, index) in info" :key="index" class="custom-timeline-item">
                <div class="timeline-left">
                    <div class="timestamp">{{ item.time}}</div>
                    <div class="timeline-connector"></div>
                </div>
         <div class="timeline-right">
                 <div class="event-title">登录</div>
                 <div class="event-content" >{{item.content}}</div>
         </div>
     </div>
</el-timeline>
css代码如下:
css
.custom-timeline-item {
  display: flex;
  position: relative;
  .timeline-left {
    width: 95px;
    padding-right: 20px;
    text-align: right;
    position: relative;
    .timestamp {
        font-size: 14px;
        color: #383838;
        font-weight: 500;
        margin-bottom: 5px;
    }
    .timeline-connector {
        position: absolute;
        top: 0;
        right: 0;
        width: 2px;
        height: 100%;
        background-color: #E3E3E3;
    }

    .timeline-connector::after {
        content: '';
        position: absolute;
        top: 0;
        right: -6px;
        width: 10px;
        height: 10px;
        border: 2px solid #4162E4;
        border-radius: 50%;
        background-color: #fff;
        z-index: 1;
    }
  }
  .timeline-right {
    flex: 1;
    padding: 0 0 0 15px;
    transition: all 0.3s ease;
    margin-bottom: 20px;
    .event-title {
      font-size: 14px;
      font-weight: 600;
      color: #4162E4;
    }
  }
}