Chrome 插件是提升浏览器生产力的强大工具,它能够定制浏览器功能、自动化重复任务、整合工作流,帮助用户更高效地使用网络。本文将带你从零开始,掌握 Chrome 插件开发的核心知识,并通过实战案例,开发一个功能完整的生产力插件。
一、Chrome 插件开发基础
1.1 什么是 Chrome 插件
Chrome 插件(Chrome Extension)是基于 Web 技术(HTML、CSS、JavaScript)开发的软件,能够扩展 Google Chrome 浏览器的功能。它可以修改和增强浏览器的行为,与网页内容交互,提供个性化功能。
与传统 Web 应用相比,Chrome 插件拥有更深入的浏览器集成能力,能够访问浏览器的书签、历史记录、标签页等核心功能。
1.2 插件的核心优势
- 轻量级:无需安装复杂的软件,通过浏览器即可运行
- 易开发:使用前端技术栈,开发门槛低
- 强集成:深度整合浏览器功能,提供无缝体验
- 跨平台:在所有支持 Chrome 的操作系统上运行
- 自动更新:发布后自动推送到用户,无需手动更新
1.3 插件的主要类型
根据功能和使用场景,Chrome 插件可以分为以下几类:
- 工具类:提供特定功能,如翻译、截图、二维码生成等
- 内容增强类:修改或增强网页内容,如广告拦截、样式美化等
- 工作流类:整合工作流程,如任务管理、笔记同步等
- 开发辅助类:辅助 Web 开发,如 React DevTools、Vue DevTools 等
二、开发环境搭建
2.1 必备工具
开发 Chrome 插件需要以下工具:
- Google Chrome 浏览器
- 代码编辑器(推荐 VS Code)
- Chrome 开发者工具
- 版本控制工具(Git)
2.2 开发环境配置
- 安装最新版 Google Chrome 浏览器
- 启用开发者模式:
- 打开 Chrome,访问
chrome://extensions - 开启右上角 "开发者模式" 开关
- 此时会出现 "加载已解压的扩展程序" 等按钮
- 打开 Chrome,访问
<mermaid>
graph TD
A打开Chrome浏览器 --> B访问chrome://extensions
B --> C开启开发者模式开关
C --> D出现开发相关按钮
D --> E可以加载未打包的插件
</mermaid>
三、Chrome 插件核心结构
一个完整的 Chrome 插件包含以下核心文件和目录结构:
plaintext
productivity-extension/
├── manifest.json          # 插件配置文件(必需)
├── popup/                 # 点击插件图标显示的弹窗
│   ├── popup.html
│   ├── popup.css
│   └── popup.js
├── background/            # 后台运行脚本
│   └── background.js
├── content-scripts/       # 注入网页的脚本
│   └── content.js
├── options/               # 插件设置页面
│   ├── options.html
│   ├── options.css
│   └── options.js
├── icons/                 # 插件图标
│   ├── 16x16.png
│   ├── 48x48.png
│   └── 128x128.png
└── utils/                 # 工具函数
    └── helper.js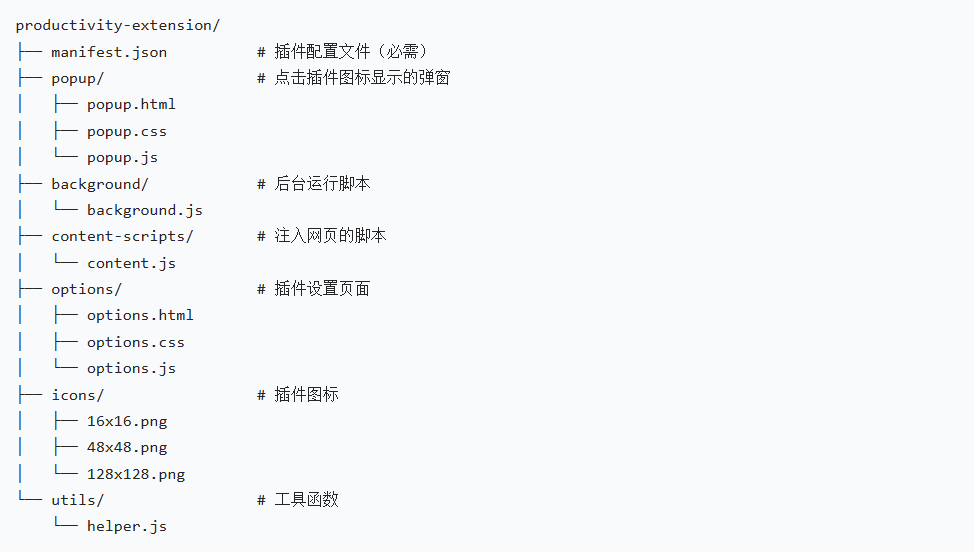
3.1 manifest.json 详解
manifest.json 是 Chrome 插件的配置文件,所有插件都必须包含这个文件。它定义了插件的名称、版本、权限、资源等关键信息。
目前最新的 manifest 版本是 V3,相比 V2 有很多改进,包括更安全的权限模型、服务工作线程替代后台页面等。
下面是一个 manifest.json V3 的示例:
{
"manifest_version": 3,
"name": "高效生产力助手",
"version": "1.0.0",
"description": "提升浏览器使用效率的工具集",
"icons": {
"16": "icons/icon16.png",
"48": "icons/icon48.png",
"128": "icons/icon128.png"
},
"action": {
"default_popup": "popup/popup.html",
"default_icon": {
"16": "icons/icon16.png",
"48": "icons/icon48.png"
}
},
"permissions": [
"activeTab",
"storage",
"scripting",
"bookmarks"
],
"background": {
"service_worker": "background/background.js"
},
"content_scripts": [
{
"matches": "\
"js": "content-scripts/content.js",
"css": "content-scripts/content.css"
}
],
"options_ui": {
"page": "options/options.html",
"open_in_tab": true
},
"commands": {
"toggle-feature": {
"suggested_key": {
"default": "Ctrl+Shift+Y",
"mac": "Command+Shift+Y"
},
"description": "切换插件功能"
}
}
}
manifest.json 各字段说明:
manifest_version: 指定 manifest 版本,V3 必须设置为 3name: 插件名称version: 插件版本号description: 插件描述icons: 不同尺寸的插件图标action: 配置插件图标点击行为,包括弹窗页面permissions: 插件需要的权限列表background: 配置后台运行的服务工作线程content_scripts: 配置注入到网页的脚本options_ui: 配置插件的设置页面commands: 配置快捷键
3.2 插件的主要组件
Chrome 插件由多个组件构成,每个组件负责不同的功能:
- Popup:点击插件图标时显示的弹窗,通常用于快速操作
- Background Service Worker:在后台持续运行的脚本,处理事件和长期任务
- Content Scripts:注入到网页中的脚本,可以访问和修改网页内容
- Options Page:插件的设置页面,允许用户自定义插件行为
- DevTools Page:自定义开发者工具面板(特定场景使用)
<mermaid>
graph TD
AChrome浏览器 --> B插件图标
B --> CPopup页面\
A --> D后台服务线程\
A --> E网页内容
E --> FContent Scripts\
A --> G插件管理页面
G --> HOptions页面\
D <--> C
D <--> F
D <--> H
</mermaid>
各组件间的通信方式:
- Popup 与 Background:直接调用和消息传递
- Content Scripts 与 Background:通过消息传递
- Popup 与 Content Scripts:通过 Background 中转消息
四、核心功能开发实战
下面我们将开发一个 "高效生产力助手" 插件,包含以下功能:
- 网页内容快速笔记
- 页面内容摘要生成
- 常用网站快速访问
- 阅读模式(去除干扰)
- 快捷键操作
4.1 项目初始化
首先创建项目目录结构:
bash
mkdir -p productivity-extension/{popup,background,content-scripts,options,icons,utils}
touch productivity-extension/manifest.json
touch productivity-extension/popup/{popup.html,popup.css,popup.js}
touch productivity-extension/background/background.js
touch productivity-extension/content-scripts/{content.js,content.css}
touch productivity-extension/options/{options.html,options.css,options.js}
将前面的 manifest.json 示例填入对应的文件中,并准备好图标文件。
4.2 开发 Popup 组件
Popup 是用户与插件交互的主要界面,我们设计一个简洁实用的界面,包含主要功能入口。
<!DOCTYPE html>
<html>
<head>
<meta charset="UTF-8">
<title>生产力助手</title>
<link rel="stylesheet" href="popup.css">
</head>
<body>
<div class="container">
<div class="header">
<h1>生产力助手</h1>
</div>
<div class="features">
<button id="noteBtn" class="feature-btn">
<i class="icon">📝</i> 添加笔记
</button>
<button id="summaryBtn" class="feature-btn">
<i class="icon">📊</i> 生成摘要
</button>
<button id="readingModeBtn" class="feature-btn">
<i class="icon">📖</i> 阅读模式
</button>
<button id="bookmarkBtn" class="feature-btn">
<i class="icon">🔖</i> 快速书签
</button>
<button id="optionsBtn" class="feature-btn">
<i class="icon">⚙️</i> 设置
</button>
</div>
<div class="notes-section">
<h3>最近笔记</h3>
<div id="recentNotes" class="notes-list">
<!-- 最近笔记将在这里显示 -->
<p class="empty-message">暂无笔记</p>
</div>
</div>
</div>
<script src="popup.js"></script>
</body>
</html>
4.3 开发 Content Scripts
Content Scripts 运行在网页上下文,可以访问和修改网页内容。我们将实现笔记添加、摘要生成和阅读模式等功能。
// 存储阅读模式状态
let isReadingModeActive = false;
// 监听来自popup或background的消息
chrome.runtime.onMessage.addListener((request, sender, sendResponse) => {
switch (request.action) {
case 'addNote':
addNote();
sendResponse({ success: true });
break;
case 'generateSummary':
generateSummary();
sendResponse({ success: true });
break;
case 'toggleReadingMode':
toggleReadingMode();
sendResponse({ success: true, isActive: isReadingModeActive });
break;
default:
sendResponse({ success: false, error: '未知操作' });
}
});
// 添加笔记功能
function addNote() {
// 创建笔记输入框
const noteContainer = document.createElement('div');
noteContainer.id = 'productivity-extension-note';
noteContainer.style.cssText = `
position: fixed;
top: 50%;
left: 50%;
transform: translate(-50%, -50%);
background: white;
padding: 20px;
border-radius: 8px;
box-shadow: 0 4px 20px rgba(0,0,0,0.15);
z-index: 99999;
width: 90%;
max-width: 500px;
`;
// 笔记HTML内容
noteContainer.innerHTML = `
<h3 style="margin-top: 0;">添加笔记</h3>
<input type="text" placeholder="笔记标题" style="width: 100%; padding: 8px; margin-bottom: 10px; border: 1px solid #ddd; border-radius: 4px; font-size: 16px;">
<textarea placeholder="请输入笔记内容..." style="width: 100%; height: 150px; padding: 8px; margin-bottom: 10px; border: 1px solid #ddd; border-radius: 4px; font-size: 14px; resize: vertical;"></textarea>
<div style="display: flex; justify-content: flex-end; gap: 10px;">
<button id="cancelNote" style="padding: 8px 16px; border: 1px solid #ddd; border-radius: 4px; background: #f5f5f5; cursor: pointer;">取消</button>
<button id="saveNote" style="padding: 8px 16px; border: none; border-radius: 4px; background: #4285f4; color: white; cursor: pointer;">保存</button>
</div>
`;
// 添加遮罩层
const overlay = document.createElement('div');
overlay.id = 'productivity-extension-overlay';
overlay.style.cssText = `
position: fixed;
top: 0;
left: 0;
right: 0;
bottom: 0;
background: rgba(0,0,0,0.5);
z-index: 99998;
`;
// 添加到页面
document.body.appendChild(overlay);
document.body.appendChild(noteContainer);
// 获取输入元素
const titleInput = noteContainer.querySelector('input');
const contentTextarea = noteContainer.querySelector('textarea');
const cancelBtn = noteContainer.querySelector('#cancelNote');
const saveBtn = noteContainer.querySelector('#saveNote');
// 自动聚焦到标题输入框
titleInput.focus();
// 取消按钮事件
cancelBtn.addEventListener('click', () => {
document.body.removeChild(noteContainer);
document.body.removeChild(overlay);
});
// 保存按钮事件
saveBtn.addEventListener('click', () => {
const title = titleInput.value.trim();
const content = contentTextarea.value.trim();
if (!title || !content) {
alert('请输入标题和内容');
return;
}
// 保存笔记到storage
saveNoteToStorage({
title,
content,
url: window.location.href,
pageTitle: document.title,
timestamp: Date.now()
});
// 移除弹窗和遮罩
document.body.removeChild(noteContainer);
document.body.removeChild(overlay);
// 显示成功提示
showNotification('笔记保存成功!');
});
// 点击遮罩关闭
overlay.addEventListener('click', () => {
document.body.removeChild(noteContainer);
document.body.removeChild(overlay);
});
}
// 保存笔记到storage
function saveNoteToStorage(note) {
chrome.storage.sync.get('notes', (result) => {
const notes = result.notes || \[\];
notes.push(note);
// 保存回storage
chrome.storage.sync.set({ notes }, () => {
console.log('笔记已保存');
});
});
}
// 生成页面摘要
function generateSummary() {
// 显示加载提示
showNotification('正在生成摘要...', true);
// 提取页面主要内容
const pageContent = extractMainContent();
// 简单摘要算法(实际应用中可以使用更复杂的NLP算法或调用API)
const summary = simpleSummarize(pageContent);
// 隐藏加载提示
hideNotification();
// 显示摘要
showSummaryDialog(summary);
}
// 提取页面主要内容
function extractMainContent() {
// 尝试找到主要内容区域
const contentSelectors = [
'article',
'.article',
'.post',
'.content',
'#content',
'.main-content',
'#main-content'
];
let mainContent = null;
// 尝试匹配选择器
for (const selector of contentSelectors) {
const element = document.querySelector(selector);
if (element) {
mainContent = element;
break;
}
}
// 如果没有找到,使用body
if (!mainContent) {
mainContent = document.body;
}
// 提取文本,过滤掉过短的段落
const paragraphs = Array.from(mainContent.querySelectorAll('p'))
.map(p => p.textContent.trim())
.filter(text => text.length > 50);
// 如果段落不够,尝试提取其他元素
if (paragraphs.length < 3) {
const allText = mainContent.textContent.trim();
// 简单分割成"段落"
return splitIntoChunks(allText, 500);
}
return paragraphs;
}
// 简单摘要算法
function simpleSummarize(content) {
// 如果内容是数组,将其连接成字符串
const text = Array.isArray(content) ? content.join(' ') : content;
// 分割成句子
const sentences = text.match(/\^.!?*.!?/g) || \[\];
// 如果句子太少,直接返回原文
if (sentences.length <= 5) {
return sentences.join(' ');
}
// 简单的词频分析
const words = text.toLowerCase().match(/\ba-z0-9+\b/g) || \[\];
const stopWords = 'the', 'and', 'of', 'to', 'a', 'in', 'is', 'it', 'you', 'that', 'he', 'she', 'this', 'my', 'your', 'me', 'we', 'us', 'our', 'for', 'on', 'with', 'as', 'at', 'by', 'i', 'have', 'has', 'had', 'be', 'been', 'are', 'was', 'were', 'will', 'would', 'shall', 'should', 'may', 'might', 'must', 'can', 'could', 'an', 'but', 'or', 'so', 'not', 'no', 'yes', 'from', 'up', 'down', 'out', 'about', 'than', 'then', 'its', 'their', 'them', 'they', 'which', 'what', 'when', 'where', 'why', 'how', 'all', 'any', 'both', 'each', 'few', 'more', 'most', 'other', 'some', 'such', 'no', 'nor', 'not', 'only', 'own', 'same', 'so', 'than', 'too', 'very', 's', 't', 'don', 'now';
// 计算词频
const wordScores = {};
words.forEach(word => {
if (!stopWords.includes(word) && word.length > 2) {
wordScoresword = (wordScoresword || 0) + 1;
}
});
// 计算句子分数
const sentenceScores = sentences.map((sentence, index) => {
let score = 0;
const sentenceWords = sentence.toLowerCase().match(/\ba-z0-9+\b/g) || \[\];
sentenceWords.forEach(word => {
if (wordScoresword) {
score += wordScoresword;
}
});
// 给首句和尾句加分
if (index === 0 || index === sentences.length - 1) {
score += 5;
}
return { sentence, score, index };
});
// 排序并选择前5句作为摘要
const topSentences = sentenceScores
.sort((a, b) => b.score - a.score)
.slice(0, 5)
.sort((a, b) => a.index - b.index); // 保持原顺序
return topSentences.map(s => s.sentence).join(' ');
}
// 显示摘要对话框
function showSummaryDialog(summary) {
// 创建对话框
const dialog = document.createElement('div');
dialog.id = 'productivity-extension-summary';
dialog.style.cssText = `
position: fixed;
top: 50%;
left: 50%;
transform: translate(-50%, -50%);
background: white;
padding: 20px;
border-radius: 8px;
box-shadow: 0 4px 20px rgba(0,0,0,0.15);
z-index: 99999;
width: 90%;
max-width: 600px;
max-height: 70vh;
overflow-y: auto;
`;
// 对话框内容
dialog.innerHTML = `
<div style="display: flex; justify-content: space-between; align-items: center; margin-bottom: 15px;">
<h3 style="margin: 0;">页面摘要</h3>
<button id="closeSummary" style="background: none; border: none; font-size: 18px; cursor: pointer;">×</button>
</div>
<div id="summaryContent" style="line-height: 1.6; font-size: 15px;">
${summary ? summary : '无法生成摘要,请尝试其他页面。'}
</div>
<div style="margin-top: 15px; text-align: right;">
<button id="copySummary" style="padding: 8px 16px; border: none; border-radius: 4px; background: #4285f4; color: white; cursor: pointer;">复制摘要</button>
</div>
`;
// 添加遮罩层
const overlay = document.createElement('div');
overlay.id = 'productivity-extension-overlay';
overlay.style.cssText = `
position: fixed;
top: 0;
left: 0;
right: 0;
bottom: 0;
background: rgba(0,0,0,0.5);
z-index: 99998;
`;
// 添加到页面
document.body.appendChild(overlay);
document.body.appendChild(dialog);
// 关闭按钮事件
dialog.querySelector('#closeSummary').addEventListener('click', () => {
document.body.removeChild(dialog);
document.body.removeChild(overlay);
});
// 复制按钮事件
dialog.querySelector('#copySummary').addEventListener('click', () => {
const summaryText = dialog.querySelector('#summaryContent').textContent;
navigator.clipboard.writeText(summaryText).then(() => {
showNotification('摘要已复制到剪贴板');
}).catch(err => {
console.error('复制失败:', err);
showNotification('复制失败,请手动复制');
});
});
// 点击遮罩关闭
overlay.addEventListener('click', () => {
document.body.removeChild(dialog);
document.body.removeChild(overlay);
});
}
// 切换阅读模式
function toggleReadingMode() {
if (isReadingModeActive) {
// 关闭阅读模式
disableReadingMode();
} else {
// 开启阅读模式
enableReadingMode();
}
isReadingModeActive = !isReadingModeActive;
}
// 开启阅读模式
function enableReadingMode() {
// 保存当前页面状态,以便恢复
savePageState();
// 创建阅读模式容器
const readerContainer = document.createElement('div');
readerContainer.id = 'productivity-extension-reader';
readerContainer.style.cssText = `
position: fixed;
top: 0;
left: 0;
right: 0;
bottom: 0;
background: #f8f8f8;
z-index: 99997;
overflow-y: auto;
padding: 20px;
box-sizing: border-box;
`;
// 提取并净化内容
const mainContent = extractMainContent();
const pageTitle = document.title;
// 构建阅读模式内容
let readerContent = `
<div style="max-width: 800px; margin: 0 auto; padding: 20px; background: white; border-radius: 8px; box-shadow: 0 2px 10px rgba(0,0,0,0.1);">
<div style="display: flex; justify-content: space-between; align-items: center; margin-bottom: 20px;">
<h1 style="margin: 0; color: #333; font-size: 24px;">${pageTitle}</h1>
<button id="exitReader" style="padding: 8px 16px; border: none; border-radius: 4px; background: #4285f4; color: white; cursor: pointer;">退出阅读模式</button>
</div>
<div id="readerContent" style="line-height: 1.8; font-size: 18px; color: #333;">
`;
// 添加内容
if (Array.isArray(mainContent)) {
mainContent.forEach(paragraph => {
if (paragraph.length > 30) { // 过滤过短内容
readerContent += `<p style="margin-bottom: 20px;">${paragraph}</p>`;
}
});
} else {
readerContent += `<p style="margin-bottom: 20px;">${mainContent}</p>`;
}
readerContent += `
</div>
</div>
`;
readerContainer.innerHTML = readerContent;
// 添加到页面
document.body.appendChild(readerContainer);
// 退出按钮事件
readerContainer.querySelector('#exitReader').addEventListener('click', toggleReadingMode);
// 显示提示
showNotification('已进入阅读模式');
}
// 关闭阅读模式
function disableReadingMode() {
// 移除阅读模式容器
const readerContainer = document.getElementById('productivity-extension-reader');
if (readerContainer) {
document.body.removeChild(readerContainer);
}
// 恢复页面状态
restorePageState();
// 显示提示
showNotification('已退出阅读模式');
}
// 保存页面状态
function savePageState() {
// 这里可以实现更复杂的状态保存逻辑
// 简化版:只记录当前滚动位置
const scrollPosition = window.scrollY;
sessionStorage.setItem('productivity-extension-scroll-pos', scrollPosition);
}
// 恢复页面状态
function restorePageState() {
// 恢复滚动位置
const scrollPosition = sessionStorage.getItem('productivity-extension-scroll-pos');
if (scrollPosition) {
window.scrollTo(0, parseInt(scrollPosition));
sessionStorage.removeItem('productivity-extension-scroll-pos');
}
}
// 显示通知
function showNotification(message, isLoading = false) {
// 先移除已存在的通知
hideNotification();
// 创建通知元素
const notification = document.createElement('div');
notification.id = 'productivity-extension-notification';
notification.style.cssText = `
position: fixed;
bottom: 20px;
left: 50%;
transform: translateX(-50%);
background: #333;
color: white;
padding: 12px 20px;
border-radius: 4px;
box-shadow: 0 2px 10px rgba(0,0,0,0.2);
z-index: 99999;
display: flex;
align-items: center;
gap: 10px;
`;
// 添加加载指示器(如果需要)
if (isLoading) {
notification.innerHTML = `
<div style="width: 16px; height: 16px; border: 2px solid #fff; border-top-color: transparent; border-radius: 50%; animation: spin 1s linear infinite;"></div>
<span>${message}</span>
<style>
@keyframes spin {
to { transform: rotate(360deg); }
}
</style>
`;
} else {
notification.textContent = message;
}
// 添加到页面
document.body.appendChild(notification);
// 非加载通知自动消失
if (!isLoading) {
setTimeout(hideNotification, 3000);
}
}
// 隐藏通知
function hideNotification() {
const notification = document.getElementById('productivity-extension-notification');
if (notification) {
document.body.removeChild(notification);
}
}
// 辅助函数:将长文本分割成块
function splitIntoChunks(text, chunkSize) {
const chunks = \[\];
for (let i = 0; i < text.length; i += chunkSize) {
chunks.push(text.substring(i, i + chunkSize));
}
return chunks;
}
4.4 开发 Background Service Worker
Background Service Worker 在后台运行,负责处理插件的生命周期事件、跨组件通信和长期任务。
// 插件安装时的初始化
chrome.runtime.onInstalled.addListener((details) => {
console.log('插件安装完成,原因:', details.reason);
// 首次安装时的操作
if (details.reason === 'install') {
// 初始化存储
chrome.storage.sync.set({
notes: \[\],
settings: {
readingModeFontSize: 18,
readingModeLineHeight: 1.8,
showNotifications: true
}
});
// 显示欢迎页面
chrome.tabs.create({
url: chrome.runtime.getURL('welcome.html')
});
}
// 扩展更新时的操作
if (details.reason === 'update') {
console.log('插件已更新,从版本', details.previousVersion, '到', chrome.runtime.getManifest().version);
}
});
// 监听浏览器启动
chrome.runtime.onStartup.addListener(() => {
console.log('浏览器启动,插件初始化');
// 可以在这里执行一些启动时需要的操作
});
// 监听消息
chrome.runtime.onMessage.addListener((request, sender, sendResponse) => {
console.log('收到消息:', request, '来自:', sender);
switch (request.action) {
case 'getNotes':
// 获取所有笔记
chrome.storage.sync.get('notes', (result) => {
sendResponse({ notes: result.notes || \[\] });
});
return true; // 表示异步响应
case 'deleteNote':
// 删除笔记
if (request.index !== undefined) {
chrome.storage.sync.get('notes', (result) => {
const notes = result.notes || \[\];
if (request.index < notes.length) {
notes.splice(request.index, 1);
chrome.storage.sync.set({ notes }, () => {
sendResponse({ success: true });
});
} else {
sendResponse({ success: false, error: '笔记不存在' });
}
});
} else {
sendResponse({ success: false, error: '缺少参数' });
}
return true;
case 'getSettings':
// 获取设置
chrome.storage.sync.get('settings', (result) => {
sendResponse({ settings: result.settings || {} });
});
return true;
case 'saveSettings':
// 保存设置
if (request.settings) {
chrome.storage.sync.set({ settings: request.settings }, () => {
sendResponse({ success: true });
});
} else {
sendResponse({ success: false, error: '缺少设置数据' });
}
return true;
default:
sendResponse({ success: false, error: '未知操作' });
}
});
// 监听快捷键
chrome.commands.onCommand.addListener((command) => {
console.log('收到快捷键命令:', command);
switch (command) {
case 'toggle-feature':
// 切换主要功能
chrome.tabs.query({ active: true, currentWindow: true }, (tabs) => {
chrome.tabs.sendMessage(tabs0.id, { action: 'toggleMainFeature' });
});
break;
case 'add-note':
// 添加笔记快捷键
chrome.tabs.query({ active: true, currentWindow: true }, (tabs) => {
chrome.tabs.sendMessage(tabs0.id, { action: 'addNote' });
});
break;
case 'toggle-reading-mode':
// 切换阅读模式快捷键
chrome.tabs.query({ active: true, currentWindow: true }, (tabs) => {
chrome.tabs.sendMessage(tabs0.id, { action: 'toggleReadingMode' });
});
break;
}
});
// 监听标签页更新
chrome.tabs.onUpdated.addListener((tabId, changeInfo, tab) => {
// 当页面加载完成时
if (changeInfo.status === 'complete') {
console.log('页面加载完成:', tab.url);
// 可以在这里执行一些页面加载完成后的操作
}
});
// 监听书签变化
chrome.bookmarks.onCreated.addListener((id, bookmark) => {
console.log('新书签创建:', bookmark.title, bookmark.url);
// 可以在这里处理新书签创建事件
});
4.5 开发 Options 页面
Options 页面允许用户自定义插件的行为和设置。
<!DOCTYPE html>
<html>
<head>
<meta charset="UTF-8">
<title>生产力助手 - 设置</title>
<link rel="stylesheet" href="options.css">
</head>
<body>
<div class="container">
<header>
<h1>生产力助手 - 设置</h1>
<p>自定义您的插件体验</p>
</header>
<main>
<section class="settings-section">
<h2>阅读模式设置</h2>
<div class="setting-item">
<label for="fontSize">字体大小 (px)</label>
<input type="number" id="fontSize" min="12" max="28" step="1">
</div>
<div class="setting-item">
<label for="lineHeight">行高</label>
<input type="number" id="lineHeight" min="1.2" max="2.5" step="0.1">
</div>
<div class="setting-item">
<label for="fontFamily">字体</label>
<select id="fontFamily">
<option value="system">系统默认</option>
<option value="serif">衬线字体</option>
<option value="sans-serif">无衬线字体</option>
<option value="monospace">等宽字体</option>
</select>
</div>
</section>
<section class="settings-section">
<h2>通知设置</h2>
<div class="setting-item checkbox-item">
<input type="checkbox" id="showNotifications">
<label for="showNotifications">显示操作通知</label>
</div>
</section>
<section class="settings-section">
<h2>笔记管理</h2>
<p>您可以在这里管理所有笔记</p>
<div id="notesContainer">
<!-- 笔记列表将在这里显示 -->
<div class="loading">加载笔记中...</div>
</div>
<button id="exportNotes" class="action-btn">导出笔记</button>
<button id="clearAllNotes" class="action-btn danger">清空所有笔记</button>
</section>
<section class="settings-section">
<h2>快捷键设置</h2>
<p>您可以在Chrome的扩展程序快捷键设置中自定义</p>
<button id="openKeyboardShortcuts" class="action-btn">打开快捷键设置</button>
</section>
</main>
<footer>
<button id="saveSettings" class="primary-btn">保存设置</button>
<div id="saveStatus" class="status-message"></div>
</footer>
</div>
<script src="options.js"></script>
</body>
</html>
五、插件调试与测试
5.1 加载未打包的插件
- 打开 Chrome 浏览器,访问
chrome://extensions - 确保 "开发者模式" 已开启
- 点击 "加载已解压的扩展程序"
- 选择插件项目的根目录
<mermaid>
graph TD
A打开chrome://extensions --> B开启开发者模式
B --> C点击"加载已解压的扩展程序"
C --> D选择插件根目录
D --> E插件加载完成
E --> F开始测试和调试
</mermaid>
5.2 调试工具
Chrome 提供了强大的调试工具,用于调试插件的不同组件:
-
Popup 调试:
- 右键点击插件图标,选择 "检查"
- 会打开开发者工具,用于调试 Popup 的 HTML、CSS 和 JavaScript
-
Background 调试:
- 在
chrome://extensions页面,找到你的插件 - 点击 "服务工作线程" 链接,打开 Background 的开发者工具
- 在
-
Content Scripts 调试:
- 打开任意网页,按 F12 打开开发者工具
- 在 "Sources" 面板中,展开 "Content scripts" 目录
- 找到你的插件的 Content Scripts 进行调试
-
Options 页面调试:
- 打开插件的 Options 页面
- 按 F12 打开开发者工具进行调试
5.3 常见问题排查
-
插件无法加载:
- 检查 manifest.json 是否有语法错误
- 确保文件路径正确
- 检查是否使用了不支持的 API 或权限
-
组件间通信失败:
- 检查消息格式是否正确
- 确保在正确的时机发送消息(如页面加载完成后)
- 检查是否有必要的权限
-
Storage 数据不持久:
- 区分
chrome.storage.sync和chrome.storage.local的使用场景 - 检查存储数据的大小是否超过限制
- 确保正确处理异步操作
- 区分
六、插件打包与发布
6.1 打包插件
- 在
chrome://extensions页面,找到你的插件 - 点击 "打包扩展程序"
- 选择插件根目录(无需私钥文件,首次打包)
- 点击 "打包扩展程序" 按钮
- 会生成一个.crx 文件(插件包)和一个.pem 文件(私钥,用于后续更新)
6.2 发布到 Chrome Web Store
- 访问Chrome Web Store 开发者控制台
- 登录你的 Google 账号
- 支付一次性的开发者注册费(通常为 5 美元)
- 点击 "添加新项",上传你的.crx 文件
- 填写插件的详细信息,包括名称、描述、截图等
- 提交审核,通常需要几个小时到几天时间
- 审核通过后,插件将在 Chrome Web Store 上线
<mermaid>
graph TD
A准备插件材料 --> B创建开发者账号并付费
B --> C打包插件为CRX文件
C --> D上传到Chrome Web Store
D --> E填写插件信息和截图
E --> F提交审核
F --> G{审核结果}
G -->|通过| H插件上线
G -->|不通过| I修改问题后重新提交
I --> F
</mermaid>
6.3 插件更新
- 对插件进行修改和测试
- 增加 manifest.json 中的 version 号
- 使用之前生成的.pem 文件重新打包插件
- 在开发者控制台上传新的.crx 文件
- 提交更新,同样需要经过审核
七、高级功能与最佳实践
7.1 高级功能实现
- 上下文菜单 :
可以为插件添加右键菜单,增强用户体验。
javascript
运行
// 在background.js中
chrome.contextMenus.create({
    id: "addNoteContext",
    title: "添加笔记到当前页面",
    contexts: ["page", "selection"]
});

chrome.contextMenus.onClicked.addListener((info, tab) => {
    if (info.menuItemId === "addNoteContext") {
        // 处理右键菜单点击事件
        chrome.tabs.sendMessage(tab.id, {
            action: 'addNote',
            selection: info.selectionText
        });
    }
});- 跨域请求 :
插件可以通过 manifest 配置权限,实现跨域请求。
json
// 在manifest.json中
"permissions": [
    "https://api.example.com/*"
]- 与其他服务集成 :
可以与第三方 API 集成,如 OpenAI、Notion 等,扩展插件功能。
7.2 性能优化
-
减少 Content Scripts 的影响:
- 只在需要的页面注入脚本
- 避免阻塞页面加载的操作
- 使用
run_at指定注入时机
-
优化 Background Service Worker:
- 避免长时间运行的任务
- 合理使用缓存
- 及时清理不再需要的资源
-
优化存储使用:
- 区分
sync和local存储的使用场景 - 定期清理过期数据
- 避免存储大量数据
- 区分
7.3 安全最佳实践
-
最小权限原则:
- 只申请必要的权限
- 避免使用
<all_urls>等过于宽泛的权限
-
防止 XSS 攻击:
- 对用户输入进行验证和转义
- 避免使用
innerHTML等可能引入 XSS 的 API
-
安全的数据处理:
- 敏感数据加密存储
- 避免在客户端存储敏感信息
- 使用 HTTPS 进行 API 通信
八、Prompt 示例:使用 AI 辅助插件开发
以下是一些使用 AI(如 ChatGPT)辅助 Chrome 插件开发的 Prompt 示例:
- 功能实现 Prompt:
plaintext
我正在开发一个Chrome插件,使用manifest V3。我需要实现一个功能:当用户点击插件图标时,获取当前页面的所有图片并显示在popup中。请提供实现这个功能的完整代码,包括popup页面、content script和background之间的通信逻辑。- 问题解决 Prompt:
plaintext
在我的Chrome插件中,使用chrome.runtime.sendMessage从content script向background发送消息时,经常收到"Could not establish connection. Receiving end does not exist."错误。我的manifest版本是V3,代码如下[粘贴代码]。请帮我找出问题并提供解决方案。- 代码优化 Prompt:
plaintext
这是我Chrome插件中的一段代码,用于处理用户笔记的存储和检索[粘贴代码]。目前随着笔记数量增加,性能有所下降。请帮我优化这段代码,提高处理大量笔记时的性能。- 新功能创意 Prompt:
plaintext
我已经开发了一个提升浏览器生产力的Chrome插件,目前有笔记和阅读模式功能。请为我的插件构思5个新的实用功能,帮助用户更高效地使用浏览器,并简要说明每个功能的实现思路。九、总结与展望
通过本文的学习,你已经掌握了 Chrome 插件开发的核心知识,包括:
- Chrome 插件的基本概念和结构
- manifest.json 配置文件的使用
- 插件各组件(Popup、Background、Content Scripts、Options)的开发
- 组件间通信的实现
- 插件的调试、打包和发布流程
- 高级功能和最佳实践
Chrome 插件开发是一个持续学习和实践的过程。随着 Web 技术的发展和 Chrome 浏览器的更新,插件开发也会不断引入新的特性和 API。
未来可以探索的方向:
- 集成 AI 功能:利用 GPT 等 AI 模型增强插件的智能性
- 跨浏览器支持:适配 Firefox、Edge 等其他基于 Chromium 的浏览器
- 渐进式 Web 应用 (PWA) 结合:将插件功能与 PWA 结合,提供更丰富的体验
- 协作功能:添加多人协作功能,如共享笔记、协同编辑等
希望本文能帮助你开启 Chrome 插件开发之旅,打造出提升生产力的优秀工具!