技术栈:
前端:Vue3全家桶
后端:django、conda、channel
通信方式:websocket
业务场景:实现实时聊天系统,聊天内容广播至所有人,目前仅支持文字聊天,实时语音、屏幕共享等方式仍在钻研中
由于前端较为简单,所以先从后端入手
一、后端
1.1新建工程
创建django工程
使用下面这个命令检查电脑是否装了django
python
python -m django --version如果这行命令输出了一个版本号,证明你已经安装了此版本的 Django;如果你得到的是一个"No module named django"的错误提示,则表明你还未安装。
执行下面这个命令使用django创建工程
python
django-admin startproject applications这行代码将会在当前目录下创建一个 applications目录,。
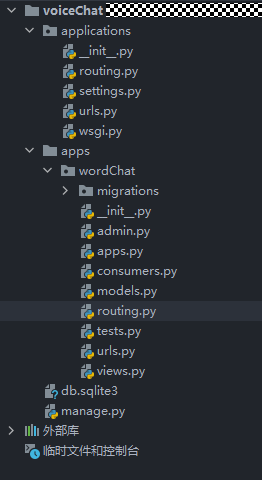
在目录下创建apps文件夹以存放各个应用,然后cd到apps文件夹下创建应用
python
python manage.py startapp wordChat对照下面的文件结构来补全缺失的文件
文件结构如图:
1.2、配置conda环境
这里提供链接:配置conda环境
1.3、安装Channels
由于django本身不支持websocket,所以我们使用django官方推荐的第三方库Channels
这里需要安装Channels和channels_redis
python
pip install channels==2.1.7
pip install channels_redis==2.3.3
1.4、环境配置
先来到settings.py手动添加channels和你的自定义app
python
INSTALLED_APPS = [
    # "daphne",
    'django.contrib.admin',
    'django.contrib.auth',
    'django.contrib.contenttypes',
    'django.contrib.sessions',
    'django.contrib.messages',
    'django.contrib.staticfiles',
    'channels',
    # 自定义app
    'apps.wordChat'
]
添加ASGI_APPLICATION
python
ASGI_APPLICATION = 'applications.routing.application'配置channels_layers
python
CHANNEL_LAYERS = {
    "default": {
        "BACKEND": "channels_redis.core.RedisChannelLayer",
        "CONFIG": {
            "hosts": [("localhost", 6379)],
            "capacity": 1500,
            "expiry": 10,
        },
    },
}
然后在applications文件夹下新建routing.py文件(与url文件用处一样,区别在于routing.py是走websocket连接的),有多少个app就导入多少个app到routingList里面
python
"""
@describe websocket路由相关
@author
@date
"""
from channels.routing import ProtocolTypeRouter, URLRouter
from channels.auth import AuthMiddlewareStack
import apps.wordChat.routing as wordChat

routinglist = []
routinglist.extend(wordChat.websocket_urlpatterns)
# routinglist.extend(a.websocket_urlpatterns)
application = ProtocolTypeRouter({
    'websocket': AuthMiddlewareStack(
        URLRouter(
            routinglist
        )
    )
})
1.5、功能实现
接下来在wordChat文件夹下新建routing.py文件和consumers.py文件,routing.py的作用是让前端发来的接口找到对应的位置,consumers.py文件的作用是写接口逻辑
在routing.py中做如下配置
python
from django.urls import path
from apps.wordChat.consumers import ChatConsumer

websocket_urlpatterns = [
    path('ws/chat/', ChatConsumer),
]
在consumers.py中接口逻辑如下
python
from channels.generic.websocket import AsyncWebsocketConsumer
import json
import asyncio
import logging
import random
import string
from datetime import datetime
from urllib.parse import parse_qs
# 配置日志
logger = logging.getLogger(__name__)


class ChatConsumer(AsyncWebsocketConsumer):
    def __init__(self, *args, **kwargs):
        super().__init__(*args, **kwargs)
        self.room_group_name = 'ops_coffee'
        self.connected = False
        self.heartbeat_task = None
        self.client_id = None  # 每个客户端唯一标识
        self.client_name = "用户"  # 客户端显示名称

    async def connect(self):
        # 检查是否已经连接
        if self.connected:
            await self.close(code=4000)
            return

        self.connected = True
        # 加入房间组
        await self.channel_layer.group_add(
            self.room_group_name,
            self.channel_name
        )
        # 获取查询字符串
        query_string = self.scope.get('query_string', b'').decode('utf-8')

        # 解析查询字符串
        query_params = parse_qs(query_string)

        # 获取 username 参数
        username_list = query_params.get('username', [])
        self.client_name = username_list[0] if username_list else "匿名用户"
        # 生成客户端唯一ID和名称
        self.client_id = self.generate_client_id()
        # self.client_name = self.scope['url_route']['kwargs'].get('username', None)

        await self.accept()
        logger.info(f"WebSocket 连接已建立, 客户端ID: {self.client_id}")

        # 发送欢迎消息
        await self.send_welcome_message()

        # 启动心跳任务
        self.heartbeat_task = asyncio.create_task(self.send_heartbeat())
        logger.info("心跳任务已启动")

    def generate_client_id(self):
        """生成8位随机客户端ID"""
        return ''.join(random.choices(string.ascii_letters + string.digits, k=8))

    async def send_welcome_message(self):
        """发送欢迎消息"""
        welcome_message = (
            f"欢迎来到聊天室!您的ID是 {self.client_id}, 名称是 {self.client_name}。\n"
            "试试发送包含'帮助'、'时间'或'天气'的消息触发自动回复"
        )

        await self.send(text_data=json.dumps({
            'type': 'system',
            'message': welcome_message,
            'client_id': self.client_id,
            'client_name': self.client_name
        }))

        # 广播新用户加入消息
        await self.channel_layer.group_send(
            self.room_group_name,
            {
                'type': 'chat_message',
                'message': f"{self.client_name} 加入了聊天室",
                'sender_id': 'system',
                'sender_name': '系统通知',
                'is_system': True
            }
        )

    async def disconnect(self, close_code):
        # 标记连接已断开
        self.connected = False
        logger.info(f"WebSocket 断开连接,代码: {close_code}")

        # 广播用户离开消息
        if self.client_id:
            await self.channel_layer.group_send(
                self.room_group_name,
                {
                    'type': 'chat_message',
                    'message': f"{self.client_name} 离开了聊天室",
                    'sender_id': 'system',
                    'sender_name': '系统通知',
                    'is_system': True
                }
            )

        # 取消心跳任务
        if self.heartbeat_task and not self.heartbeat_task.done():
            self.heartbeat_task.cancel()
            try:
                await self.heartbeat_task
            except asyncio.CancelledError:
                logger.info("心跳任务已取消")
            except Exception as e:
                logger.error(f"等待心跳任务时出错: {str(e)}")

        # 离开房间组
        await self.channel_layer.group_discard(
            self.room_group_name,
            self.channel_name
        )

    async def receive(self, text_data):
        # 检查连接状态
        if not self.connected:
            logger.warning("尝试在断开连接后接收消息")
            await self.close(code=4001)
            return

        logger.debug(f"收到消息: {text_data}")

        try:
            data = json.loads(text_data)
            message = data.get('message', '')
            message_type = data.get('type', 'chat')

            if message_type == 'chat' and message:
                # 广播用户消息到所有客户端
                await self.broadcast_user_message(message)

                # 检查是否需要自动回复
                if self.should_reply(message):
                    auto_reply = await self.generate_auto_reply(message)
                    await asyncio.sleep(1.5)  # 添加延迟
                    await self.broadcast_auto_reply(auto_reply)

            elif message_type == 'heartbeat':
                # 处理心跳响应
                logger.debug("收到心跳响应")

        except json.JSONDecodeError:
            logger.warning("消息JSON解析失败")
            await self.send_error_message('消息格式错误,请发送有效的JSON')
        except Exception as e:
            logger.error(f"处理消息时出错: {str(e)}")
            await self.send_error_message('处理消息时发生错误')

    async def broadcast_user_message(self, message):
        """广播用户消息到所有客户端"""
        await self.channel_layer.group_send(
            self.room_group_name,
            {
                'type': 'chat_message',
                'message': message,
                'sender_id': self.client_id,
                'sender_name': self.client_name,
                'is_auto_reply': False,
                'is_system': False,
                'timestamp': datetime.now().isoformat()
            }
        )

    async def broadcast_auto_reply(self, message):
        """广播自动回复消息"""
        await self.channel_layer.group_send(
            self.room_group_name,
            {
                'type': 'chat_message',
                'message': message,
                'sender_id': 'system',
                'sender_name': '客服助手',
                'is_auto_reply': True,
                'is_system': False,
                'timestamp': datetime.now().isoformat()
            }
        )

    async def send_error_message(self, message):
        """发送错误消息到当前客户端"""
        await self.send(text_data=json.dumps({
            'type': 'error',
            'message': message,
            'timestamp': datetime.now().isoformat()
        }))

    def should_reply(self, message):
        """检查是否需要自动回复"""
        triggers = ["?", "help", "帮助", "怎么", "如何", "请问", "时间", "天气"]
        return any(trigger in message for trigger in triggers)

    async def generate_auto_reply(self, user_message):
        """生成智能回复"""
        if any(word in user_message for word in ["你好", "您好", "hi", "hello"]):
            return "您好!我是客服助手,有什么可以帮您?"

        if "时间" in user_message:
            return f"现在是北京时间:{datetime.now().strftime('%Y-%m-%d %H:%M:%S')}"

        if "天气" in user_message:
            return "您可以通过 https://www.weather.com 查询实时天气信息"

        return "感谢您的留言!如需人工帮助,请留言'人工客服'"

    async def chat_message(self, event):
        """处理聊天消息广播"""
        if not self.connected:
            return

        # 准备消息数据
        message_data = {
            'type': 'chat',
            'message': event['message'],
            'sender_id': event['sender_id'],
            'sender_name': event['sender_name'],
            'is_auto_reply': event.get('is_auto_reply', False),
            'is_system': event.get('is_system', False),
            'timestamp': event.get('timestamp', datetime.now().isoformat())
        }

        try:
            await self.send(text_data=json.dumps(message_data))
        except Exception as e:
            logger.error(f"发送消息时出错: {str(e)}")

    async def send_heartbeat(self):
        """定期发送心跳包保持连接活跃"""
        logger.info("心跳任务开始运行")

        try:
            while self.connected:
                try:
                    await asyncio.sleep(25)

                    if not self.connected:
                        break

                    await self.send(text_data=json.dumps({
                        'type': 'heartbeat',
                        'message': 'ping',
                        'timestamp': datetime.now().isoformat()
                    }))
                    logger.debug("发送心跳包")
                except asyncio.CancelledError:
                    break
                except Exception as e:
                    logger.error(f"发送心跳包时出错: {str(e)}")

        except Exception as e:
            logger.error(f"心跳任务出错: {str(e)}")
        finally:
            logger.info("心跳任务结束")
执行如下命令启动工程
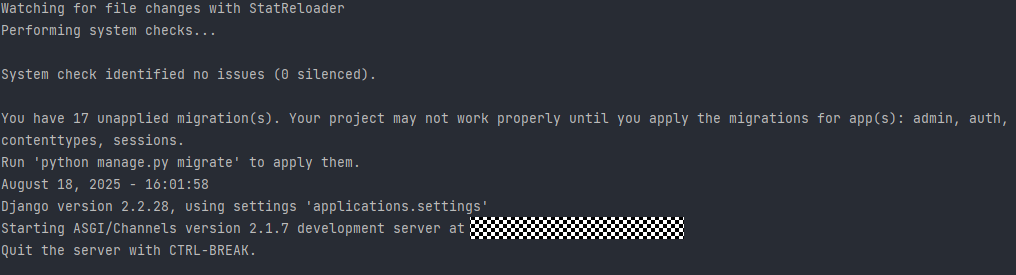
python
python manage.py runserver 0.0.0.0:8000出现以下log说明工程已经在运行中
二、前端
前端要做的核心就是websocket的连接
javascript
<template>
    <div id="websocket_test_box">
        <div id="show_msg_box">
            <div v-for="item in chat_data" :key="item.id">
              {{ item.sender_name }} : {{ item.message }}
            </div>
        </div>
        <div id="send_box">
            <div id="input_box">
                <input type="text" id="input_msg" v-model="msg">
            </div>
            <div id="send_msg_box" @click="send_msg()">发送</div>
        </div>
    </div>
</template>

<script setup>
import { onBeforeUnmount, onMounted, ref } from 'vue'
let ws = null
let msg = ref()
let username=ref()
let chat_data=ref([])


onMounted(() => {
    username.value='user'+Math.floor(Math.random()*1000)
    initSocket()
})


const initSocket = () => {
    ws = new WebSocket("ws://后端IP:8000/ws/chat/?username="+username.value)
    ws.onopen = () => {
        console.log("websocket连接已打开");
        ws.send(JSON.stringify({
        message: 'test'
    }))
    }
    ws.onmessage = (e) => {
        // console.log(JSON.parse(e.data));
        // let res=JSON.parse(e.data)
        let msg=JSON.parse(e.data)
        if (msg.message!=="ping"&&msg.message!=="test") {
            chat_data.value.push({
            id:chat_data.value.length,
            sender_name:msg.sender_name,
            message:msg.message
        })
        }


    }
    ws.onclose = e => {
        console.log("websocket error", e);
    }
    ws.onerror = e => {
        console.log("websocket error", e);
    }
}

const send_msg = () => {
    ws.send(JSON.stringify({
        user:username.value,
        message: msg.value
    }))
}
</script>