1.Hbase安装
bash
          ┌──────────────────────────────────────┐
          │               Client                 │
          └──────────────────────────────────────┘
                           │
                           ▼
          ┌──────────────────────────────────────┐
          │               ZooKeeper              │
          │   负责 HMaster 选举、元数据存储、       │
          │   集群状态协调                         │
          └──────────────────────────────────────┘
                           │
            ┌──────────────┴──────────────┐
            ▼                             ▼
┌───────────────────────┐     ┌───────────────────────┐
│        HMaster        │     │        HMaster        │
│(主) 负责管理元数据表、  │ ... │(备) 热备,主挂时接管     │
│    分配 Region、监控   │     │                       │
└───────────────────────┘     └───────────────────────┘
            │
            ▼
┌──────────────────────────────────────────────────────┐
│                      RegionServers                   │
│ 每个 RegionServer 管理若干 Region(表的分片),         │
│ 提供数据读写服务                                       │
└──────────────────────────────────────────────────────┘
            │
            ▼
┌──────────────────────────────────────────────────────┐
│                         HDFS                         │
│ 底层存储,保存 HBase 的实际数据文件(HFile)             │
│ 以及 WAL 日志                                         │
└──────────────────────────────────────────────────────┘-
Client → 先联系 ZooKeeper,获取当前活跃的 HMaster 和 RegionServer 信息。
-
ZooKeeper → 协调 HMaster 选举、记录元数据位置。
-
HMaster → 管理 RegionServer,分配/迁移 Region。
-
RegionServer → 直接与 HDFS 交互,存取数据文件和日志。
-
HDFS → 作为 HBase 的底层分布式存储。
1.1 相关环境
启动Zookeeper,HDFS,YARN
zk.sh start
bin/start-dfs.sh
bin/start-yarn.sh
1.2 解压安装
cd /opt/software/
tar -zxvf hbase-2.4.11-bin.tar.gz -C /opt/module/
配置环境变量并使之生效
bash
sudo vim /etc/profile.d/my_env.sh
source /etc/profile.d/my_env.sh
添加以下内容
bash
export HBASE_HOME=/opt/module/hbase
export PATH=$PATH:$HBASE_HOME/bin
1.3 修改配置
hbase-env.sh添加内容
bash
export HBASE_MANAGES_ZK=false # 告诉 HBase 是否应该管理它自己的 ZooKeeper 实例。hbase-site.xml修改内容
XML
<?xml version="1.0"?>
<?xml-stylesheet type="text/xsl" href="configuration.xsl"?>

<configuration>
# 使用分布式集群,HBase 会启动多个 RegionServer,通过 Zookeeper 协调
<property>
    <name>hbase.cluster.distributed</name>
    <value>true</value>
  </property>

# 指定 HBase 集群使用的 Zookeeper 节点列表,所有 RegionServer 和 HMaster 启动时,都会先连接到这些 Zookeeper 节点。
  <property>
    <name>hbase.zookeeper.quorum</name>
    <value>hadoop102,hadoop103,hadoop104</value>
    <description>The directory shared by RegionServers.
    </description>
  </property>

# 指定 HBase 存储数据的根目录(HDFS 路径),HBase 会将表数据(HFiles)、WAL 日志等存储在这个路径下。RegionServers 共享这个目录,保证数据一致性。
  <property>
    <name>hbase.rootdir</name>
    <value>hdfs://hadoop102:8020/hbase</value>
    <description>The directory shared by RegionServers.
    </description>
  </property>


# 指定 HBase 的 WAL(Write-Ahead Log)日志实现方式。filesystem → 使用文件系统(HDFS)存储 WAL 日志。WAL 是写前日志机制,保证数据在写入 MemStore 前先写日志,即使 RegionServer 崩溃,也能恢复数据。filesystem 方案稳定可靠,适合生产环境。
  <property>
    <name>hbase.wal.provider</name>
    <value>filesystem</value>
  </property>
</configuration>
修改regionservers
XML
hadoop102
hadoop103
hadoop104
解决HBase和Hadoop的log4j兼容性问题,修改HBase的jar包,使用Hadoop的jar包
把 HBase 自带的
slf4j-reload4j-1.7.33.jar备份起来(改名成.bak),从而让它不再参与类加载,这样 HBase 在运行时就会去用 Hadoop 的相关 jar(比如 Hadoop 中的slf4j-log4j12.jar)来避免 log4j 冲突。
远程分发
bash
cd /opt/module
xsync hbase/
启动集群
bash
start-hbase.sh
# 对应关闭命令
stop-hbase.sh
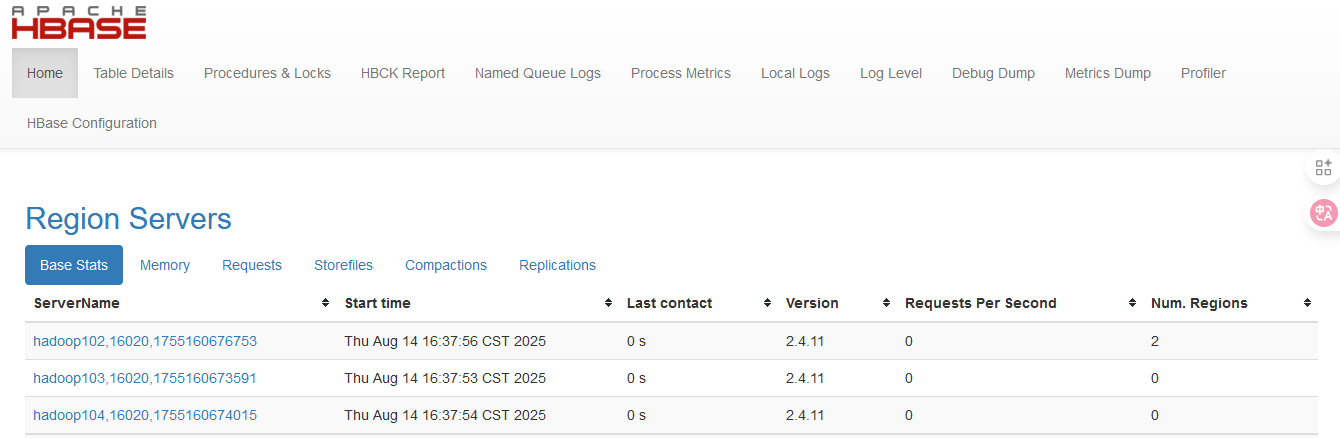
启动成功后,可以通过"host:port"的方式来访问HBase管理页面,例如:
1.4 高可用
-
关闭集群
-
在conf目录下创建backup-masters文件
bash
touch conf/backup-masters- 在backup-masters文件中配置高可用HMaster节点
bash
echo hadoop104 > backup-masters- 将整个conf目录分发到其他节点
bash
# Hbase安装目录下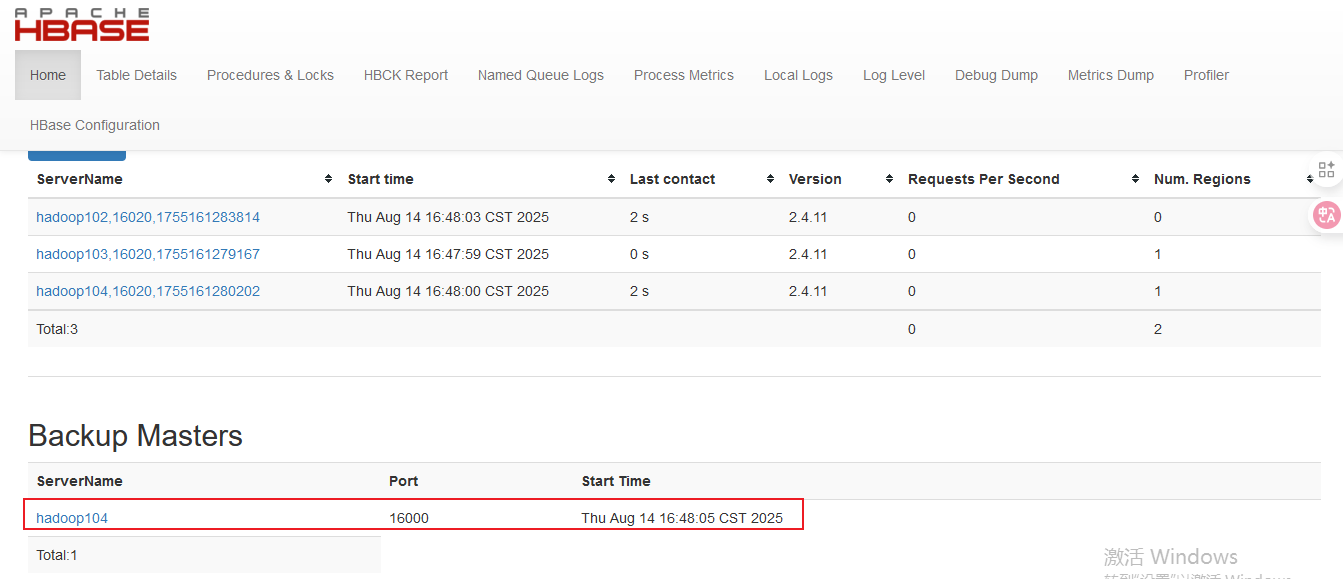
xsync conf/- 重启Hbase集群,查看web界面
2.Redis安装
Redis 用一个主线程在事件循环里轮询 所有活跃客户端,把就绪的请求一个个顺序执行,这样既能处理成千上万连接,又保证数据一致性;但执行速度受单线程 CPU 性能限制。epoll_wait (或 select、kqueue)是多路 I/O 复用的核心,它一次能监听很多客户端连接,一旦有"可读/可写"事件,就告诉 Redis 哪个 socket 该处理。
Redis 单线程事件循环:
-
事件循环开始
-
处理定时任务(过期键删除、RDB/AOF持久化等)
-
I/O多路复用等待事件 (
epoll_wait等待客户端有数据可读/可写) -
读取客户端请求并解析命令
-
单线程按顺序执行命令(数据结构操作、计算等)
-
将结果写回客户端
-
继续下一轮循环
bash
时间 →
──────────────────────────────────────────────────────

客户端A:  ──(发送GET key)──────────等待──────────(收到结果)──────
客户端B:  ───────────(发送SET key value)────等待────(收到结果)──
客户端C:  ─────────────────────(发送INCR counter)────等待─────

Redis主线程:
         | epoll_wait 监听A/B/C 的socket
         | 发现A有数据可读 → 读取并解析(GET key)
         | 执行GET key
         | 将结果放到A的写队列
         | 发现B有数据可读 → 读取并解析(SET key value)
         | 执行SET key value
         | 将结果放到B的写队列
         | 发现C有数据可读 → 读取并解析(INCR counter)
         | 执行INCR counter
         | 将结果放到C的写队列
         | 把结果发送给A/B/C
         → 回到 epoll_wait 等待下一个事件
2.1 准备工作:下载安装最新版的gcc编译器
bash
sudo yum install centos-release-scl scl-utils-build
sudo yum install -y devtoolset-8-toolchain
报错:Could not retrieve mirrorlist http://mirrorlist.centos.org?arch=x86_64\&release=7\&repo=sclo-rh error was 14: curl#6 - "Could not resolve host: mirrorlist.centos.org; 未知的错误" One of the configured repositories failed (未知), and yum doesn't have enough cached data to continue. At this point the only safe thing yum can do is fail. There are a few ways to work "fix" this: 1. Contact the upstream for the repository and get them to fix the problem. 2. Reconfigure the baseurl/etc. for the repository, to point to a working upstream. This is most often useful if you are using a newer distribution release than is supported by the repository (and the packages for the previous distribution release still work). 3. Run the command with the repository temporarily disabled yum --disablerepo=<repoid> ... 4. Disable the repository permanently, so yum won't use it by default. Yum will then just ignore the repository until you permanently enable it again or use --enablerepo for temporary usage: yum-config-manager --disable <repoid> or subscription-manager repos --disable=<repoid> 5. Configure the failing repository to be skipped, if it is unavailable. Note that yum will try to contact the repo. when it runs most commands, so will have to try and fail each time (and thus. yum will be be much slower). If it is a very temporary problem though, this is often a nice compromise: yum-config-manager --save --setopt=<repoid>.skip_if_unavailable=true Cannot find a valid baseurl for repo: centos-sclo-rh/x86_64
原因:
devtoolset-8-toolchain是 SCL 软件集的包,CentOS SCL 源很多也停了。解决办法:替换 SCL 源为阿里云的:
临时启用 devtoolset-8 提供的新版 GCC 等开发工具,并进入一个新的 bash 环境中运行它们
bash
sudo scl enable devtoolset-8 bash测试 gcc版本
bash
gcc --version 
2.2 解压安装
解压
bash
tar -zxvf redis-6.0.8.tar.gz -C /opt/module/在redis安装目录下执行**"make"**命令,根据源码编译 Redis 生成可执行程序,具体来说就是把 .c 源代码文件编译成二进制的 Redis 服务器和客户端等工具。
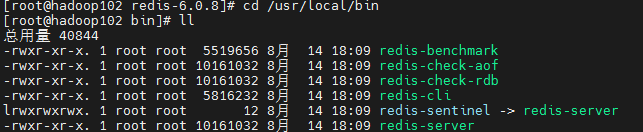
执行**"make install"命令,把 make 编译好的可执行文件和相关资源安装到系统指定的位置,方便你在任意目录直接运行程序,而不是只能在源码目录下运行。默认安装目录:++/usr/local/bin**++
2.3 后台启动关闭
复制redis.conf文件
bash
cp redis.conf ~/my_redis.conf修改daemonize
daemon(守护进程)启动 的意思是:
让一个程序 在后台长期运行,不依赖当前登录的终端会话,并且通常会随系统启动而自动运行。

启动redis
bash
redis-server ~/my_redis.conf
客户端访问


2.4 IDEA连接Redis注意事项
禁用Linux防火墙
bash
sudo systemctl stop firewalld
sudo systemctl disable firewalld
修改my_redis.conf


3.Doris安装
doris介绍:https://blog.csdn.net/u011250186/article/details/135963133
3.1 准备工作
集群部署
|------------|--------------|--------------|
| hadoop102 | hadoop103 | hadoop104 |
| FE(leader) | FE(observer) | FE(observer) |
| BE | BE | BE |
设置++系统最大打开文件句柄数++ (操作系统对 一个进程 能同时打开的文件(广义的"文件")数量的限制。)三台机器都需要改
bash
sudo vim /etc/security/limits.conf
bash
* soft nofile 65536
* hard nofile 131072
* soft nproc 131072
* hard nproc 131072
设置最大虚拟块大小,三台机器都需要改
bash
sudo vim /etc/sysctl.conf
bash
vm.max_map_count=2000000Doris 的元数据要求时间精度要小于5000ms,所以所有集群所有机器要进行时钟同步,避免因为时钟问题引发的元数据不一致导致服务出现异常。


关闭交换分区
bash
# 查看交换分区是否开启
 sudo swapon -s    # 有输出说明swap是开启的
# 永久关闭
sudo vim /etc/fstab
# 注释掉带有swap的这一行
以上配置**++重启后生效++**
3.2 下载安装
下载地址:https://doris.apache.org/download
查看机器是否为avx2架构
bash
cat /proc/cpuinfo | grep avx2
# 有输出说明是
解压改名
bash
tar -zxvf apache-doris-2.1.0-bin-x64.tar.gz -C /opt/module/
cd /opt/module
mv apache-doris-2.1.0-bin-x64/ doris/
3.3 FE配置
bash
# doris安装目录下
cd fe/conf
vim fe.conf
修改以下配置:
1)web端口(原8030,与hadoop冲突,改为7030)

2)机器有多个ip地址的情况下(ip地址可以使用ifconfig命令查询,inet指示ip地址)

3)添加

启动FE
bash
cd doris/fe
bin/start_fe.sh --daemon
hadoop102:7030(根据自己的实际情况修改)可以访问doris的web界面
3.4 BE配置
修改BE的配置文件
bash
vim /opt/module/doris2.1/be/conf/be.conf1)配置文件中指定数据存放路径

2)修改端口,避免与hadoop端口冲突

3)修改绑定ip(每台机器修改成自己的ip)

分发be
bash
xsync /opt/module/doris/be/修改hadoop103和hadoop104的绑定ip
3.5 添加BE(BE扩容)
BE节点需要先在FE中添加,才可加入集群。可以使用mysql-client连接到FE。
mysql -h hadoop102 -P 9030 -uroot # 端口号使用QueryPort:9030
设置密码
sql
set password for 'root'=password('123456');添加BE

sql
 alter system add backend "hadoop102:9050";
# 查看BE状态
show proc '/backends' \G;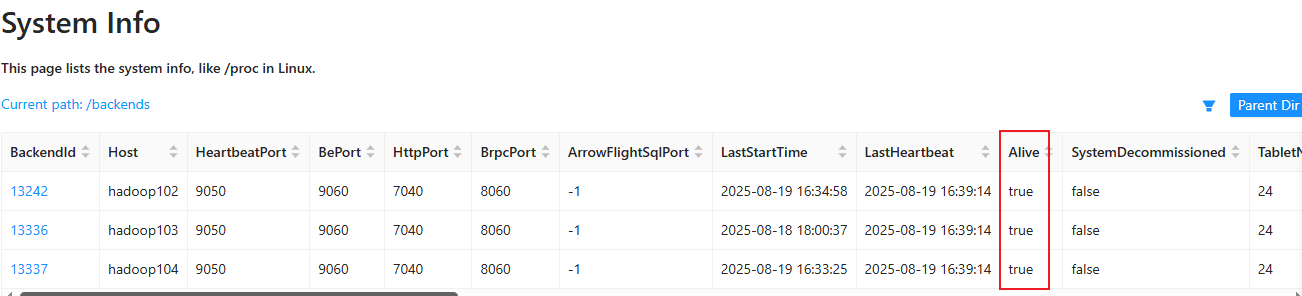
3.6 FE和BE的扩容和缩容
3.6.1 FE扩容缩容
要实现高可用,要增加follower,follower总数(包括leader)应为奇数,分摊查询压力,可以增加observer
sql
#用MySQL客户端连接doris
alter system add follower "hadoop103:9010";    # 角色和主机名称根据自己的实际情况修改
分发FE,修改fe节点ip
sql
xsync /opt/module/doris/fe/
vim /opt/module/doris/fe/conf/fe.conf
删除hadoop102发送过来的元数据
sql
rm -rf doris-meta/*在hadoop103和hadoop104上启动FE,第一次启动时要添加参数 "--helper 主机名:edit_log_port"

bash
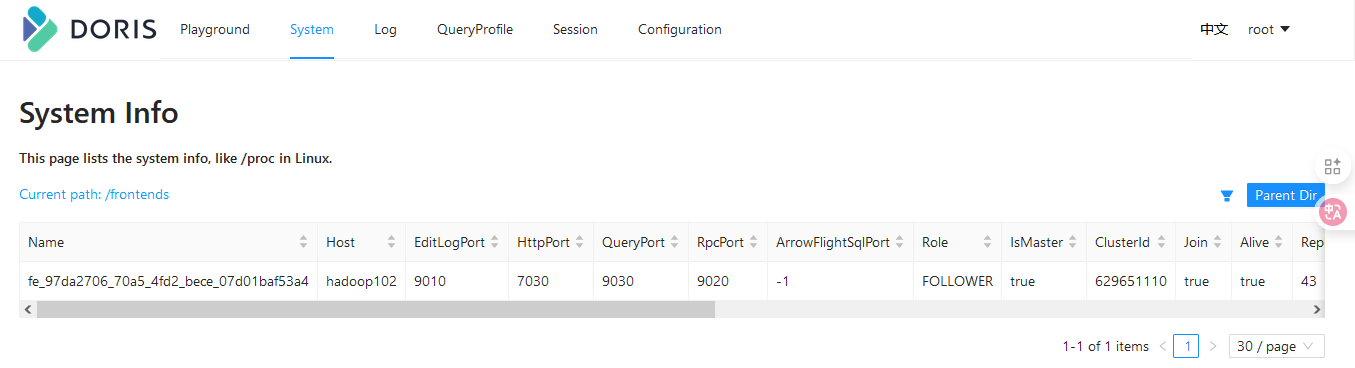
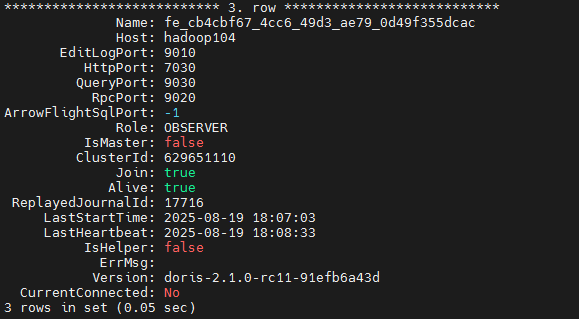
bin/start_fe.sh --helper hadoop102:9010 --daemon # 参数helper指定leader查看FE状态
bash
show proc "/frontends" \G;
FE缩容(删除hadoop103和hadoop104)
bash
alter system drop observer "hadoop103:9010"; # drop关键词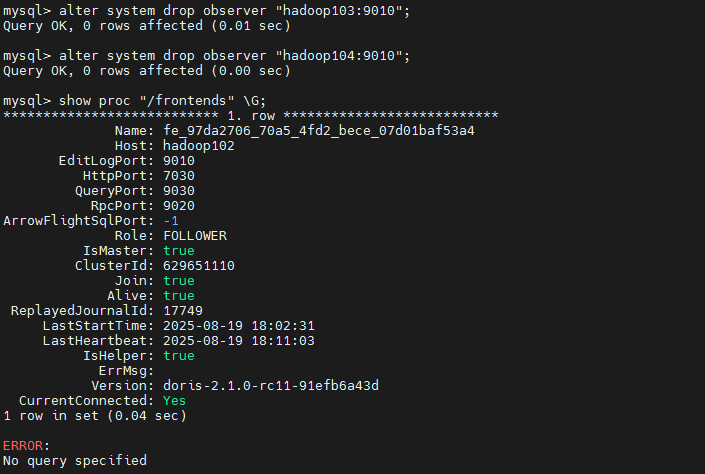
3.6.2 BE缩容
dropp关键词删除be节点会同时删除该节点上的数据,安全删除方式应为使用decommission关键字,这种方式会将该节点上的数据向其他节点迁移,迁移结束之后会自动删除该节点
sql
alter system decommission backend "hadoop102:9050"; # 主机名称根据实际情况而定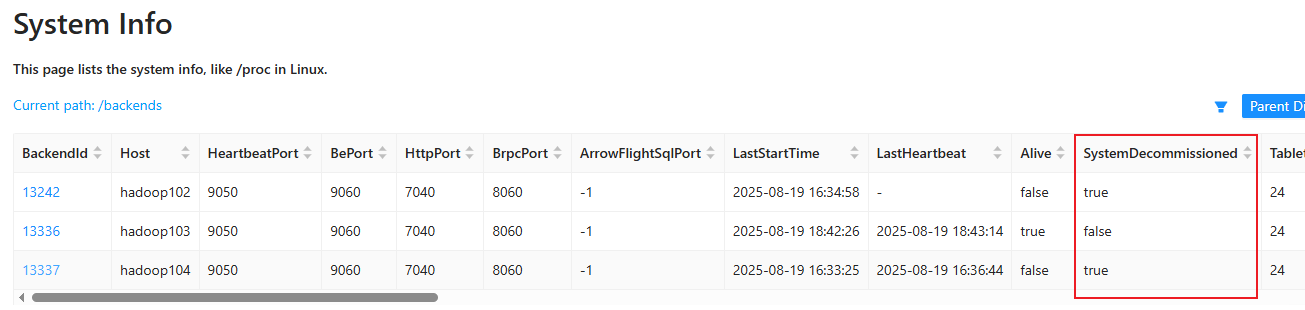
最终部署情况:在hadoop102上运行FE,在hadoop103 上运行BE
3.7 doris启停脚本
sql
cd ~/bin
vim doris.sh
bash
#!/bin/bash
case $1 in
        "start")
                echo "======= hadoop102 | 启动fe ======="
                ssh hadoop102 "source /etc/profile; /opt/module/doris/fe/bin/start_fe.sh --daemon;"
                echo "======= hadoop103 | 启动be ======="
                ssh hadoop103 "source /etc/profile; /opt/module/doris/be/bin/start_be.sh --daemon;"

        ;;
        "stop")
                echo "======= hadoop102 | 停止fe ======="
                ssh hadoop102 "source /etc/profile; /opt/module/doris/fe/bin/stop_fe.sh;"
                echo "======= hadoop103 | 停止be ======="
                ssh hadoop103 "source /etc/profile; /opt/module/doris/be/bin/stop_be.sh;"

        ;;

        *)
                echo "启动命令错误"
                echo "start     启动doris集群"
                echo "stop      停止doris集群"
        ;;
esac
修改执行权限
bash
chmod 777 doris.sh