介绍
本文将使用vllm容器运行deepseek服务,并通过envoy代理该服务,仿照k8s gateway api inference extension通过http header直接指定服务IP的方式进行转发
vLLM镜像
如果有GPU环境,可以直接使用vllm官方镜像
vllm/vllm-openai:latest以下演示使用CPU的情况,需要使用vllm源码中的Dockerfile.cpuhttps://github.com/vllm-project/vllm/blob/main/docker/Dockerfile.cpu构建镜像,中间几个build-arg默认就是false,可以不加
docker build -f docker/Dockerfile.cpu \
        --build-arg VLLM_CPU_AVX512BF16=false (default)|true \
        --build-arg VLLM_CPU_AVX512VNNI=false (default)|true \
        --build-arg VLLM_CPU_DISABLE_AVX512=false (default)|true \
        --tag vllm-cpu-env \
        --target vllm-openai .
先将源码clone下来,然后可以简化为如下执行,镜像名随便
docker build -f docker/Dockerfile.cpu -t vllm-cpu-env:test直接构建镜像可能会遇到以下问题:
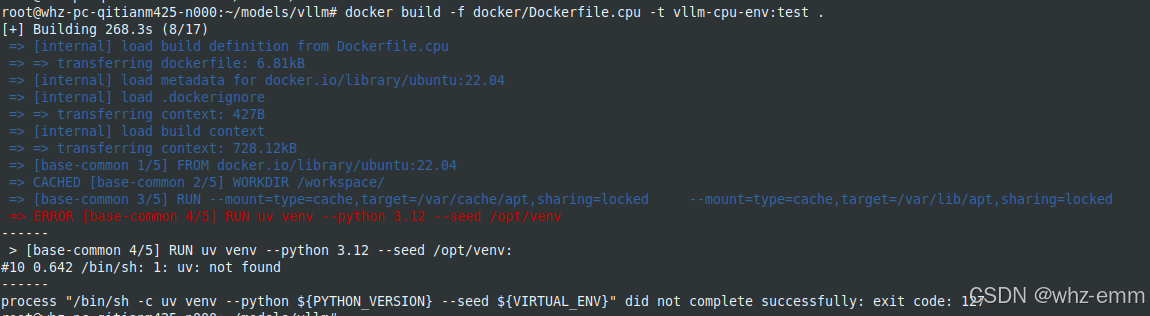
看Dockerfile已经安装了uv,但还是报uv找不到
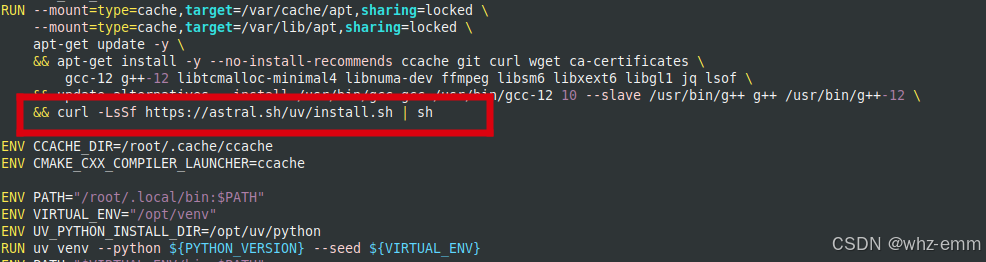
通常是网络原因,多重试几次,为了不一直重复安装上面那些包,我们把安装uv的这一段单独拿出来,并增加一行环境变量
ENV XDG_BIN_HOME=/root/.local/bin
RUN curl -LsSf https://astral.sh/uv/install.sh | sh
也可以用我已经构建好的镜像
registry.cn-hangzhou.aliyuncs.com/waly/vllm-cpu-env下载模型
使用deepseek1.5b测试
pip install modelscope -i https://pypi.tuna.tsinghua.edu.cn/simple

modelscope download --model deepseek-ai/DeepSeek-R1-Distill-Qwen-1.5B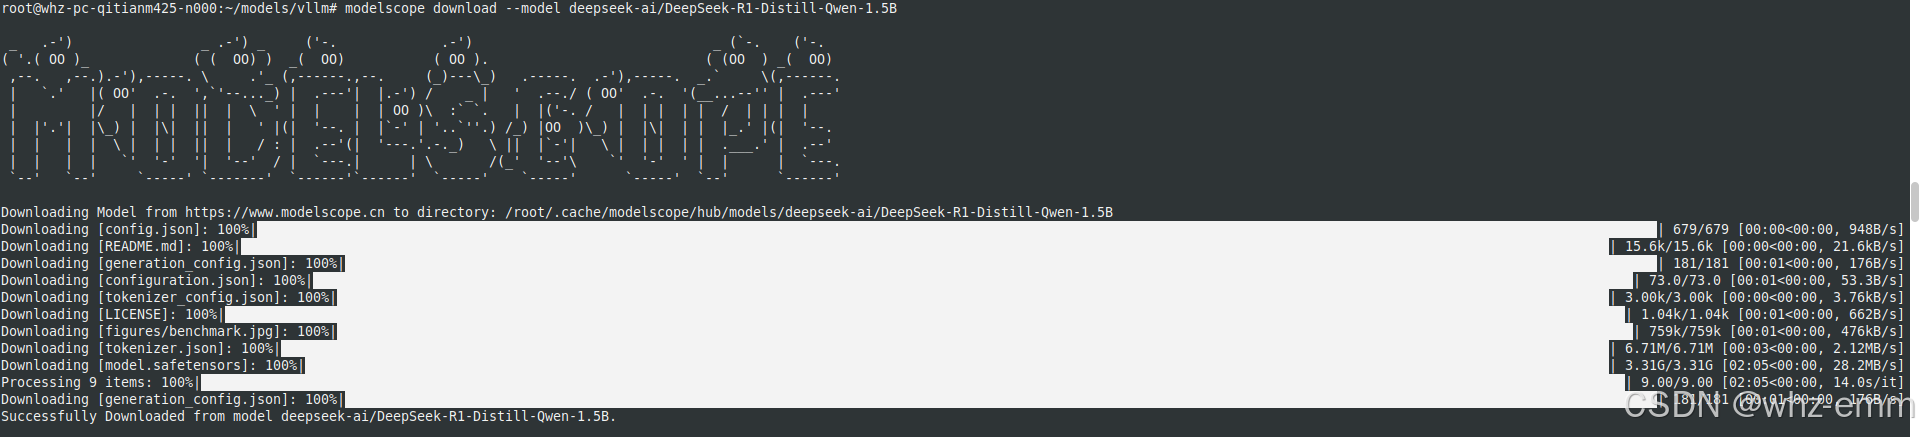
下载的模型会放在~/.cache/modelscope/hub/models/目录下

模型地址:DeepSeek-R1-Distill-Qwen-1.5B
使用vLLM运行模型
将模型目录挂载到容器同名目录
docker run -d --name vllm --privileged -v /root/.cache/modelscope/hub/models/:/root/.cache/modelscope/hub/models/ -e VLLM_CPU_KVCACHE_SPACE=4 -e VLLM_CPU_OMP_THREADS_BIND=2 --entrypoint tail vllm-cpu-env:latest -f /dev/null因为DeepSeek-R1-Distill-Qwen-1.5B是一个软链接指向/root/.cache/modelscope/hub/models/deepseek-ai/DeepSeek-R1-Distill-Qwen-1___5B

或者挂载到其他目录,但是选择模型时,模型为deepseek-ai/DeepSeek-R1-Distill-Qwen-1___5B
进入容器并切换到模型目录:
cd /root/.cache/modelscope/hub/models/启动服务,暴露在8000端口,可以在启动容器时将8000端口使用 -p 映射到宿主机,也可直接使用容器IP访问,容器IP可通过docker inspect获取
vllm serve deepseek-ai/DeepSeek-R1-Distill-Qwen-1.5B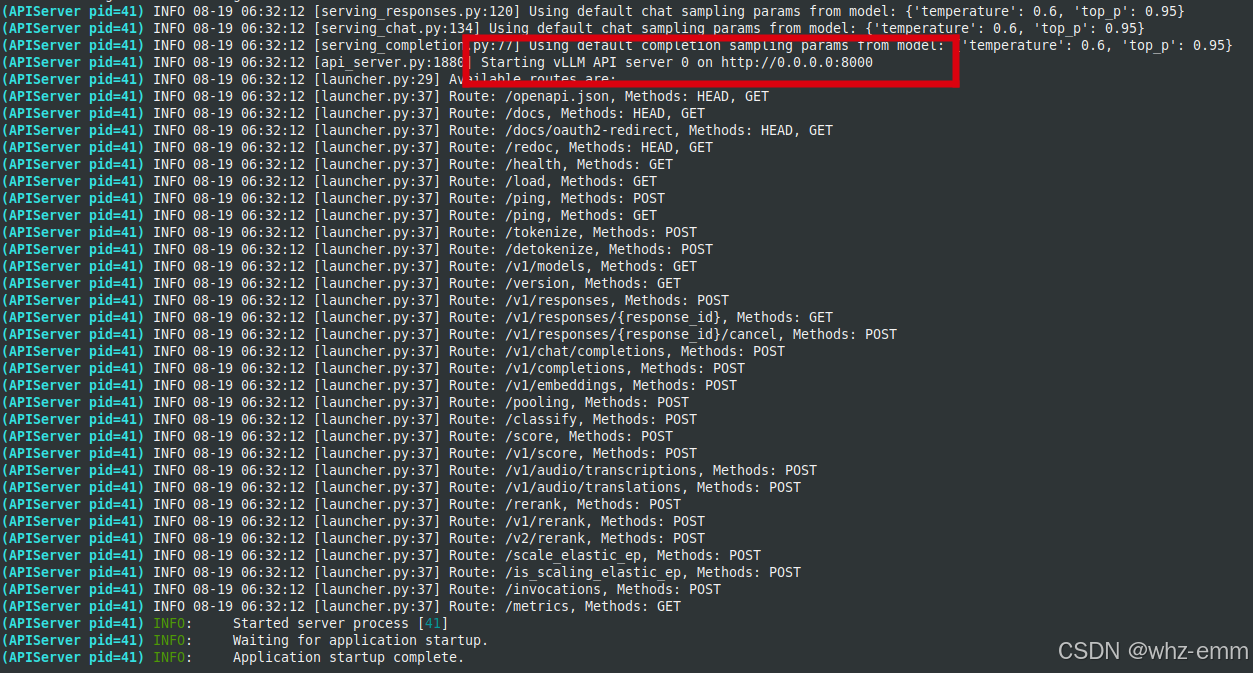
测试服务
curl http://128.128.0.14:8000/v1/completions     -H "Content-Type: application/json"     -d '{
        "model": "deepseek-ai/DeepSeek-R1-Distill-Qwen-1.5B",
        "prompt": "San Francisco is a",
        "max_tokens": 7,
        "temperature": 0
    }'
部署envoy
envoy容器内没有vi和vim命令,所以映射一个当前工作目录到容器内的/mnt目录,方便在宿主机上修改envoy配置
docker run -d --name envoy --privileged -v `pwd`:/mnt --entrypoint tail envoyproxy/envoy:v1.34.1 -f /dev/null将容器内的/etc/envoy/envoy.yaml拷贝到/mnt,并改为如下内容:
-
增加log (非必须)
-
将cluster改为ORIGINAL_DST类型的cluster,通过http header直接指定后端IP,这就与
https://github.com/kubernetes-sigs/gateway-api-inference-extension
中的实现方式相同了
admin:
  address:
    socket_address:
      protocol: TCP
      address: 0.0.0.0
      port_value: 9901
static_resources:
  listeners:
  - name: listener_0
    address:
      socket_address:
        address: 0.0.0.0
        port_value: 10000
    filter_chains:
    - filters:
      - name: envoy.filters.network.http_connection_manager
        typed_config:
          "@type": type.googleapis.com/envoy.extensions.filters.network.http_connection_manager.v3.HttpConnectionManager
          stat_prefix: ingress_http
          access_log:
          - name: envoy.access_loggers.stdout
            typed_config:
              "@type": type.googleapis.com/envoy.extensions.access_loggers.stream.v3.StdoutAccessLog
          route_config:
            name: local_route
            virtual_hosts:
            - name: local_service
              domains: ["*"]
              routes:
              - match:
                  prefix: "/"
                route:
                  cluster: original_destination_cluster
          http_filters:
          - name: envoy.filters.http.router
            typed_config:
              "@type": type.googleapis.com/envoy.extensions.filters.http.router.v3.Router
  clusters:
    - name: original_destination_cluster
      type: ORIGINAL_DST
      connect_timeout: 1000s
      lb_policy: CLUSTER_PROVIDED
      circuit_breakers:
        thresholds:
          - max_connections: 40000
            max_pending_requests: 40000
            max_requests: 40000
      original_dst_lb_config:
        use_http_header: true
        http_header_name: x-gateway-destination-endpoint
运行envoy
envoy -c /mnt/envoy.yaml测试经过envoy转发:
envoy暴露的端口为10000,获取到vllm服务容器的IP和端口,通过header:x-gateway-destination-endpoint传递,在gateway api inference extension中有一个epp组件,即endpoint picker组件,最终就是为了选择一个最佳的节点,把这个header附加到原始请求上,也就是在发起请求时不需要加这个header,epp组件会自动加上
curl http://128.128.0.13:10000/v1/completions  -H "x-gateway-destination-endpoint: 128.128.0.14:8000"   -H "Content-Type: application/json"     -d '{
        "model": "deepseek-ai/DeepSeek-R1-Distill-Qwen-1.5B",
        "prompt": "San Francisco is a",
        "max_tokens": 7,
        "temperature": 0
    }'