微服务类型及特点对比
| 类型 | 作用描述 | 适用场景 |
|---|---|---|
| ClusterIP | 自动分配集群内部虚拟 IP,仅限集群内访问 | 集群内部服务通信 |
| NodePort | 在所有节点开放静态端口(默认 30000-32767),外部通过 NodeIP:NodePort 访问 |
简单外部访问需求 |
| LoadBalancer | 基于 NodePort,结合云厂商负载均衡器分配外部 IP | 云环境生产环境 |
| ExternalName | 通过 DNS CNAME 记录映射到外部域名,无集群 IP | 集群内外服务迁移过渡 |
| Headless | 无集群 IP,DNS 直接解析到 Pod IP,不经过负载均衡 | 需直接访问 Pod 的场景(如 StatefulSet) |
关键特点说明
- ClusterIP:默认类型,安全性高,适合纯内部服务交互。
- NodePort:通过节点物理端口暴露服务,适合测试或临时访问。
- LoadBalancer:依赖云平台,自动管理流量分发,适合高可用生产环境。
- ExternalName:无实际代理,仅提供 DNS 层转发,适用于集成外部服务。
- Headless:直接暴露 Pod IP,适合有状态服务或需要独立寻址的场景。
以下内容已按照要求整理为结构化、无步骤词汇的Markdown格式:
查看iptables规则
iptables -t nat -nLIPVS
查看宿主机上与服务相关的iptables规则,了解默认的服务调度方式。
1.1, 安装ipvsadm工具
所有节点都下载
yum install ipvsadm -y在所有节点安装ipvsadm工具,用于支持ipvs模式。
修改kube-proxy配置
kubectl -n kube-system edit cm kube-proxy在配置中设置mode: "ipvs",将kube-proxy的模式修改为ipvs以提高大规模Pod场景下的性能。
1.2, 重启kube-proxy pod
kubectl -n kube-system get pods | awk '/kube-proxy/{system("kubectl -n kube-system delete pods "$1)}'使kube-proxy的配置生效,重启后采用ipvs模式。
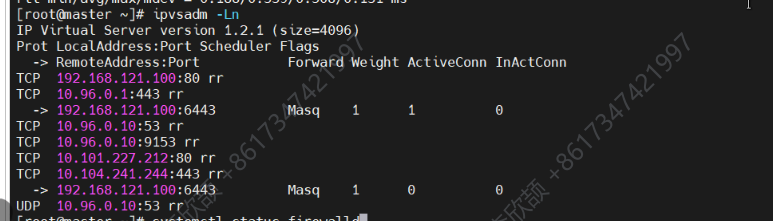
查看ipvs规则
ipvsadm -Ln1.3,生成控制器和微服务yaml文件
先创建 Deployment 资源
cpp
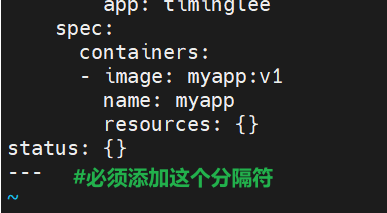
kubectl create deployment timinglee --image myapp:v1 --replicas 2 --dry-run=client -o yaml > timinglee.yaml编辑 timinglee.yaml,确保 Deployment 和 Service 配置用 --- 分隔:
root@master ingress# vi timinglee.yaml
应用yaml文件
kubectl apply -f timinglee.yaml确认deployment是否成功创建
cpp
kubectl get deployment timinglee现在可以基于已存在的 Deployment 生成 Service 配置:
cpp
kubectl expose deployment timinglee --port 80 --target-port 80 --dry-run=client -o yaml >> timinglee.yaml生成包含Deployment和Service资源的yaml文件,用于创建部署和对应的微服务。
cpp
[root@master ingress]# vi timinglee.yaml
[root@master ingress]# kubectl apply  -f timinglee.yaml
deployment.apps/timinglee configured
service/timinglee created
文件具体配置
cpp
apiVersion: apps/v1
kind: Deployment
metadata:
  labels:
    app: timinglee
  name: timinglee
spec:
  replicas: 2
  selector:
    matchLabels:
      app: timinglee
  template:
    metadata:
      creationTimestamp: null
      labels:
        app: timinglee
    spec:
      containers:
      - image: myapp:v1
        name: myapp
---										#不同资源间用---隔开

apiVersion: v1
kind: Service
metadata:
  labels:
    app: timinglee
  name: timinglee
spec:
  ports:
  - port: 80
    protocol: TCP
    targetPort: 80
  selector:
    app: timinglee
根据yaml文件创建Deployment和Service资源。
cpp
kubectl get services
kubectl get services -o wide
查看创建的服务信息,包括名称、类型、集群IP、端口等详细信息。

现在这里是没有外部IP的,因为我们没有配置type微服务类型
微服务类型配置示例
2.1,NodePort服务配置
apiVersion: v1
kind: Service
metadata:
  labels:
    app: timinglee-service
  name: timinglee-service
spec:
  ports:
  - port: 80
    protocol: TCP
    targetPort: 80
  selector:
    app: timinglee
  type: NodePort
通过节点上的端口将服务暴露给外部,外部可通过任意节点的IP和该端口访问服务。
2.2,LoadBalancer服务配置
云平台会为我们分配vip并实现访问,如果是裸金属主机那么需要metallb来实现ip的分配
LoadBalancer 是 Kubernetes 中 Service 类型,期望从底层获取外部 IP 暴露服务;MetalLB 是 开源组件,为无云厂商 LB 的集群,模拟实现 LoadBalancer 功能。
root@k8s-master \~# vim timinglee.yaml
apiVersion: v1
kind: Service
metadata:
  labels:
    app: timinglee-service
  name: timinglee-service
spec:
  ports:
  - port: 80
    protocol: TCP
    targetPort: 80
  selector:
    app: timinglee
  type: LoadBalancer
在NodePort基础上,借助外部负载均衡器将服务暴露出去,适用于需要更高可用性的场景。
使文件生效
cpp
kubectl apply -f myapp.yml这里type已经生效,但是因为还没有配置Metallb,所以一直处于就绪态
因为 Kubernetes 原生不支持自建集群的 LoadBalancer 功能,必须依赖 MetalLB 这类组件提供 IP 分配和网络宣告能力。

解决办法:部署并配置 MetalLB 后,它会自动检测到该 Service,从 IP 池分配 IP 并完成网络配置,EXTERNAL-IP 会从 <pending> 变为具体 IP,状态就绪。
后面配置了metallb,就会获取到对外IP(这里的截图用的是后面ingress实验的,方便理解)

2.3,ExternalName服务配置
apiVersion: v1
kind: Service
metadata:
  labels:
    app: timinglee-service
  name: timinglee-service
spec:
  selector:
    app: timinglee
  type: ExternalName
  externalName: www.timinglee.org
通过DNS的CNAME记录将服务映射到指定域名,解决IP变化问题。
MetalLB
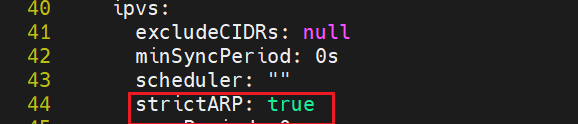
前提条件:必须要把集群做成ipvs的模式,为metallb的部署做准备。
触发:创建 LoadBalancer 类型 Service 时,Kubernetes 调用 MetalLB。
分配 IP:MetalLB 从配置的 IP 池选一个 IP,绑定给该 Service。
宣告 IP:MetalLB 通过 ARP/BGP 协议,把 IP "广播" 到集群所在网络,让外部能访问。
3.1,修改kube-proxy配置
kubectl edit cm -n kube-system kube-proxy

导入镜像
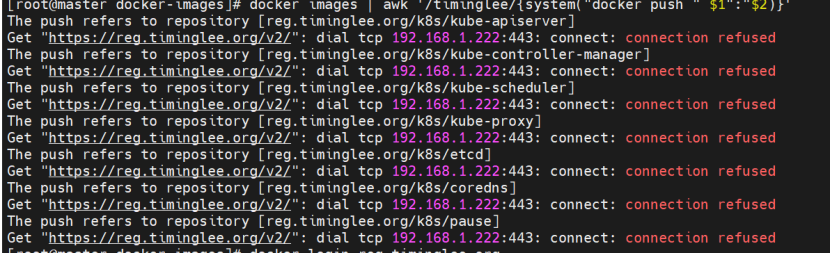
获取metallb的部署文件并适配本地镜像仓库。
cpp
[root@master metalLB]# vi configmap.yml
[root@master metalLB]# vi metallb-native.yaml 这个文件内容太长就不粘贴了
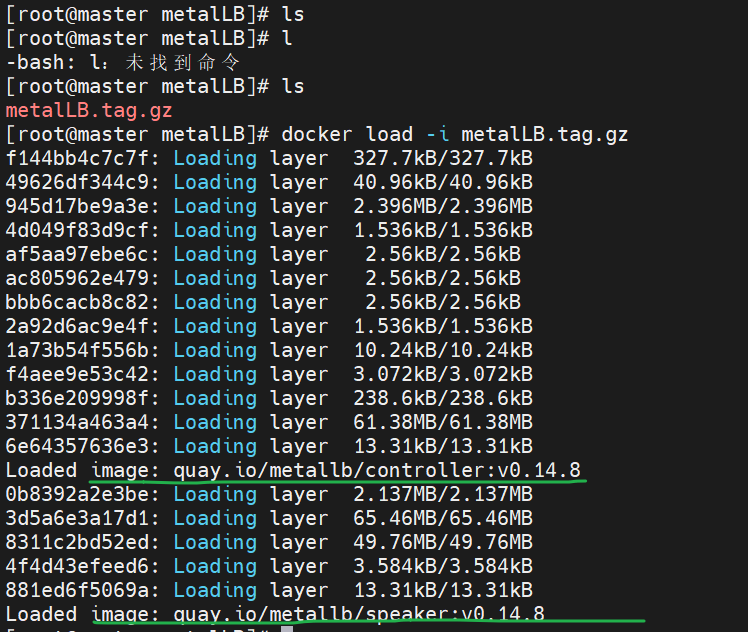
[root@master metalLB]# ls
configmap.yml metallb-native.yaml metalLB.tag.gz
[root@master metalLB]#
cpp
[root@master metalLB]# vi configmap.yml
apiVersion: metallb.io/v1beta1
kind: IPAddressPool
metadata:
  name: first-pool
  namespace: metallb-system
spec:
  addresses:
  - 172.25.254.50-172.25.254.99  #改为自己网段范围的50-99

---
apiVersion: metallb.io/v1beta1
kind: L2Advertisement
metadata:
  name: example
  namespace: metallb-system
spec:
  ipAddressPools:
  - first-pool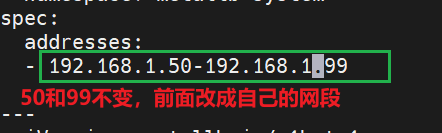
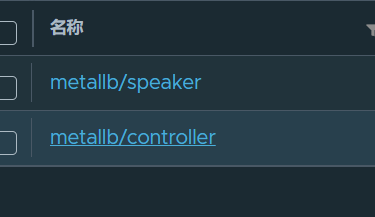
3.2,上传metallb镜像
cpp
docker tag quay.io/metallb/controller:v0.14.8 reg.timinglee.org/metallb/controller:v0.14.8
docker tag quay.io/metallb/speaker:v0.14.8  reg.timinglee.org/metallb/speaker:v0.14.8

docker push reg.timinglee.org/metallb/controller:v0.14.8
docker push reg.timinglee.org/metallb/speaker:v0.14.8
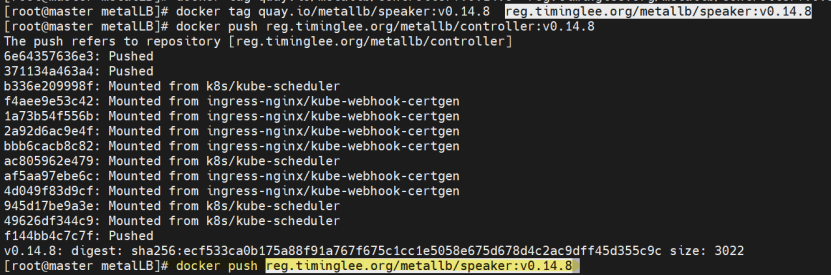
将metallb所需镜像上传到本地仓库。
3.3,部署metallb
部署metallb服务,为LoadBalancer类型的服务提供IP分配能力。
按顺序部署

kubectl apply -f metallb-native.yaml稍等片刻等待运行

再部署第二个文件
配置metallb可分配的IP地址范围,使LoadBalancer服务能获取到外部IP。

Ingress-nginx
前提条件:部署完metallb
4.1,下载ingress-nginx部署文件
wget https://raw.githubusercontent.com/kubernetes/ingress-nginx/controller-v1.11.2/deploy/static/provider/baremetal/deploy.yaml我这里是直接导入文件

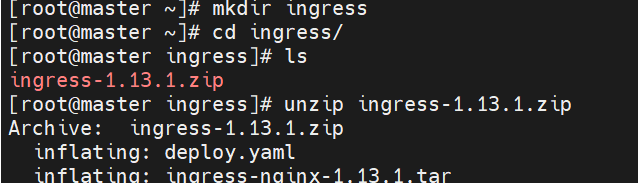
导入镜像
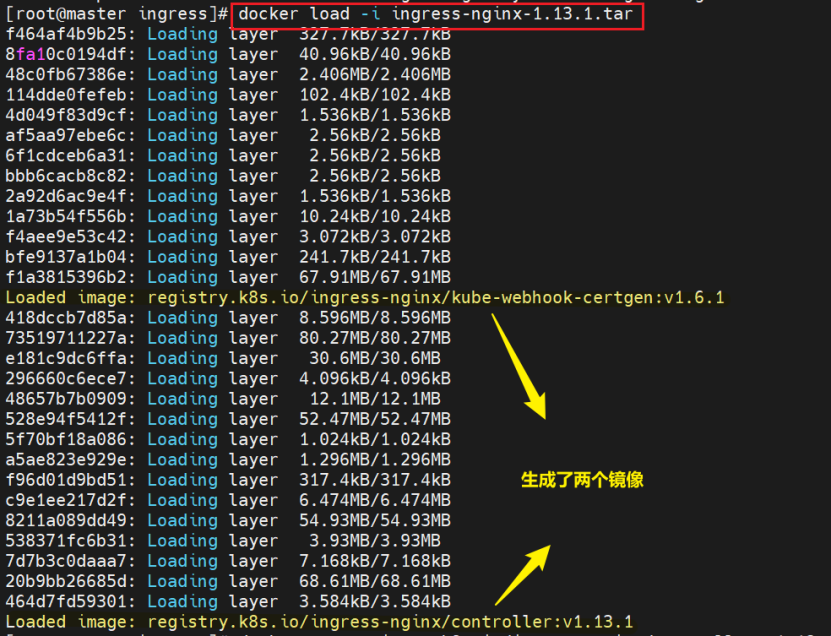
获取ingress-nginx的部署文件。
4.2,上传ingress-nginx镜像
cpp
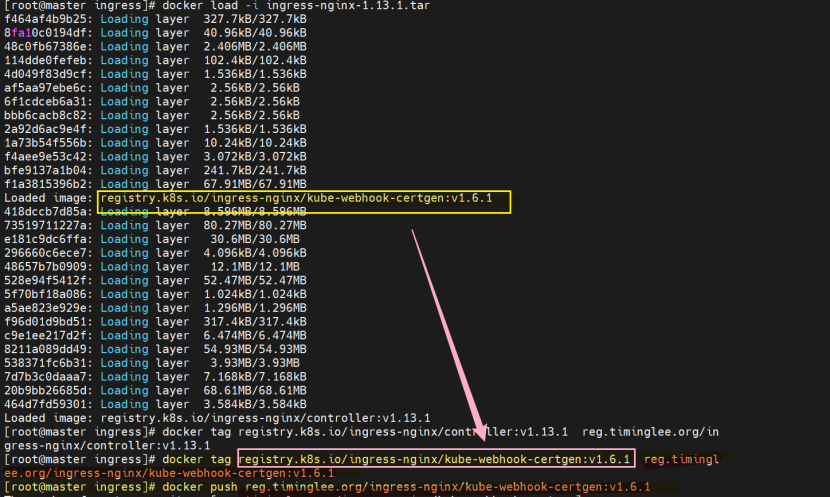
[root@master ingress]# docker tag registry.k8s.io/ingress-nginx/controller:v1.13.1 reg.timinglee.org/ingress-nginx/controller:v1.13.1
[root@master ingress]# docker tag registry.k8s.io/ingress-nginx/kube-webhook-certgen:v1.6.1  reg.timinglee.org/ingress-nginx/kube-webhook-certgen:v1.6.1

[root@master ingress]# docker push reg.timinglee.org/ingress-nginx/kube-webhook-certgen:v1.6.1
[root@master ingress]# docker push reg.timinglee.org/ingress-nginx/controller:v1.13.1
表示上传到 网站地址/目录/名字
上传前如果没有该ingress-nginx目录要先创建
将ingress-nginx所需镜像上传到本地仓库。
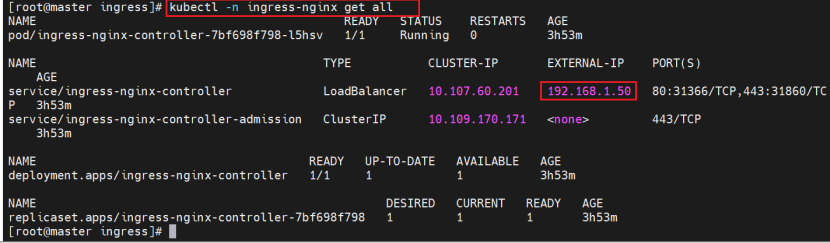
4.3,安装ingress-nginx
修改配置文件
把前缀和后缀删掉,冒号后面要有一个空格,注意不要误删


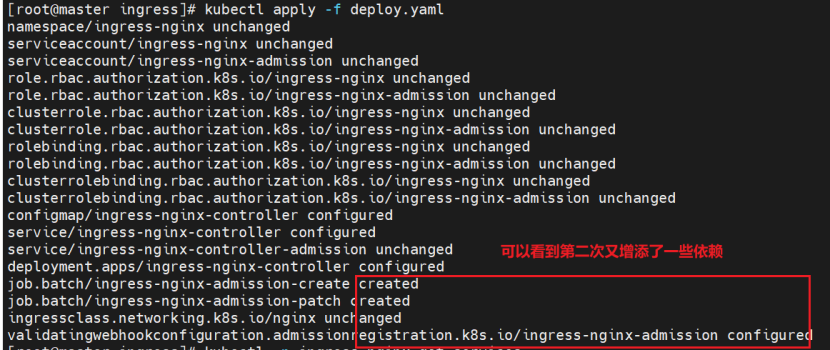
kubectl apply -f deploy.yaml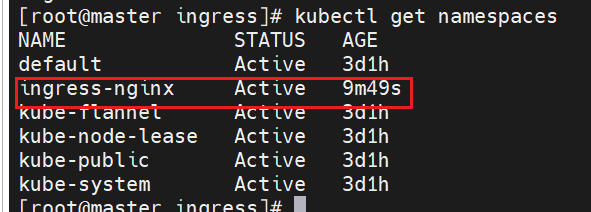

cpp
#修改微服务为可以对外开放的loadbalancer
[root@k8s-master ~]# kubectl -n ingress-nginx edit svc ingress-nginx-controller
49   type: LoadBalancer
修改后可以通过该命令查看镜像

cpp
kubectl -n ingress-nginx describe pod ingress-nginx-controller-7bf698f798-l5hsv | grep "Image:"

注意:Kubernetes 是增量式应用配置,首次 apply 主要是初始化各种资源,让控制器、服务等逐步就绪。
二次 apply 是补足依赖、修正配置,让整个 ingress-nginx 生态(控制器、服务、规则 )完全就绪。
简单说,就是首次部署是 "搭框架",二次 apply 是 "填细节、补依赖",让整个 ingress 环境从 "部分就绪" 变成 "完全可用",所以需要多次 apply 来推进不同阶段的资源配置和状态调和
这就是为什么查看状态没有问题但状态一直是<pending>的原因
此时就要再次apply
然后修改微服务

cpp
#生成yaml文件
[root@k8s-master ~]# kubectl create ingress webcluster --rule '*/=timinglee-svc:80' --dry-run=client -o yaml > timinglee-ingress.yml

[root@k8s-master ~]# vim timinglee-ingress.yml
aapiVersion: networking.k8s.io/v1
kind: Ingress
metadata:
  name: test-ingress
spec:
  ingressClassName: nginx
  rules:
  - http:
      paths:
      - backend:
          service:
            name: timinglee-svc
            port:
              number: 80
        path: /
        pathType: Prefix
        #Exact(精确匹配),ImplementationSpecific(特定实现),Prefix(前缀匹配),Regular expression(正则表达式匹配)
部署ingress-nginx控制器,提供7层负载均衡能力。

同理,再次apply

4.4,测试
cpp
kubectl -n ingress-nginx get service ingress-nginx-controller


Ingress高级功能
5.1,基于路径的访问
配置基于路径的转发将不同路径映射到不同后端服务。
cpp
[root@master myapp]# kubectl -n ingress-nginx  get ingressclasses.networking.k8s.io
NAME    CONTROLLER             PARAMETERS   AGE
nginx   k8s.io/ingress-nginx   <none>       5h14m

[root@master myapp]# kubectl create ingress ingress-test --class nginx \
> --rule="*/myappv1=myapp-v1:80" \
> --dry-run=client -o yaml > ingress-test.yml
[root@master myapp]# ls
ingress-test.yml  myapp-v1.yaml  myapp-v2.yaml
[root@master myapp]# vi ingress-test.yml
[root@master myapp]# kubectl apply -f ingress-test.yml
Ps:如果文件配置错误,需要重新上传
root@master myapp#kubectl delete ingress test-ingress
ingress.networking.k8s.io "test-ingress" deleted
root@master myapp# kubectl apply -f ingress-test.yml

root@master myapp# kubectl describe ingress
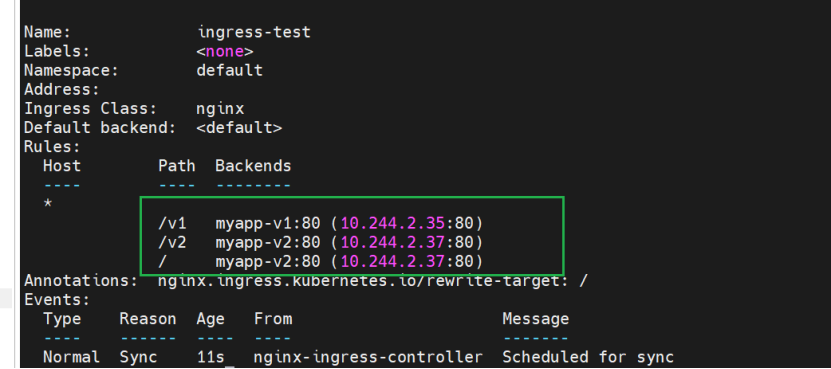
执行curl 172.25.254.5(外部访问 IP),返回v1版本响应,确认通过 Ingress 成功从集群外部访问到myappv1。

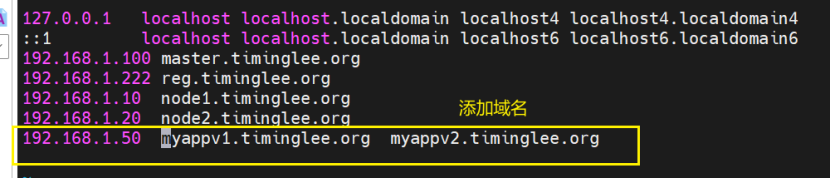
5.2,基于域名的访问
配置基于域名的转发使不同域名指向不同服务。
编辑yml文件


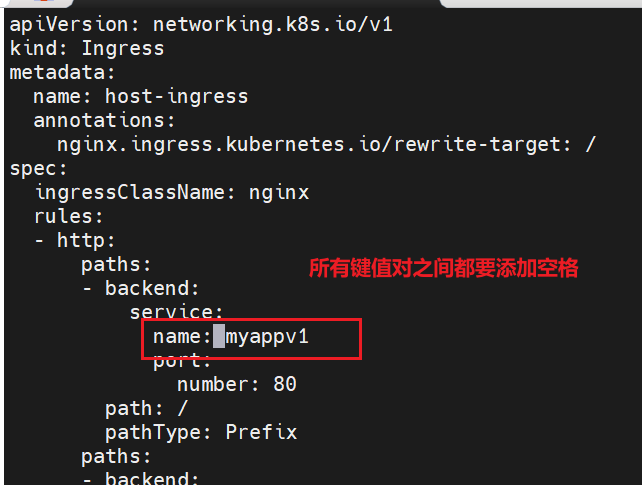
Name是你的实际服务名,我这里少了一条杠-,已经改过来了


cpp
#添加域名解析
[root@master ingress]# cat host-ingress.yml
apiVersion: networking.k8s.io/v1
kind: Ingress
metadata:
  name: host-ingress
  annotations:
    nginx.ingress.kubernetes.io/rewrite-target: /
spec:
  ingressClassName: nginx
  rules:
  - http:
      paths:
      - backend:
          service:
            name: myapp-v1
            port:
              number: 80
        path: /
        pathType: Prefix
    host: myappv1.timinglee.org

  - http:
      paths:
      - backend:
          service:
            name: myapp-v2
            port:
              number: 80
        path: /
        pathType: Prefix
    host: myappv2.timinglee.org
查看状态有没有问题
root@master ingress# kubectl describe ingress
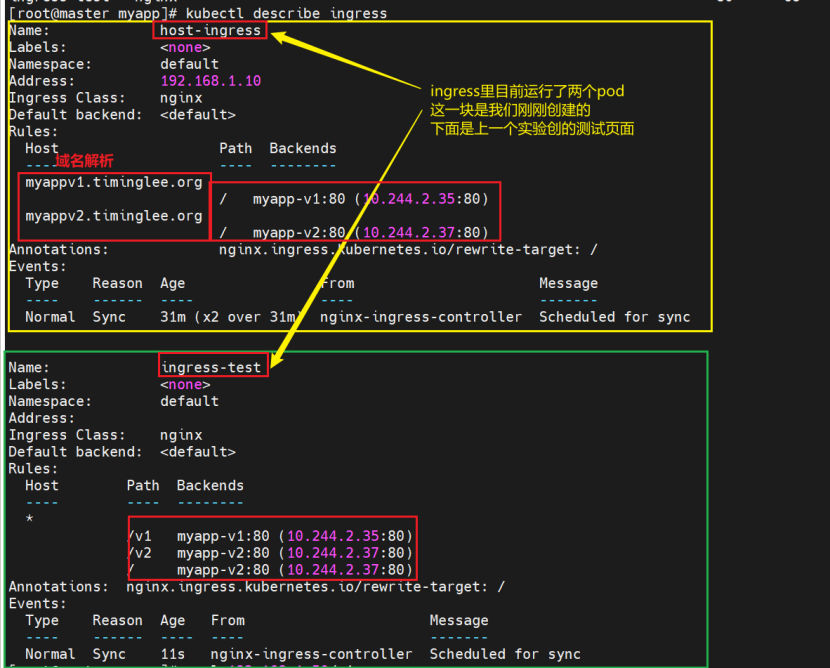
root@master ingress# kubectl get ingress

Ps:如果某个服务有问题可以通过如下命令具体查看
root@master ingress#kubectl describe svc myapp-v1
测试

删除,避免影响后续实验

5.3,建立tls加密
使用自签名或正式证书配置TLS加密。
生成证书去加密

此时证书还没和集群连起来,把证书变成资源,能被集群调用
cpp
#建立加密资源类型secret
[root@k8s-master app]# kubectl create secret tls  web-tls-secret --key tls.key --cert tls.crt
secret/web-tls-secret created
[root@k8s-master app]# kubectl get secrets
#建立ingress3基于tls认证的yml文件
cs
[root@k8s-master app]# vim ingress3.yml
apiVersion: networking.k8s.io/v1
kind: Ingress
metadata:
  annotations:
    nginx.ingress.kubernetes.io/rewrite-target: /
  name: ingress3
spec:
  tls:
  - hosts:
    - myapp-tls.timinglee.org
    secretName: web-tls-secret
  ingressClassName: nginx
  rules:
  - host: myapp-v1.timinglee.org
    http:
      paths:
      - backend:
          service:
            name: myapp-v1
            port:
              number: 80
        path: /
        pathType: Prefix
#测试
cs
[root@reg ~]# curl -k https://myapp-v1.timinglee.org
Hello MyApp | Version: v1 | <a href="hostname.html">Pod Name</a>
查看新建的ingress的详细情况,是否加密成功

此时无法直接访问
cs
curl myapp-v1.timinglee.org
如何访问
bash
curl -k https://myapp-v1.timinglee.org
https:// 表示使用 HTTPS 协议 访问,符合 Ingress 配置中强制 HTTPS 的要求,因此不会被重定向。
-k 参数的作用是 跳过 SSL 证书验证
5.4,建立auth认证
在Ingress层面添加HTTP基本认证保护后端服务。
建立认证文件
cpp
[root@k8s-master app]# dnf install httpd-tools -y
[root@k8s-master app]# htpasswd -cm auth lee
New password:
Re-type new password:
Adding password for user lee
[root@k8s-master app]# cat auth
建立认证类型资源,把这个叫做htpasswd的文件抽象成集群中的资源
cpp
[root@k8s-master app]# kubectl create secret generic auth-web --from-file auth
root@k8s-master app]# kubectl describe secrets auth-web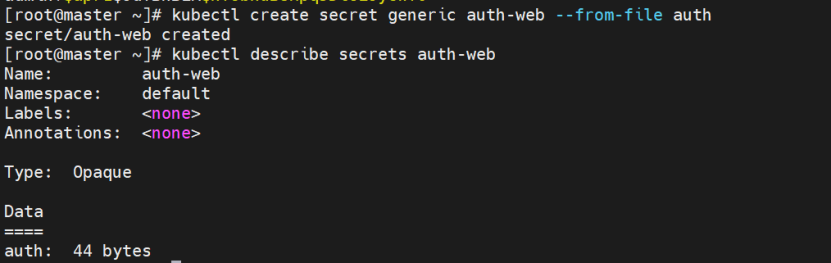
cpp
apiVersion: networking.k8s.io/v1
kind: Ingress
metadata:
name:host-ingress
annotations:
nginx.ingress.kubernetes.io/auth-type: basic
nginx.ingress.kubernetes.io/auth-secret: auth-web
nginx.ingress.kubernetes.io/auth-realm: "Please input username and password"
nginx.ingress.kubernetes.io/rewrite-target: /
spec:
ingressClassName: nginx
rules:
- host: myapp-tls.timinglee.org
http:
paths:
- backend:
service:
name: myapp-v1
port:
number: 80
path: /
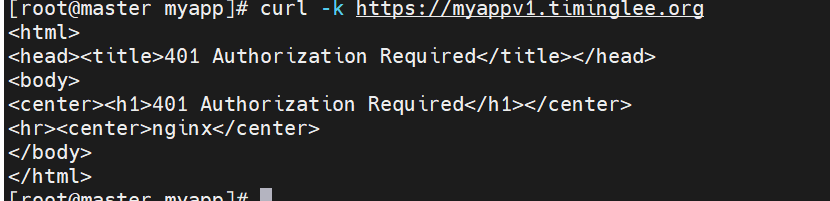
pathType: Prefix测试:
不使用用户名和密码访问时 出现401 Authorization Required 错误,这是因为在 Ingress 配置中启用了基本认证(Basic Authentication) ,只有提供正确的用户名和密码才能访问后端服务。


5.5,Rewrite重定向
使用正则表达式重写URL路径实现Rewrite重定向。

cpp
[root@master ingress]# vi rewrite-ingress.yml
[root@master ingress]# kubectl apply -f rewrite-ingress.yml
[root@master ingress]# cat rewrite-ingress.yml
apiVersion: networking.k8s.io/v1
kind: Ingress
metadata:
name: rewrite-ingress
annotations:
nginx.ingress.kubernetes.io/use-regex: "true"
nginx.ingress.kubernetes.io/rewrite-target: /$2
spec:
ingressClassName: nginx
rules:
- http:
paths:
- backend:
service:
name: myapp-v1
port:
number: 80
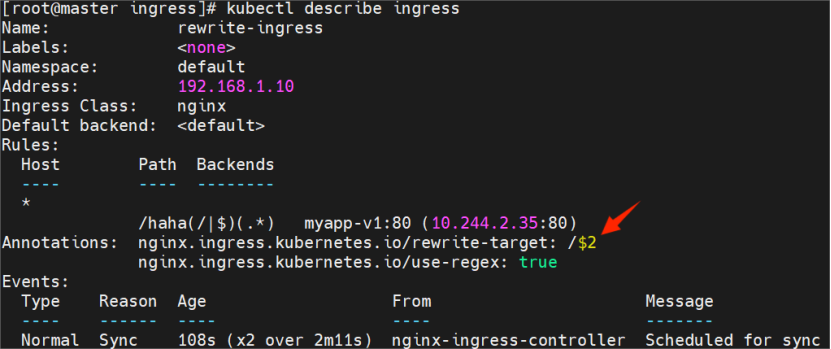
path: /haha(/|$)(.*)
pathType: ImplementationSpecificpath: /haha(/|$)(.*)
这是用于匹配外部访问 URL 的正则表达式,拆解如下:
/haha:固定前缀,匹配包含/haha的路径(如/haha、/haha/、/haha/abc等)。
(/|):匹配/或字符串结尾(),避免误匹配类似/hahaX的路径:
(/:匹配/haha后的斜杠(如/haha/abc中的/)。
$):匹配/haha本身(无后续字符,如/haha)。
(.*):捕获/haha/之后的所有字符(任意长度、任意字符),作为第二个分组($2)。
rewrite-target: /$2
定义路径重写规则:将匹配到的 URL 重写为/2,其中2对应正则表达式中第二个分组(.*)捕获的内容。
核心作用:
通过正则表达式的分组捕获和重写规则,实现了 "外部访问路径/haha/*映射到后端服务的/*路径" 的效果。
没有创建haha目录,但我们访问是会重定向到v1对印的
客户端请求 → Ingress 匹配正则 path → 路径重写(/haha/hostname.html → /hostname.html) → 转发到 myapp-v1 Service → Service 负载到 Pod → Pod 返回响应
这样就实现了 "带路径前缀的请求,经 Ingress 重写后,精准转发到后端服务特定路径" 的效果。

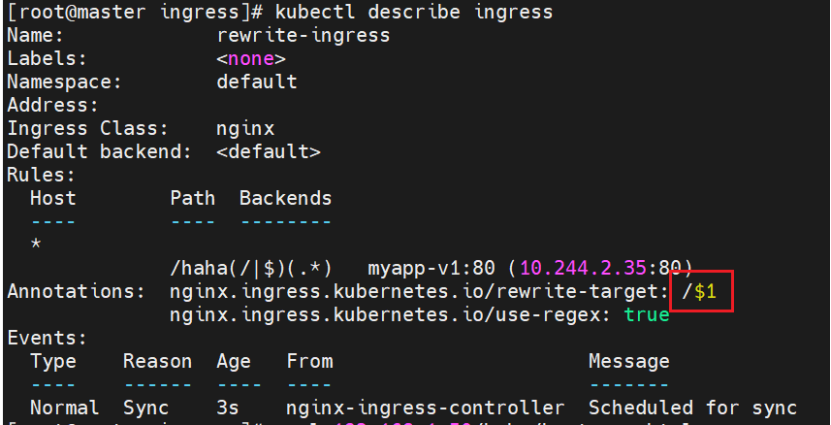
对比1和2:将配置文件的2改为1,其他不变


金丝雀发布
6.1,初始版本
创建原始old版本方便后续对比

cpp
[root@master myapp]# cat ingress-test.yml
apiVersion: networking.k8s.io/v1
kind: Ingress
metadata:
  name: ingress-old
spec:
  ingressClassName: nginx
  rules:
  - http:
      paths:
      - backend:
          service:
            name: myapp-v1
            port:
              number: 80
        path: /
        pathType: Prefix

6.2,基于header(http包头)灰度
通过特定HTTP头将流量路由到新版本实现基于Header的灰度。
创建灰度ingress,配置灰度头部key以及value
#建立基于header的ingress

cpp
apiVersion: networking.k8s.io/v1
kind: Ingress
metadata:
  name: ingress-new
  annotations:
    nginx.ingress.kubernetes.io/canary: "true"
    nginx.ingress.kubernetes.io/canary-by-header: "timinglee"
    nginx.ingress.kubernetes.io/canary-by-header-value: "6"
spec:
  ingressClassName: nginx
  rules:
  - http:
      paths:
      - backend:
          service:
            name: myapp-v2
            port:
              number: 80
        path: /
        pathType: Prefix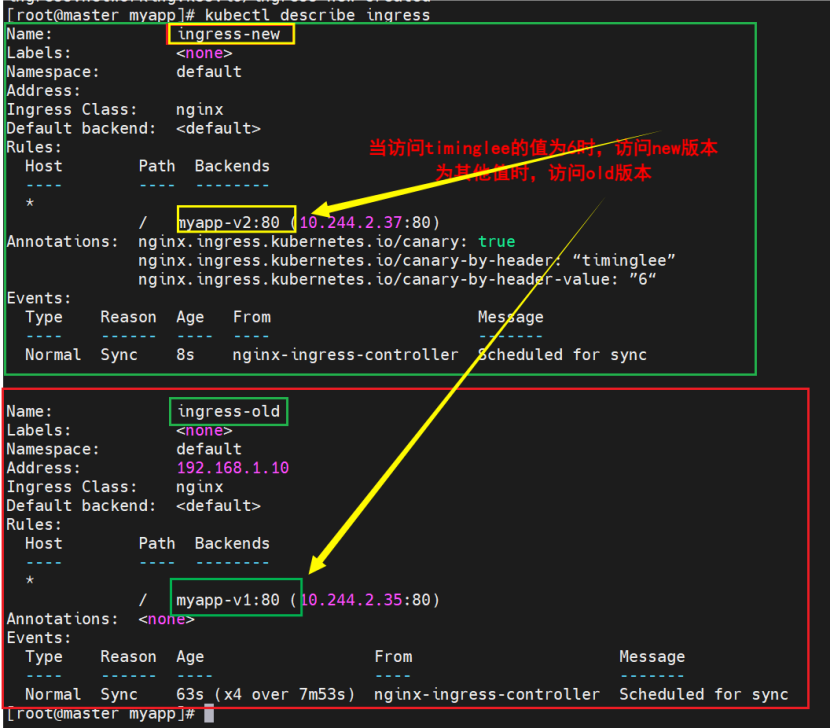
测试


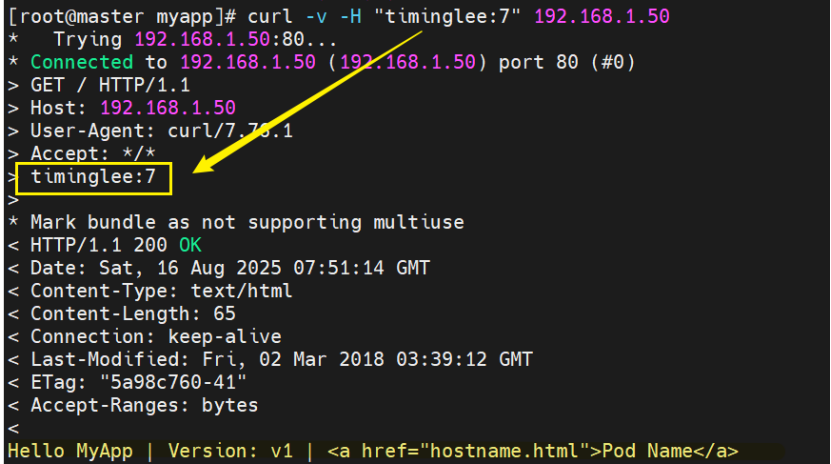
基于包头灰度发布
curl -v:-v:开启 verbose 模式,输出请求 / 响应的详细过程(协议交互细节)
- -v :开启 verbose 模式,输出请求 / 响应的详细过程(协议交互细节)
- -H "timinglee:7" :自定义 HTTP 请求头 ,添加 timinglee:7 键值对(业务自定义头)
可以通过该参数设置包头,并且随时可以改

6.3,基于权重的灰度发布
按比例分配流量实现基于权重的灰度。

cpp
apiVersion: networking.k8s.io/v1
kind: Ingress
metadata:
name: ingress-new
annotations:
nginx.ingress.kubernetes.io/canary: "true"
nginx.ingress.kubernetes.io/canary-weight: "10"
nginx.ingress.kubernetes.io/canary-weight-total: "100"
spec:
ingressClassName: nginx
rules:
- http:
paths:
- backend:
service:
name: myapp-v2
port:
number: 80
path: /
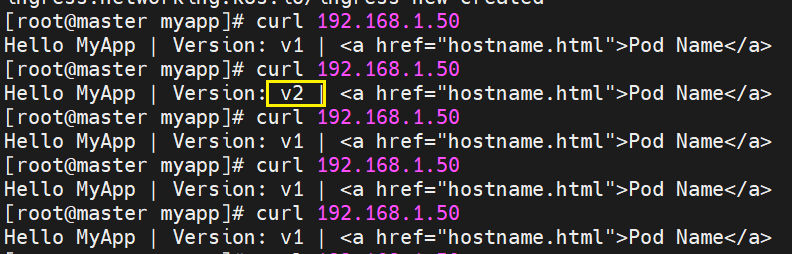
pathType: Prefixcanary-weight: "10":流量分配核心!表示 10% 的请求会路由到 myapp-v2(金丝雀版本),剩余 90% 路由到基础 Ingress(需存在路由 myapp-v1 的 Ingress)。
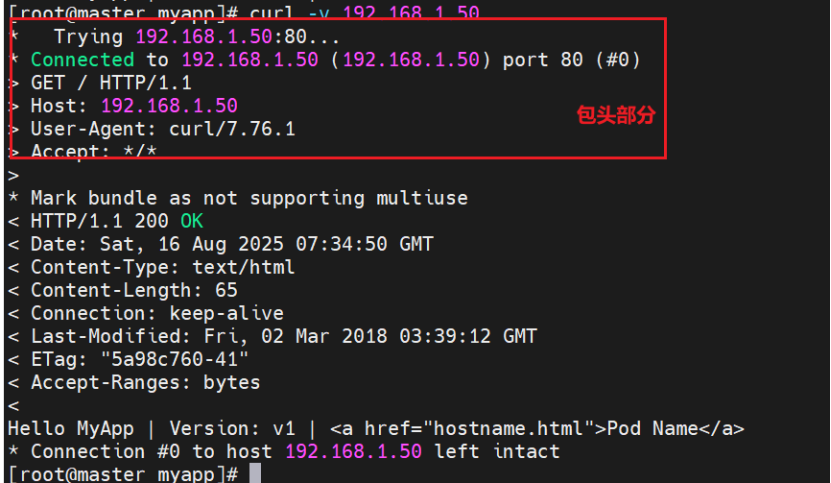
可以看到大部分的访问都划给了v1,只有一个给了v2
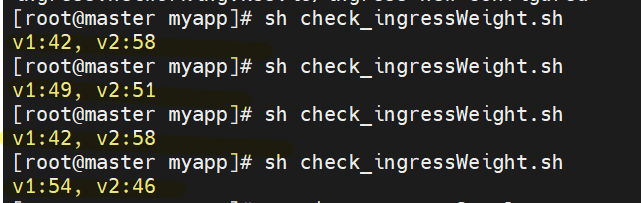
使用脚本模拟请求验证流量分配比例。
那么具体访问次数对比?手动测试次数太多不方便,于是我们写一个脚本来测试
bash
#!/bin/bash
v1=0
v2=0

for (( i=0; i<100; i++))
do
    response=`curl -s 192.168.1.50 |grep -c v1`

    v1=`expr $v1 + $response`
    v2=`expr $v2 + 1 - $response`

done
echo "v1:$v1, v2:$v2"
结果没有那么准确但是基本接近

V2值太低,提高一下v2的权重
cpp
[root@master myapp]# vi ingress-test2.yml
[root@master myapp]# kubectl apply -f ingress-test2.yml
ingress.networking.k8s.io/ingress-new configured
[root@master myapp]# sh check_ingressWeight.sh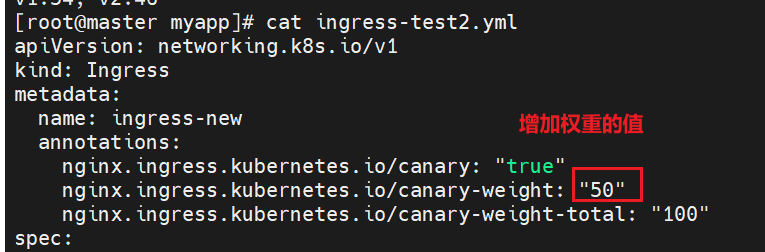
再修改文件
修改权重
过滤v1访问v2


避免影响后续实验,做完后删除配置

常见问题与排查
检查Harbor仓库、镜像标签、网络策略解决镜像拉取失败。检查资源配额、节点调度条件、网络插件状态解决Pod一直Pending。
检查Service类型、Ingress配置、防火墙规则解决服务无法访问。检查kubelet状态、网络插件、CNI配置解决节点NotReady。
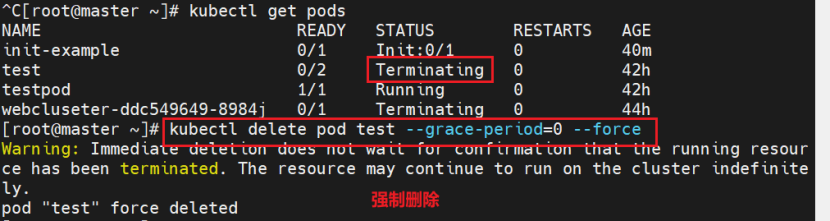
强制删除正在运行的pod
想让其尽快终止完成,可结合
cpp
kubectl delete pod myapp-v1-7479d6c54d-g7jh6 --grace-period=0 --force (强制删除,跳过宽限期
pod状态运行问题

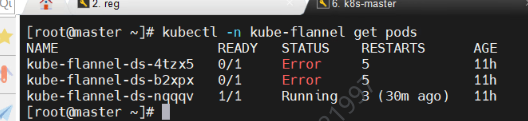
1.查看镜像拉取失败的具体原因
root@master \~# kubectl describe pod -n kube-flannel kube-flannel-ds-2vf9x
通过 kubectl describe pod <pod名称> 命令查看详细错误信息,确认具体的镜像拉取问题。
错因:镜像拉取不到
没有在harbor上上传这两个镜像,要上传

2..检查3个节点状态运行是否正常(是否都是ready)

3..Ifconfig检查flannel有没有IP


4..检查网关
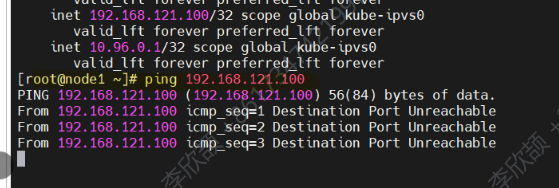
Master的网络挂了
对节点网络不通
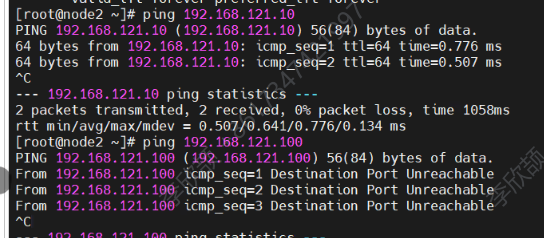
Ping自己可以
检查策略
连接仓库失败
每次关闭虚拟机后重新打开时都要重启一下harbor仓库
apply文件报错

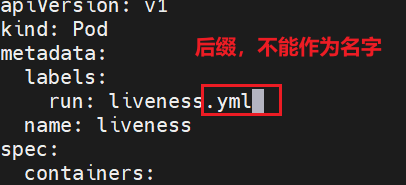
错误提示表明容器名称包含了点(.)字符,而 Kubernetes 中容器名称不允许包含点。这是因为 Kubernetes 对容器名称有严格的命名规范:只能包含字母、数字、连字符(-)和下划线(_),且必须以字母或数字开头和结尾。
解决方法:需要修改liveness.yml文件中容器的name字段,移除其中的点(.)或替换为允许的字符(如连字符-)。

说明刚刚敲的配置文件键值对中间少了空格