🚀 如何运行Rust项目代码 - 完全指南
一篇内容详实的技术博客,带你深入了解Rust项目的运行机制和最佳实践
📖 目录
🌟 前言
Rust作为系统编程语言,其项目运行方式既简单又灵活。本文将从最基础的单文件程序到复杂的多模块项目,全面讲解Rust代码的运行方法,帮助开发者掌握从开发到部署的完整流程。
本文适合的读者:
- 🎯 Rust初学者
- 🎯 从其他语言转向Rust的开发者
- 🎯 希望了解Rust构建系统的程序员
- 🎯 需要部署Rust应用的运维人员
🎪 Rust项目类型概览
单文件程序 (Single File)
rust
// hello.rs
fn main() {
    println!("Hello, Rust!");
}
特点:
- 简单直接,适合学习和快速原型
- 无依赖管理,编译快速
- 适用于脚本化任务
Cargo项目 (Cargo Project)
my_project/
├── Cargo.toml      # 项目配置文件
├── src/            # 源代码目录
│   ├── main.rs     # 主程序入口
│   └── lib.rs      # 库代码(可选)
├── tests/          # 测试代码
├── examples/       # 示例代码
└── target/         # 编译输出
特点:
- 标准项目结构,支持复杂应用
- 内置依赖管理和构建系统
- 支持测试、文档生成、发布等功能
📝 单文件Rust程序运行
基础编译运行流程
第1步:创建源文件
rust
// calculator.rs
use std::io;

fn main() {
    println!("🔢 简单计算器");
    println!("请输入第一个数字:");

    let mut input1 = String::new();
    io::stdin().read_line(&mut input1).expect("读取失败");
    let num1: f64 = input1.trim().parse().expect("解析失败");

    println!("请输入第二个数字:");
    let mut input2 = String::new();
    io::stdin().read_line(&mut input2).expect("读取失败");
    let num2: f64 = input2.trim().parse().expect("解析失败");

    println!("结果:");
    println!("{} + {} = {}", num1, num2, num1 + num2);
    println!("{} - {} = {}", num1, num2, num1 - num2);
    println!("{} × {} = {}", num1, num2, num1 * num2);
    if num2 != 0.0 {
        println!("{} ÷ {} = {}", num1, num2, num1 / num2);
    }
}
第2步:编译程序
bash
# 基础编译
rustc calculator.rs

# 查看生成的文件
ls -la
# 输出:calculator.exe (Windows) 或 calculator (Unix)
第3步:运行程序
bash
# Windows
./calculator.exe

# Linux/macOS
./calculator

# 或者通用方式
./calculator
高级编译选项
优化编译
bash
# 优化编译(更快的运行速度)
rustc -O calculator.rs

# 指定输出文件名
rustc calculator.rs -o my_calculator

# 显示详细信息
rustc --verbose calculator.rs
条件编译
rust
// config.rs
fn main() {
    #[cfg(debug_assertions)]
    println!("这是调试版本");

    #[cfg(not(debug_assertions))]
    println!("这是发布版本");

    #[cfg(target_os = "windows")]
    println!("运行在Windows上");

    #[cfg(target_os = "linux")]
    println!("运行在Linux上");
}
bash
# 调试模式编译(默认)
rustc config.rs

# 发布模式编译
rustc --cfg 'not(debug_assertions)' config.rs
🏗️ Cargo项目运行详解
创建新项目
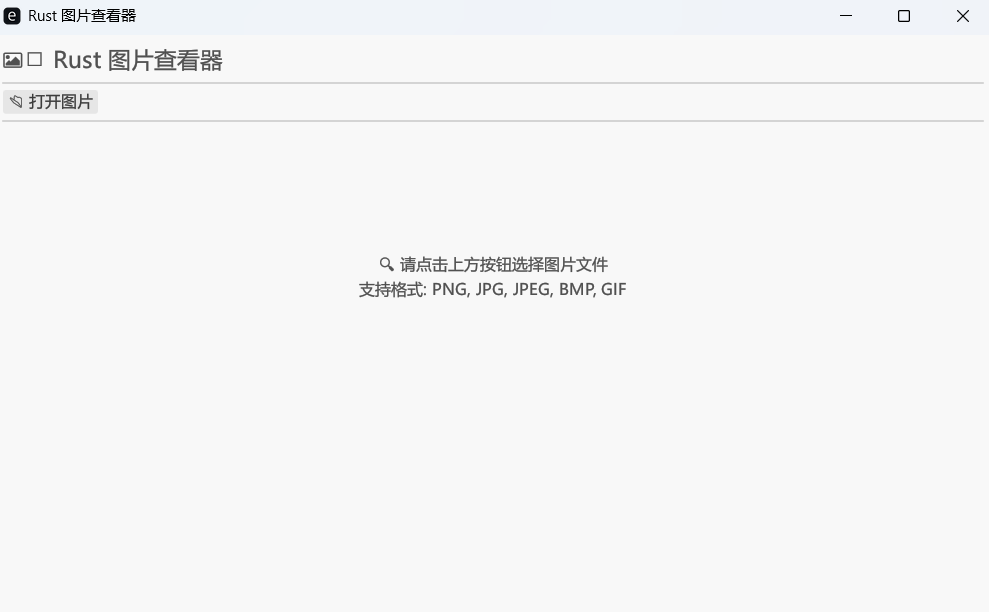
实战案例:图片查看器项目
让我们以一个真实的GUI图片查看器项目为例,详细讲解Cargo项目的运行过程。
技术栈介绍:
- GUI框架: egui + eframe - 现代化的即时模式GUI库
- 图片处理: image crate - 支持多种图片格式的处理库
- 文件对话框: rfd (rusty-file-dialog) - 跨平台文件选择对话框
- 系统集成: 支持中文字体,自动窗口管理
项目创建过程
bash
# 创建图片查看器项目
cargo new image_viewer
cd image_viewer

# 查看初始项目结构
tree
生成的项目结构:
image_viewer/
├── Cargo.toml      # 项目配置文件
├── src/            # 源代码目录
│   └── main.rs     # 主程序入口
├── .gitignore      # Git忽略文件
└── target/         # 编译输出目录(运行后生成)
实际项目的Cargo.toml配置
toml
[package]
name = "image_viewer"
version = "0.1.0"
edition = "2021"

# GUI应用的依赖配置
[dependencies]
eframe = "0.28"     # egui的原生窗口框架
egui = "0.28"       # 即时模式GUI库
image = "0.25"      # 图片处理库
rfd = "0.14"        # 跨平台文件对话框

# 发布优化配置
[profile.release]
strip = true        # 移除调试符号
lto = true         # 链接时优化
技术选型说明:
-
egui + eframe组合的优势:
- 即时模式GUI,代码简洁直观
- 纯Rust实现,无需额外的GUI运行时
- 跨平台支持(Windows, macOS, Linux)
- 内置主题和现代化控件
-
image crate特性:
- 支持PNG, JPEG, GIF, BMP, WebP等格式
- 高性能的图像处理能力
- 内存安全的图像操作
- 与GUI框架完美集成
-
rfd文件对话框:
- 原生系统文件对话框
- 异步/同步两种API
- 文件过滤和多选支持
项目核心代码结构
rust
// src/main.rs - 图片查看器主程序
#![cfg_attr(not(debug_assertions), windows_subsystem = "windows")]

use eframe::egui;
use image::DynamicImage;
use std::path::PathBuf;

/// 图片查看器应用结构体
struct ImageViewerApp {
    /// 当前显示的图片
    current_image: Option<DynamicImage>,
    /// 当前图片路径
    current_path: Option<PathBuf>,
    /// egui纹理句柄
    texture: Option<egui::TextureHandle>,
}

impl Default for ImageViewerApp {
    fn default() -> Self {
        Self {
            current_image: None,
            current_path: None,
            texture: None,
        }
    }
}

impl eframe::App for ImageViewerApp {
    fn update(&mut self, ctx: &egui::Context, _frame: &mut eframe::Frame) {
        // GUI更新逻辑
        // ... 完整代码约150行
    }
}

fn main() -> Result<(), eframe::Error> {
    let options = eframe::NativeOptions {
        viewport: egui::ViewportBuilder::default()
            .with_inner_size([800.0, 600.0])
            .with_title("Rust 图片查看器"),
        ..Default::default()
    };

    eframe::run_native(
        "图片查看器",
        options,
        Box::new(|cc| {
            setup_custom_fonts(&cc.egui_ctx);
            Ok(Box::new(ImageViewerApp::default()))
        }),
    )
}
详细运行命令解析
开发阶段命令
bash
# 进入项目目录
cd image_viewer

# 快速语法检查(推荐在开发时频繁使用)
cargo check
# 输出:Checking image_viewer v0.1.0
# 耗时:~2-5秒(比完整编译快很多)

# 编译项目(调试模式)
cargo build
# 输出:target/debug/image_viewer.exe (Windows)
# 特点:包含调试信息,会显示控制台窗口

# 编译并运行(调试模式)
cargo run
# 相当于:cargo build && ./target/debug/image_viewer.exe
# 适用场景:开发调试,查看println!输出
运行效果对比
Debug模式运行效果:
bash
cargo run
# 现象:
# 1. 弹出黑色控制台窗口(显示调试信息)
# 2. 然后打开GUI窗口(图片查看器界面)
# 3. 可以看到中文字体加载状态信息
# 4. 编译时间:约10-15秒(首次),后续增量编译2-3秒
Release模式运行效果:
bash
cargo run --release
# 现象:
# 1. 直接打开GUI窗口,无控制台
# 2. 启动速度更快,界面响应更流畅
# 3. 编译时间:约30-60秒(首次),包含优化过程
# 4. 文件大小:通常比Debug版本小30-50%
传递命令行参数示例
bash
# 如果图片查看器支持命令行参数
cargo run -- --help
cargo run -- image.png
cargo run -- --fullscreen image.jpg

# Release模式传参
cargo run --release -- image.png
项目特定的构建特性
解决中文字体显示问题:
rust
// 在代码中通过条件编译解决跨平台字体问题
#[cfg(target_os = "windows")]
fn setup_custom_fonts(ctx: &egui::Context) {
    // Windows系统字体加载逻辑
    if let Ok(font_data) = std::fs::read("C:/Windows/Fonts/msyh.ttc") {
        // 微软雅黑字体配置
    }
}
隐藏控制台窗口:
rust
// 文件顶部的编译器指令
#![cfg_attr(not(debug_assertions), windows_subsystem = "windows")]
// 效果:Release版本不显示控制台,Debug版本保留便于调试
实际编译输出分析
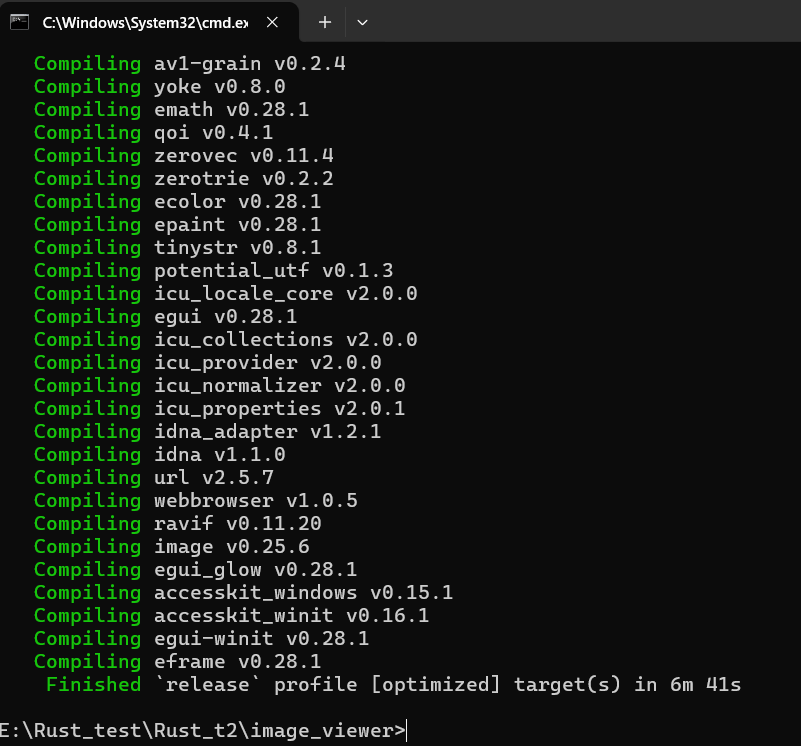
首次编译过程:
bash
$ cargo build --release
   Compiling proc-macro2 v1.0.70
   Compiling unicode-ident v1.0.12
   Compiling syn v2.0.39
   Compiling memchr v2.6.4
   ... (下载并编译约100个依赖包)
   Compiling eframe v0.28.1
   Compiling image_viewer v0.1.0
    Finished release [optimized] target(s) in 45.23s
生成的文件结构:
target/
├── debug/              # Debug模式输出
│   ├── image_viewer.exe    # 可执行文件(较大,含调试信息)
│   ├── image_viewer.pdb    # Windows调试信息文件
│   └── deps/              # 依赖库文件
├── release/            # Release模式输出
│   ├── image_viewer.exe    # 优化后的可执行文件(较小)
│   └── deps/              # 优化后的依赖库
└── CACHEDIR.TAG        # 缓存标识文件
文件大小对比:
- Debug版本:约15-20MB(包含所有调试信息)
- Release版本:约8-12MB(经过优化和压缩)
- 首次编译后target目录:约1.6GB(所有依赖的编译缓存)
GUI项目特有的测试运行
bash
# 功能测试运行
cargo run --release
# 测试项目:
# 1. 点击"📂 打开图片"按钮
# 2. 选择PNG/JPG/GIF等格式图片
# 3. 验证图片正确显示和缩放
# 4. 检查中文界面是否正常显示
# 5. 测试窗口大小调整时图片自适应

# 性能测试
cargo run --release -- large_image.png
# 观察:
# - 大图片加载时间
# - 内存使用情况
# - 界面响应流畅度
项目部署和分发
bash
# 生成分发版本
cargo build --release

# 复制可执行文件到分发目录
cp target/release/image_viewer.exe ./image_viewer.exe

# 文件大小优化(可选)
strip image_viewer.exe    # Linux/macOS
# 或使用UPX压缩
upx --best image_viewer.exe
分发包说明:
- 单文件部署:只需image_viewer.exe即可运行
- 无需额外运行时:Rust编译生成的是原生可执行文件
- 系统兼容性:支持Windows 7+, macOS 10.12+, 主流Linux发行版
这个实际项目展示了Cargo如何管理复杂的GUI应用依赖,从开发调试到最终发布的完整流程。通过这个例子,我们可以看到Cargo项目管理的强大功能和实际应用价值。
Cargo.toml深度解析
toml
[package]
name = "my_app"              # 项目名称
version = "0.1.0"            # 版本号(语义化版本)
edition = "2021"             # Rust版本
authors = ["你的名字 <email@example.com>"]
description = "一个示例Rust应用"
license = "MIT"              # 许可证
readme = "README.md"         # 说明文件
homepage = "https://example.com"
repository = "https://github.com/user/repo"
keywords = ["cli", "tool"]   # 关键词
categories = ["command-line-utilities"]

# 依赖管理
[dependencies]
serde = "1.0"                # 最新1.x版本
tokio = { version = "1", features = ["full"] }
clap = { version = "4.0", optional = true }

# 开发依赖(仅测试时需要)
[dev-dependencies]
assert_cmd = "2.0"
predicates = "3.0"

# 构建依赖
[build-dependencies]
cc = "1.0"

# 可选功能
[features]
default = ["cli"]
cli = ["dep:clap"]
extra = []

# 二进制目标
[[bin]]
name = "my_app"
path = "src/main.rs"

# 库目标
[lib]
name = "my_lib"
path = "src/lib.rs"

# 示例程序
[[example]]
name = "basic"
path = "examples/basic.rs"

# 性能配置
[profile.dev]
opt-level = 0      # 无优化,快速编译
debug = true       # 包含调试信息
overflow-checks = true

[profile.release]
opt-level = 3      # 最高优化
debug = false      # 不包含调试信息
lto = true         # 链接时优化
codegen-units = 1  # 单个代码生成单元
panic = 'abort'    # panic时直接终止
基础运行命令
开发阶段命令
bash
# 快速检查语法(不生成可执行文件)
cargo check
# 优点:比cargo build快很多,适合频繁检查

# 编译项目(调试模式)
cargo build
# 输出:target/debug/my_app

# 编译并运行(调试模式)
cargo run
# 相当于:cargo build && ./target/debug/my_app

# 传递命令行参数
cargo run -- --help
cargo run -- arg1 arg2

# 指定二进制目标
cargo run --bin my_app
测试相关命令
bash
# 运行所有测试
cargo test

# 运行特定测试
cargo test test_function_name

# 显示测试输出
cargo test -- --nocapture

# 运行文档测试
cargo test --doc

# 运行示例
cargo run --example basic
发布模式命令
bash
# 发布模式编译(高度优化)
cargo build --release
# 输出:target/release/my_app

# 发布模式运行
cargo run --release

# 安装到系统路径
cargo install --path .
🔧 编译模式深入解析
Debug vs Release模式对比
| 特性 | Debug模式 | Release模式 |
|---|---|---|
| 编译速度 | 🚀 快速 | ⏳ 较慢 |
| 运行速度 | ⏳ 较慢 | 🚀 快速 |
| 文件大小 | 📦 较大 | 📦 较小 |
| 调试信息 | ✅ 包含 | ❌ 不包含 |
| 优化级别 | 0 | 3 |
| panic行为 | 展开栈 | 可配置 |
编译过程详解
bash
# 查看详细编译过程
RUST_LOG=debug cargo build --verbose

# 编译时间分析
cargo build --timings

# 查看编译产生的文件
find target/debug -name "*my_app*"
编译过程步骤:
- 依赖解析 - 下载和解析Cargo.toml中的依赖
- 预处理 - 宏展开、条件编译
- 类型检查 - 借用检查、生命周期分析
- 代码生成 - LLVM IR生成
- 优化 - LLVM优化(Release模式)
- 链接 - 生成最终可执行文件
目标平台编译
bash
# 查看可用目标
rustup target list

# 安装目标平台
rustup target add x86_64-pc-windows-gnu
rustup target add x86_64-unknown-linux-gnu
rustup target add x86_64-apple-darwin

# 交叉编译
cargo build --target x86_64-pc-windows-gnu
cargo build --target x86_64-unknown-linux-gnu

# 发布模式交叉编译
cargo build --release --target x86_64-pc-windows-gnu
📦 依赖管理与构建过程
依赖版本管理
语义化版本控制
toml
[dependencies]
# 精确版本
serde = "=1.0.136"

# 兼容版本(推荐)
serde = "1.0"        # >=1.0.0, <2.0.0
serde = "1.0.100"    # >=1.0.100, <1.1.0

# 范围版本
serde = ">=1.0.100, <1.1.0"

# 预发布版本
serde = "1.1.0-alpha.1"

# 从Git仓库
serde = { git = "https://github.com/serde-rs/serde.git" }
serde = { git = "https://github.com/serde-rs/serde.git", branch = "main" }
serde = { git = "https://github.com/serde-rs/serde.git", tag = "v1.0.136" }

# 本地路径
my_lib = { path = "../my_lib" }
功能特性管理
toml
[dependencies]
# 禁用默认功能
serde = { version = "1.0", default-features = false }

# 启用特定功能
serde = { version = "1.0", features = ["derive"] }
tokio = { version = "1", features = ["full"] }

# 可选依赖
clap = { version = "4.0", optional = true }

[features]
default = ["json"]
json = ["dep:serde", "serde/derive"]
cli = ["dep:clap"]
构建脚本 (build.rs)
rust
// build.rs
use std::env;
use std::path::Path;

fn main() {
    // 获取构建信息
    let out_dir = env::var("OUT_DIR").unwrap();
    let target = env::var("TARGET").unwrap();

    println!("cargo:rerun-if-changed=build.rs");
    println!("cargo:rustc-link-lib=ssl");

    // 根据目标平台进行不同配置
    if target.contains("windows") {
        println!("cargo:rustc-link-lib=ws2_32");
    }

    // 生成代码
    let dest_path = Path::new(&out_dir).join("generated.rs");
    std::fs::write(&dest_path, "pub const BUILD_TIME: &str = \"compiled at build time\";").unwrap();
}
在Cargo.toml中启用:
toml
[build-dependencies]
cc = "1.0"

[package]
build = "build.rs"
Cargo工作空间
toml
# Cargo.toml (工作空间根目录)
[workspace]
members = [
    "app",
    "core",
    "utils",
]

[workspace.dependencies]
serde = "1.0"
tokio = "1.0"
子项目引用:
toml
# app/Cargo.toml
[package]
name = "app"
version = "0.1.0"

[dependencies]
core = { path = "../core" }
serde = { workspace = true }
🌍 跨平台运行考虑
平台特定代码
rust
// src/platform.rs
#[cfg(target_os = "windows")]
mod windows {
    use std::os::windows::process::CommandExt;

    pub fn run_command() {
        use std::process::Command;
        Command::new("cmd")
            .creation_flags(0x08000000) // CREATE_NO_WINDOW
            .output()
            .expect("failed to execute process");
    }
}

#[cfg(target_os = "linux")]
mod linux {
    pub fn run_command() {
        use std::process::Command;
        Command::new("sh")
            .arg("-c")
            .arg("echo 'Hello from Linux'")
            .output()
            .expect("failed to execute process");
    }
}

#[cfg(target_os = "macos")]
mod macos {
    pub fn run_command() {
        // macOS特定实现
    }
}

// 统一接口
#[cfg(target_os = "windows")]
pub use windows::*;

#[cfg(target_os = "linux")]
pub use linux::*;

#[cfg(target_os = "macos")]
pub use macos::*;
路径处理
rust
use std::path::PathBuf;

fn get_config_path() -> PathBuf {
    #[cfg(target_os = "windows")]
    {
        dirs::config_dir()
            .unwrap_or_else(|| PathBuf::from(r"C:\ProgramData"))
            .join("MyApp")
    }

    #[cfg(target_os = "macos")]
    {
        dirs::config_dir()
            .unwrap_or_else(|| PathBuf::from("/etc"))
            .join("MyApp")
    }

    #[cfg(target_os = "linux")]
    {
        dirs::config_dir()
            .unwrap_or_else(|| PathBuf::from("/etc"))
            .join("myapp")
    }
}
🎨 生成带图标的可执行文件
为什么需要自定义图标
默认情况下,Rust编译生成的exe文件使用系统默认图标,看起来不够专业。通过添加自定义图标,可以:
- ✅ 提升专业度 - 让应用看起来像商业软件
- ✅ 品牌标识 - 在任务栏和文件管理器中容易识别
- ✅ 用户体验 - 提供更好的视觉识别度
- ✅ 版本信息 - 同时可以添加版本、版权等信息
图标文件准备
制作ICO图标文件
在线工具制作(推荐):
bash
# 步骤:
# 1. 准备正方形PNG图片(建议512x512或1024x1024)
# 2. 访问在线转换工具:
#    - https://www.icoconverter.com/
#    - https://convertio.co/zh/png-ico/
# 3. 上传图片,选择ICO格式
# 4. 下载生成的.ico文件图标设计建议:
- 🎯 简洁明了 - 小尺寸下仍能清晰识别
- 🎯 高对比度 - 确保在各种背景下可见
- 🎯 主题相关 - 体现应用功能特点
- 🎯 多尺寸优化 - 包含16x16到256x256多种尺寸
图标创意示例(图片查看器)
🖼️ 相框 + 图片        - 经典图片查看器风格
📁 文件夹 + 图像图标    - 文件管理风格
🔍 放大镜 + 图片       - 查看功能突出
👁️ 眼睛图标           - 简约现代风格
🎨 调色板样式          - 艺术创意风格
配置构建系统
修改Cargo.toml
toml
# Cargo.toml
[package]
name = "image_viewer"
version = "0.1.0"
edition = "2021"

[dependencies]
eframe = "0.28"
egui = "0.28"
image = "0.25"
rfd = "0.14"

# 构建时依赖(仅在Windows需要)
[build-dependencies]
winres = "0.1"

[profile.release]
strip = true
lto = true
创建构建脚本
创建 build.rs 文件:
rust
// build.rs - 编译时执行,用于嵌入资源
fn main() {
    // 仅在Windows平台添加图标和版本信息
    #[cfg(target_os = "windows")]
    {
        let mut res = winres::WindowsResource::new();

        // 设置应用图标(如果存在)
        if std::path::Path::new("icon.ico").exists() {
            res.set_icon("icon.ico");
        }

        // 添加版本信息
        res.set("FileDescription", "Rust图片查看器");
        res.set("ProductName", "Image Viewer");
        res.set("CompanyName", "Rust学习项目");
        res.set("LegalCopyright", "© 2024 图片查看器");
        res.set("FileVersion", "1.0.0.0");
        res.set("ProductVersion", "1.0.0.0");
        res.set("OriginalFilename", "image_viewer.exe");
        res.set("InternalName", "image_viewer");

        // 编译资源
        if let Err(e) = res.compile() {
            eprintln!("资源编译失败: {}", e);
            // 继续编译,不因图标问题中断
        }
    }

    // Linux和macOS有不同的图标设置方式
    #[cfg(not(target_os = "windows"))]
    {
        // macOS: 通过Info.plist设置
        // Linux: 通过.desktop文件设置
        println!("cargo:warning=图标功能主要支持Windows平台");
    }
}
项目文件布局
正确的文件放置位置:
image_viewer/
├── Cargo.toml          # 项目配置
├── build.rs            # 构建脚本
├── icon.ico            # 图标文件(重要:放在根目录)
├── src/
│   └── main.rs         # 主程序
└── target/             # 编译输出
编译带图标的程序
完整编译流程
bash
# 1. 确保图标文件存在且位置正确
ls icon.ico
# 应该显示:icon.ico

# 2. 清理之前的编译缓存(重要!)
cargo clean

# 3. 重新编译(会自动应用图标和版本信息)
cargo build --release

# 4. 验证编译结果
ls -la target/release/image_viewer.exe
编译过程分析
首次编译输出示例:
bash
$ cargo build --release
   Compiling winres v0.1.12
   Compiling proc-macro2 v1.0.70
   ...
   Running build script for image_viewer v0.1.0
   # 这里会执行build.rs,嵌入图标和版本信息
   Compiling image_viewer v0.1.0
Finished release [optimized] target(s) in 52.31s资源嵌入过程:
- 构建脚本执行 -
build.rs在编译前运行 - 资源文件处理 - 将
icon.ico转换为Windows资源 - 版本信息添加 - 创建版本信息资源块
- 资源编译 - 生成
.res文件 - 链接嵌入 - 将资源链接到最终的exe文件中
验证图标效果
视觉验证方法
文件管理器检查:
bash
# Windows资源管理器中查看
# target/release/image_viewer.exe 应该显示自定义图标而非默认图标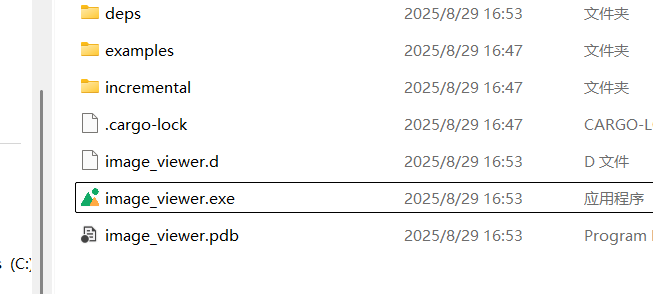
运行时检查:
bash
# 运行程序
cargo run --release

# 检查任务栏图标
# 程序运行时任务栏应显示自定义图标
属性信息检查:
bash
# Windows中右键exe文件 → 属性 → 详细信息
# 应该显示:
# - 文件描述: Rust图片查看器
# - 产品名称: Image Viewer
# - 版权: © 2024 图片查看器
# - 文件版本: 1.0.0.0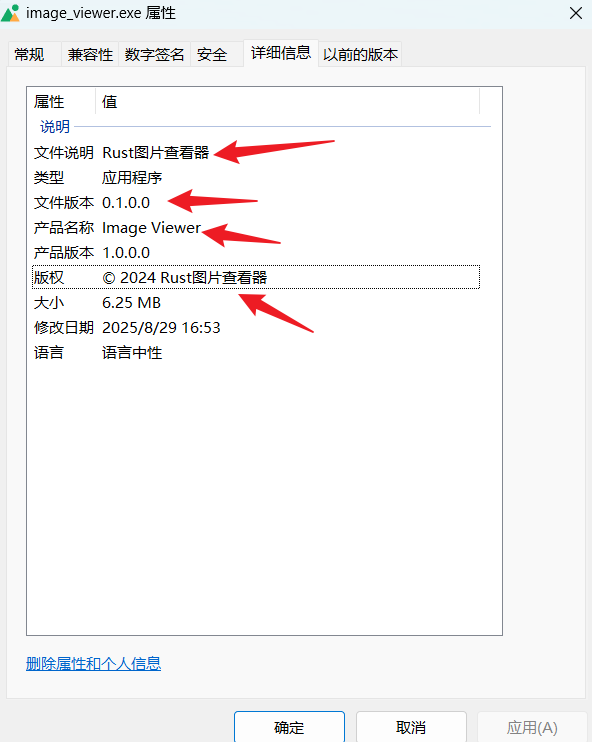
技术验证方法
bash
# 使用工具查看资源(可选)
# Windows Resource Hacker 或类似工具
# 可以查看嵌入的图标和版本信息资源
跨平台图标支持
Windows平台
rust
// 通过winres crate完全支持
// - ICO图标文件
// - 版本信息资源
// - 完整的Windows资源系统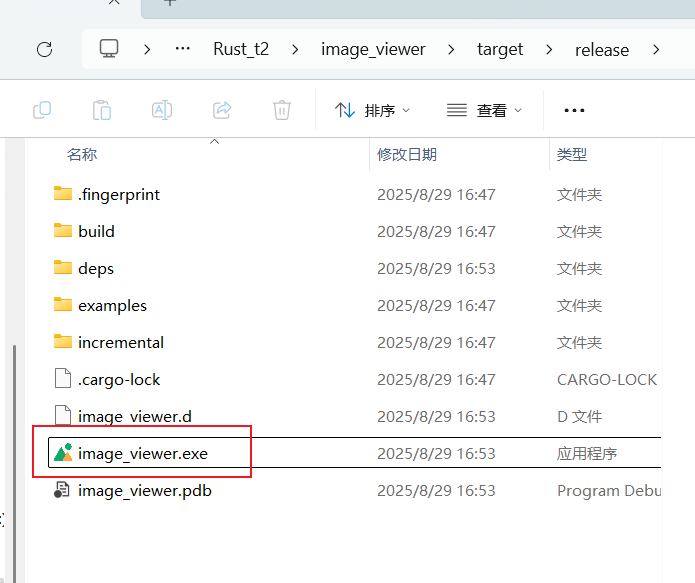
macOS平台
bash
# macOS应用图标设置方式:
# 1. 创建.app包结构
# 2. 在Info.plist中指定图标
# 3. 提供.icns格式图标文件

# 示例Info.plist配置:
# <key>CFBundleIconFile</key>
# <string>app_icon.icns</string>
Linux平台
bash
# Linux桌面图标设置:
# 1. 创建.desktop文件
# 2. 指定Icon字段
# 3. 安装到系统图标目录

# 示例.desktop文件:
# [Desktop Entry]
# Name=Image Viewer
# Icon=/usr/share/icons/image_viewer.png
# Exec=/usr/bin/image_viewer
图标相关的最佳实践
开发阶段建议
bash
# 1. 提前准备图标文件
# 避免后期为了图标重新编译整个项目

# 2. 版本信息要准确
# 在build.rs中设置正确的版本号和信息

# 3. 测试不同尺寸
# 确保图标在16x16到256x256都清晰可见

# 4. 保持一致性
# 图标设计要与应用功能和界面风格一致
发布时注意事项
bash
# 1. 版本信息同步
# 确保Cargo.toml和build.rs中的版本号一致

# 2. 图标版权
# 确保使用的图标有合适的授权

# 3. 文件大小
# ICO文件不要过大,推荐小于100KB

# 4. 备份原图
# 保留原始高分辨率图标文件用于后续修改
实际项目效果展示
编译前后对比:
| 特性 | 默认版本 | 带图标版本 |
|---|---|---|
| 文件图标 | 系统默认exe图标 | 自定义图片查看器图标 |
| 任务栏图标 | 通用程序图标 | 个性化应用图标 |
| 文件属性 | 基础信息 | 完整版本和版权信息 |
| 专业程度 | 程序员作品 | 商业软件外观 |
| 用户体验 | 功能性 | 专业 + 易识别 |
实际应用场景:
- 📦 软件分发 - 用户下载时看到专业图标
- 🖥️ 桌面快捷方式 - 桌面上易于识别
- 📋 任务管理器 - 进程列表中快速找到
- 📁 文件管理 - 在程序文件夹中突出显示
通过这个完整的图标配置流程,你的Rust GUI应用就能拥有专业软件的外观,极大提升用户体验和软件的整体质量!
⚡ 性能优化与发布
编译优化配置
toml
# Cargo.toml
[profile.release]
opt-level = 3              # 最高优化级别
debug = false              # 移除调试信息
debug-assertions = false   # 移除调试断言
overflow-checks = false    # 移除溢出检查
lto = "fat"               # 链接时优化
codegen-units = 1          # 单个代码生成单元
panic = "abort"           # panic时终止而非展开
strip = "symbols"         # 移除符号信息

# 自定义优化配置
[profile.production]
inherits = "release"
opt-level = "z"           # 优化文件大小
运行时优化
bash
# 使用自定义profile
cargo build --profile production

# 链接时优化(LTO)
cargo build --release

# 目标CPU优化
RUSTFLAGS="-C target-cpu=native" cargo build --release

# 并行编译
cargo build --release -j 8
二进制大小优化
toml
[profile.release]
opt-level = "z"     # 优化大小
lto = true          # 链接时优化
codegen-units = 1   # 单个代码生成单元
panic = "abort"     # 直接终止
strip = true        # 移除符号
后处理:
bash
# 使用UPX压缩
upx --best target/release/my_app

# 移除调试符号(如果profile中没设置)
strip target/release/my_app
🛠️ 常见问题排查
编译错误处理
依赖版本冲突
bash
# 查看依赖树
cargo tree

# 查看冲突的依赖
cargo tree -d

# 更新依赖
cargo update

# 更新特定依赖
cargo update -p serde
解决方案:
toml
# 强制使用特定版本
[patch.crates-io]
serde = "1.0.136"
链接错误
bash
# 详细链接信息
RUST_LOG=rustc_codegen_ssa::back::link=info cargo build

# 查看链接库
ldd target/release/my_app  # Linux
otool -L target/release/my_app  # macOS
内存问题
bash
# 增加链接器内存
export RUSTFLAGS="-C link-arg=-Wl,--no-keep-memory"

# 减少并行度
cargo build -j 1
运行时错误处理
环境变量调试
bash
# 显示backtrace
RUST_BACKTRACE=1 ./my_app
RUST_BACKTRACE=full ./my_app

# 日志级别
RUST_LOG=debug ./my_app
RUST_LOG=my_app=trace ./my_app
性能调试
rust
// 添加性能监控
use std::time::Instant;

fn main() {
    let start = Instant::now();

    // 你的代码
    expensive_operation();

    println!("耗时: {:?}", start.elapsed());
}
🎯 高级运行技巧
Cargo扩展命令
bash
# 安装有用的cargo扩展
cargo install cargo-watch      # 文件变化时自动重新编译
cargo install cargo-edit       # 命令行编辑依赖
cargo install cargo-outdated   # 检查过期依赖
cargo install cargo-audit      # 安全审计
cargo install cargo-flamegraph # 性能分析

# 使用扩展
cargo watch -x run             # 自动重新运行
cargo add serde               # 添加依赖
cargo rm serde                # 移除依赖
cargo outdated                # 检查过期依赖
cargo audit                   # 安全审计
开发工作流优化
bash
# .cargo/config.toml
[alias]
r = "run"
b = "build"
t = "test"
c = "check"
br = "build --release"
rr = "run --release"

# 使用别名
cargo r    # 等同于 cargo run
cargo br   # 等同于 cargo build --release
环境配置
bash
# .env文件
DATABASE_URL=postgresql://localhost/myapp
RUST_LOG=debug
API_KEY=your-secret-key
在代码中使用:
rust
use std::env;

fn main() {
    // 加载.env文件
    dotenv::dotenv().ok();

    let database_url = env::var("DATABASE_URL")
        .expect("DATABASE_URL must be set");

    println!("连接到数据库: {}", database_url);
}
条件编译与特性门控
rust
// 功能开关
#[cfg(feature = "encryption")]
mod encryption {
    pub fn encrypt(data: &str) -> String {
        // 加密实现
        format!("encrypted({})", data)
    }
}

#[cfg(not(feature = "encryption"))]
mod encryption {
    pub fn encrypt(data: &str) -> String {
        // 无加密版本
        data.to_string()
    }
}

// 调试版本专用代码
#[cfg(debug_assertions)]
macro_rules! debug_print {
    ($($arg:tt)*) => {
        eprintln!($($arg)*);
    };
}

#[cfg(not(debug_assertions))]
macro_rules! debug_print {
    ($($arg:tt)*) => {};
}
编译时选择:
bash
# 启用加密功能
cargo run --features encryption

# 多个功能
cargo run --features "encryption,logging"

# 禁用默认功能
cargo run --no-default-features --features minimal
🎊 总结
通过本文的详细讲解,我们掌握了:
核心技能 ✅
- 基础运行: 单文件和Cargo项目的运行方法
- 编译优化: Debug和Release模式的选择和配置
- 依赖管理: 版本控制、功能特性、工作空间
- 跨平台: 目标平台编译和平台特定代码处理
- 性能调优: 编译优化和运行时优化策略
- 问题排查: 常见错误的诊断和解决方法
最佳实践 🌟
- 开发阶段使用Debug模式,快速迭代和调试
- 发布时使用Release模式,获得最佳性能
- 合理管理依赖版本,保持项目稳定性
- 使用工作空间管理大型项目
- 配置合适的优化参数,平衡编译时间和运行性能
- 充分利用Cargo生态,提高开发效率
进阶方向 🚀
- 异步编程 - tokio、async-std生态
- WebAssembly - 在浏览器中运行Rust
- 嵌入式开发 - no_std环境编程
- 系统编程 - 操作系统、驱动开发
- 网络服务 - 高性能Web服务器开发
Rust的强大不仅在于其内存安全特性,更在于其完善的工具链和灵活的配置选项。掌握这些运行技巧,你就能充分发挥Rust的潜力,构建高性能、可靠的应用程序!
🔗 相关链接: