✨ 哈喽,屏幕前的每一位开发者朋友,你们好呀!✨
当你点开这篇文章时,或许正对着 IDE 里闪烁的光标发呆,或许刚解决一个卡了三天的 bug,正端着咖啡松口气 ------ 不管此刻的你在经历什么,都想先和你说声:"辛苦了,同行者!" 👋
作为一名摸爬滚打多年的开发工程师,我始终觉得,我们敲出的每一行代码,不仅是业务逻辑的堆叠,更是无数个 "踩坑与爬坑" 的缩影。从第一次上线时的手忙脚乱,到如今能冷静应对突发 bug;从对着文档啃源码的迷茫,到能给新人讲清设计思路 ------ 这些藏在键盘敲击声里的成长,太值得被好好梳理和分享了。 📝
所以,这一系列文章里,不会有太多高深的架构理论,也不会罗列晦涩的技术文档。我想聊的,是那些 "教科书里没写" 的实战细节:
比如上线前必做的 3 个自查动作(亲测能减少 80% 的线上问题)🛡️;
比如和产品经理 "友好沟通" 需求的 5 个小技巧(避免反复改需求到崩溃)🤝;
比如如何用最少的时间,快速定位线上性能瓶颈(曾靠这招拯救过一次紧急故障)🚀;
再比如那些看似 "浪费时间" 的重构,其实藏着怎样的长期价值...... ♻️
当然,更想和大家聊聊 "技术之外" 的事:如何平衡加班与生活(毕竟身体是敲代码的本钱)💪,如何在团队中清晰表达自己的想法(别让好方案被沉默埋没)🗣️,甚至是 "35 岁焦虑" 来袭时,我是如何调整心态的...... 🌱
如果你也和我一样,相信 "经验不是用来炫耀的资本,而是能帮同行少走弯路的路灯",那不妨坐下来喝杯茶,一起在评论区聊聊:你最近遇到的最大挑战是什么?有没有哪个瞬间,让你觉得 "啊,原来我真的成长了"? 💬
毕竟,开发这条路从来不是孤军奋战。我们分享的每一个踩坑故事,都可能成为别人的指路牌;你留下的每一条评论,或许也会给我新的启发。 🌟
那么,准备好了吗?让我们开始这场 "代码背后的成长对话" 吧!接下来的每一篇,都等你来拍砖、补充、共鸣 ------ 因为最好的经验,永远在交流里生长。 🌱
目录
2.创建Excel工作簿对象(XSSWorkbook),并将查出的logList写入
4.将Excel工作簿对象写入字节输出流,并将字节输出流转换成字节数组
一.需求说明
现在mysql数据库有一个【系统操作日志】表,我现在要在java后端,将其查询出来,并转成一个Excel的.xlsx类型的文件,然后返回给前端,前端可以下载出来。
二.后端操作步骤
1.使用mybatis,将表中的数据查询出来
之所以使用条件查询,是因为我不一定非要导出整张【系统操作日志】表的数据,而是我只想导出20250827-20250828这两天的所有操作日志,或者我只想导出操作人是甲的所有日志。因此需要使用条件查询。
java
//1.先从数据库,查询出需要导出的操作日志(条件查询)
List<SysOperationLog> logList = sysOperationLogMapper.queryLogs(sysOperationLogListReq);
2.创建Excel工作簿对象(XSSWorkbook),并将查出的logList写入
java
//2.1创建Excel工作簿(内存中临时存Excel内容)
XSSFWorkbook workbook = new XSSFWorkbook();
try{
//2.2创建工作表(sheet)
Sheet sheet = workbook.createSheet("系统操作日志");
//设置列宽(每列大概要求能放下20个英文字母吧)
sheet.setColumnWidth(0, 20*256);
sheet.setColumnWidth(1, 20*256);
sheet.setColumnWidth(2, 20*256);
sheet.setColumnWidth(3, 20*256);
sheet.setColumnWidth(4, 20*256);
sheet.setColumnWidth(5, 20*256);
sheet.setColumnWidth(6, 20*256);
sheet.setColumnWidth(7, 20*256);
sheet.setColumnWidth(8, 20*256);
sheet.setColumnWidth(9, 20*256);
sheet.setColumnWidth(10, 20*256);
//创建单元格的水平居中样式,等待被使用即可(所有单元格都会用)
CellStyle centerStyle = workbook.createCellStyle();
centerStyle.setAlignment(HorizontalAlignment.CENTER);
//创建单元格的背景色为浅灰、文字为白色,内容居中(只有表头的单元格会用这个样式)
CellStyle headerStyle = workbook.createCellStyle();
headerStyle.setAlignment(HorizontalAlignment.CENTER);//单元格内容水平居中
headerStyle.setFillForegroundColor(IndexedColors.GREY_50_PERCENT.getIndex());//单元格背景色为深灰
headerStyle.setFillPattern(FillPatternType.SOLID_FOREGROUND);//必须设置为填充模式,否则背景色不生效
//创建白色字体,并设置到上面创建的headerStyle样式中
Font headerFont = workbook.createFont();
headerFont.setBold(true);
headerFont.setColor(IndexedColors.WHITE.getIndex());
headerStyle.setFont(headerFont);//令表头单元格的文字颜色为白色
//由于我们一会写入日期字段时,要让Excel认识,因此要定义一个日期格式
CellStyle dateStyle = workbook.createCellStyle();
DataFormat dataFormat = workbook.createDataFormat();
dateStyle.setDataFormat(dataFormat.getFormat("yyyy-MM-dd HH:mm:ss"));
dateStyle.setAlignment(HorizontalAlignment.CENTER);//日期格式也要水平居中
//2.3在上面的工作表sheet中,创建表头headerRow
Row headerRow = sheet.createRow(0);//第一行就是表头,这很好理解吧
//2.4在表头headerRow上面创建单元格,写入表头
String[] headers = {"日志编号", "系统模块","操作类型","请求方式","操作人员","主机","操作状态","操作时间","操作方法","返回值","请求路径","请求参数"};
for(int i=0; i<headers.length; i++){
//写入表头(相当于数据库表的字段名)
Cell cell = headerRow.createCell(i);
cell.setCellValue(headers[i]);
//应用上面创建的headerStyle样式
cell.setCellStyle(headerStyle);
}
//2.5写入数据
int rowNum = 1;
for(SysOperationLog log : logList){
//创建一行
Row row = sheet.createRow(rowNum++);//由于刚才创建了表头(已经占用了第一行),因此此时要从第二行(下标从1开始)开始写入数据
//创建该行的第一个单元格
Cell cell01 = row.createCell(0);
cell01.setCellValue(log.getId());//写入数据
cell01.setCellStyle(centerStyle);//令内容水平居中
//创建该行的第二个单元格
Cell cell02 = row.createCell(1);
cell02.setCellValue(log.getModuleName());
cell02.setCellStyle(centerStyle);
//创建该行的第三个单元格
Cell cell03 = row.createCell(2);
cell03.setCellValue(log.getOperationType()==1?"新增":
log.getOperationType()==2?"删除":
log.getOperationType()==3?"修改":
log.getOperationType()==4?"查询":
log.getOperationType()==5?"授权":
log.getOperationType()==6?"导出":
log.getOperationType()==7?"导入":
log.getOperationType()==8?"强退":
log.getOperationType()==9?"生成代码":
log.getOperationType()==10?"清空数据":"其他");
cell03.setCellStyle(centerStyle);
//创建该行的第四个单元格
Cell cell04 = row.createCell(3);
cell04.setCellValue(log.getRequestMethod());
cell04.setCellStyle(centerStyle);
//创建该行的第五个单元格
Cell cell05 = row.createCell(4);
cell05.setCellValue(log.getOperator());
cell05.setCellStyle(centerStyle);
//创建该行的第六个单元格
Cell cell06 = row.createCell(5);
cell06.setCellValue(log.getHostIp());
cell06.setCellStyle(centerStyle);
//创建该行的第七个单元格:1=成功 0=失败
Cell cell07 = row.createCell(6);
cell07.setCellValue(log.getOperationStatus()==1?"成功":"失败");
cell07.setCellStyle(centerStyle);
//创建该行的第八个单元格:日期格式,需要特殊处理一下
Cell cell08 = row.createCell(7);
if(log.getOperationTime()!=null){
//写入日期值(用Date对象,而不是用字符串)
cell08.setCellValue(log.getOperationTime());
//应用日期样式
cell08.setCellStyle(dateStyle);
}
//创建该行的第九个单元格
Cell cell09 = row.createCell(8);
cell09.setCellValue(log.getMethodFullName());
cell09.setCellStyle(centerStyle);
//创建该行的第十个单元格
Cell cell10 = row.createCell(9);
cell10.setCellValue(log.getMethodResult());
cell10.setCellStyle(centerStyle);
//创建该行的第十一个单元格
Cell cell11 = row.createCell(10);
cell11.setCellValue(log.getRequestUrl());
cell11.setCellStyle(centerStyle);
//创建该行的第十二个单元格
Cell cell12 = row.createCell(11);
cell12.setCellValue(log.getRequestParam());
cell12.setCellStyle(centerStyle);
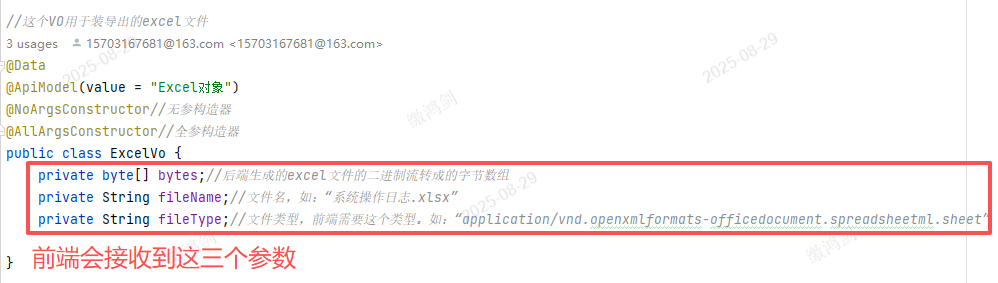
}3.自定义返回体(用于盛下载excel所需要的数据)
java
//这个VO用于装导出的excel文件
@Data
@ApiModel(value = "Excel对象")
@NoArgsConstructor//无参构造器
@AllArgsConstructor//全参构造器
public class ExcelVo {
    private byte[] bytes;//后端生成的excel文件的二进制流转成的字节数组
    private String fileName;//文件名,如:"系统操作日志.xlsx"
    private String fileType;//文件类型,前端需要这个类型。如:"application/vnd.openxmlformats-officedocument.spreadsheetml.sheet"

}
4.将Excel工作簿对象写入字节输出流,并将字节输出流转换成字节数组
java
//2.6转换Excel文件为字节数组
ByteArrayOutputStream byteArrayOutputStream = new ByteArrayOutputStream();
workbook.write(byteArrayOutputStream);
byte[] excelBytes = byteArrayOutputStream.toByteArray();
5.封装并返回数据
java
//3.封装响应体
ExcelVo excelVo = new ExcelVo(excelBytes, "系统操作日志.xlsx", "application/vnd.openxmlformats-officedocument.spreadsheetml.sheet");
//4.返回数据
return ResultBody.ok().data(excelVo).msg("导出系统操作日志成功!");
6.处理可能的异常
java
}catch (Exception e){
    //返回数据
    return ResultBody.failed().msg("导出系统操作日志失败!exception:"+e.getMessage());
}
finally {
    // JDK 1.8中确保资源关闭(try-with-resources在1.7+已支持,但这里显式关闭更兼容旧写法)
    if (workbook != null) {
        workbook.close();
    }
}
}
完整代码(即上面的1~6步)
java
//导出系统操作日志(需根据查询条件)
public ResultBody exportLogs(SysOperationLogListReq sysOperationLogListReq) throws IOException {
    //如果前端传来了开始日期、结束日期,先将参数中的字符串日期(如'20250818')转换成'2025-08-18'
    String operationStartTime = sysOperationLogListReq.getOperationStartTime();
    String operationEndTime = sysOperationLogListReq.getOperationEndTime();
    if(operationStartTime!=null && !operationStartTime.equals("") && operationEndTime!=null && !operationEndTime.equals("")){
        sysOperationLogListReq.setOperationStartTime(operationStartTime.substring(0,4) + "-" + operationStartTime.substring(4,6) + "-" + operationStartTime.substring(6,8));
        sysOperationLogListReq.setOperationEndTime(operationEndTime.substring(0,4) + "-" + operationEndTime.substring(4,6) + "-" + operationEndTime.substring(6,8));
    }
    //1.先从数据库,查询出需要导出的操作日志(条件查询)
    List<SysOperationLog> logList = sysOperationLogMapper.queryLogs(sysOperationLogListReq);
    //2.1创建Excel工作簿(内存中临时存Excel内容)
    XSSFWorkbook workbook = new XSSFWorkbook();
    try{
        //2.2创建工作表(sheet)
        Sheet sheet = workbook.createSheet("系统操作日志");
        //设置列宽(每列大概要求能放下20个英文字母吧)
        sheet.setColumnWidth(0, 20*256);
        sheet.setColumnWidth(1, 20*256);
        sheet.setColumnWidth(2, 20*256);
        sheet.setColumnWidth(3, 20*256);
        sheet.setColumnWidth(4, 20*256);
        sheet.setColumnWidth(5, 20*256);
        sheet.setColumnWidth(6, 20*256);
        sheet.setColumnWidth(7, 20*256);
        sheet.setColumnWidth(8, 20*256);
        sheet.setColumnWidth(9, 20*256);
        sheet.setColumnWidth(10, 20*256);
        //创建单元格的水平居中样式,等待被使用即可(所有单元格都会用)
        CellStyle centerStyle = workbook.createCellStyle();
        centerStyle.setAlignment(HorizontalAlignment.CENTER);
        //创建单元格的背景色为浅灰、文字为白色,内容居中(只有表头的单元格会用这个样式)
        CellStyle headerStyle = workbook.createCellStyle();
        headerStyle.setAlignment(HorizontalAlignment.CENTER);//单元格内容水平居中
        headerStyle.setFillForegroundColor(IndexedColors.GREY_50_PERCENT.getIndex());//单元格背景色为深灰
        headerStyle.setFillPattern(FillPatternType.SOLID_FOREGROUND);//必须设置为填充模式,否则背景色不生效
        //创建白色字体,并设置到上面创建的headerStyle样式中
        Font headerFont = workbook.createFont();
        headerFont.setBold(true);
        headerFont.setColor(IndexedColors.WHITE.getIndex());
        headerStyle.setFont(headerFont);//令表头单元格的文字颜色为白色
        //由于我们一会写入日期字段时,要让Excel认识,因此要定义一个日期格式
        CellStyle dateStyle = workbook.createCellStyle();
        DataFormat dataFormat = workbook.createDataFormat();
        dateStyle.setDataFormat(dataFormat.getFormat("yyyy-MM-dd HH:mm:ss"));
        dateStyle.setAlignment(HorizontalAlignment.CENTER);//日期格式也要水平居中
        //2.3在上面的工作表sheet中,创建表头headerRow
        Row headerRow = sheet.createRow(0);//第一行就是表头,这很好理解吧
        //2.4在表头headerRow上面创建单元格,写入表头
        String[] headers = {"日志编号", "系统模块","操作类型","请求方式","操作人员","主机","操作状态","操作时间","操作方法","返回值","请求路径","请求参数"};
        for(int i=0; i<headers.length; i++){
            //写入表头(相当于数据库表的字段名)
            Cell cell = headerRow.createCell(i);
            cell.setCellValue(headers[i]);
            //应用上面创建的headerStyle样式
            cell.setCellStyle(headerStyle);
        }

        //2.5写入数据
        int rowNum = 1;
        for(SysOperationLog log : logList){
            //创建一行
            Row row = sheet.createRow(rowNum++);//由于刚才创建了表头(已经占用了第一行),因此此时要从第二行(下标从1开始)开始写入数据
            //创建该行的第一个单元格
            Cell cell01 = row.createCell(0);
            cell01.setCellValue(log.getId());//写入数据
            cell01.setCellStyle(centerStyle);//令内容水平居中
            //创建该行的第二个单元格
            Cell cell02 = row.createCell(1);
            cell02.setCellValue(log.getModuleName());
            cell02.setCellStyle(centerStyle);
            //创建该行的第三个单元格
            Cell cell03 = row.createCell(2);
            cell03.setCellValue(log.getOperationType()==1?"新增":
                                log.getOperationType()==2?"删除":
                                log.getOperationType()==3?"修改":
                                log.getOperationType()==4?"查询":
                                log.getOperationType()==5?"授权":
                                log.getOperationType()==6?"导出":
                                log.getOperationType()==7?"导入":
                                log.getOperationType()==8?"强退":
                                log.getOperationType()==9?"生成代码":
                                log.getOperationType()==10?"清空数据":"其他");
            cell03.setCellStyle(centerStyle);
            //创建该行的第四个单元格
            Cell cell04 = row.createCell(3);
            cell04.setCellValue(log.getRequestMethod());
            cell04.setCellStyle(centerStyle);
            //创建该行的第五个单元格
            Cell cell05 = row.createCell(4);
            cell05.setCellValue(log.getOperator());
            cell05.setCellStyle(centerStyle);
            //创建该行的第六个单元格
            Cell cell06 = row.createCell(5);
            cell06.setCellValue(log.getHostIp());
            cell06.setCellStyle(centerStyle);
            //创建该行的第七个单元格:1=成功 0=失败
            Cell cell07 = row.createCell(6);
            cell07.setCellValue(log.getOperationStatus()==1?"成功":"失败");
            cell07.setCellStyle(centerStyle);
            //创建该行的第八个单元格:日期格式,需要特殊处理一下
            Cell cell08 = row.createCell(7);
            if(log.getOperationTime()!=null){
                //写入日期值(用Date对象,而不是用字符串)
                cell08.setCellValue(log.getOperationTime());
                //应用日期样式
                cell08.setCellStyle(dateStyle);
            }
            //创建该行的第九个单元格
            Cell cell09 = row.createCell(8);
            cell09.setCellValue(log.getMethodFullName());
            cell09.setCellStyle(centerStyle);
            //创建该行的第十个单元格
            Cell cell10 = row.createCell(9);
            cell10.setCellValue(log.getMethodResult());
            cell10.setCellStyle(centerStyle);
            //创建该行的第十一个单元格
            Cell cell11 = row.createCell(10);
            cell11.setCellValue(log.getRequestUrl());
            cell11.setCellStyle(centerStyle);
            //创建该行的第十二个单元格
            Cell cell12 = row.createCell(11);
            cell12.setCellValue(log.getRequestParam());
            cell12.setCellStyle(centerStyle);
        }
        /*//2.6设置响应头信息
        response.setContentType("application/vnd.openxmlformats-officedocument.spreadsheetml.sheet");
        String fileName = URLEncoder.encode("系统操作日志.xlsx", "UTF-8");
        // JDK 1.8中处理引号需要注意转义
        response.setHeader("Content-Disposition", "attachment; filename=\"" + fileName + "\"");
        response.setHeader("Access-Control-Expose-Headers", "Content-Disposition");
        // 6. 写入响应流
        OutputStream os = response.getOutputStream();
        workbook.write(os);
        os.flush(); // JDK 1.8需要手动刷新流*/
        //2.6转换Excel文件为字节数组
        ByteArrayOutputStream byteArrayOutputStream = new ByteArrayOutputStream();
        workbook.write(byteArrayOutputStream);
        byte[] excelBytes = byteArrayOutputStream.toByteArray();
        //3.封装响应体
        ExcelVo excelVo = new ExcelVo(excelBytes, "系统操作日志.xlsx", "application/vnd.openxmlformats-officedocument.spreadsheetml.sheet");
        //4.返回数据
        return ResultBody.ok().data(excelVo).msg("导出系统操作日志成功!");
    }catch (Exception e){
        //返回数据
        return ResultBody.failed().msg("导出系统操作日志失败!exception:"+e.getMessage());
    }
    finally {
        // JDK 1.8中确保资源关闭(try-with-resources在1.7+已支持,但这里显式关闭更兼容旧写法)
        if (workbook != null) {
            workbook.close();
        }
    }
}
三.前端操作步骤
1.点击【导出】按钮,发送请求,接收自定义返回体
2.根据上面的参数,下载xlsx文件即可
核心逻辑代码如下:
javascript
export const getDownLoad = function(url, params) {
  const instance = axios.create();
  instance.defaults.headers.get['Content-Type'] = 'application/json';
  return new Promise((resolve, reject) => {
    var p = new URLSearchParams();
    for (var key in params) {
      p.append(key, params[key]);
    }
    ajax
      .get(url, { params: p, responseType: 'blob' })
      .then(response => {
        console.log(response);
        resolve(response.data);
      })
      .catch(error => {
        reject(error);
      });
  });
};
function baseToBinary(baseData) {
  // window.atob()用于解码使用base64编码的字符串
  const binaryString = window.atob(baseData);
  const binaryLen = binaryString.length;
  const bytes = new Uint8Array(binaryLen);
  for (var i = 0; i < binaryLen; i++) {
    // charCodeAt()用于返回指定位置处字符的Unicode编码
    bytes[i] = binaryString.charCodeAt(i);
  }
  return bytes;
}
export const xltjDownLoad = function({ url, data, responseType = 'json', xltjType = 1, setTipContent, setIsLoading }) {
  setTipContent && setTipContent('正在导出中...');
  setIsLoading && setIsLoading(true);
  return request({
    method: 'post',
    url,
    data,
    xltjType,
    responseType,
  })
    .then(res => {
      if (res) {
        console.log('正在导出中-res', res.data.bytes);
        // 4. 关键:将后端返回的字节数组(result.data)转成 ArrayBuffer
        // (若后端返回的是 Base64 字符串,需先解码,见下方"注意事项")
        // 1. Base64字符串解码成Uint8Array(关键步骤)
        const base64Str = res.data.bytes;
        const uint8Array = baseToBinary(base64Str); // 解码Base64

        // 2. 后续流程同上:生成Blob+下载
        const mimeType = 'application/vnd.openxmlformats-officedocument.spreadsheetml.sheet';
        const blob = new Blob([uint8Array], { type: mimeType });

        // 6. 生成临时下载 URL
        const url = window.URL.createObjectURL(blob);
        const link = document.createElement('a');
        link.href = url;
        link.setAttribute('download', res.data.fileName);
        document.body.appendChild(link);
        link.click();
        link.remove();
      } else {
        alertMessage({
注意:核心思路就下面的几步

四.总结流程
后端:
- 后端从数据库的表中,查询出数据(对象集合)
- 创建XSSWorkbook对象,将上面的数据写入XSSWorkbook对象中
- 创建字节输出流ByteArrayOutputStream,将XSSWorkbook对象写入该流
- 将字节输出流,转换成字节数组(byte )
- 封装返回数据(包含byte 、文件名、文件类型三部分即可),给前端返回
前端:
- 前端收到响应结果,处理一下即可(具体处理逻辑见上)
五.效果展示
1.点击【导出】按钮

2.浏览器会自动下载xlsx文件
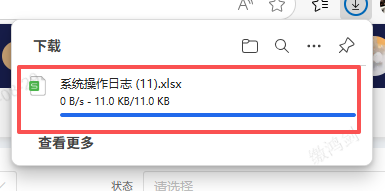

以上就是【系统操作日志导出】功能的详细流程,喜欢本篇文章的话,可以留个免费的关注呦~~~