前言
vue 有个社区贡献者 ubugeeei(推特/X ID: @ubugeeei)是 vue 官方 Discord 的长期活跃者,经常解答新特性、源码实现相关问题,他对 vue 的源码非常熟悉,也是 Vue Vapor(Vue 无虚拟 DOM 草案)的早期研究者之一,他发布的 "Reading vuejs/core-vapor" 阅读指南站点旨在帮助读者完整梳理 Vapor 模式的编译输出与实现细节,由于 ubugeeei 是一个日本开发者,这个站点只有日语和英语,并且中文互联网上关于这本书的介绍很少,而且我觉得内容很好,因此这里我将这个网站内容翻译成 中文 供大家阅读,由于掘金单篇文章字符限制问题,这里拆分成三部曲进行发布,本篇为中卷

关于作者
ubugeeei

-
Vue.js成员和Vue.js日本用户组的核心成员。 -
从 2023 年 11 月起参与
Vapor模式的发展。 -
2023 年 12 月成为
vuejs/core-vapor的外部合作者。 -
2024 年 4 月加入
Vue.js组织,成为Vapor团队的一员。
作者博客:ublog.dev/
Vue Vapor的实现最初始于一个名为vuejs/core-vapor的仓库,但在 2024 年 10 月更名为vuejs/vue-vapor。在本文档中,链接已更改为vuejs/vue-vapor,但由于本文档的项目名称和页面,文本已统一为vuejs/core-vapor。注意,在你阅读时vuejs/core-vapor=vuejs/vue-vapor。它们在时间线上是不同的名称,但指的是完全相同的事物。
接下来是什么?
好的,到目前为止,我们已经看了编译一个简单的组件,如
vue
<template>
  <p>Hello, Vapor!</p>
</template>
编译成
js
const t0 = _template("<p>Hello, Vapor!</p>");
function _sfc_render(_ctx) {
  const n0 = t0();
  return n0;
}
我们已经看到了编译这个的实现。
接下来我们应该看什么?
我们现在在哪里?
让我们简要回顾一下我们需要做什么以及涉及的步骤。
要做的事情
- 查看产生输出的实现
- 阅读生成代码的内容
步骤
- 编写一个 Vue.js SFC
- 通过 Vapor 模式编译器运行它
- 查看输出(了解概述)
- 查看编译器的实现
- 阅读生成代码的内容
- 返回步骤 1
首先,到目前为止,我们已经完成了我们需要做的第一部分:"查看产生输出的实现"。就步骤而言,我们已经完成了 1 到 4(对于一个简单的组件)。
向前推进
让我们整理一下接下来需要做的事情。
SFC 编译器周围的代码
周围的代码
此时,我们只能看到部分:
js
const t0 = _template("<p>Hello, Vapor!</p>");
function _sfc_render(_ctx) {
  const n0 = t0();
  return n0;
}
然而,实际输出是这样的:
js
const _sfc_main = {};
import { template as _template } from "vue/vapor";
const t0 = _template("<p>Hello, Vapor!</p>");
function _sfc_render(_ctx) {
  const n0 = t0();
  return n0;
}
export default Object.assign(_sfc_main, {
  render: _sfc_render,
  vapor: true,
  __file: "/path/to/App.vue",
});
我们缺少了一点。
由于最复杂的部分似乎已经结束,简要了解周围代码是如何生成的会很好。我们将在下一页简要介绍这一点。
编译器在哪里配置和调用
实际上,我们没有详细解释这部分。虽然我们已经阅读了编译器拥有的解析器、转换器和代码生成函数的实现细节,但我们还没有看到它们在哪里配置,如何连接,以及如何操作。让我们也看看这个。
运行时
这很重要。
假设我们理解生成了如下代码:
js
const _sfc_main = {};
import { template as _template } from "vue/vapor";
const t0 = _template("<p>Hello, Vapor!</p>");
function _sfc_render(_ctx) {
  const n0 = t0();
  return n0;
}
export default Object.assign(_sfc_main, {
  render: _sfc_render,
  vapor: true,
  __file: "/path/to/App.vue",
});
我们仍然没有看到"这段代码如何工作"。我们还没有研究为什么将 Block 传递给渲染函数会导致渲染屏幕,以及其他方面。
这就是所谓的"运行时"部分,其实现在 runtime-vapor 中。为了深入理解 Vapor 模式的实现,理解这个运行时是必不可少的。
让我们也深入研究这个。就我们的步骤而言,这对应于步骤 5。
如果我们更详细地分解这部分:
- 查看生成代码中使用的辅助函数(例如
template)是什么 - 了解这个组件如何与 Vue.js 的内部实现连接
- 查看内部实现
类似这样。
各种模式的组件
目前,
vue
<template>
  <p>Hello, Vapor!</p>
</template>
我们只处理了像这样的简单组件。
当涉及到 Vue.js 组件时,它们有各种特性,如有 <script> 部分、有状态组件、插值、指令等。
让我们也按照上面的步骤 1 到 6 来探索这些。
让我们争取完全掌握!hh
SFC 编译流程
现在,让我们看看生成最终输出代码的实现。
再次看一下,
vue
<template>
  <p>Hello, Vapor!</p>
</template>
被转换为
js
const _sfc_main = {};
import { template as _template } from "vue/vapor";
const t0 = _template("<p>Hello, Vapor!</p>");
function _sfc_render(_ctx) {
  const n0 = t0();
  return n0;
}
export default Object.assign(_sfc_main, {
  render: _sfc_render,
  vapor: true,
  __file: "/path/to/App.vue",
});
这就是我们创建它的方式。
由于我们已经从上一页理解了最复杂的渲染输出,从这里开始应该能够顺利进行。
阅读 compiler-sfc 和 vite-plugin-vue
从这里开始,更多的是关于 compiler-sfc 和 vite-plugin-vue 的实现,而不是 Vapor 模式。
在非 Vapor 的情况下,通常会变成:
js
const _sfc_main = {};
import { createElement as _createElement } from "vue";
function _sfc_render(_ctx) {
return _createElement("p", null, "Hello, World!");
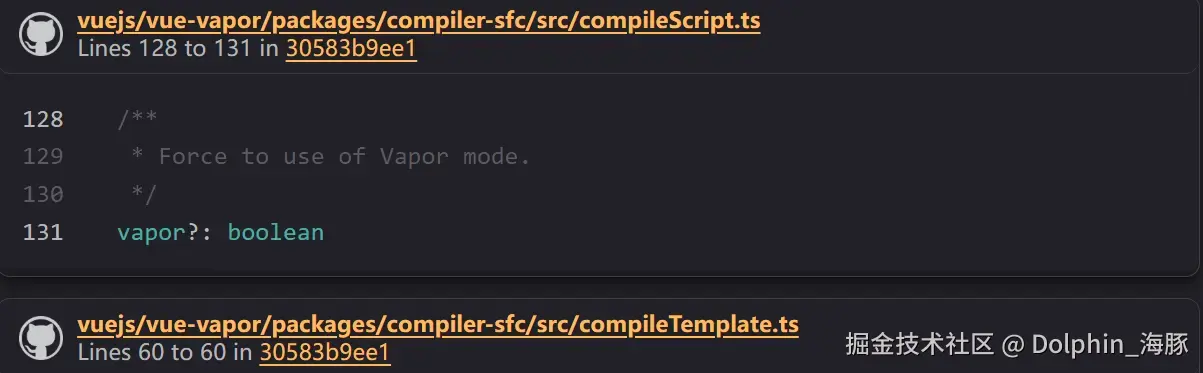
}
export default Object.assign(_sfc_main, {
render: _sfc_render,
__file: "/path/to/App.vue",
});周围的代码和转换流程不会改变。
compiler 只是在适当的时机被调用,在 compiler-vapor 中实现。
SFC 何时被编译?
正如你从 compiler-sfc 的入口点看到的,这里只导出了单独的 compiler。
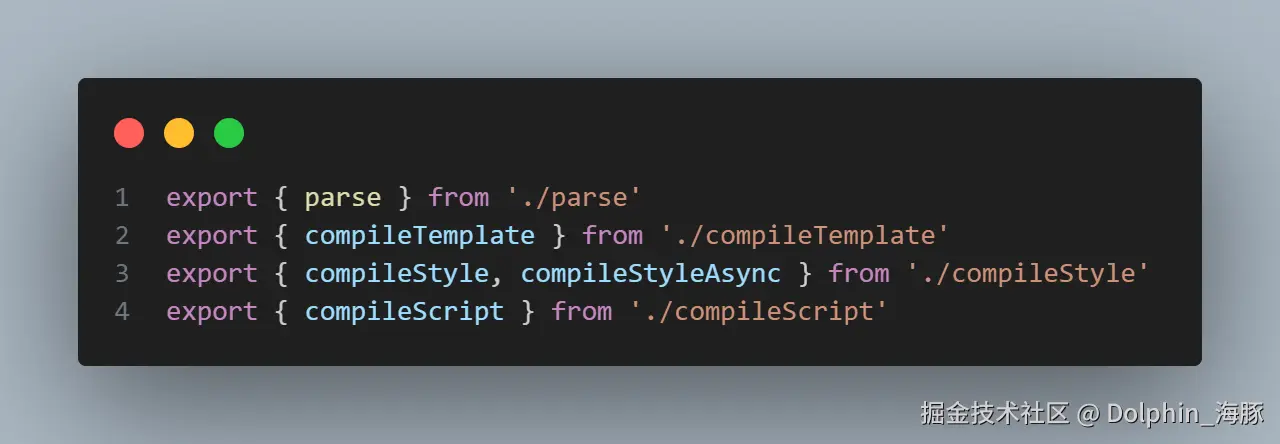
这里没有以集成方式处理这些的实现。
Vite 的插件系统
如开始时提到的,这些实现被像 bundler 这样的工具调用,并执行每个编译。
有各种工具,但让我们假设使用 Vite 来看看这个。
在 Vite 中,官方插件 vite-plugin-vue 在这个角色中很有名。
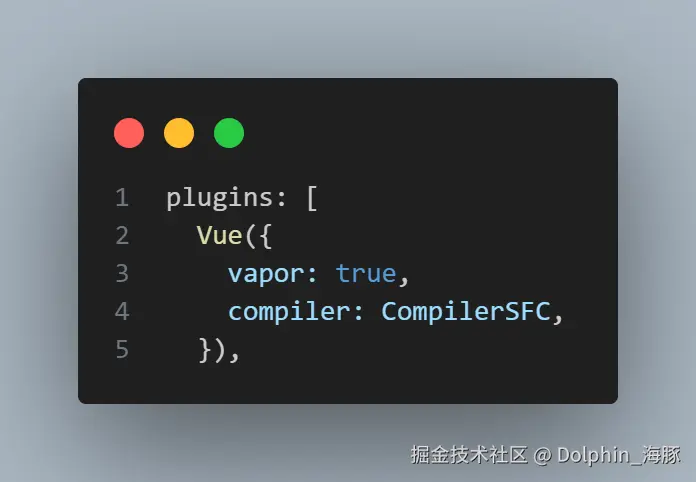
通过在 vite.config.js 中设置,插件变得有效。
当你使用 Vue.js 和 Vite 时,你可能会写类似这样的内容:
js
import { defineConfig } from "vite";
import vue from "@vitejs/plugin-vue";

export default defineConfig({
  plugins: [vue()],
});
这个 vue() 生成插件代码。
在查看这个插件的实现之前,让我们首先掌握 Vite 中插件的概念。
主要的,重要的钩子是 transform。
作为前提,Vite 的插件系统是 Rollup 的超集,在生产构建中,实际上使用的是 Rollup 的插件系统。
Vite 插件扩展了 Rollup 精心设计的插件接口,增加了一些 Vite 特有的选项。因此,你可以编写一次 Vite 插件,让它同时适用于开发和构建。
transform 钩子
在实现插件时,你可以通过在这个 transform 钩子中编写处理过程来转换模块。
大致上,你可以在这里运行 compiler 来编译 SFC。
那么,这个 transform 何时执行?通常,是在从 JavaScript 加载模块时。
更具体地说,当执行 import 或 import() 时。
开发模式
import 何时执行取决于模式。
在开发模式下,带有 import 的 JavaScript 在浏览器中加载,当它执行时,使用浏览器的原生 ESM 机制向开发服务器发送请求。
开发服务器处理它,执行 transform,并将结果返回给浏览器。
从那里开始,它与原生 ESM 相同。
这个机制由 Vite 实现。
ts
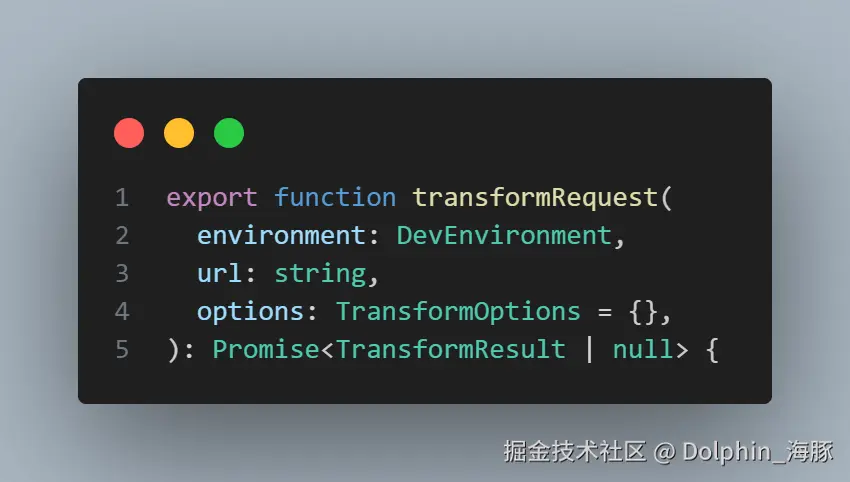
const request = doTransform(environment, url, options, timestamp)
ts
  const transformResult = await pluginContainer.transform(code, id, {
    inMap: map,
  })
生产模式
在生产模式构建中,rollup bundler 运行。
bundler 在解析模块时读取 import。
此时,它执行 transform 并使用结果作为解析结果。
这由 Rollup 实现。
Vite 大致上只是调用 Rollup 的 bundle 函数。
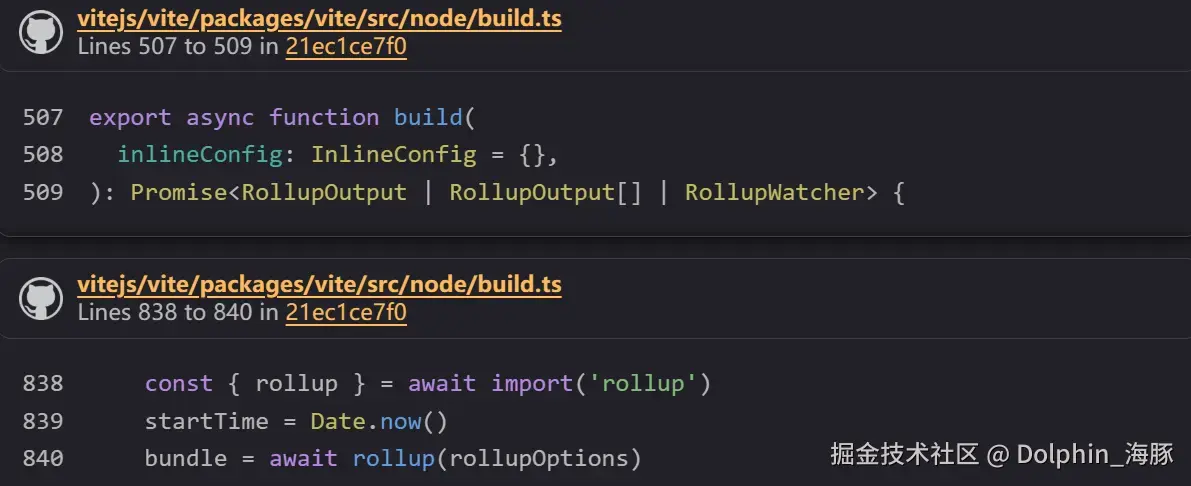
Rollup 调用 transform 的代码:
ts
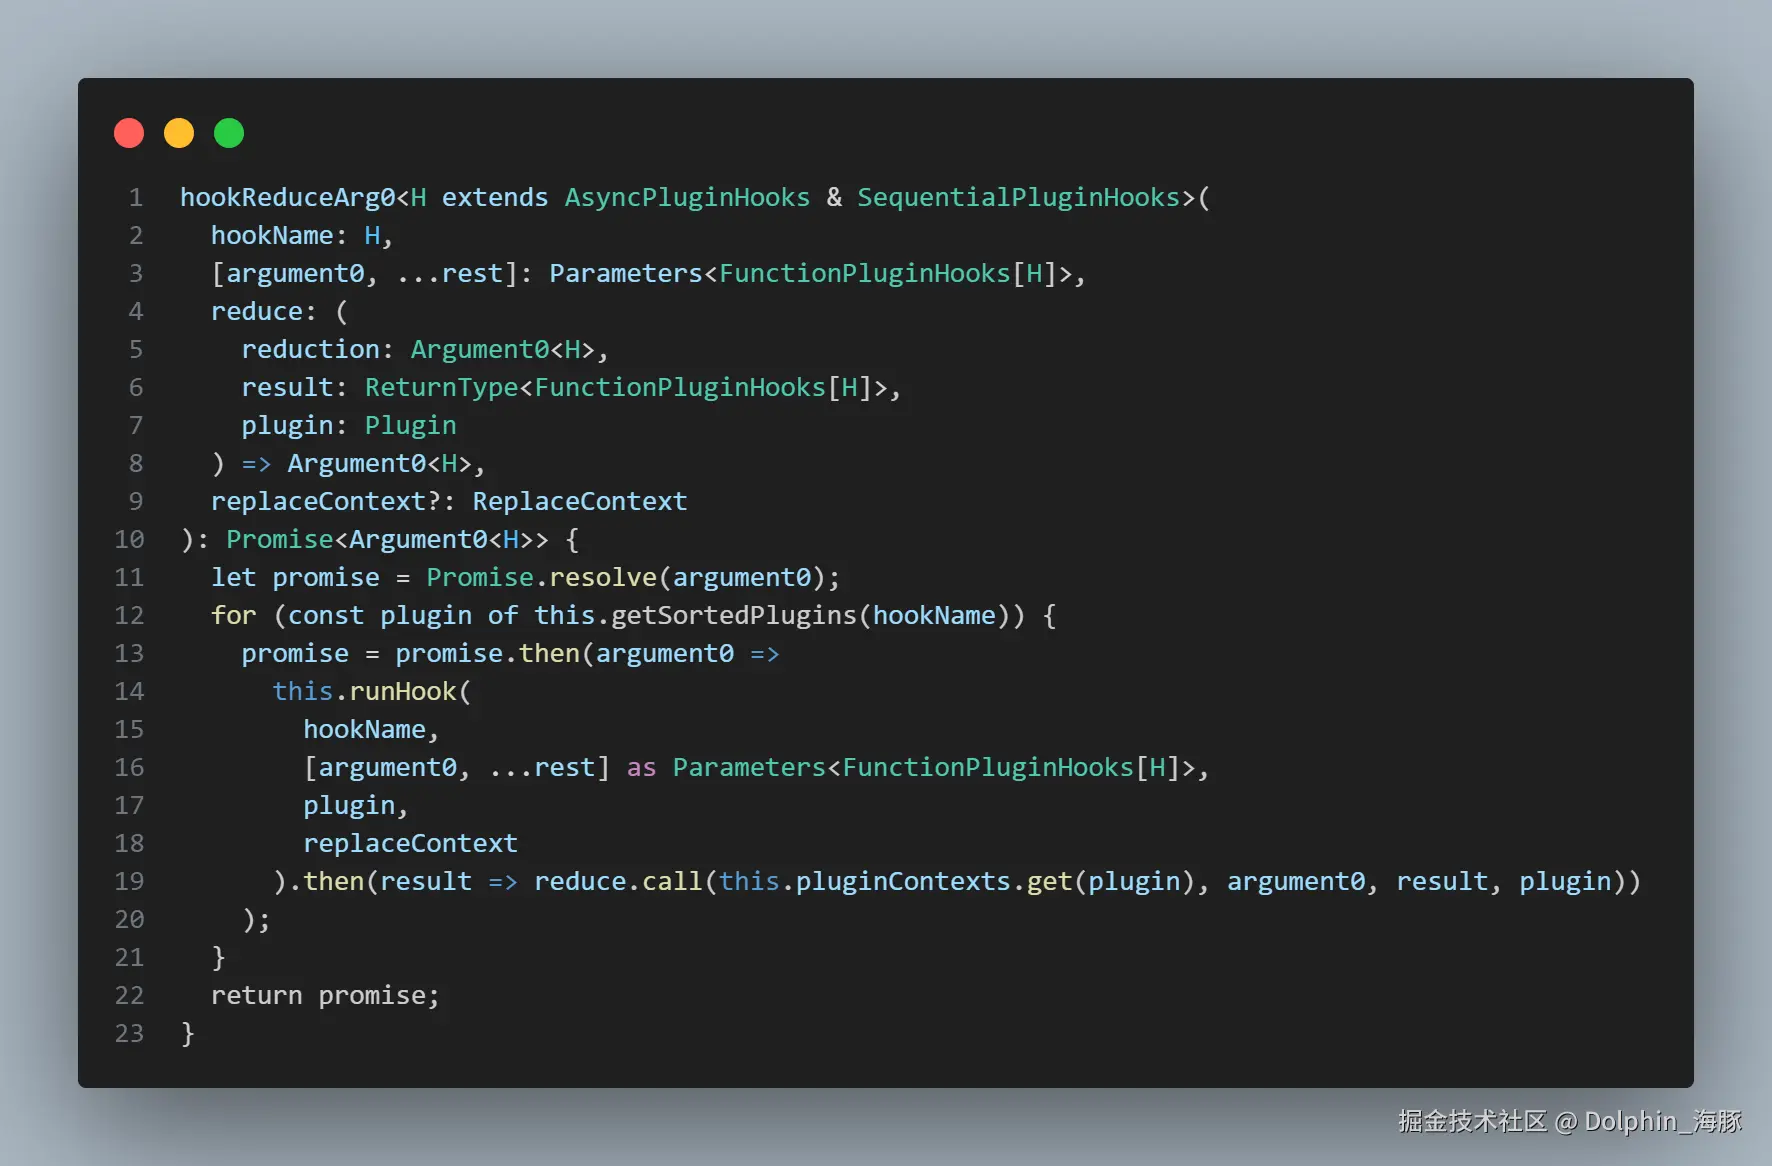
code = await pluginDriver.hookReduceArg0(
  'transform',
ts
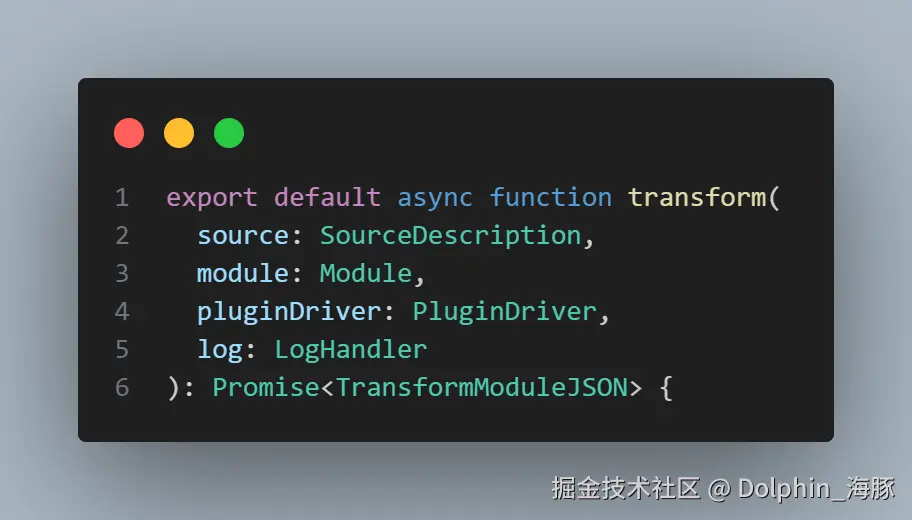
await module.setSource(
    await transform(sourceDescription, module, this.pluginDriver, this.options.onLog)
);
vite-plugin-vue 中的 transform 钩子
vite-plugin-vue 中 transform 钩子的实现大约在这里。
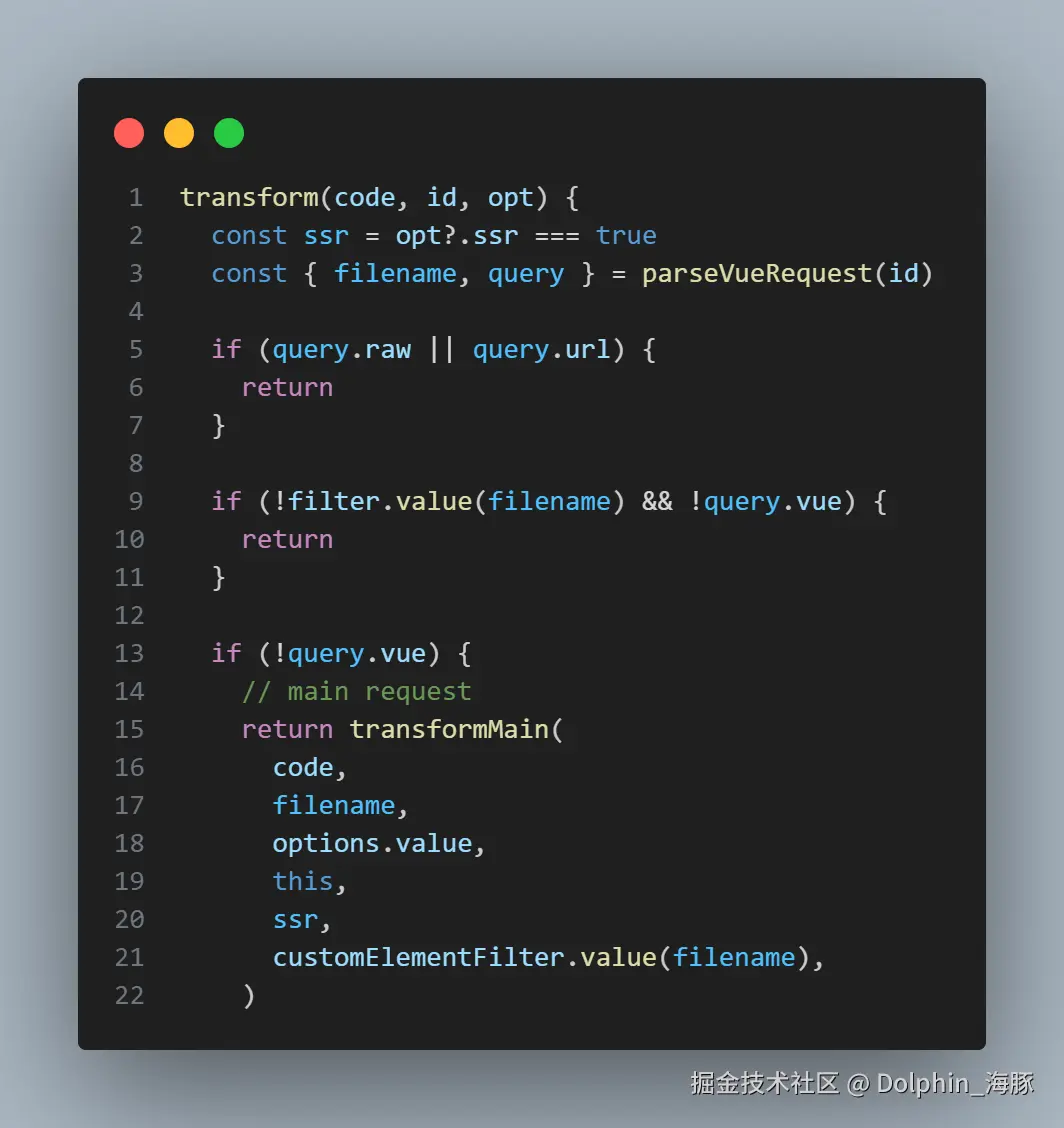
在这里,它执行一个名为 transformMain 的函数。
transformMain 在 vite-plugin-vue/packages/plugin-vue/src/main.ts 中实现。

在这里,调用了 compiler-sfc 中的 compileScript 和 compileTemplate。
这应该清楚地说明了 Vue.js 的 compiler 是如何设置的,以及何时执行。
通过调用 transformMain 掌握整个输出代码
回想一下这样的编译结果。
js
const _sfc_main = {};
import { template as _template } from "vue/vapor";
const t0 = _template("<p>Hello, Vapor!</p>");
function _sfc_render(_ctx) {
  const n0 = t0();
  return n0;
}
export default Object.assign(_sfc_main, {
  render: _sfc_render,
  vapor: true,
  __file: "/path/to/App.vue",
});
我们应该如何输出这样的代码?通常,
js
import { template as _template } from "vue/vapor";
const t0 = _template("<p>Hello, Vapor!</p>");
function _sfc_render(_ctx) {
  const n0 = t0();
  return n0;
}
这部分是由一个名为 compileTemplate 的函数生成的。
js
const _sfc_main = {};

// <---------------- 插入 compileTemplate 结果

export default Object.assign(_sfc_main, {
  render: _sfc_render,
  vapor: true,
  __file: "/path/to/App.vue",
});
如果有 <script> 或 <script setup>,主要由 compileScript 生成这样的代码:
js
const constant = 42;

const _sfc_main = {
  props: {
    count: {
      type: Number,
      required: true,
    },
  },
  setup() {
    const localCount = ref(0);
    return { localCount };
  },
};

// <---------------- 插入 compileTemplate 结果

export default Object.assign(_sfc_main, {
  render: _sfc_render,
  vapor: true,
  __file: "/path/to/App.vue",
});
换句话说,它像是:
js
// <---------------- 插入 compileScript 结果
// <---------------- 插入 compileTemplate 结果
export default Object.assign(_sfc_main, {
render: _sfc_render,
vapor: true,
__file: "/path/to/App.vue",
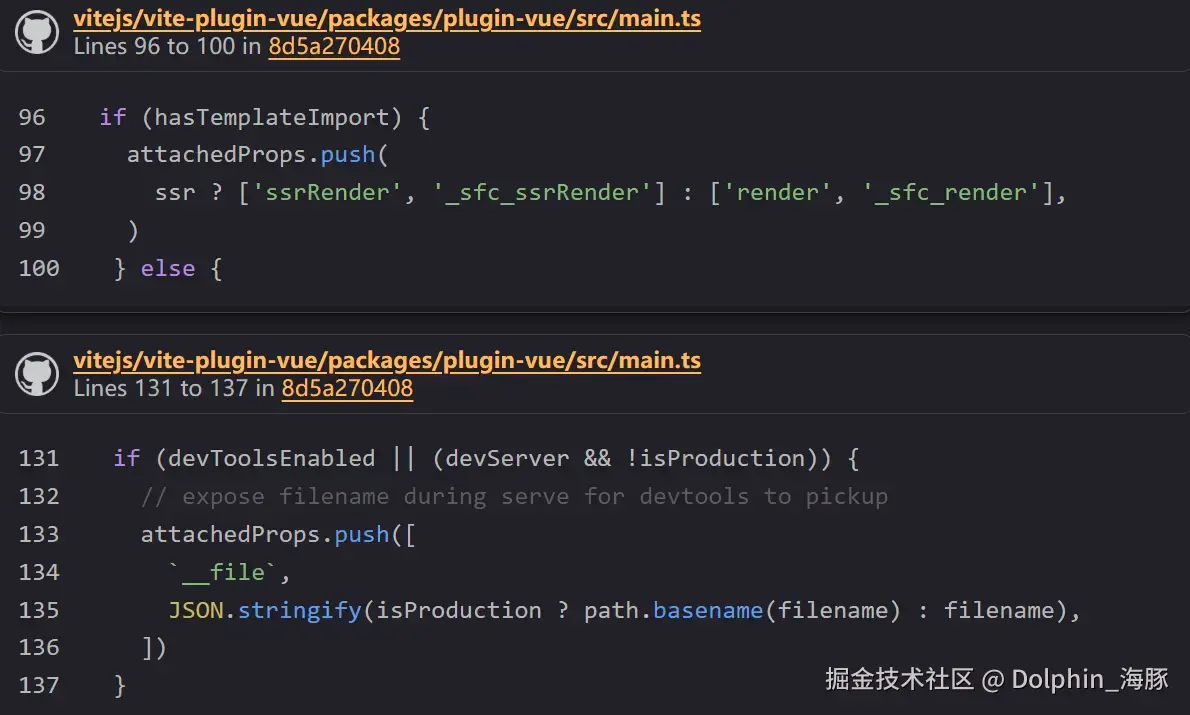
});然后,最后一部分,添加到 _sfc_main 的属性被收集为 attachedProps 并作为代码展开。
上述讨论的源代码在以下部分。
(它们调用 genScriptCode 和 genTemplateCode 而不是 compileScript 和 compileTemplate,但可以将它们视为包装函数。)
ts
const attachedProps: [string, string][] = []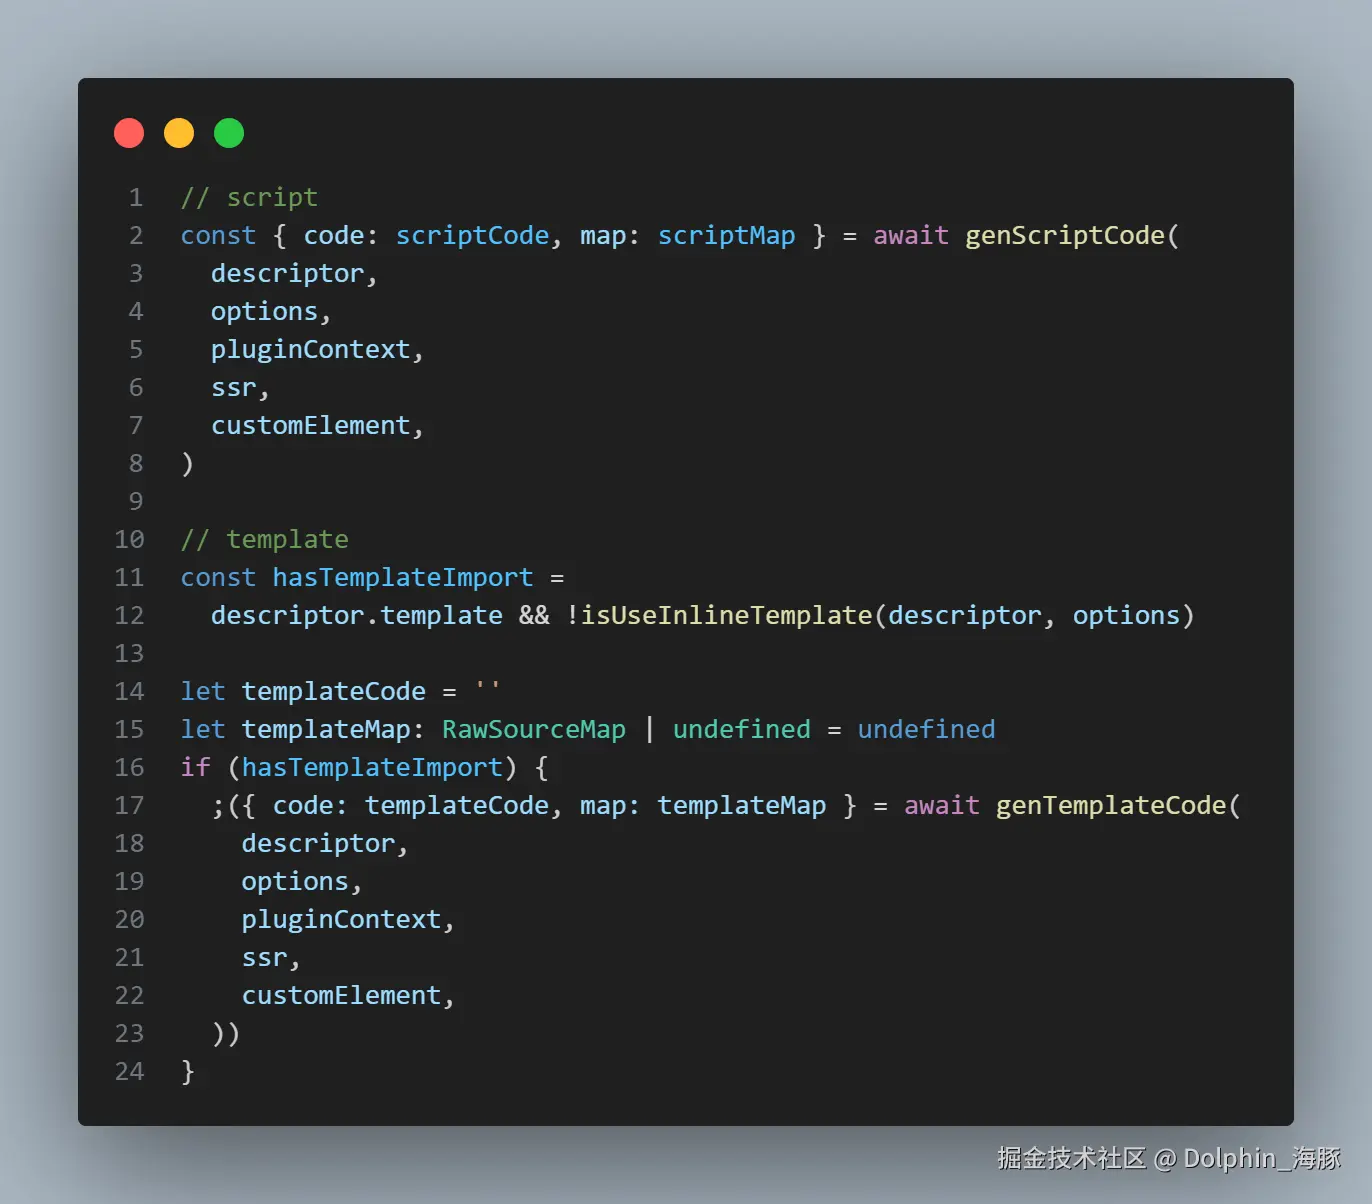

(连接的 output 成为最终结果。)
ts
let resolvedCode = output.join('\n')(注意:attachedProps 的收集)
通过这种方式,大致上,我们生成最终代码如:
js
const _sfc_main = {};
import { template as _template } from "vue/vapor";
const t0 = _template("<p>Hello, Vapor!</p>");
function _sfc_render(_ctx) {
  const n0 = t0();
  return n0;
}
export default Object.assign(_sfc_main, {
  render: _sfc_render,
  vapor: true,
  __file: "/path/to/App.vue",
});
切换 Vapor 模式 Compiler
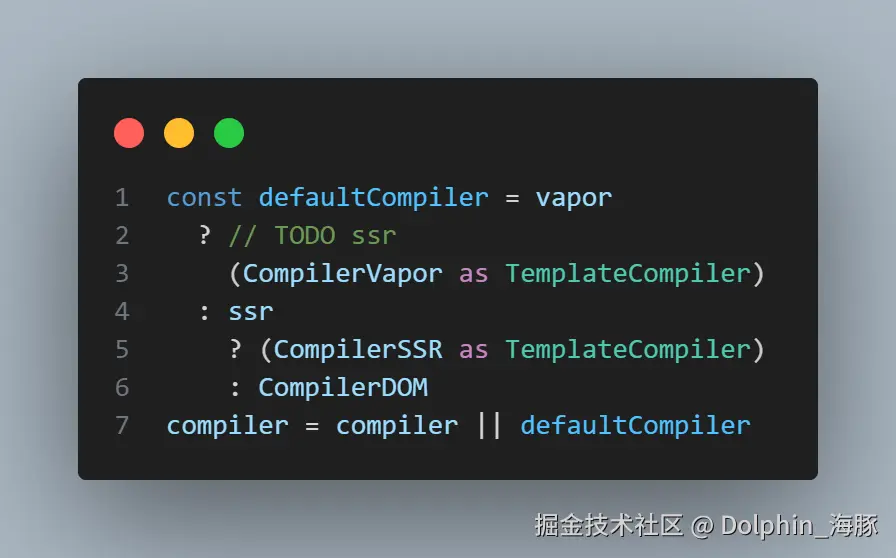
最后,在结束这一页之前,让我们看看如何在 Vapor 模式 compiler 和常规 compiler 之间切换。实际上,vite-plugin-vue 有一个专门用于 Vapor 模式的 vapor 分支。
这是因为 Vapor 模式目前处于 R&D 阶段。vuejs/core-vapor 正在单独开发,以避免影响现有代码库。vite-plugin-vue 也是如此。
compiler 切换部分侵入 vite-plugin-vue 是不可避免的。这通过切换分支和更改 npm 包分发名称来规避。
这是分支:
分发的包是这个,作为 @vue-vapor/vite-plugin-vue 提供:
这个分支提供了一个标志来切换是否为 vapor。准确地说,这个选项旨在传递到 vuejs/core-vapor 的实现,所以描述为从类型中省略。
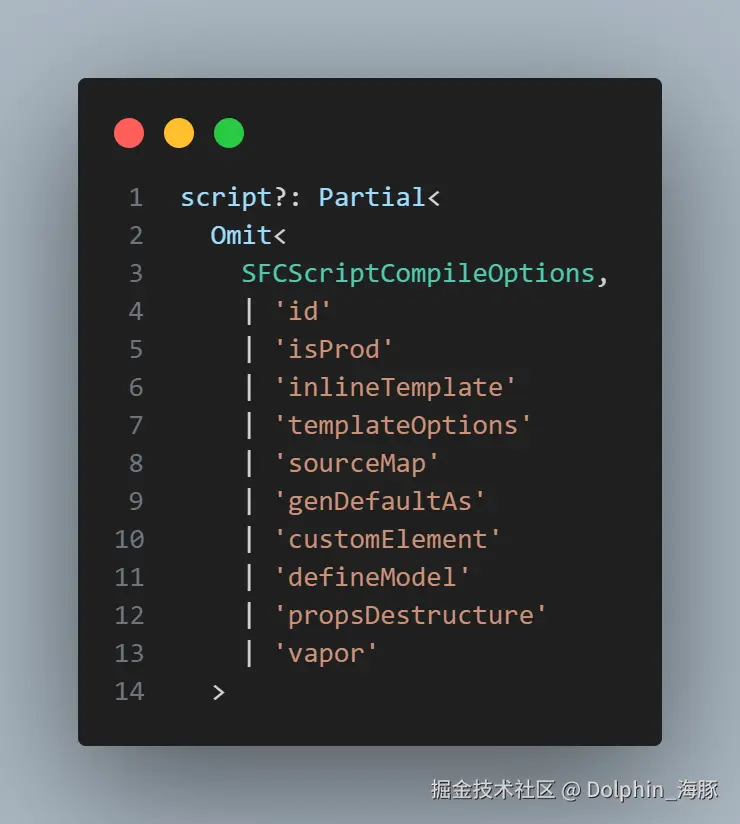
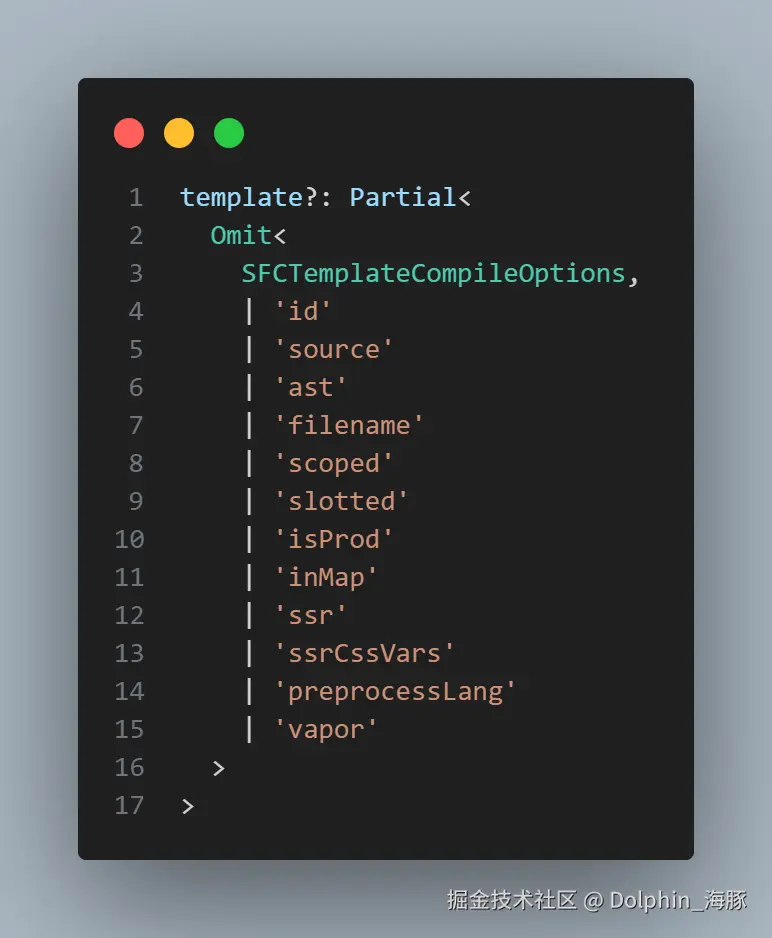
换句话说,定义本身存在于 SFCScriptCompileOptions 和 SFCTemplateCompileOptions 中。
之后,你可以通过在设置插件时将此标志作为参数传递来切换 compiler。作为参考,在 vuejs/core-vapor playground 中,它是这样设置的:
然后,只要实现基于从这里传递的标志切换 compiler,它就应该工作。这个实现在下面完成:
关于 Compiler 切换 API 将来,每个组件都可以切换 compiler。虽然 API 尚未确定,但提出了类似
<script vapor>的方案。顺便说一下,API 的制定正在以下 issue 中讨论:
开始阅读运行时
现在我们已经了解了如何编译
vue
<template>
  <p>Hello, Vapor!</p>
</template>
接下来让我们看看生成的代码
js
const _sfc_main = {};
import { template as _template } from "vue/vapor";
const t0 = _template("<p>Hello, Vapor!</p>");
function _sfc_render(_ctx) {
  const n0 = t0();
  return n0;
}
export default Object.assign(_sfc_main, {
  render: _sfc_render,
  vapor: true,
  __file: "/path/to/App.vue",
});
是如何工作的!
vue/vapor
我们一直忽略了它,但还没有解释这个包。
这是 Vapor 模式的入口点。
源代码位于 packages/vue/vapor。
Vapor 模式还有另一个入口包叫做 packages/vue-vapor,但 vue/vapor 只是简单地导入这个包。
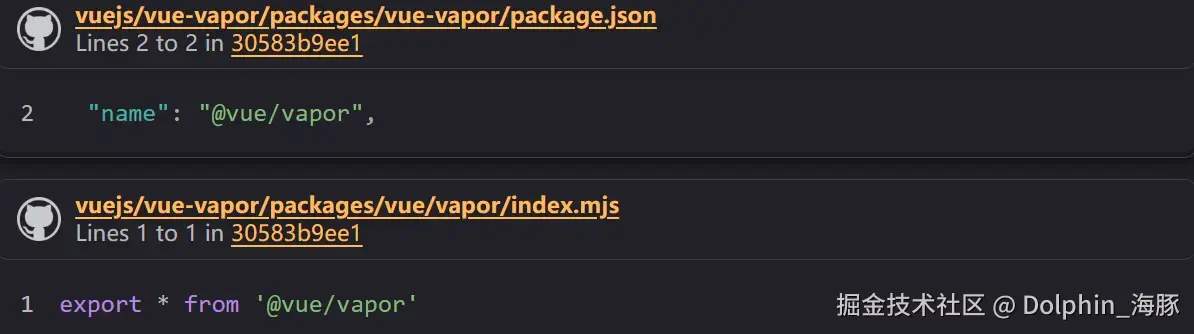
我们从 vue/vapor 导入 Vapor 运行时所需的辅助函数。
template 函数
这是 Vapor 的辅助函数之一。
js
import { template } from "vue/vapor";
const t0 = template("<p>Hello, Vapor!</p>");
const n0 = t0();
这就是声明模板并获取 Block 的方式。
让我们看看 template 函数的实现。
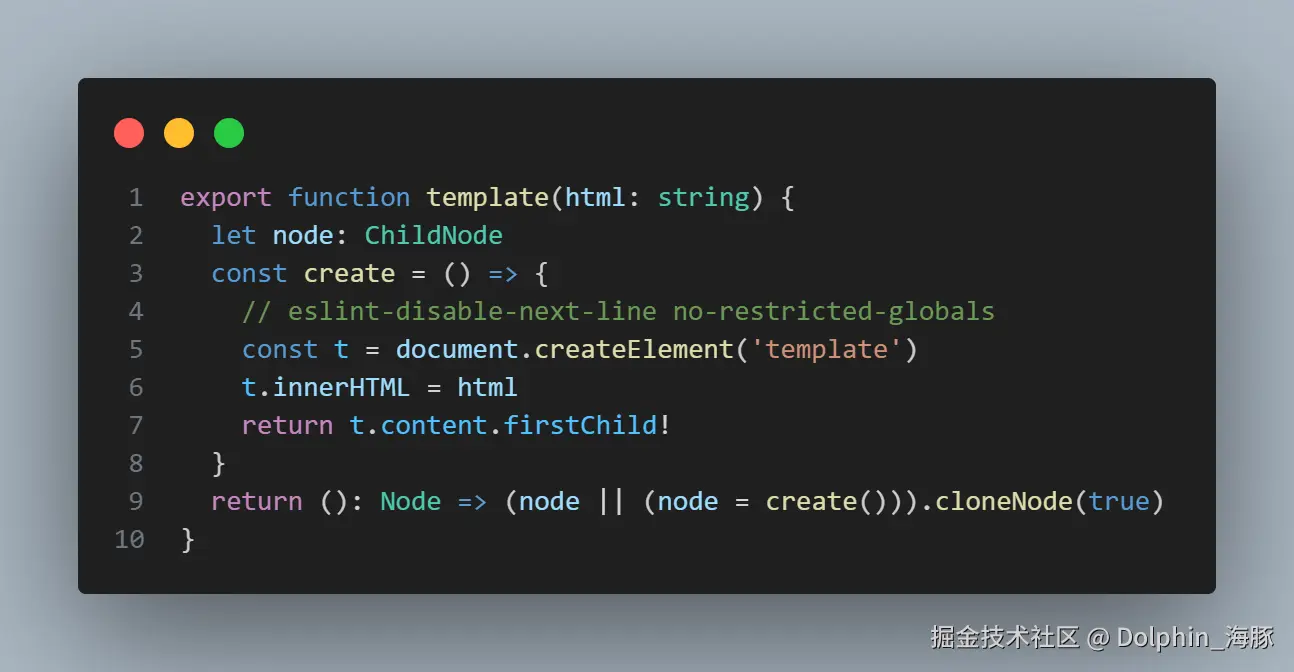
它将作为参数传入的字符串存储到临时 template 元素的 innerHTML 中,并通过读取 template 的 firstChild 来获取 Block。
创建一次的节点会被保存在这个函数的局部变量中,后续调用会通过 cloneNode 来获取。
js
import { template } from "vue/vapor";
const t0 = template("<p>Hello, Vapor!</p>");
const n0 = t0();
const n1 = t0(); // 克隆节点
如下面的代码所示,
js
function _sfc_render(_ctx) {
  const n0 = t0();
  return n0;
}
export default Object.assign(_sfc_main, {
  render: _sfc_render,
  vapor: true,
  __file: "/path/to/App.vue",
});
在 Vapor 模式下,组件的 render 函数只是返回一个 DOM 元素。
应用入口点
现在,让我们了解应用的入口点,看看这个组件是如何工作的。
当使用 Vue.js 构建应用时,通常会这样写:
ts
import { createApp } from "vue";
import App from "./App.vue";

createApp(App).mount("#app");
Vapor 模式也是如此。我们使用 createVaporApp 而不是 createApp。
ts
import { createVaporApp } from "vue/vapor";
import App from "./App.vue";

createVaporApp(App).mount("#app");
换句话说,如果我们阅读 createVaporApp 的实现,我们就能理解这个组件是如何工作的。
createVaporApp
实现位于 packages/runtime-vapor/src/apiCreateVaporApp.ts。
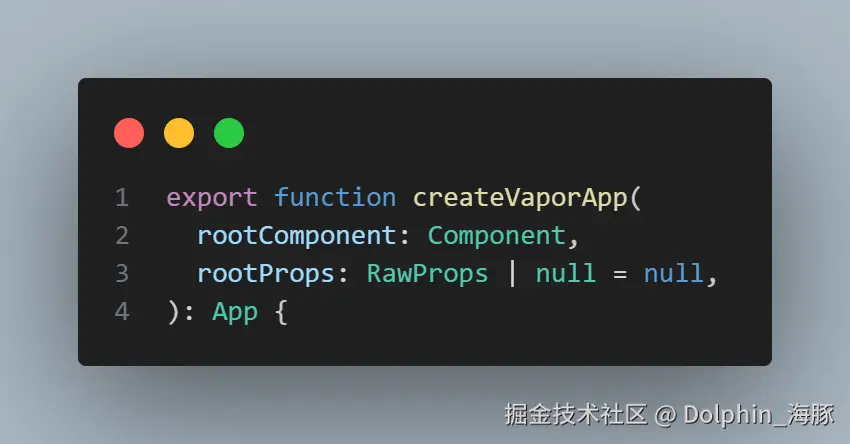
它与 runtime-core 中的 createApp 几乎相同。
首先,它创建应用的上下文并创建一个 App 实例。
这个 App 实例有一个叫做 mount 的方法。
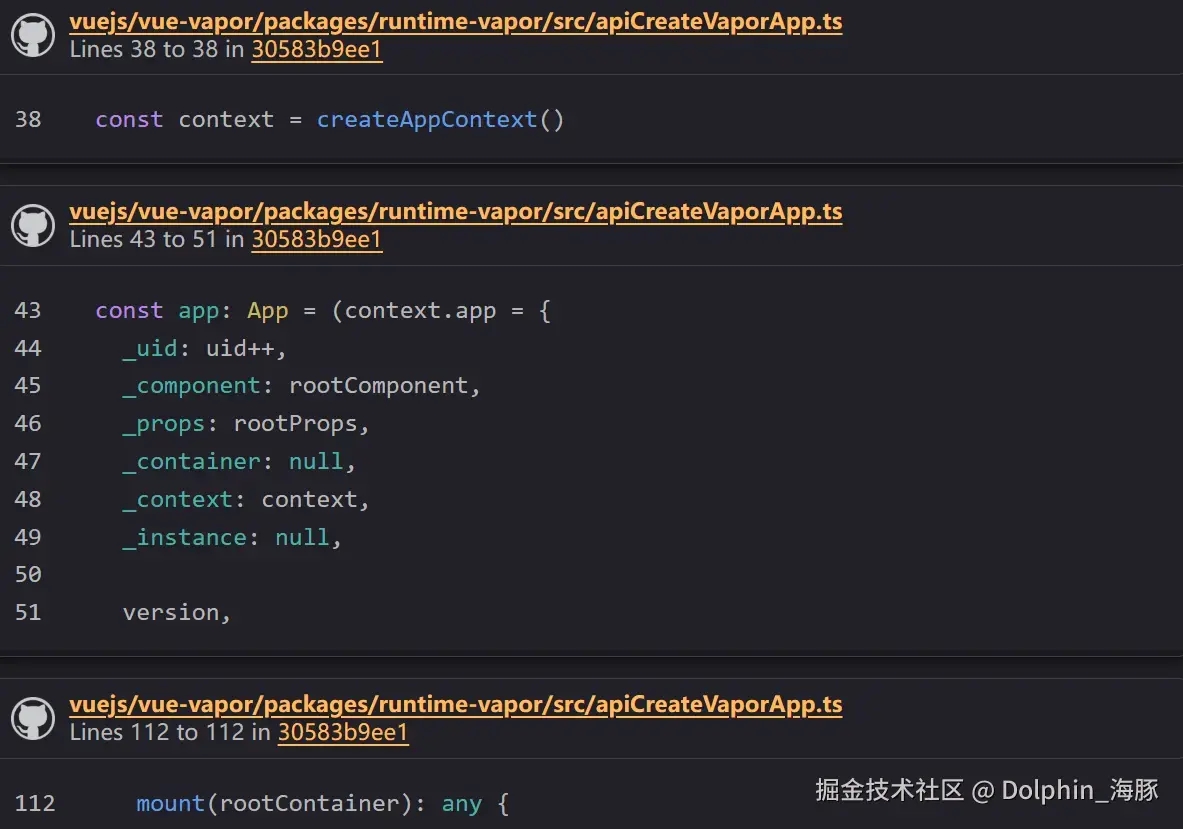
还有用于注册组件的 component 函数和用于使用插件的 use 函数。
这与传统的 Vue.js 基本相同。
App.mount
让我们看看 mount 函数的过程。
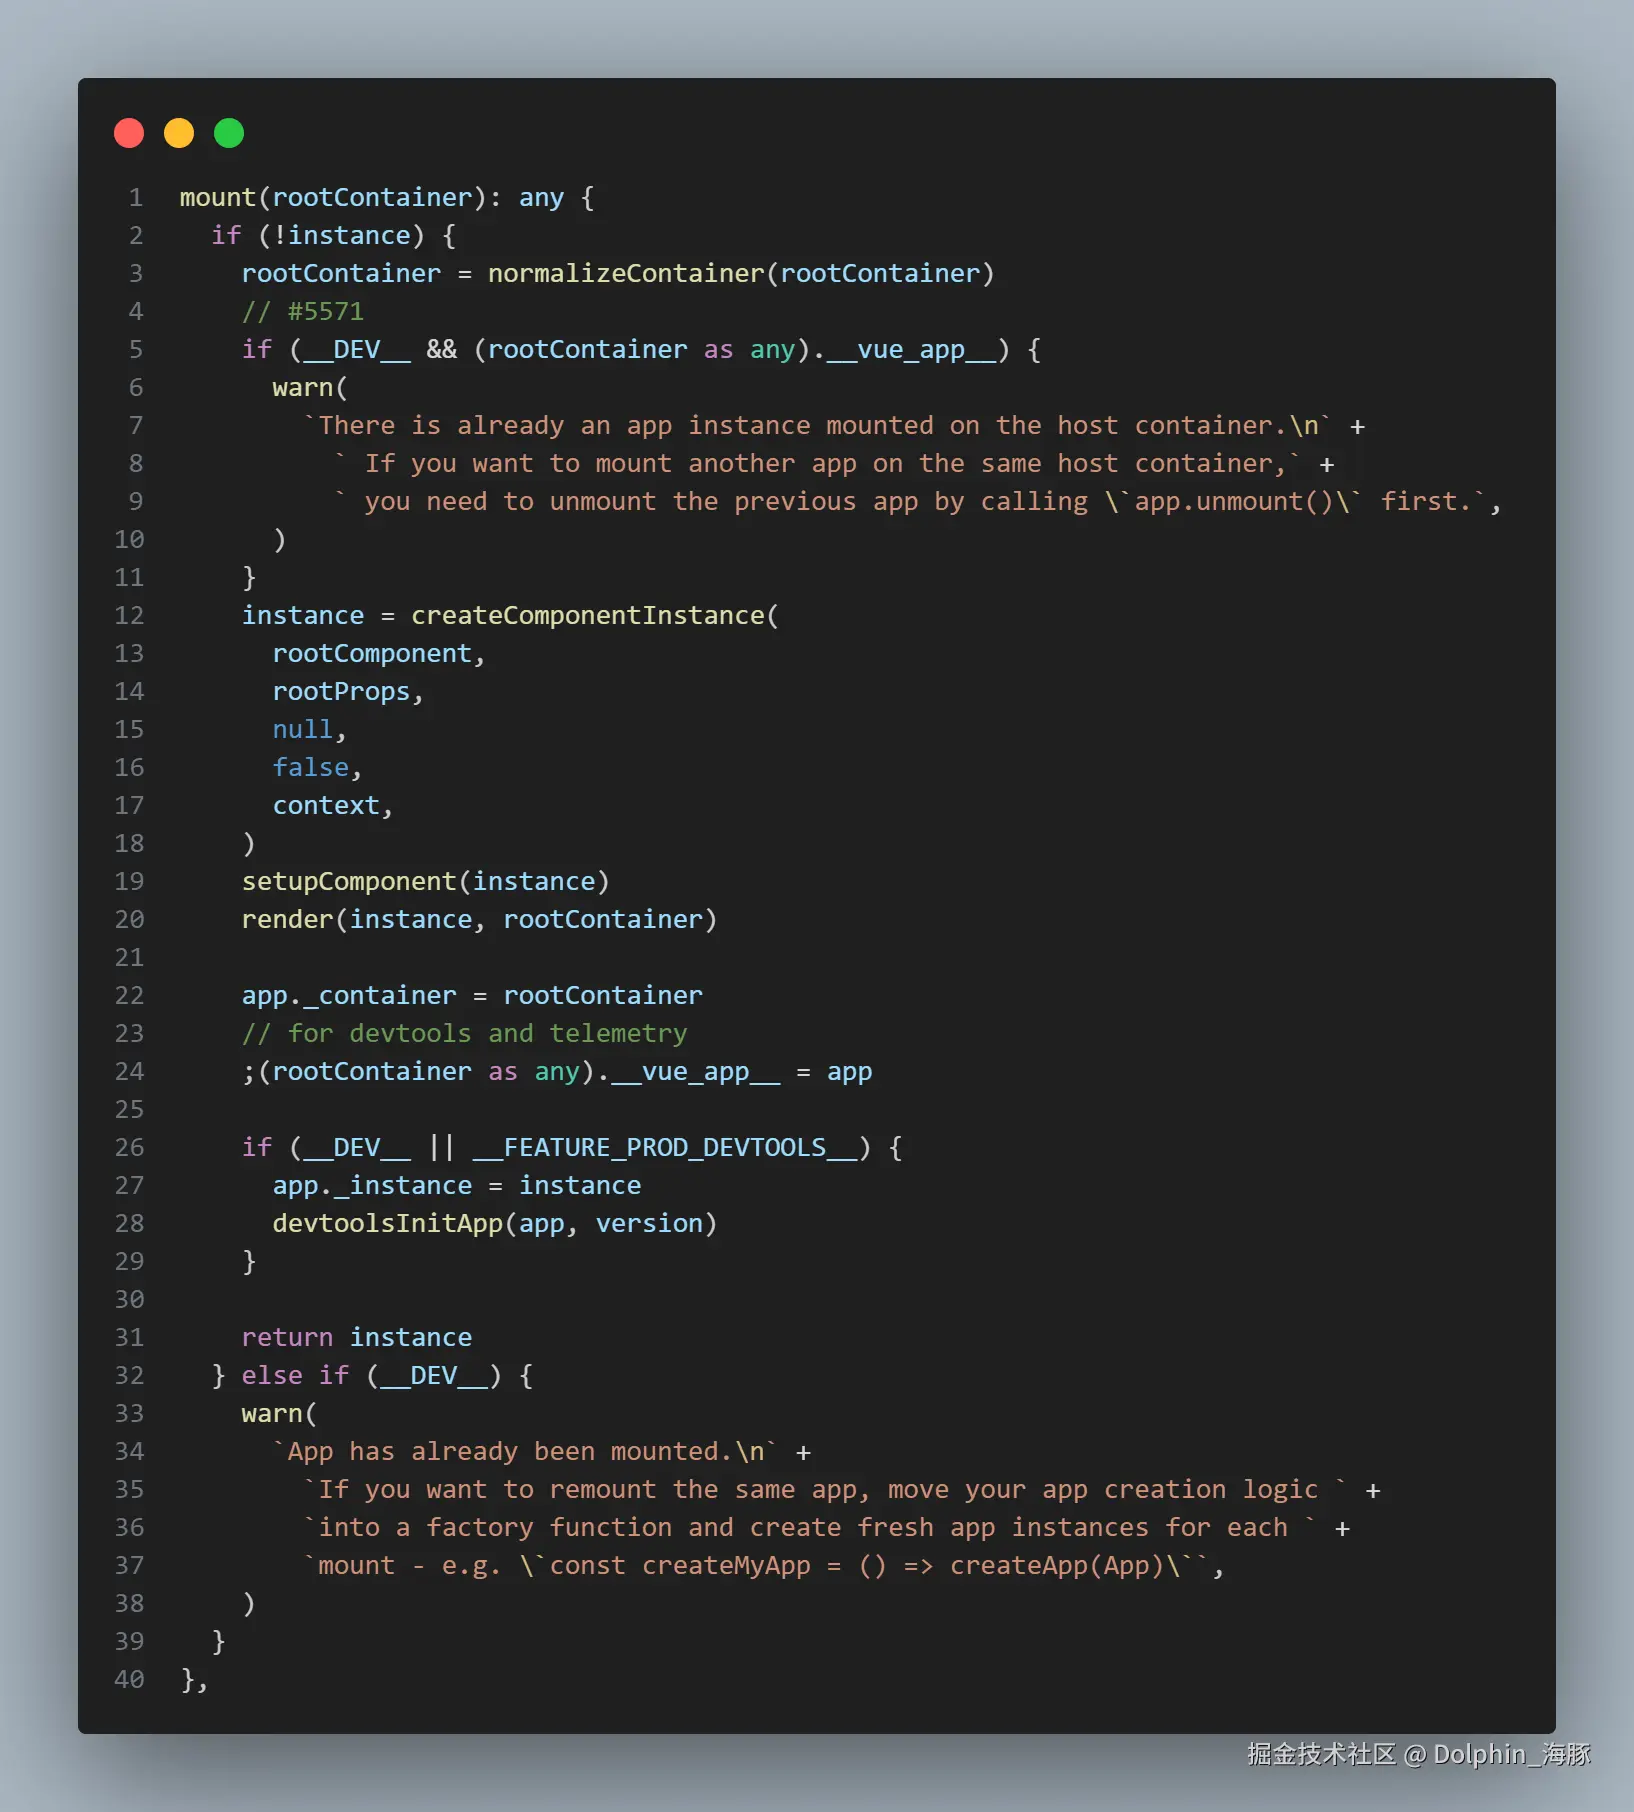
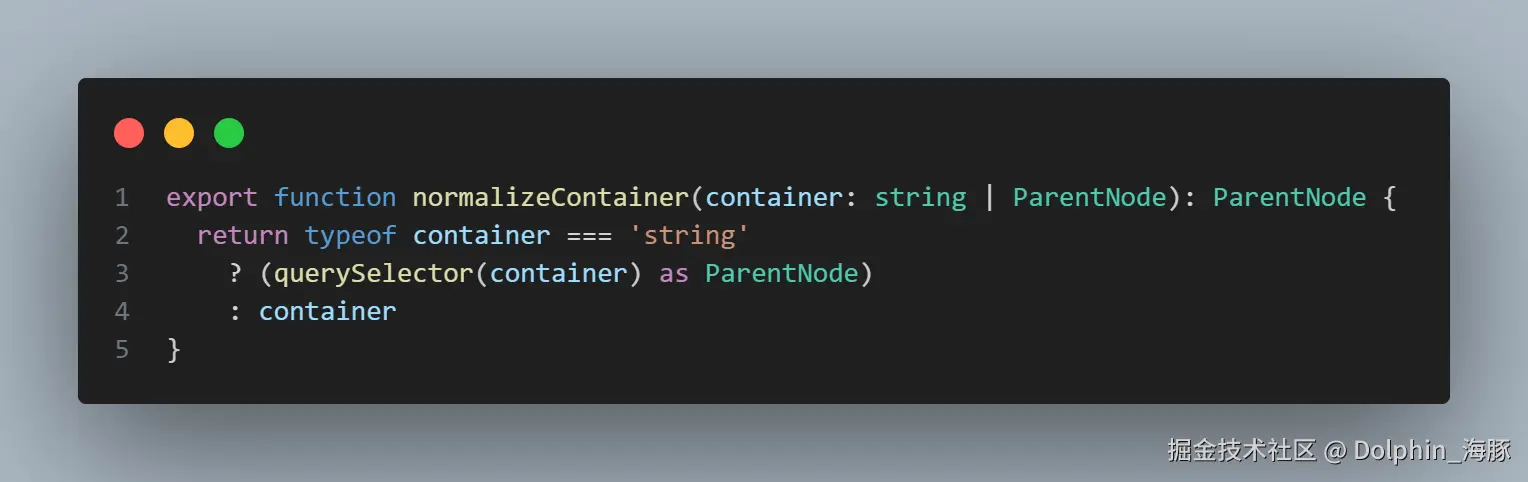
它将作为参数传入的选择器或元素视为容器。
normalizeContainer 函数的实现如下:
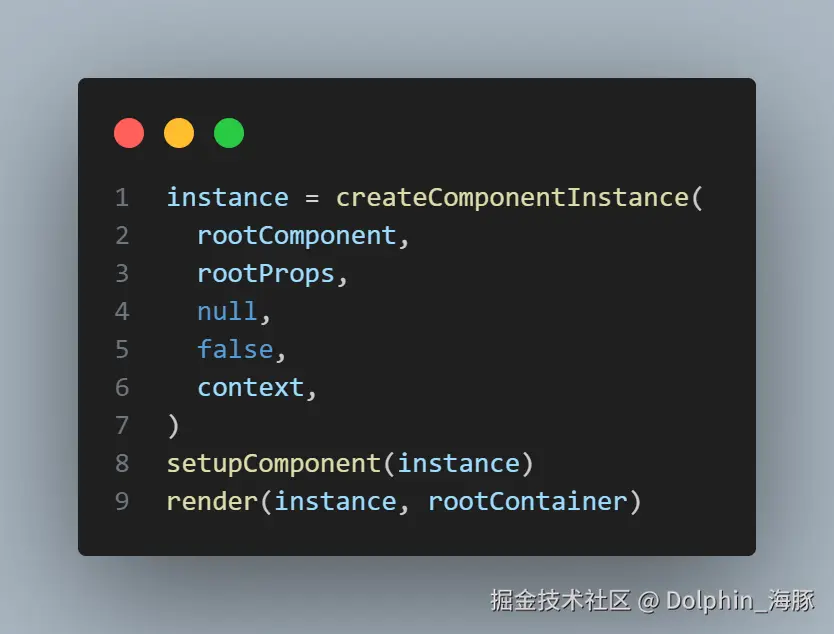
之后,它执行 createComponentInstance、setupComponent 和 render(初始)来完成挂载过程。
createComponentInstance
createComponentInstance 创建一个叫做 ComponentInternalInstance 的对象。
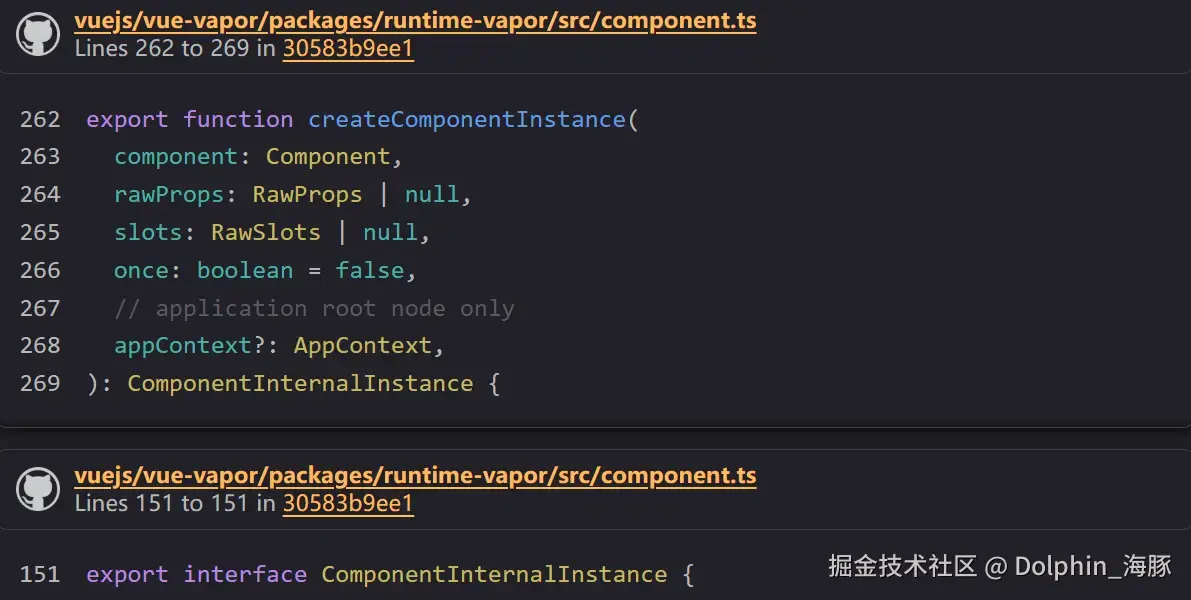
ComponentInternalInstance 持有内部组件信息,如注册的生命周期、props、emit 信息、状态等。
它还持有提供的组件的定义。
ts
  /**
   * @internal
   */
  [VaporLifecycleHooks.BEFORE_MOUNT]: LifecycleHook
  /**
   * @internal
   */
  [VaporLifecycleHooks.MOUNTED]: LifecycleHook
  /**
   * @internal
   */
  [VaporLifecycleHooks.BEFORE_UPDATE]: LifecycleHook
  /**
   * @internal
   */
  [VaporLifecycleHooks.UPDATED]: LifecycleHook
  /**
   * @internal
   */
  [VaporLifecycleHooks.BEFORE_UNMOUNT]: LifecycleHook
  /**
   * @internal
   */
  [VaporLifecycleHooks.UNMOUNTED]: LifecycleHook
  /**
   * @internal
   */
  [VaporLifecycleHooks.RENDER_TRACKED]: LifecycleHook
  /**
   * @internal
   */
  [VaporLifecycleHooks.RENDER_TRIGGERED]: LifecycleHook
  /**
   * @internal
   */
  [VaporLifecycleHooks.ACTIVATED]: LifecycleHook
  /**
   * @internal
   */
  [VaporLifecycleHooks.DEACTIVATED]: LifecycleHook
  /**
   * @internal
   */
  [VaporLifecycleHooks.ERROR_CAPTURED]: LifecycleHook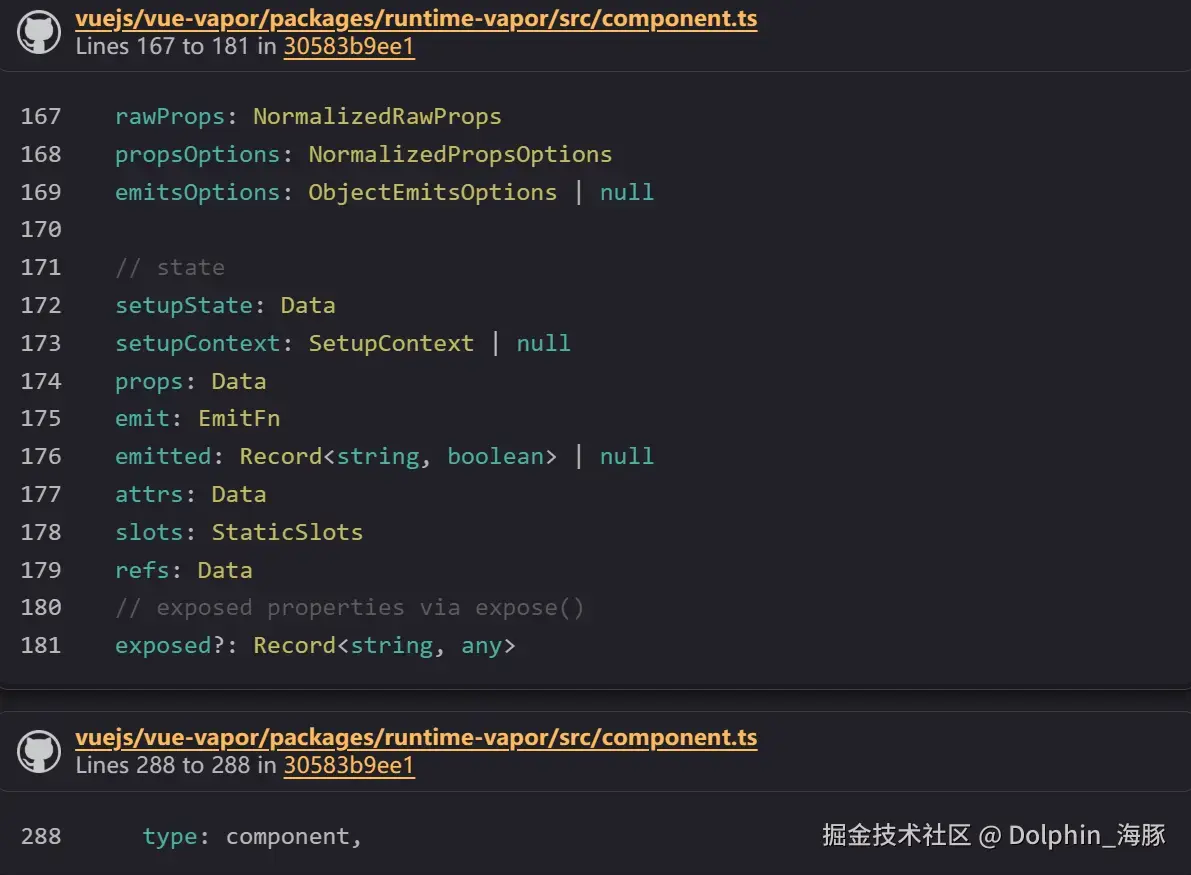
这也与 runtime-core 基本相同。
在 createComponentInstance 中,它不仅生成 ComponentInternalInstance 对象,还创建 EffectScope 并初始化 props、emit 和 slot。

Vapor 的一个独特实现是它持有 block。
传统上,它持有 VNode(虚拟 DOM)作为 subTree 或 next,但在 Vapor 中,它持有 Block。
ts
block: Block | null传统方式:
ts
  /**
   * The pending new vnode from parent updates
   * @internal
   */
  next: VNode | null
  /**
   * Root vnode of this component's own vdom tree
   */
subTree: VNode从现在开始,当渲染时,Block 将被存储在这里。
当我们运行使用它们的组件时,我们会重新讨论 props、emit 和 slot 的处理。
现在我们先跳过它们。
setupComponent
现在,让我们继续渲染过程。
这是 Vapor 模式的精髓。
以前,在文件 renderer.ts 中,执行了 VNode 的 patch 过程。
在 Vapor 模式中,没有 VNode 或 patch,所以初始设置过程就是一切。
后续的更新通过响应式系统直接操作 DOM(Block)。
现在,由于我们没有任何状态,让我们看看如何处理从 render 函数获取的 Block。
这个函数位于 packages/runtime-vapor/src/apiRender.ts 文件中,它实现了渲染过程。
首先,一进入 setupComponent,我们就将 currentInstance 设置为目标组件。
ts
const reset = setCurrentInstance(instance)接下来,在 createComponentInstance 中生成的 effectScope 内执行各种设置。
ts
instance.scope.run(() => {我们不会详细讨论 effectScope,因为它是 Vue.js API 的一部分,但对于那些不知道的人来说,它本质上是"一种收集 effects 并使它们更容易在以后清理的方式"。
通过在这个作用域内形成各种 effects,我们可以在组件卸载时通过停止 effectScope 来清理。
现在,让我们看看在 effectScope 内具体做了什么。
setupComponent > effectScope
首先是处理 setup 函数。
如果组件本身是一个函数,它会被作为函数组件执行。
如果它是一个对象,则提取 setup 函数。
ts
const setupFn = isFunction(component) ? component : component.setup然后,执行这个函数。
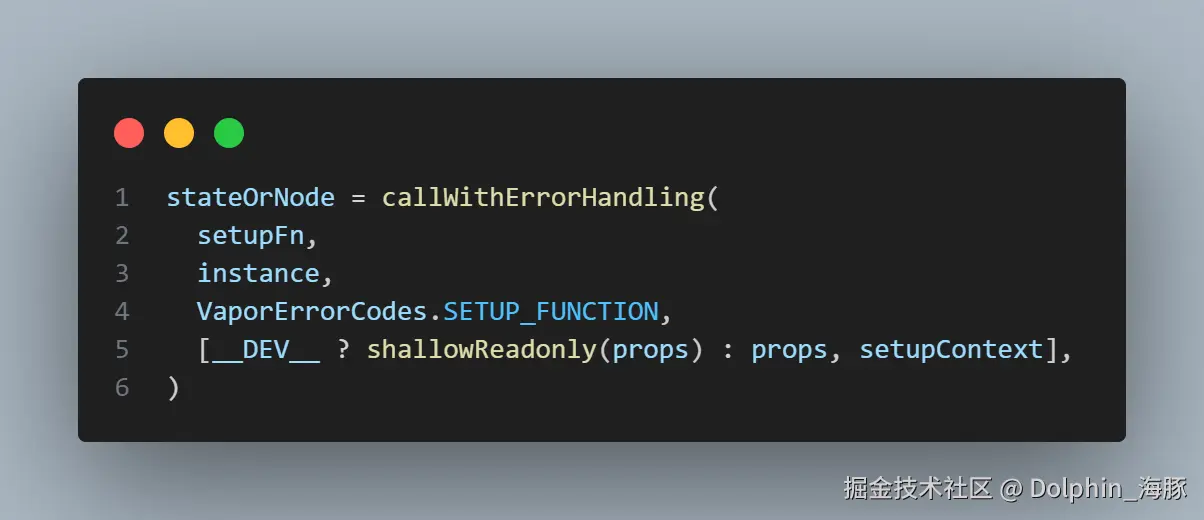
结果将是一个状态或一个 Node。
如果结果是 Node(或 fragment 或组件),它会被存储在名为 block 的变量中。
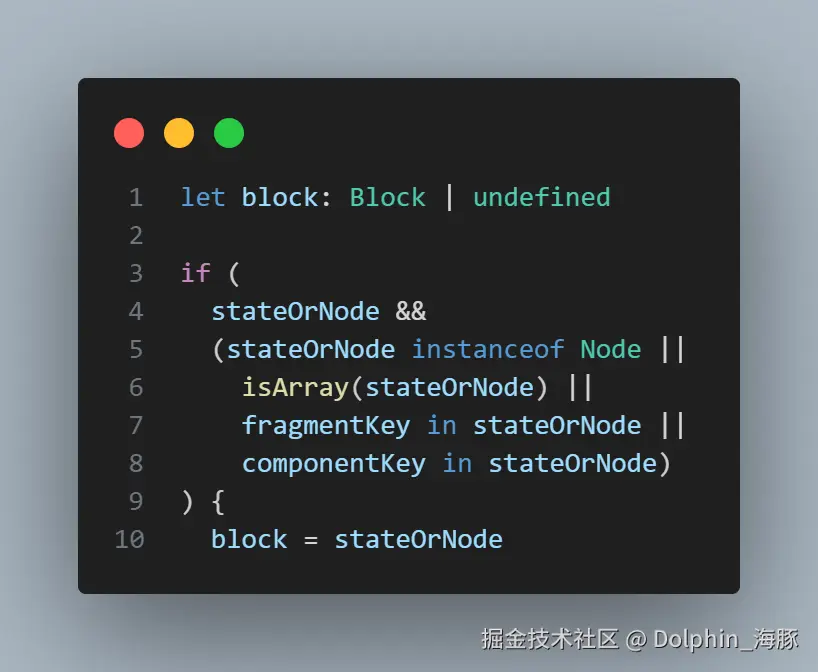
之后,如果 block 变量中仍然没有任何内容,它会尝试从 render 函数获取 block。
在这个组件中,它进入这个分支,执行 render 函数,存储 block(n0)。
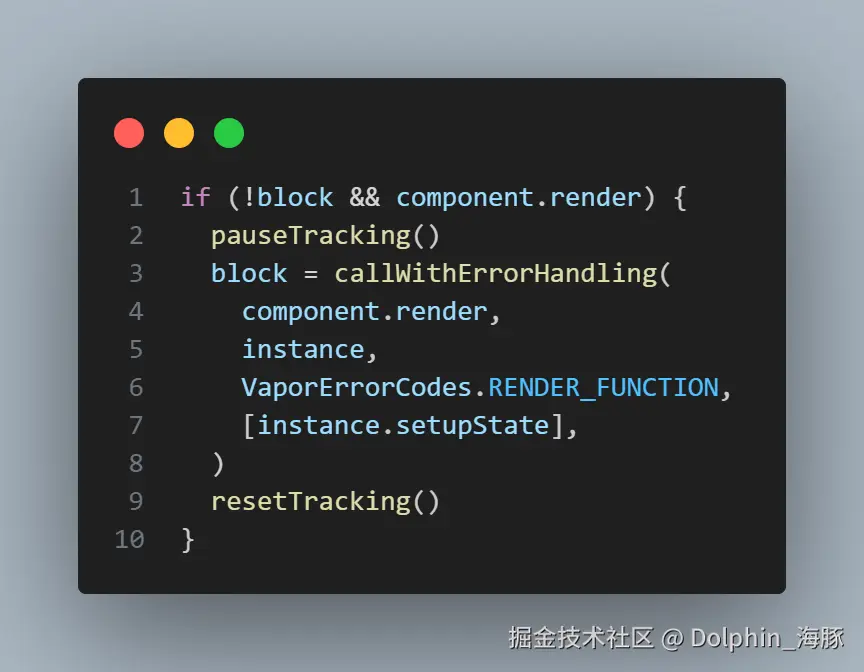
此时,block 被存储在 instance.block 中。
ts
instance.block = block这就是设置屏幕更新的全部内容。
正如我们在查看更复杂组件的编译结果时将看到的,大多数更新过程都直接在组件中描述为 effects。
因此,渲染组件就像执行 setup 函数(定义状态)和用 render 函数生成 block(形成 effect)一样简单。
剩下的就是将从 render 函数获取的 block 挂载到 DOM 中。
render
ts
    instance = createComponentInstance(
      rootComponent,
      rootProps,
      null,
      false,
      context,
    )
    setupComponent(instance)
    render(instance, rootContainer)
我们有 render 部分。
这个 render 函数是一个内部函数,与组件的 render 函数不同。
ts
  render,
  setupComponent,
  unmountComponent,
} from './apiRender'
像 setupComponent 一样,它实现在 packages/runtime-vapor/src/apiRender.ts 中。
它做的事情非常简单:挂载组件并执行队列中的任务(调度器)。
(※ 现在不需要担心调度器。)
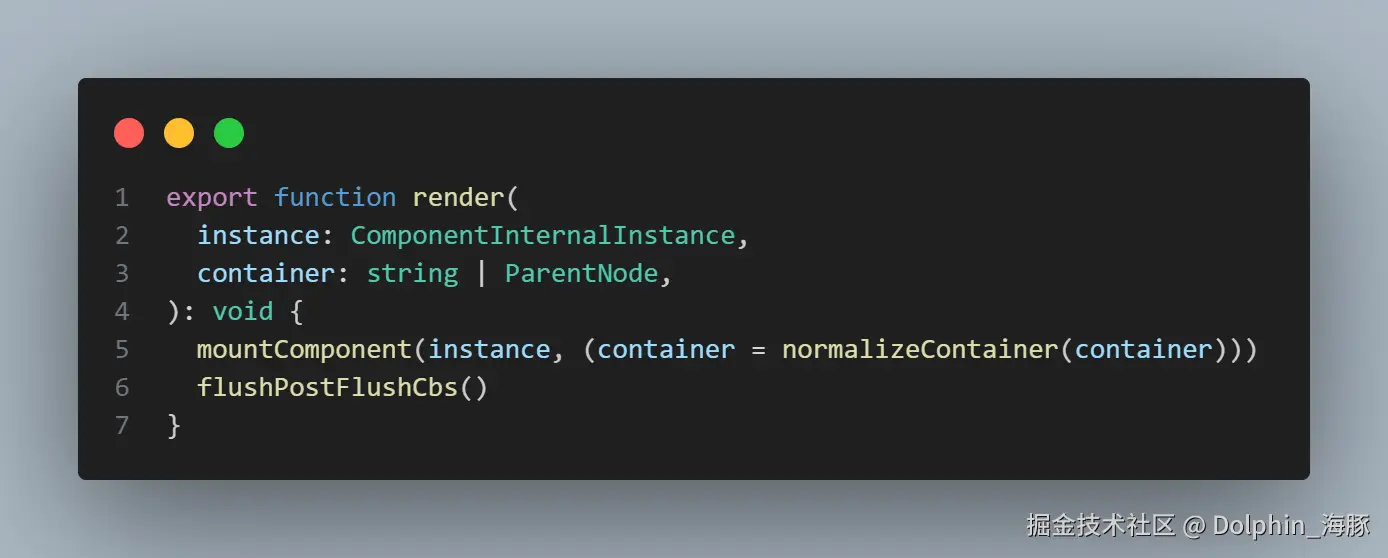
mountComponent 也很简单。
ts
function mountComponent(
  instance: ComponentInternalInstance,
  container: ParentNode,
) {
它将作为参数传入的容器(在这种情况下是从 #app 选择的 DOM)设置为 instance.container。
ts
instance.container = container然后,执行 beforeMount 钩子。
ts
// hook: beforeMount
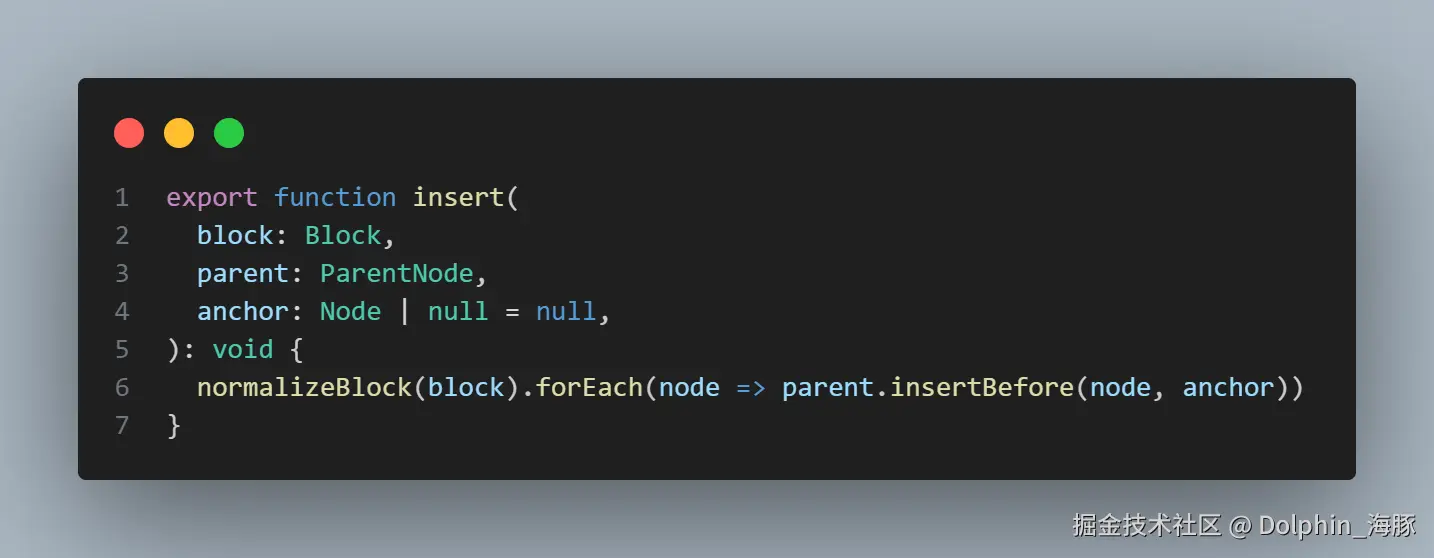
invokeLifecycle(instance, VaporLifecycleHooks.BEFORE_MOUNT, 'beforeMount')最后,它将 block 插入到容器中。
ts
insert(instance.block!, instance.container)(insert 函数真的只是一个插入。)
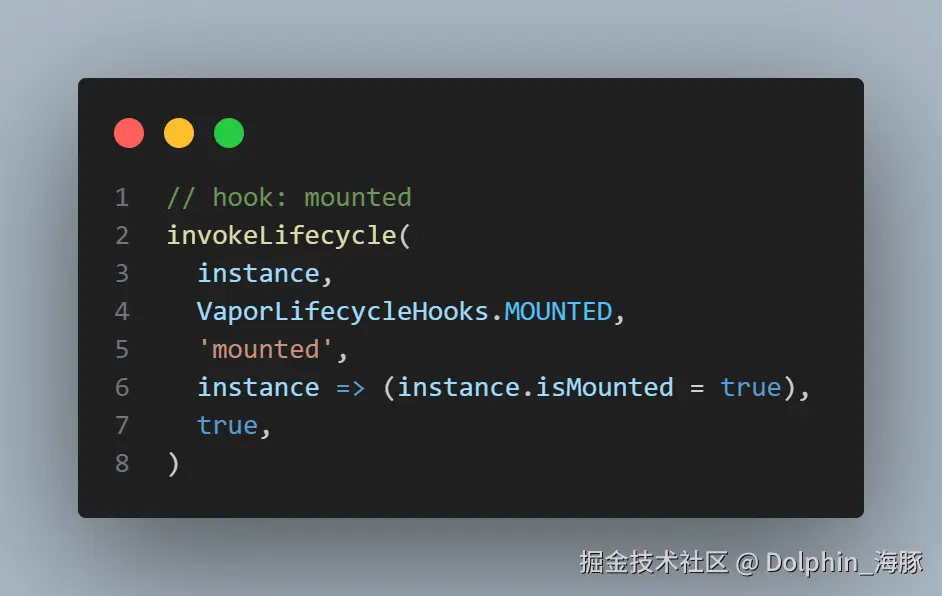
执行 mounted 钩子后,组件的挂载就完成了。
总结
我们已经看到了像这样的编译代码
js
const _sfc_main = {};
import { template as _template } from "vue/vapor";
const t0 = _template("<p>Hello, Vapor!</p>");
function _sfc_render(_ctx) {
  const n0 = t0();
  return n0;
}
export default Object.assign(_sfc_main, {
  render: _sfc_render,
  vapor: true,
  __file: "/path/to/App.vue",
});
是如何工作的,它只是创建一个组件实例,执行 setup 函数(如果有的话),调用 render 函数获取 block,然后通过 app.mount(selector) 将 block 插入到选择器中。
非常简单。
现在我们已经理解了像这样的 SFC
vue
<template>
  <p>Hello, Vapor!</p>
</template>
是如何被编译并在运行时工作的!
步骤是:
- 编写 Vue.js SFC。
- 通过 Vapor 模式编译器运行它。
- 查看输出(获取概述)。
- 检查编译器的实现。
- 阅读输出代码。
- 回到步骤 1。
我们已经完成了到步骤 5。
让我们回到步骤 1,以同样的方式查看更多复杂的组件!
插值 和 状态 绑定
本节的目标组件
由于我中间解释了调度器,所以顺序有些乱,但让我们继续看看 Vapor 的组件。
现在,让我们看看一个更复杂的模板。
vue
<script setup>
import { ref } from "vue";
const count = ref(0);
</script>

<template>
  <div>
    <p>count: {{ count }}</p>
    <button>increment</button>
  </div>
</template>
这次,我们有一个嵌套的元素,并且使用了插值语法。
编译结果
首先,让我们看看这个 SFC 的编译结果是什么样的。
js
import { ref } from "vue";

const _sfc_main = {
  vapor: true,
  __name: "App",
  setup(__props, { expose: __expose }) {
    __expose();

    const count = ref(0);

    const __returned__ = { count, ref };
    Object.defineProperty(__returned__, "__isScriptSetup", {
      enumerable: false,
      value: true,
    });
    return __returned__;
  },
};

import {
  renderEffect as _renderEffect,
  setText as _setText,
  template as _template,
} from "vue/vapor";

const t0 = _template("<div><p></p><button>increment</button></div>");

function _sfc_render(_ctx) {
  const n0 = t0();
  const n1 = n0.firstChild;
  _renderEffect(() => _setText(n1, "count: " + _ctx.count));
  return n0;
}

import _export_sfc from "/@id/__x00__plugin-vue:export-helper";
export default /*#__PURE__*/ _export_sfc(_sfc_main, [
  ["render", _sfc_render],
  ["vapor", true],
  ["__file", "/path/to/core-vapor/playground/src/App.vue"],
]);
结构比之前的组件稍微复杂了一些,但基本结构保持不变。
vue
<script setup>
import { ref } from "vue";
const count = ref(0);
</script>
被编译成
js
import { ref } from "vue";

const _sfc_main = {
  vapor: true,
  __name: "App",
  setup(__props, { expose: __expose }) {
    __expose();

    const count = ref(0);

    const __returned__ = { count, ref };
    Object.defineProperty(__returned__, "__isScriptSetup", {
      enumerable: false,
      value: true,
    });
    return __returned__;
  },
};
而模板部分
vue
<template>
  <div>
    <p>count: {{ count }}</p>
    <button>increment</button>
  </div>
</template>
被编译成
js
import {
  renderEffect as _renderEffect,
  setText as _setText,
  template as _template,
} from "vue/vapor";

const t0 = _template("<div><p></p><button>increment</button></div>");

function _sfc_render(_ctx) {
  const n0 = t0();
  const n1 = n0.firstChild;
  _renderEffect(() => _setText(n1, "count: " + _ctx.count));
  return n0;
}
理解输出代码的概述
让我们专注于理解以下代码:
js
import {
  renderEffect as _renderEffect,
  setText as _setText,
  template as _template,
} from "vue/vapor";

const t0 = _template("<div><p></p><button>increment</button></div>");

function _sfc_render(_ctx) {
  const n0 = t0();
  const n1 = n0.firstChild;
  _renderEffect(() => _setText(n1, "count: " + _ctx.count));
  return n0;
}
首先,模板中写为 <div><p>count: {{ count }}</p><button>increment</button></div> 的部分被转换为 <div><p></p><button>increment</button></div>。内容 count: {{ count }} 通过 _renderEffect 和 _setText 设置为在 count 的值改变时更新。
这次,我们有一个嵌套的元素,所以我们需要获取 p 元素。
n0 是 div 元素,n1 是 p 元素。
n1 是通过 n0.firstChild 获取的。
阅读编译器的实现
首先,让我们输出模板的 AST。
json
{
  "type": "Root",
  "source": "\n  <div>\n    <p>count: {{ count }}</p>\n    <button>increment</button>\n  </div>\n",
  "children": [
    {
      "type": "Element",
      "tag": "div",
      "ns": 0,
      "tagType": 0,
      "props": [],
      "children": [
        {
          "type": "Element",
          "tag": "p",
          "ns": 0,
          "tagType": 0,
          "props": [],
          "children": [
            {
              "type": "Text",
              "content": "count: ",
              "loc": {
                "start": { "offset": 12, "line": 2, "column": 7 },
                "end": { "offset": 19, "line": 2, "column": 14 },
                "source": "count: "
              }
            },
            {
              "type": "Interpolation",
              "content": {
                "type": "SimpleExpression",
                "content": "count",
                "isStatic": false,
                "constType": 0,
                "ast": null
              }
            }
          ]
        },
        {
          "type": "Element",
          "tag": "button",
          "ns": 0,
          "tagType": 0,
          "props": [],
          "children": [
            {
              "type": "Text",
              "content": "increment",
              "loc": {
                "start": { "offset": 33, "line": 3, "column": 12 },
                "end": { "offset": 42, "line": 3, "column": 21 },
                "source": "increment"
              }
            }
          ]
        }
      ]
    }
  ],
  "helpers": {},
  "components": [],
  "directives": [],
  "hoists": [],
  "imports": [],
  "cached": [],
  "temps": 0
}
到现在为止,你应该能够理解 Template AST 的一般节点了。
而且既然你已经看到了解析器的实现,你应该已经知道如何获取这个对象了。
阅读转换器
接下来,让我们看看如何转换这个。
可能,这种流程(浏览 AST,解析并彻底阅读转换器)从现在开始会变得更常见。
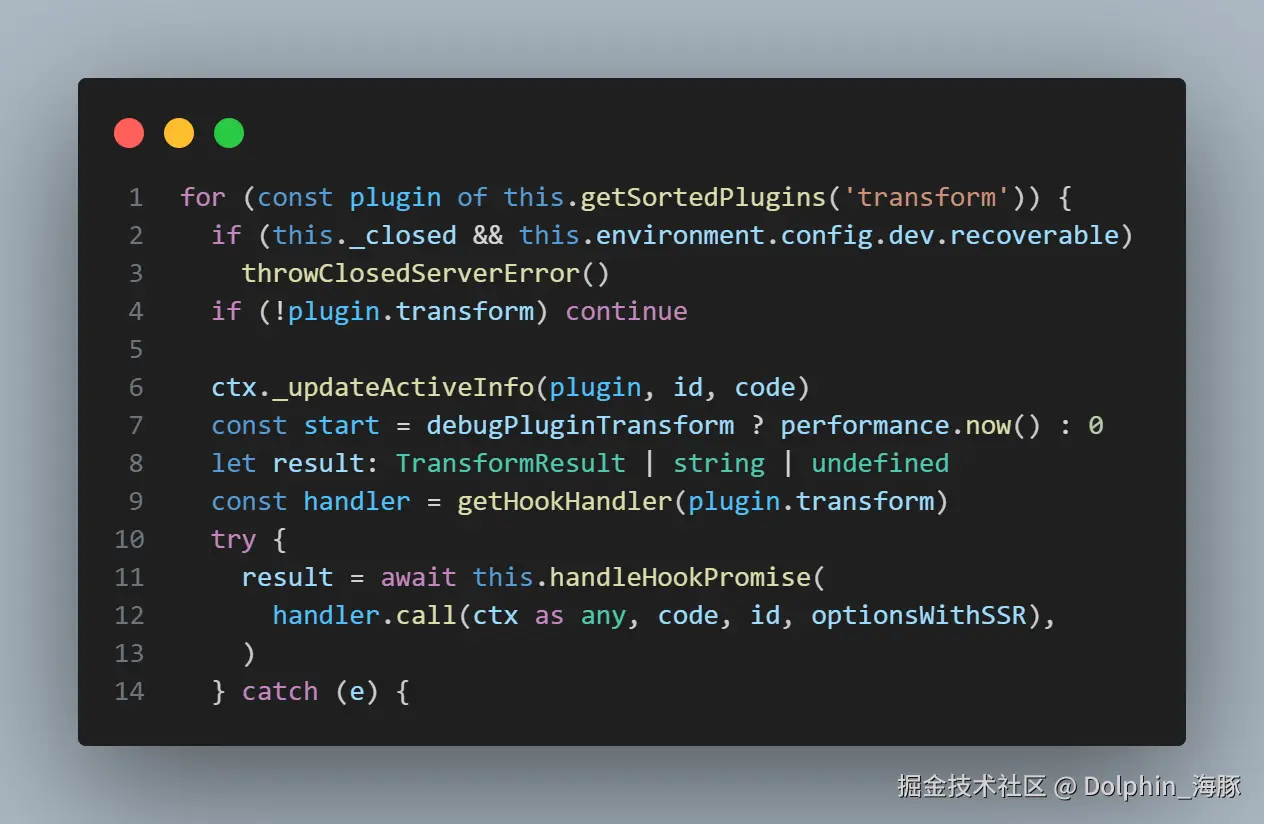
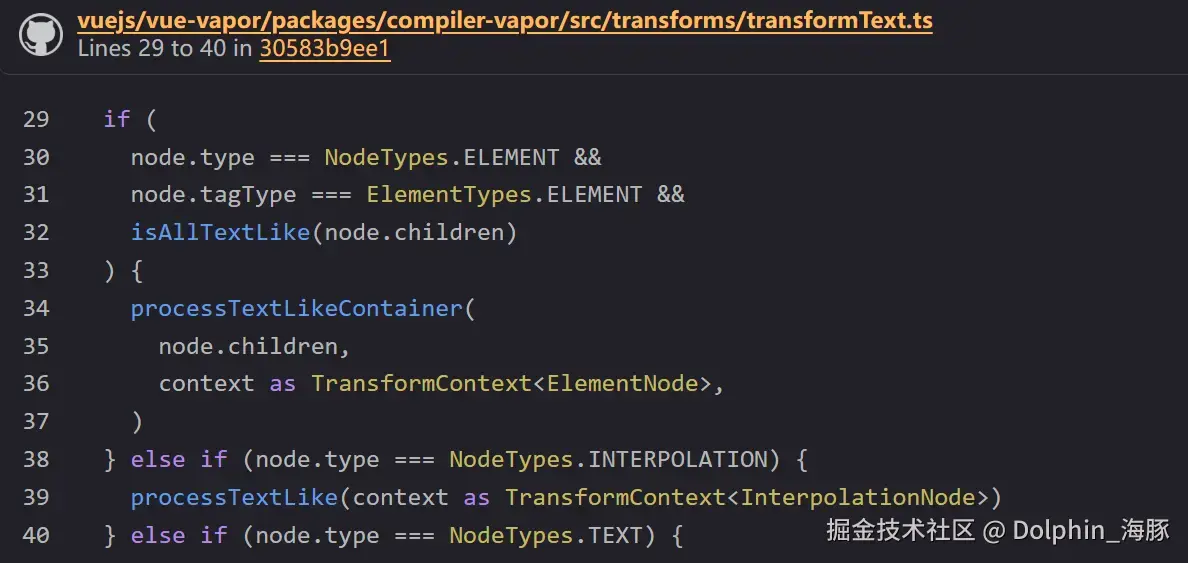
像往常一样,当进入 transform -> transformNode 时,执行 NodeTransformer。
它进入 transformElement(onExit)-> transformChildren,然后进入 transformText。
到这里都是常规的,从这里开始是这次的重点。

这次,当通过这个检查时,
因为它包含 Interpolation,所以进入以下分支。
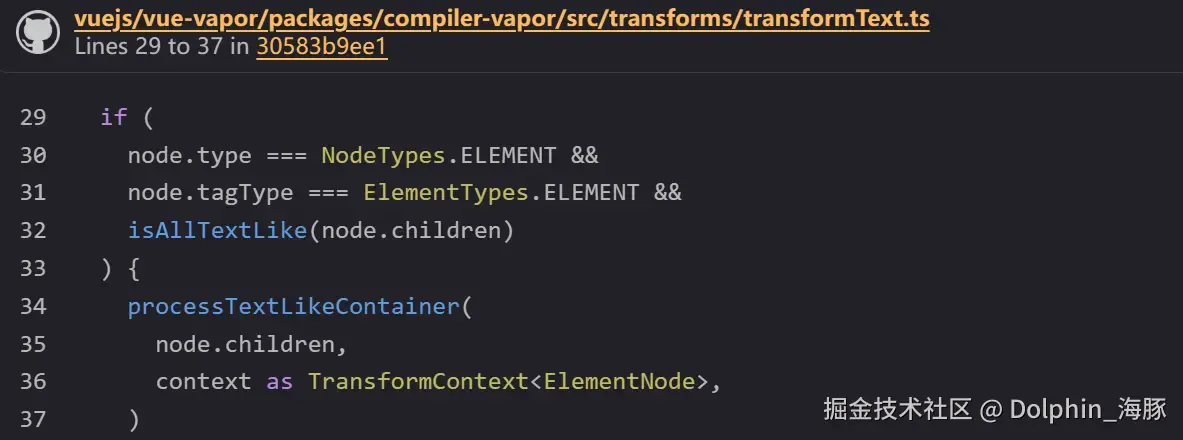
让我们看看 processTextLikeContainer。
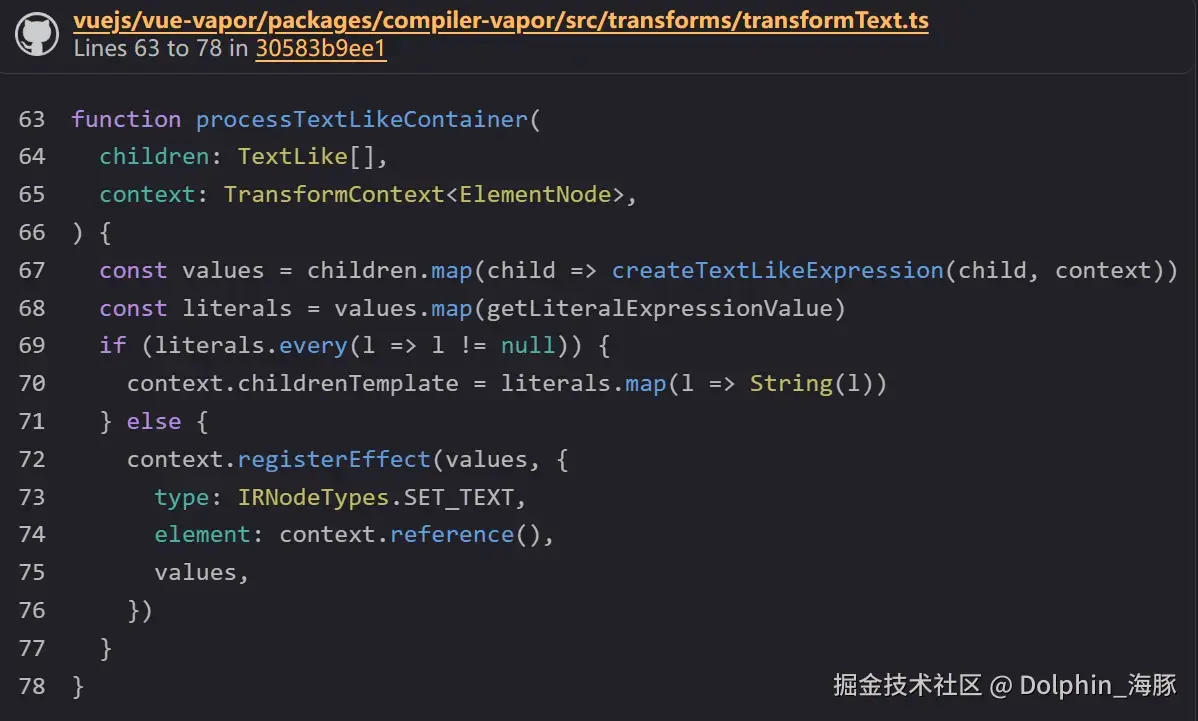
显然,它在这里调用了一个叫做 registerEffect 的函数。
并且它正确地设置了 type: IRNodeTypes.SET_TEXT。
它还获取字面量,如果它们都不是 null,就将它们连接起来并添加到 context.childrenTemplate 中,然后结束。
(换句话说,它进入 template 参数)
相反,如果不是,context.childrenTemplate 保持为空,所以这部分不会被传递给 template 参数。
(在这种情况下,最终的模板变成 "<div><p></p><button>increment</button></div>")
否则,就是 registerEffect。
它执行 context.reference,标记将这个 Node 保存在变量中,并获取 id。
registerEffect
让我们看看叫做 registerEffect 的函数的内容。
ts
  registerEffect(
    expressions: SimpleExpressionNode[],
    ...operations: OperationNode[]
  ): void {
它接收 expressions 和 operations 作为参数。
expression 是 AST 的 SimpleExpression。(例如 count、obj.prop 等)
operations 是一个新概念。
这是一种 IR,叫做 OperationNode。
ts
export type OperationNode =
  | SetPropIRNode
  | SetDynamicPropsIRNode
  | SetTextIRNode
  | SetEventIRNode
  | SetDynamicEventsIRNode
  | SetHtmlIRNode
  | SetTemplateRefIRNode
  | SetModelValueIRNode
  | CreateTextNodeIRNode
  | InsertNodeIRNode
  | PrependNodeIRNode
  | WithDirectiveIRNode
  | IfIRNode
  | ForIRNode
  | CreateComponentIRNode
  | DeclareOldRefIRNode
  | SlotOutletIRNode
如果你看这个定义,你可能可以想象,它是一个表示"操作"的 Node。
例如,SetTextIRNode 是一个"设置文本"的操作。
还有设置事件的 SetEventIRNode 和创建组件的 CreateComponentIRNode。
这次,因为使用了 SetTextIRNode,让我们看看它。
ts
export interface SetTextIRNode extends BaseIRNode {
  type: IRNodeTypes.SET_TEXT
  element: number
  values: SimpleExpressionNode[]
}
SetTextIRNode 有元素的 id(数字)和值(SimpleExpression\[\])。
例如,如果 id 是 0,值是表示 count 的 SimpleExpression,
ts
setText(n0, count);它表示这样的代码的 IR。
回到 registerEffect 的继续,
ts
      this.block.effect.push({
        expressions,
        operations,
      })
它将传入的 expressions 和 operations 推送到 block.effect。
block.effect 是
ts
effect: IREffect[]这样,主栈的 IR 生成就大致完成了。
剩下的就是基于这个进行代码生成了。
阅读代码生成
嗯,正如预期的那样,没有什么特别困难的。
它只是基于 type 分支并处理 block 持有的 effects。
你可能不需要任何解释就能阅读它。
ts
export function genBlockContent(
  block: BlockIRNode,
  context: CodegenContext,
  root?: boolean,
  customReturns?: (returns: CodeFragment[]) => CodeFragment[],
): CodeFragment[] {
ts
push(...genEffects(effect, context))
ts
export function genEffects(
  effects: IREffect[],
  context: CodegenContext,
): CodeFragment[] {
  const [frag, push] = buildCodeFragment()
  for (const effect of effects) {
    push(...genEffect(effect, context))
ts
export function genEffect(
  { operations }: IREffect,
  context: CodegenContext,
): CodeFragment[] {
  const { vaporHelper } = context
  const [frag, push] = buildCodeFragment(
    NEWLINE,
    `${vaporHelper('renderEffect')}(() => `,
  )

  const [operationsExps, pushOps] = buildCodeFragment()
  operations.forEach(op => pushOps(...genOperation(op, context)))

  const newlineCount = operationsExps.filter(frag => frag === NEWLINE).length
  if (newlineCount > 1) {
    push('{', INDENT_START, ...operationsExps, INDENT_END, NEWLINE, '})')
  } else {
    push(...operationsExps.filter(frag => frag !== NEWLINE), ')')
  }

  return frag
}
ts
export function genOperation(
  oper: OperationNode,
  context: CodegenContext,
): CodeFragment[] {
ts
    case IRNodeTypes.SET_TEXT:
      return genSetText(oper, context)
ts
export function genSetText(
  oper: SetTextIRNode,
  context: CodegenContext,
): CodeFragment[] {
  const { vaporHelper } = context
  const { element, values } = oper
  return [
    NEWLINE,
    ...genCall(
      vaporHelper('setText'),
      `n${element}`,
      ...values.map(value => genExpression(value, context)),
    ),
  ]
}
就这样,完全掌握了编译器!
阅读运行时
现在,让我们阅读编译结果的运行时(实际行为)部分:
js
import {
  renderEffect as _renderEffect,
  setText as _setText,
  template as _template,
} from "vue/vapor";

const t0 = _template("<div><p></p><button>increment</button></div>");

function _sfc_render(_ctx) {
  const n0 = t0();
  const n1 = n0.firstChild;
  _renderEffect(() => _setText(n1, "count: " + _ctx.count));
  return n0;
}
在应用入口中,创建组件实例,并调用组件的 render 函数将结果节点放入容器中,这与之前相同。
让我们看看当 render 执行时实际发生了什么。
首先是 setText。
这些操作大多实现在 packages/runtime-vapor/src/dom 中。
setText 的实现如下:
ts
export function setText(el: Node, ...values: any[]): void {
  const text = values.map(v => toDisplayString(v)).join('')
  const oldVal = recordPropMetadata(el, 'textContent', text)
  if (text !== oldVal) {
    el.textContent = text
  }
}
它真的只做非常简单的事情。它只是 DOM 操作。它将 values 连接起来并赋值给 el 的 textContent。
接下来,让我们看看 renderEffect 的实现来结束这一页。
换句话说,renderEffect 是一个"带有更新钩子执行的 watchEffect"。
实现位于 packages/runtime-vapor/src/renderEffect.ts。
在设置当前实例和 effectScope 的同时,它包装回调,
ts
  const instance = getCurrentInstance()
  const scope = getCurrentScope()

  if (scope) {
    const baseCb = cb
    cb = () => scope.run(baseCb)
  }

  if (instance) {
    const baseCb = cb
    cb = () => {
      const reset = setCurrentInstance(instance)
      baseCb()
      reset()
    }
    job.id = instance.uid
  }
并生成一个 ReactiveEffect。
ts
  const effect = new ReactiveEffect(() =>
    callWithAsyncErrorHandling(cb, instance, VaporErrorCodes.RENDER_FUNCTION),
  )
对于 effect.scheduler(通过触发器而不是通过 effect.run 调用的行为),它设置了一个叫做 job 的函数(稍后讨论)。
ts
effect.scheduler = () => queueJob(job)以下是初始执行。
ts
effect.run()这是 job 部分。
ts
function job() {在执行 effect 之前,它运行生命周期钩子(beforeUpdate)。
ts
      const { bu, u, scope } = instance
      const { dirs } = scope
      // beforeUpdate hook
      if (bu) {
        invokeArrayFns(bu)
      }
      if (dirs) {
        invokeDirectiveHook(instance, 'beforeUpdate', scope)
      }
然后,它执行 effect。
ts
effect.run()最后,它运行生命周期钩子(updated)。
实际上,它只是将其排队到调度器中。
(调度器适当地处理去重并在适当的时间执行它。)
ts
      queuePostFlushCb(() => {
        instance.isUpdating = false
        const reset = setCurrentInstance(instance)
        if (dirs) {
          invokeDirectiveHook(instance, 'updated', scope)
        }
        // updated hook
        if (u) {
          queuePostFlushCb(u)
        }
        reset()
      })
由于调度器周围的实现开始频繁出现,在下一页,让我们看看调度器的实现!
复杂模板
由于我在中间解释了调度器,顺序有些颠倒,但让我们继续看看 Vapor 的组件。
目前,我们已经理解了包含以下 mustache 的简单模板。
vue
<script setup>
import { ref } from "vue";
const count = ref(0);
</script>

<template>
  <p>{{ count }}</p>
</template>
现在,关于这个模板部分,如果我们写一些稍微复杂的东西会发生什么?
目前,它被简单地编译为:
ts
import {
  renderEffect as _renderEffect,
  setText as _setText,
  template as _template,
} from "vue/vapor";

const t0 = _template("<p></p>");

function _sfc_render(_ctx) {
  const n0 = t0();
  _renderEffect(() => _setText(n0, _ctx.count));
  return n0;
}
但是如果我们嵌套更多元素或使 mustache 成为部分内容会发生什么?(例如,count: {{ count }})
让我们以下面的组件为例来看看。
vue
<script setup>
import { ref } from "vue";
const count = ref(0);
</script>

<template>
  <p>count is {{ count }}</p>
  <div>
    <div>
      {{ "count" }} : <span>{{ count }}</span>
    </div>
  </div>
</template>
编译结果
编译结果如下。
由于脚本部分相同,所以省略了。
js
import {
  createTextNode as _createTextNode,
  prepend as _prepend,
  renderEffect as _renderEffect,
  setText as _setText,
  template as _template,
} from "vue/vapor";

const t0 = _template("<p></p>");
const t1 = _template("<div><div><span></span></div></div>");

function _sfc_render(_ctx) {
  const n0 = t0();
  const n4 = t1();
  const n3 = n4.firstChild;
  const n2 = n3.firstChild;
  const n1 = _createTextNode(["count", " : "]);
  _prepend(n3, n1);
  _renderEffect(() => {
    _setText(n0, "count is ", _ctx.count);
    _setText(n2, _ctx.count);
  });
  return [n0, n4];
}
理解概览
首先,由于这个组件的模板是一个片段,生成了两个模板,并返回两个结果节点。
js
const t0 = _template("<p></p>");
const t1 = _template("<div><div><span></span></div></div>");

function _sfc_render(_ctx) {
  const n0 = t0();
  const n4 = t1();
  // 省略
  return [n0, n4];
}
从 t0 和 t1 可以看出,文本已从模板中移除,只留下元素。
对于 n0,所有内容都使用 setText 插入。
ts
const t0 = _template("<p></p>");
const t1 = _template("<div><div><span></span></div></div>");

function _sfc_render(_ctx) {
  const n0 = t0();
  const n4 = t1();
  // 省略
  _renderEffect(() => {
    _setText(n0, "count is ", _ctx.count);
    // 省略
  });
  return [n0, n4];
}
到这里,你应该能够理解到目前为止看到的实现。\
问题是这部分的编译:
vue
<div>
  <div>
    {{ "count" }} : <span>{{ count }}</span>
  </div>
</div>
提取只需要的部分:
js
const t1 = _template("<div><div><span></span></div></div>");

function _sfc_render(_ctx) {
  const n4 = t1();
  const n3 = n4.firstChild;
  const n2 = n3.firstChild;
  const n1 = _createTextNode(["count", " : "]);
  _prepend(n3, n1);
  _renderEffect(() => {
    _setText(n2, _ctx.count);
  });

  // 省略
}
首先,我们可以看到 {{ "count" }} : 部分由 createTextNode 生成,并插入到 n4 的 firstChild 之前。
js
const t1 = _template("<div><div><span></span></div></div>");
const n4 = t1();
const n3 = n4.firstChild;
const n1 = _createTextNode(["count", " : "]);
_prepend(n3, n1);
而 <span>{{ count }}</span> 部分使用 setText 插入。
这有点令人困惑,所以让我们添加注释来指示哪个 Node 对应哪个。
(为了更容易理解,我给元素分配了 ID。)
js
const t0 = _template("<p></p>");
const t1 = _template(
  "<div id='root'><div id='inner'><span></span></div></div>"
);

function _sfc_render(_ctx) {
  const n0 = t0(); // p
  const n4 = t1(); // div#root
  const n3 = n4.firstChild; // div#inner
  const n2 = n3.firstChild; // span
  const n1 = _createTextNode(["count", " : "]); // "count" :
  _prepend(n3, n1); // 将 `"count : "` 添加到 `div#inner` 的前面
  _renderEffect(() => {
    _setText(n0, "count is ", _ctx.count); // 将 `count is ${_ctx.count}` 设置到 p
    _setText(n2, _ctx.count); // 将 `${_ctx.count}` 设置到 span
  });
  return [n0, n4];
}
确实,这似乎是成立的。
这次我们想要确认的编译器实现部分如下:
- 嵌套时输出访问
firstChild代码的实现。 - 输出
createTextNode的实现。 - 输出使用
prepend插入元素的实现。
阅读编译器(转换器)
好吧,从 AST 再次阅读也可以,但让我们换个方式,从 IR 反向工程。
你现在应该已经习惯了,所以你也应该能够大致理解 IR。
json
{
  "type": "IRRoot",
  "source": "\n  <p>count is {{ count }}</p>\n  <div>\n    <div>\n      {{ 'count' }} : <span>{{ count }}</span>\n    </div>\n  </div>\n",
  "template": ["<p></p>", "<div><div><span></span></div></div>"],
  "component": {},
  "directive": {},
  "block": {
    "type": "IRBlock",
    "dynamic": {
      "flags": 1,
      "children": [
        {
          "flags": 1,
          "children": [
            {
              "flags": 3,
              "children": []
            },
            {
              "flags": 3,
              "children": []
            }
          ],
          "id": 0,
          "template": 0
        },
        {
          "flags": 1,
          "children": [
            {
              "flags": 1,
              "children": [
                {
                  "flags": 7,
                  "children": [],
                  "id": 1
                },
                {
                  "flags": 3,
                  "children": []
                },
                {
                  "flags": 1,
                  "children": [
                    {
                      "flags": 3,
                      "children": []
                    }
                  ],
                  "id": 2
                }
              ],
              "id": 3
            }
          ],
          "id": 4,
          "template": 1
        }
      ]
    },
    "effect": [
      {
        "expressions": [
          {
            "type": "SimpleExpression",
            "content": "count",
            "isStatic": false,
            "constType": 0,
            "ast": null
          }
        ],
        "operations": [
          {
            "type": "IRSetText",
            "element": 0,
            "values": [
              {
                "type": "SimpleExpression",
                "content": "count is ",
                "isStatic": true,
                "constType": 3
              },
              {
                "type": "SimpleExpression",
                "content": "count",
                "isStatic": false,
                "constType": 0,
                "ast": null
              }
            ]
          },
          {
            "type": "IRSetText",
            "element": 2,
            "values": [
              {
                "type": "SimpleExpression",
                "content": "count",
                "isStatic": false,
                "constType": 0,
                "ast": null
              }
            ]
          }
        ]
      }
    ],
    "operation": [
      {
        "type": "IRCreateTextNode",
        "id": 1,
        "values": [
          {
            "type": "SimpleExpression",
            "content": "'count'",
            "isStatic": false,
            "constType": 0,
            "ast": {
              "type": "StringLiteral",
              "start": 1,
              "end": 8,
              "extra": {
                "rawValue": "count",
                "raw": "'count'",
                "parenthesized": true,
                "parenStart": 0
              },
              "value": "count",
              "comments": [],
              "errors": []
            }
          },
          {
            "type": "SimpleExpression",
            "content": " : ",
            "isStatic": true,
            "constType": 3
          }
        ],
        "effect": false
      },
      {
        "type": "IRPrependNode",
        "elements": [1],
        "parent": 3
      }
    ],
    "returns": [0, 4]
  }
}
它相当长,但如果你冷静地阅读,你应该能理解。
首先,显然有一个 IRNode。块的子元素是片段的模板部分分别有 id 0 和 4。
template 属性也有 template 的 id。
json
{
  "type": "IRRoot",
  "template": ["<p></p>", "<div><div><span></span></div></div>"],
  "block": {
    "type": "IRBlock",
    "dynamic": {
      "flags": 1,
      "children": [
        {
          "id": 0,
          "template": 0
        },
        {
          "id": 4,
          "template": 1
        }
      ]
    }
  }
}
在这一点上,在代码生成中,
js
const t0 = _template("<p></p>");
const t1 = _template(
  "<div id='root'><div id='inner'><span></span></div></div>"
);

const n0 = t0();
const n4 = t1();
可以被生成。
为什么 id 突然跳到 4 是因为它深入到子元素并从内到外爬升。
transformChildren 的 id 在以下时机生成。
ts
childContext.reference()这是在对这个元素的子元素调用 transformNode 之后完成的,所以递归进入的 transformChildren 首先处理。
ts
transformNode(childContext)换句话说,id 的生成从叶节点向父节点递增。
这次,碰巧 t1 的子节点是 #inner、span 和其中的文本,所以它们分别被分配 id 3、2 和 1(因为 0 从 t0 获得),从 t1 获得的节点被分配 4。
json
{
  "type": "IRRoot",
  "template": [
    "<p></p>",
    "<div id='root'><div id='inner'><span></span></div></div>"
  ],
  "block": {
    "type": "IRBlock",
    "dynamic": {
      "children": [
        // p
        {
          "id": 0,
          "template": 0
        },

        // #root
        {
          "id": 4,
          "template": 1,
          "children": [
            // #inner
            {
              "id": 3,
              "children": [
                // Text
                { "id": 1 },

                // span
                { "id": 2 }
              ]
            }
          ]
        }
      ]
    }
  }
}
让我们也看看操作和效果部分的 IR。
json
{
  "effect": [
    {
      "expressions": [
        {
          "type": "SimpleExpression",
          "content": "count",
          "isStatic": false,
          "constType": 0,
          "ast": null
        }
      ],
      "operations": [
        {
          "type": "IRSetText",
          "element": 0,
          "values": [
            {
              "type": "SimpleExpression",
              "content": "count is ",
              "isStatic": true,
              "constType": 3
            },
            {
              "type": "SimpleExpression",
              "content": "count",
              "isStatic": false,
              "constType": 0,
              "ast": null
            }
          ]
        },
        {
          "type": "IRSetText",
          "element": 2,
          "values": [
            {
              "type": "SimpleExpression",
              "content": "count",
              "isStatic": false,
              "constType": 0,
              "ast": null
            }
          ]
        }
      ]
    }
  ],
  "operation": [
    {
      "type": "IRCreateTextNode",
      "id": 1,
      "values": [
        {
          "type": "SimpleExpression",
          "content": "'count'",
          "isStatic": false,
          "constType": 0,
          "ast": {
            "type": "StringLiteral",
            "start": 1,
            "end": 8,
            "extra": {
              "rawValue": "count",
              "raw": "'count'",
              "parenthesized": true,
              "parenStart": 0
            },
            "value": "count",
            "comments": [],
            "errors": []
          }
        },
        {
          "type": "SimpleExpression",
          "content": " : ",
          "isStatic": true,
          "constType": 3
        }
      ],
      "effect": false
    },
    {
      "type": "IRPrependNode",
      "elements": [1],
      "parent": 3
    }
  ]
}
Effect 有两个 IRSetText,operation 有 IRCreateTextNode 和 IRPrependNode。
如果生成了这些,就可以执行代码生成。
SetText 应该没问题。
你可以跟随我们到目前为止看到的 transformText 部分。
让我们看看 IRCreateTextNode。
这也是由 transformText 生成的。
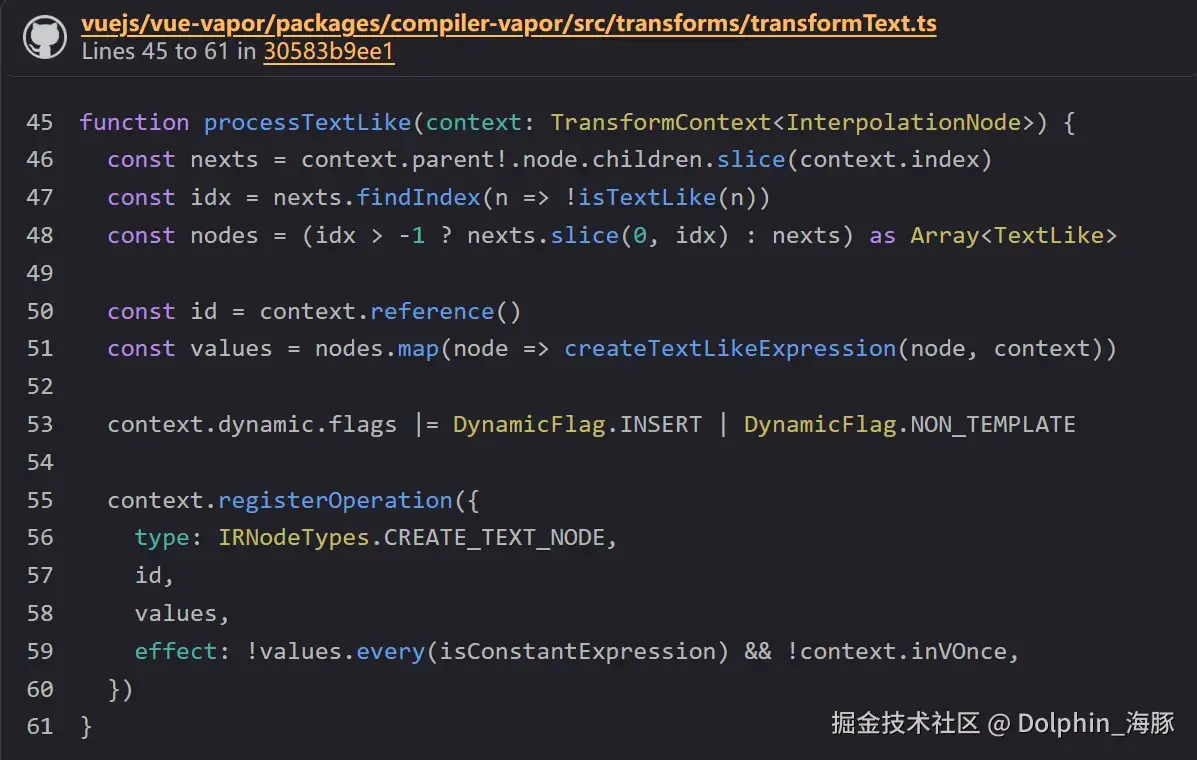
这个 processTextLike 通过第二个分支,即当有 INTERPOLATION 时。
最后,IRPrependNode。
注册 PREPEND_NODE 的部分如下。
ts
        } else {
          context.registerOperation({
            type: IRNodeTypes.PREPEND_NODE,
            elements: prevDynamics.map(child => child.id!),
            parent: context.reference(),
          })
        }
这在哪里?它在一个叫做 processDynamicChildren 的函数中,在 transformChildren 的处理中,当 isFragment 为假时调用。
它从 children 中取出每个子元素,并收集设置了 DynamicFlag.INSERT 的节点。
这次,从以下可以看出:
ts
function processTextLike(context: TransformContext<InterpolationNode>) {
  const nexts = context.parent!.node.children.slice(context.index)
  const idx = nexts.findIndex(n => !isTextLike(n))
  const nodes = (idx > -1 ? nexts.slice(0, idx) : nexts) as Array<TextLike>

  const id = context.reference()
  const values = nodes.map(node => createTextLikeExpression(node, context))

  context.dynamic.flags |= DynamicFlag.INSERT | DynamicFlag.NON_TEMPLATE

  context.registerOperation({
    type: IRNodeTypes.CREATE_TEXT_NODE,
    id,
    values,
    effect: !values.every(isConstantExpression) && !context.inVOnce,
  })
}
设置了这个标志。
我们已经理解了这些过程转换为 IR。
阅读代码生成
只要 IR 完成了,代码生成就不是什么难事,所以让我们快速看一下。
新的部分主要是 IRCreateTextNode 和 IRPrependNode。
ts
export function genOperation(
  oper: OperationNode,
  context: CodegenContext,
): CodeFragment[] {
ts
    case IRNodeTypes.CREATE_TEXT_NODE:
      return genCreateTextNode(oper, context)
ts
export function genCreateTextNode(
  oper: CreateTextNodeIRNode,
  context: CodegenContext,
): CodeFragment[] {
  const { vaporHelper } = context
  const { id, values, effect } = oper
  return [
    NEWLINE,
    `const n${id} = `,
    ...genCall(vaporHelper('createTextNode'), [
      effect && '() => ',
      ...genMulti(
        DELIMITERS_ARRAY,
        ...values.map(value => genExpression(value, context)),
      ),
    ]),
  ]
}
ts
    case IRNodeTypes.PREPEND_NODE:
      return genPrependNode(oper, context)
ts
export function genPrependNode(
  oper: PrependNodeIRNode,
  { vaporHelper }: CodegenContext,
): CodeFragment[] {
  return [
    NEWLINE,
    ...genCall(
      vaporHelper('prepend'),
      `n${oper.parent}`,
      ...oper.elements.map(el => `n${el}`),
    ),
  ]
}
访问 firstChild 的代码生成在 genChildren 中通过条件分支处理。
firstChild 有些特殊,否则,它输出执行辅助函数 children。
ts
    } else {
      if (newPaths.length === 1 && newPaths[0] === 0) {
        push(`n${from}.firstChild`)
      } else {
        push(
          ...genCall(
            vaporHelper('children'),
            `n${from}`,
            ...newPaths.map(String),
          ),
        )
      }
    }
genChildren 在传递 from 和 id 的同时递归执行 genChildren。
阅读运行时
ts
const t0 = _template("<p></p>");
const t1 = _template(
  "<div id='root'><div id='inner'><span></span></div></div>"
);

function _sfc_render(_ctx) {
  const n0 = t0(); // p
  const n4 = t1(); // div#root
  const n3 = n4.firstChild; // div#inner
  const n2 = n3.firstChild; // span
  const n1 = _createTextNode(["count", " : "]); // "count" :
  _prepend(n3, n1); // 将 `"count : "` 添加到 `div#inner` 的前面
  _renderEffect(() => {
    _setText(n0, "count is ", _ctx.count); // 将 `count is ${_ctx.count}` 设置到 p
    _setText(n2, _ctx.count); // 将 `${_ctx.count}` 设置到 span
  });
  return [n0, n4];
}
运行时代码并不是什么大不了的事,所以让我们快速过一遍。
createTextNode
首先,createTextNode。
它真的只是做 document.createTextNode。
它接收 values 数组或 getter 函数。
在 getter 的情况下,它被认为是动态的并用 renderEffect 包装。
ts
export function createTextNode(values?: any[] | (() => any[])): Text {
  // eslint-disable-next-line no-restricted-globals
  const node = document.createTextNode('')
  if (values)
    if (isArray(values)) {
      setText(node, ...values)
    } else {
      renderEffect(() => setText(node, ...values()))
    }
  return node
}
prepend
prepend 简单地调用 ParentNode.prepend。
ts
export function prepend(parent: ParentNode, ...blocks: Block[]): void {
  parent.prepend(...normalizeBlock(blocks))
}
虽然相当快,但到这里,你可以理解如何处理稍微复杂的模板。
跟随这些子元素和前置元素的知识在将来附加事件处理程序时是相同的。
现在,让我们用简单的结构来看看各种指令和组件功能!
调度器
到目前为止,"调度器"这个术语已经出现了好几次。
在这一页中,我们将更仔细地看看这个调度器。
什么是调度器
调度器是调度和执行任务的东西。
有时是关于调整执行时机,有时是关于排队。
操作系统也有调度进程的调度器。
Vue.js 也有调度各种操作的机制。
这个概念不仅来自 vuejs/core-vapor (runtime-vapor),也来自 vuejs/core (runtime-core)。
例如,众所周知的 nextTick 就是这个调度器的 API。
此外,可以在 watch 和 watchEffect 等观察器中设置的 flush 选项也与调度执行相关。
ts
export interface WatchEffectOptions extends DebuggerOptions {
  flush?: 'pre' | 'post' | 'sync'
}
调度器 API 概览
在深入了解详细实现之前,让我们看看调度器实际上是如何使用的。
这是关于 Vue.js 内部如何使用它,而不是 Vue.js 用户直接使用的 API。
调度器的实现在 packages/runtime-vapor/src/scheduler.ts。
首先,基本结构包括一个 queue 和 job。
有两种类型的队列。
queue 和 pendingPostFlushCbs。
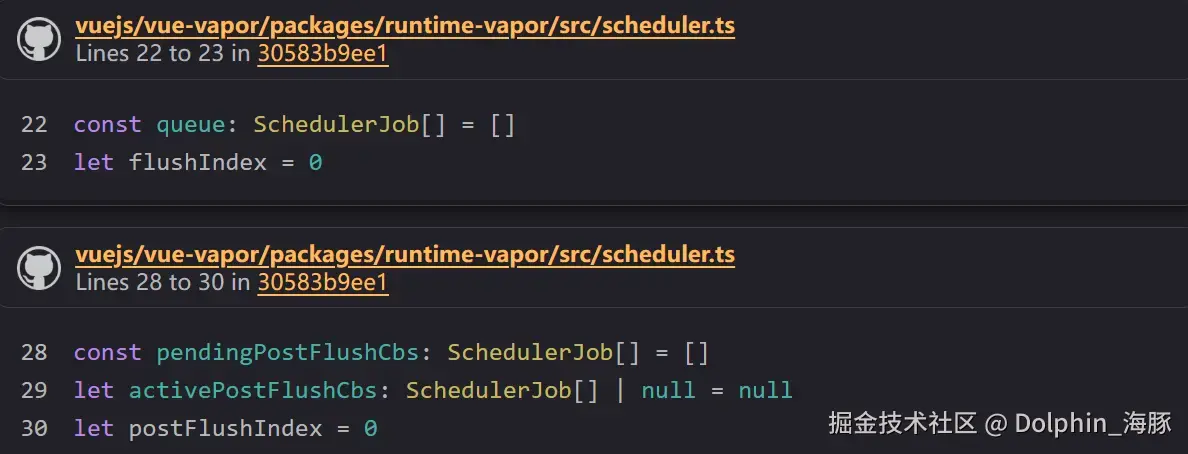
在这里,它管理排队的作业和当前执行索引。
job 是实际的执行目标。
它是一个附加了 id 和 flag(稍后讨论)的函数。
ts
export interface SchedulerJob extends Function {
  id?: number
  /**
   * flags can technically be undefined, but it can still be used in bitwise
   * operations just like 0.
   */
  flags?: SchedulerJobFlags
}
接下来,关于操作这些的函数。
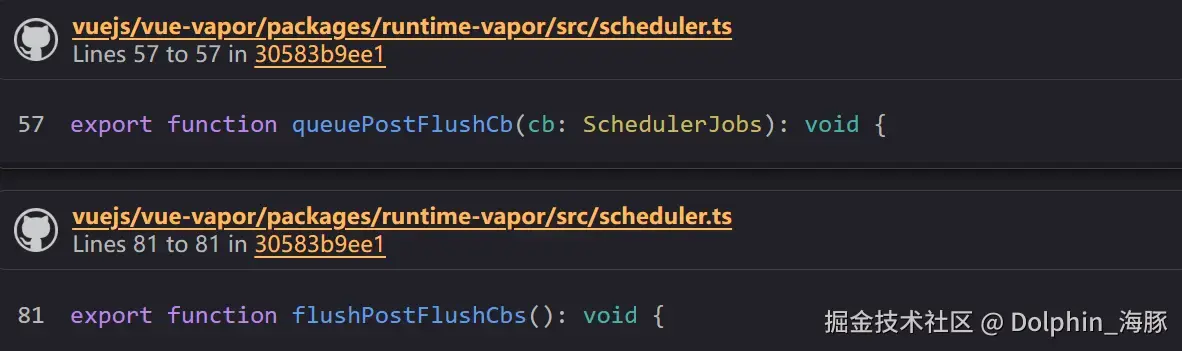
有 queueJob 将 job 添加到 queue,queueFlush 和 flushJobs 执行 queue 中的 jobs。
(flushJobs 从 queueFlush 调用。)
然后,在 flushJobs 中,执行队列中的作业后,它也执行 pendingPostFlushCbs 中的作业。
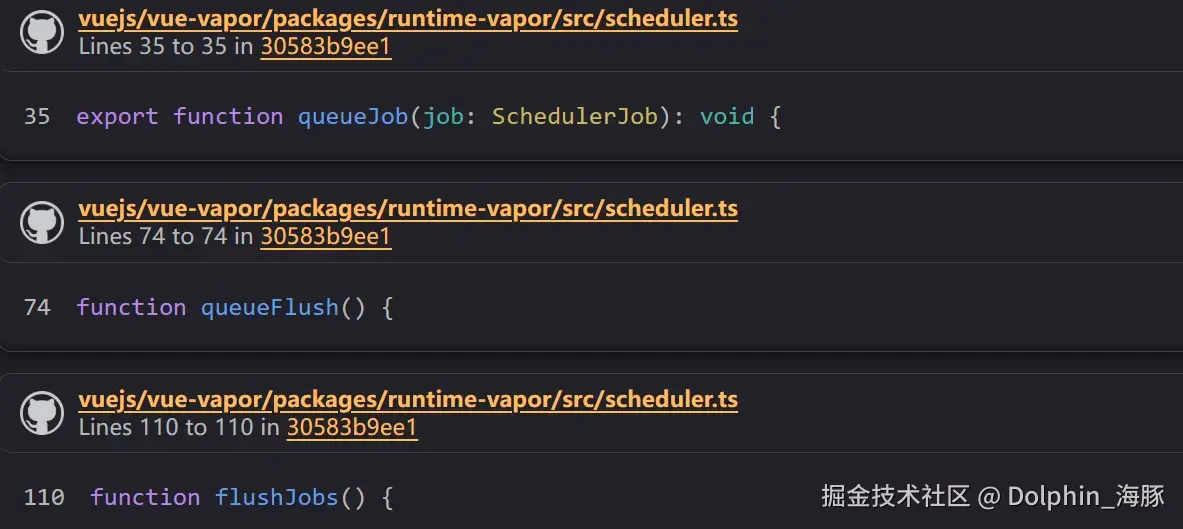
此外,还有 queuePostFlushCb 将 job 添加到 flushPostFlushCbs,以及 flushPostFlushCbs 执行 pendingPostFlushCbs 中的 jobs。
(如前所述,flushPostFlushCbs 也从 flushJobs 调用。)
这些作业的执行(flushJobs)被包装在 Promise 中(如 Promise.resolve().then(flushJobs)),当前作业执行(Promise)作为 currentFlushPromise 管理。
然后,通过连接到这个 currentFlushPromise 的 then 来进行任务调度。
众所周知的 nextTick 只是一个将回调注册到这个 currentFlushPromise 的 then 的函数。
ts
export function nextTick<T = void, R = void>(
  this: T,
  fn?: (this: T) => R,
): Promise<Awaited<R>> {
  const p = currentFlushPromise || resolvedPromise
  return fn ? p.then(this ? fn.bind(this) : fn) : p
}
在哪里使用?
让我们看看操作队列的实现在哪里。
queueJob
目前,在 Vapor 中,它在三个地方使用。
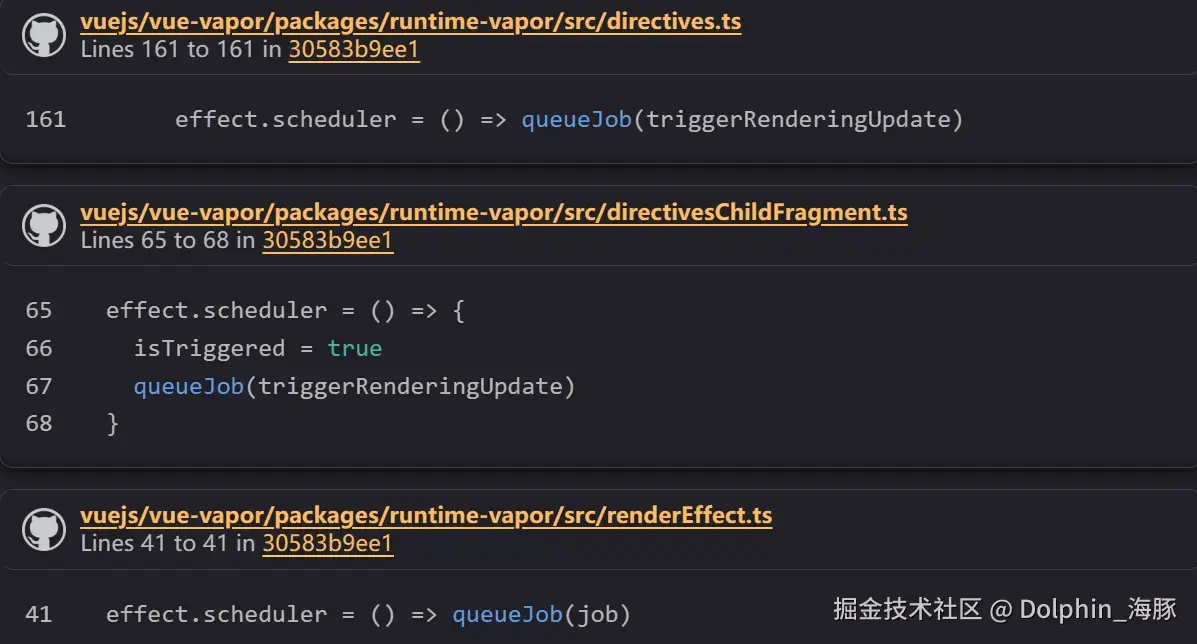
这些的共同点是它们都设置在 effect.scheduler 中。
让我们稍微提前阅读一下这些是什么。
queueFlush
与 queueJob 相反,queueFlush 只在调度器实现内部处理。
这些何时执行取决于我们何时查看实现细节。
queuePostFlushCb
这在几个地方使用。
ts
  invokeLifecycle(
    instance,
    VaporLifecycleHooks.UNMOUNTED,
    'unmounted',
    instance => queuePostFlushCb(() => (instance.isUnmounted = true)),
    true,
  )
ts
  function invokeCurrent() {
    cb && cb(instance)
    const hooks = instance[lifecycle]
    if (hooks) {
      const fn = () => {
        const reset = setCurrentInstance(instance)
        instance.scope.run(() => invokeArrayFns(hooks))
        reset()
      }
      post ? queuePostFlushCb(fn) : fn()
    }

    invokeDirectiveHook(instance, directive, instance.scope)
  }
ts
      queuePostFlushCb(() => {
        instance.isUpdating = false
        const reset = setCurrentInstance(instance)
        if (dirs) {
          invokeDirectiveHook(instance, 'updated', scope)
        }
        // updated hook
        if (u) {
          queuePostFlushCb(u)
        }
        reset()
      })
ts
  if (!dirs) {
    const res = handler && handler()
    if (name === 'mount') {
      queuePostFlushCb(() => (scope.im = true))
    }
    return res
  }

  invokeDirectiveHook(instance, before, scope)
  try {
    if (handler) {
      return handler()
    }
  } finally {
    queuePostFlushCb(() => {
      invokeDirectiveHook(instance, after, scope)
    })
  }
ts
      queuePostFlushCb(() => {
        instance.isUpdating = false
        const reset = setCurrentInstance(instance)
        if (dirs) {
          invokeDirectiveHook(instance, 'updated', scope)
        }
        // updated hook
        if (u) {
          queuePostFlushCb(u)
        }
        reset()
      })
上述五个的共同点是它们都是某种生命周期钩子。
看起来它们将在这些钩子中注册的回调函数的执行添加到 pendingPostFlushCbs。
像 updated、mounted、unmounted 等生命周期钩子,如果立即执行,DOM 可能还没有更新。
通过调度器和 Promise(事件循环)控制执行时机,似乎管理执行时机。
我们稍后会一起阅读更多实现细节。
ts
export function on(
  el: Element,
  event: string,
  handlerGetter: () => undefined | ((...args: any[]) => any),
  options: AddEventListenerOptions &
    ModifierOptions & { effect?: boolean } = {},
): void {
  const handler: DelegatedHandler = eventHandler(handlerGetter, options)
  let cleanupEvent: (() => void) | undefined
  queuePostFlushCb(() => {
    cleanupEvent = addEventListener(el, event, handler, options)
  })
ts
      queuePostFlushCb(doSet)

      onScopeDispose(() => {
        queuePostFlushCb(() => {
          if (isArray(existing)) {
            remove(existing, refValue)
          } else if (_isString) {
            refs[ref] = null
            if (hasOwn(setupState, ref)) {
              setupState[ref] = null
            }
          } else if (_isRef) {
            ref.value = null
          }
        })
      })
至于上述两个,由于 event 和 templateRef 还没有介绍,让我们暂时跳过它们。
flushPostFlushCbs
这主要出现在 apiRender.ts 中。它也出现在本书的运行时解释中。
它似乎在挂载组件后刷新。
ts
export function render(
  instance: ComponentInternalInstance,
  container: string | ParentNode,
): void {
  mountComponent(instance, (container = normalizeContainer(container)))
  flushPostFlushCbs()
}
同样,在卸载期间。
ts
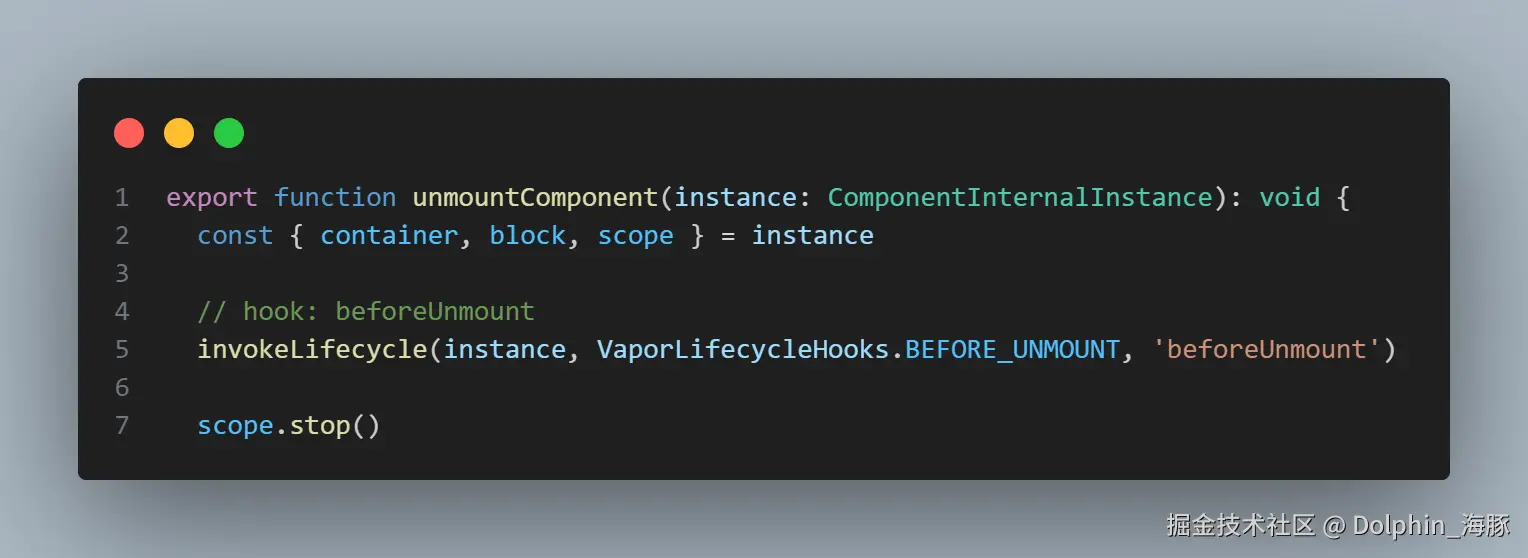
export function unmountComponent(instance: ComponentInternalInstance): void {
  const { container, block, scope } = instance

  // hook: beforeUnmount
  invokeLifecycle(instance, VaporLifecycleHooks.BEFORE_UNMOUNT, 'beforeUnmount')

  scope.stop()
  block && remove(block, container)

  // hook: unmounted
  invokeLifecycle(
    instance,
    VaporLifecycleHooks.UNMOUNTED,
    'unmounted',
    instance => queuePostFlushCb(() => (instance.isUnmounted = true)),
    true,
  )
  flushPostFlushCbs()
}
实现细节
现在,让我们看看这四个函数的实现。
queueJob
首先,queueJob。
ts
export function queueJob(job: SchedulerJob): void {
  let lastOne: SchedulerJob | undefined
  if (!(job.flags! & SchedulerJobFlags.QUEUED)) {
    if (job.id == null) {
      queue.push(job)
    } else if (
      // fast path when the job id is larger than the tail
      !(job.flags! & SchedulerJobFlags.PRE) &&
      job.id >= (((lastOne = queue[queue.length - 1]) && lastOne.id) || 0)
    ) {
      queue.push(job)
    } else {
      queue.splice(findInsertionIndex(job.id), 0, job)
    }

    if (!(job.flags! & SchedulerJobFlags.ALLOW_RECURSE)) {
      job.flags! |= SchedulerJobFlags.QUEUED
    }
    queueFlush()
  }
}
它检查作为参数传递的 job 的 flags 来确定它是否已经添加到队列中。
如果有,它会忽略它。
然后,如果 job 没有设置 id,它会无条件地将其添加到队列中。
因为无法控制去重等(因为无法识别)。
之后,如果 flags 不是 PRE,它会添加到末尾;否则,它会在适当的索引处插入。
该索引基于 id 使用 findInsertionIndex 找到。
ts
// #2768
// Use binary-search to find a suitable position in the queue,
// so that the queue maintains the increasing order of job's id,
// which can prevent the job from being skipped and also can avoid repeated patching.
function findInsertionIndex(id: number) {
  // the start index should be `flushIndex + 1`
  let start = flushIndex + 1
  let end = queue.length

  while (start < end) {
    const middle = (start + end) >>> 1
    const middleJob = queue[middle]
    const middleJobId = getId(middleJob)
    if (
      middleJobId < id ||
      (middleJobId === id && middleJob.flags! & SchedulerJobFlags.PRE)
    ) {
      start = middle + 1
    } else {
      end = middle
    }
  }

  return start
}
由于队列被指定为维护递增 id 的顺序,它使用二分搜索来快速确定位置。
完成后,它将 flags 设置为 QUEUED 并结束。
这里的关键点是它最终调用 queueFlush()。
接下来,让我们看看 queueFlush。
queueFlush -> flushJobs
ts
function queueFlush() {
  if (!isFlushing && !isFlushPending) {
    isFlushPending = true
    currentFlushPromise = resolvedPromise.then(flushJobs)
  }
}
queueFlush 简单地调用 resolvedPromise.then(flushJobs)。
此时,flushJobs 被 resolvedPromise.then 包装,该 Promise 被设置为 currentFlushPromise。
让我们看看 flushJobs。
ts
function flushJobs() {
  isFlushPending = false
  isFlushing = true

  // Sort queue before flush.
  // This ensures that:
  // 1. Components are updated from parent to child. (because parent is always
  //    created before the child so its render effect will have smaller
  //    priority number)
  // 2. If a component is unmounted during a parent component's update,
  //    its update can be skipped.
  queue.sort(comparator)

  try {
    for (let i = 0; i < queue!.length; i++) {
      queue[i]()
      queue[i].flags! &= ~SchedulerJobFlags.QUEUED
    }
  } finally {
    flushIndex = 0
    queue.length = 0

    flushPostFlushCbs()

    isFlushing = false
    currentFlushPromise = null
    // some postFlushCb queued jobs!
    // keep flushing until it drains.
    if (queue.length || pendingPostFlushCbs.length) {
      flushJobs()
    }
  }
}
首先,队列按 id 排序。
ts
queue.sort(comparator)
ts
const comparator = (a: SchedulerJob, b: SchedulerJob): number => {
  const diff = getId(a) - getId(b)
  if (diff === 0) {
    const isAPre = a.flags! & SchedulerJobFlags.PRE
    const isBPre = b.flags! & SchedulerJobFlags.PRE
    if (isAPre && !isBPre) return -1
    if (isBPre && !isAPre) return 1
  }
  return diff
}
然后,它们按顺序执行。
ts
  try {
    for (let i = 0; i < queue!.length; i++) {
      queue[i]()
      queue[i].flags! &= ~SchedulerJobFlags.QUEUED
    }
在 finally 块中,它也执行 flushPostFlushCbs,最后,它再次检查 queue 和 pendingPostFlushCbs;如果仍有作业剩余,它会递归地再次调用 flushJobs。
ts
  } finally {
    flushIndex = 0
    queue.length = 0

    flushPostFlushCbs()

    isFlushing = false
    currentFlushPromise = null
    // some postFlushCb queued jobs!
    // keep flushing until it drains.
    if (queue.length || pendingPostFlushCbs.length) {
      flushJobs()
    }
queuePostFlushCb
同样,目标是 pendingPostFlushCbs,基本流程与 queueJob 相同。
ts
export function queuePostFlushCb(cb: SchedulerJobs): void {
  if (!isArray(cb)) {
    if (!(cb.flags! & SchedulerJobFlags.QUEUED)) {
      pendingPostFlushCbs.push(cb)
      if (!(cb.flags! & SchedulerJobFlags.ALLOW_RECURSE)) {
        cb.flags! |= SchedulerJobFlags.QUEUED
      }
    }
  } else {
    // if cb is an array, it is a component lifecycle hook which can only be
    // triggered by a job, which is already deduped in the main queue, so
    // we can skip duplicate check here to improve perf
    pendingPostFlushCbs.push(...cb)
  }
  queueFlush()
}
对于排队后的刷新,只需记住它是 queueFlush。(queue 也被消费)
ts
queueFlush()flushPostFlushCbs
ts
export function flushPostFlushCbs(): void {
  if (!pendingPostFlushCbs.length) return

  const deduped = [...new Set(pendingPostFlushCbs)]
  pendingPostFlushCbs.length = 0

  // #1947 already has active queue, nested flushPostFlushCbs call
  if (activePostFlushCbs) {
    activePostFlushCbs.push(...deduped)
    return
  }

  activePostFlushCbs = deduped

  activePostFlushCbs.sort((a, b) => getId(a) - getId(b))

  for (
    postFlushIndex = 0;
    postFlushIndex < activePostFlushCbs.length;
    postFlushIndex++
  ) {
    activePostFlushCbs[postFlushIndex]()
    activePostFlushCbs[postFlushIndex].flags! &= ~SchedulerJobFlags.QUEUED
  }
  activePostFlushCbs = null
  postFlushIndex = 0
}
此外,它使用 new Set 去除重复项,按 id 排序,并按顺序执行 pendingPostFlushCbs。
ReactiveEffect 和调度器
现在,调度器还有一个方面我们需要理解。
它们的共同点是都设置在
effect.scheduler中。
这就是这部分。
effect 具有的 scheduler 选项用于以 queueJob 的形式包装处理。
那么,这个 effect.scheduler 到底是什么?
effect 是 ReactiveEffect 的实例。
ts
export class ReactiveEffect<T = any>它接收你想要执行的函数(fn)并创建一个实例。
ts
constructor(public fn: () => T) {有两种方法来执行 ReactiveEffect:
run 和 trigger。
run 方法可以在任何需要的时候执行,例如:
ts
const effect = new ReactiveEffect(() => console.log("effect"));
effect.run();
它也在 renderEffect 的初始执行期间通过这个 run 执行。
ts
  const effect = new ReactiveEffect(() =>
    callWithAsyncErrorHandling(cb, instance, VaporErrorCodes.RENDER_FUNCTION),
  )

  effect.scheduler = () => queueJob(job)
  if (__DEV__ && instance) {
    effect.onTrack = instance.rtc
      ? e => invokeArrayFns(instance.rtc!, e)
      : void 0
    effect.onTrigger = instance.rtg
      ? e => invokeArrayFns(instance.rtg!, e)
      : void 0
  }
effect.run()另一方面,trigger 主要在建立响应性时使用。
例如,当调用 ref 对象的 set 方法时。
ts
set value(newValue) {↓
ts
this.dep.trigger()↓
ts
  trigger(debugInfo?: DebuggerEventExtraInfo): void {
    this.version++
    globalVersion++
    this.notify(debugInfo)
  }
↓
ts
      for (let link = this.subs; link; link = link.prevSub) {
        link.sub.notify()
      }
↓
ts
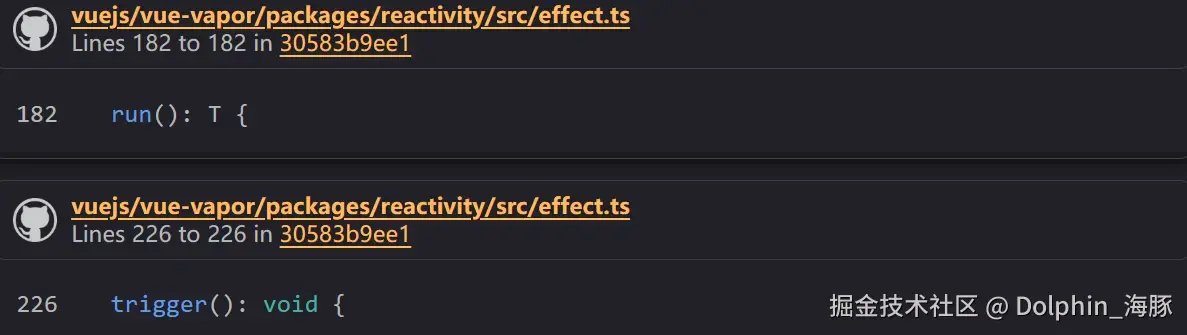
return this.trigger()当查看 trigger 函数时,
ts
  trigger(): void {
    if (this.flags & EffectFlags.PAUSED) {
      pausedQueueEffects.add(this)
    } else if (this.scheduler) {
      this.scheduler()
    } else {
      this.runIfDirty()
    }
  }
如果它有 scheduler,则优先执行它。
这种机制确保当基于某些依赖项触发响应式效果时不会发生不必要的执行。
scheduler 属性允许你适当地设置要由调度器排队的处理,优化效果的执行。
例如,让我们看看 renderEffect 的实现。
它将 () => queueJob(job) 设置为 scheduler。
ts
  const effect = new ReactiveEffect(() =>
    callWithAsyncErrorHandling(cb, instance, VaporErrorCodes.RENDER_FUNCTION),
  )

  effect.scheduler = () => queueJob(job)
假设 renderEffect 如下调用。
ts
const t0 = template("<p></p>");

const n0 = t0();
const count = ref(0);
const effect = () => setText(n0, count.value);
renderEffect(effect);这样,effect(包装 effect 的作业)被 count 跟踪,当 count 改变时,它触发该作业。
当调用 trigger 时,内部设置的 scheduler 属性被执行,但在这种情况下,它被设置为"将作业添加到队列"而不是"执行作业",所以它不会立即执行,而是传递给调度器。
现在,让我们考虑这样的触发器。
ts
const count = ref(0);
const effect = () => setText(n0, count.value);
renderEffect(effect);

count.value = 1; // 将作业入队
count.value = 2; // 将作业入队
这样做会执行 () => queueJob(job) 两次。
回想 queueJob 的实现,
ts
if (!(job.flags! & SchedulerJobFlags.QUEUED)) {如果作业已经添加,它将被忽略。
由于这个函数在最后执行 queueFlush,你可能认为队列每次都会被清空,但实际上,因为它通过 Promise 连接,此时 flush 还没有发生,job 仍然在队列中。
这实现了通过事件循环介导的作业去重,防止不必要的执行。
实际上,考虑以下情况:
ts
count.value = 1;
count.value = 2;
即使这样写,从视觉上看,只有第二个
ts
setText(n0, 2);应该被执行,这是可以的。
有了这个,你应该对调度器有了大致的理解。
为了控制不必要效果的执行,利用了 Promise 和 queue,为了在等待屏幕更新和通过生命周期钩子的其他操作后正确执行,准备了一个名为 pendingPostFlushCbs 的单独队列来控制执行时机。
最后
下卷内容为 v- 指令的编译时和运行时,翻译不易,喜欢还请点个赞支持下