CommonJS 原理与实现:手写一个极简的模块系统
本文将带你从零实现一个"能跑"的 CommonJS 运行时,代码不到 150 行,却能解释
require、module.exports、__filename、__dirname等概念的本质。 读完你会发现:Node 的模块系统没有黑魔法,只有"查文件→缓存→套壳→跑代码"四步。
一、整体流程(一张图记住)
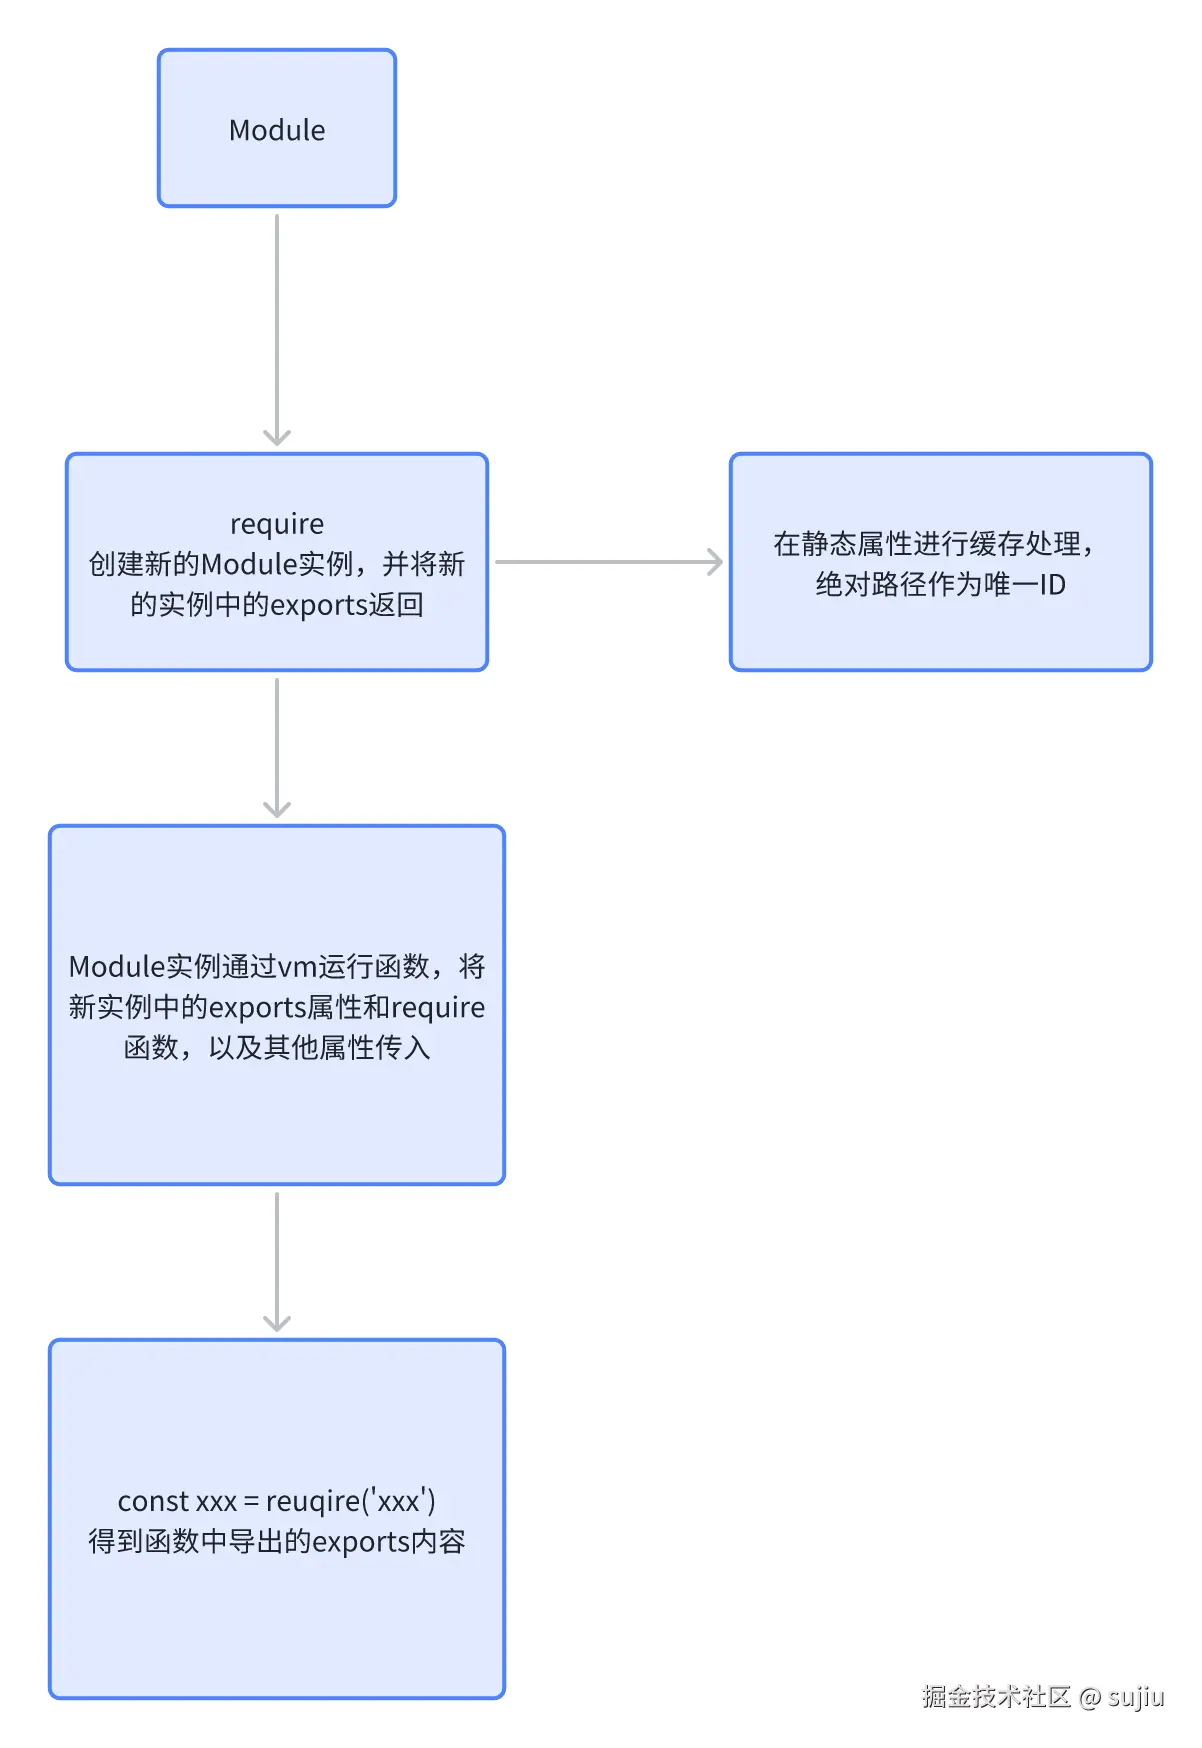
整个系统只有 3 个静态变量 + 4 个原型方法,下面逐行拆解。
二、源码逐行讲解
js
// common.js ------ 150 行内的 CommonJS 运行时
const fs   = require('fs');
const path = require('path');
const vm   = require('vm');

class MyModule {
  constructor(id = '') {
    this.id       = id;        // 绝对路径
    this.exports  = {};        // 真正的导出对象
    this.loaded   = false;     // 是否已编译执行
  }

  // 1. 缓存 & 扩展名注册表
  static _cache      = Object.create(null);
  static _extensions = Object.create(null);

  // 2. 路径解析:把 './foo' 变成 '/abs/path/to/foo.js'
  static resolveFilename(request) {
    const filename = path.resolve(request);
    const ext      = path.extname(filename);
    if (ext) return filename;               // 用户已给后缀
    // 自动补后缀,按注册顺序找
    for (const e of Object.keys(MyModule._extensions)) {
      const full = filename + e;
      if (fs.existsSync(full)) return full;
    }
    return filename;                        // 找不到也返回,后面会抛错
  }

  // 3. 总入口:MyModule._load (对应 Node 的 Module._load)
  static _load(request) {
    const filename = MyModule.resolveFilename(request);
    if (MyModule._cache[filename]) {
      return MyModule._cache[filename].exports; // 缓存命中
    }
    const module = new MyModule(filename);
    MyModule._cache[filename] = module;         // 先缓存,防循环引用
    module.load(filename);
    module.loaded = true;
    return module.exports;
  }

  // 4. 装载:根据扩展名交给不同处理器
  load(filename) {
    const ext = path.extname(filename);
    const handler = MyModule._extensions[ext];
    if (!handler) throw new Error(`Unknown extension: ${ext}`);
    handler(this, filename);
  }

  // 5. 套壳模板:把用户代码变成 "(function(exports,require,module,__filename,__dirname){ ... })"
  static wrapper = [
    '(function (exports, require, module, __filename, __dirname) { ',
    '\n});'
  ];
  static wrap(script) {
    return MyModule.wrapper[0] + script + MyModule.wrapper[1];
  }

  // 6. 编译:读文件 → 套壳 → vm 跑 → 拿到 factory 函数 → call 注入 5 个实参
  _compile(content, filename) {
    const wrapped   = MyModule.wrap(content);
    const compiled  = vm.runInThisContext(wrapped, { filename });
    const dirname   = path.dirname(filename);
    // 关键:把 this.exports 当 exports 实参传进去,用户改的就是它
    compiled.call(this.exports, this.exports, this.require.bind(this), this, filename, dirname);
  }

  // 7. 实例方法:require,保持"相对路径"语义
  require(id) {
    // 相对路径以 ./ 或 ../ 开头,否则走"包解析"逻辑(本文简化成直接抛错)
    if (id.startsWith('.') || id.startsWith('/')) {
      return MyModule._load(id, this);
    }
    throw new Error(`Built-in/core modules not supported: ${id}`);
  }
}

// 8. 注册 .js 处理器
MyModule._extensions['.js'] = function (module, filename) {
  const content = fs.readFileSync(filename, 'utf8');
  module._compile(content, filename);
};

// 9. 把"自己"导出,供外部使用
module.exports = MyModule;
三、测试一把:缓存 + 沙箱 + 5 个变量全验证
js
// test.js
const KoalaModule = require('./common.js');
const path        = require('path');

const fixture = path.join(__dirname, 'fixtures', 'simple'); // 无后缀
const m1 = KoalaModule._load(fixture);
const m2 = KoalaModule._load(fixture);

console.log('message:', m1.message);     // Koala loader works!
console.log('add(2,3):', m1.add(2, 3));  // 5
console.log('same cache:', m1 === m2);   // true
js
// fixtures/simple.js
module.exports = {
  message: 'Koala loader works!',
  add(a, b) { return a + b; }
};
运行结果与 Node 完全一致,证明:
- 路径补全生效(无后缀自动加 .js)
- 缓存生效(m1 === m2)
- 沙箱注入的 5 个变量(exports、require、module、__filename、__dirname)全部可用
四、再深入 3 个细节
- 循环引用怎么办? 先缓存后编译,因此如果 a.js 里 require 了 b.js,而 b.js 又反过来 require a.js,第二次会立即拿到"未完成"的 a.exports,避免无限递归------这与 Node 行为一致。
- 为什么用
vm.runInThisContext而不是eval?runInThisContext不会访问当前作用域,只拿到全局变量,模拟了"干净"的模块级作用域,避免污染外部变量。 - exports 与 module.exports 的关系 在套壳函数里我们传的是 同一个引用 :
compiled.call(this.exports, this.exports, ...)因此用户直接写exports.foo = 1没问题;但如果写exports = {}就断开了引用,必须写module.exports = {}------这也是 Node 的"坑"所在,我们的实现 100% 复现。
五、小结:CommonJS 只有四句话
- 把文件名变成绝对路径并补后缀;
- 有缓存读缓存,没有就新建 Module 实例并缓存;
- 读文件内容,套一层函数壳,注入 5 个变量后用 vm 跑;
- 跑完返回 module.exports。
只要记住这四步,再去看 Node 的 lib/internal/modules/cjs 源码,会发现思路完全一致,只是多了包查找、内置模块、ESM 互操作等增强逻辑。手写一遍,Node 模块系统就不再是黑盒。