多行文本截断组件(TextTruncation)
1. 组件概述
1.1 开发背景
在前端开发中,文本显示常面临空间限制 与内容完整性平衡的问题:
- 原生 CSS 仅支持单行文本截断(text-overflow: ellipsis),无法满足多行场景(如卡片描述、评论摘要);
- 部分场景需在文本末尾预留空间放置额外元素(如 "查看更多" 按钮、标签、图标),常规截断方案无法适配;
- 窗口缩放或容器尺寸变化时,文本需实时重新计算截断位置,确保布局不错乱;
- 中英文混排时字符宽度差异大,简单按字符数截断易导致布局偏移。
基于上述痛点,开发了此支持多行限制 + 预留宽度的文本截断组件,解决复杂场景下的文本自适应显示问题。
1.2 核心用途
适用于需精确控制文本显示范围,并预留空间放置额外元素的场景,例如:
- 商品卡片:文本描述限制 2 行,右侧预留 "加入购物车" 按钮空间;
- 评论列表:评论内容限制 3 行,末尾预留 "点赞" 图标空间;
- 列表项:标题限制 1 行,右侧预留 "编辑 / 删除" 操作按钮空间;
- 信息卡片:摘要文本限制 2 行,底部预留 "展开" 按钮空间。
1.3 核心功能
| 功能点 | 描述 |
|---|---|
| 多行文本截断 | 支持自定义最大行数(maxLines),超出行数时自动在最后一行添加省略号 |
| 预留宽度适配 | 支持自定义预留宽度(reservedWidth),为额外元素预留空间 |
| 实时响应式 | 监听容器尺寸变化(如窗口缩放),动态重新计算截断位置 |
| 中英文兼容 | 以中文字符 "中" 为基准测量宽度,适配中英文混排场景 |
| 占位元素插槽 | 提供 placeholder 插槽,用于放置预留空间的额外元素(如按钮、图标) |
2. 实现思路解析
组件核心逻辑围绕 "文本尺寸测量→截断规则计算→实时更新" 三步展开,以下是关键模块的设计思路:
2.1 整体结构设计
xml
<template>
  <div class="text-container" ref="container">
    <!-- 文本显示容器:承载截断后的文本 -->
    <div class="text-content" id="textContent">
      {{ displayedText }}
      <!-- 预留空间占位符:仅当reservedWidth>0时显示 -->
      <div class="placeholder-box" id="placeholderBox" v-if="reservedWidth">
        <slot name="placeholder"></slot> <!-- 插槽:放置额外元素 -->
      </div>
    </div>
  </div>
</template>- 外层 text-container:作为组件容器,确保宽度 100% 适配父元素;
- 内层 text-content:文本显示核心容器,通过 position: relative 实现占位元素的绝对定位;
- placeholder-box:预留空间的占位容器,通过绝对定位(bottom: 0; right: 0)固定在文本末尾;
- placeholder 插槽:允许用户自定义预留空间的内容(如按钮、图标),增强组件灵活性。
2.2 核心逻辑模块
2.2.1 文本尺寸测量(calculateTextMetrics)
作用:精确测量文本的宽高、边界框信息,并同步设置占位元素的样式。
实现细节:
- 使用 canvas 测量文本尺寸(比 DOM 测量性能更优,且支持离线计算);
- 通过 window.getComputedStyle 获取 text-content 的实际字体样式(字体大小、权重、家族),确保测量结果与实际渲染一致;
- 以中文字符 "中" 为基准计算单个字符宽度,适配中英文混排场景;
- 同步设置 placeholder-box 的宽高(宽 = 预留宽度,高 = 文本行高)和垂直位置(bottom 基于文本基线偏移),确保占位元素与文本对齐。
ini
const calculateTextMetrics = (text) => {
  const canvas = document.createElement('canvas');
  const context = canvas.getContext('2d');
  // 获取实际字体样式
  const textContent = document.getElementById('textContent');
  const styles = window.getComputedStyle(textContent);
  const font = `${styles.fontWeight} ${styles.fontSize} ${styles.fontFamily}`;

  context.font = font;
  const metrics = context.measureText(text);

  // 同步设置占位元素样式
  const placeholderBox = document.getElementById('placeholderBox');
  if (placeholderBox) {
    placeholderBox.style.width = `${props.reservedWidth}px`;
    placeholderBox.style.height = `${parseInt(styles.fontSize, 10)}px`;
    placeholderBox.style.bottom = `${metrics.actualBoundingBoxDescent}px`;
  }

  return {
    width: metrics.width, // 文本宽度
    height: parseInt(styles.fontSize, 10), // 文本行高
    actualBoundingBoxAscent: metrics.actualBoundingBoxAscent, // 文本上边界偏移
    actualBoundingBoxDescent: metrics.actualBoundingBoxDescent // 文本下边界偏移
  };
};
2.2.2 文本截断计算(updateDisplayedText)
作用:根据容器尺寸、最大行数、预留宽度,计算最终显示的文本(含省略号),是组件的核心逻辑。
实现步骤:
- 基础参数计算:
-
- 容器宽度 = text-content 的实际宽度;
-
- 可用宽度 = 容器宽度 - 预留宽度(reservedWidth);
-
- 每行最大字符数 = 可用宽度 / 单个字符宽度(确保非负);
-
- 文本总行数 = 总文本宽度 / 容器宽度(向上取整,不考虑最大行数限制)。
- 逐行截取文本:
-
- 循环处理文本,直到处理完所有文本或达到最大行数(maxLines);
-
- 每行截取字符数 = 容器宽度 / 单个字符宽度(确保文本不超出容器宽度);
-
- 若为最后一行且文本未处理完:截取时预留 3 个字符位置给省略号(...),避免省略号超出预留空间。
- 最终文本组装:
-
- 多行文本:仅截断最后一行,前 maxLines-1 行保持完整;
-
- 单行文本:直接按最大字符数截断并添加省略号;
-
- 文本未超出限制:完整显示原文本。
ini
const updateDisplayedText = () => {
  const textContent = document.getElementById('textContent');
  if (!textContent) return;
  // 1. 计算基础参数
  const containerWidth = textContent.offsetWidth;
  const { width: charWidth } = calculateTextMetrics('中'); // 基准字符宽度
  const availableWidth = containerWidth - props.reservedWidth;
  const maxChars = Math.max(0, Math.floor(availableWidth / charWidth)); // 每行最大可显字符
  const totalLineCount = Math.ceil(props.text.length * charWidth / containerWidth); // 文本总行数
  // 2. 逐行截取文本(按maxLines限制)
  let lines = [];
  let currentLine = 0;
  let startIndex = 0;
  while (startIndex < props.text.length && currentLine < props.maxLines) {
    const charsPerLine = Math.floor(containerWidth / charWidth); // 每行可显字符(无预留)
    const endIndex = Math.min(startIndex + charsPerLine, props.text.length);
    // 最后一行且文本未处理完:添加省略号
    if (currentLine === props.maxLines - 1 && endIndex < props.text.length) {
      lines.push(props.text.substring(startIndex, startIndex + Math.max(0, charsPerLine - 3)) + '...');
      break;
    }
    lines.push(props.text.substring(startIndex, endIndex));
    startIndex = endIndex;
    currentLine++;
  }
  // 3. 处理预留宽度的字符限制(最后一行不超出可用宽度)
  if (totalLineCount > 1) {
    const lastLine = lines[lines.length - 1];
    if (lastLine.length > maxChars) {
      lines[lines.length - 1] = lastLine.substring(0, Math.max(0, maxChars - 3)) + '...';
    }
    displayedText.value = lines.join('\n');
  } else if (props.text.length > maxChars) {
    displayedText.value = props.text.substring(0, Math.max(0, maxChars - 3)) + '...';
  } else {
    displayedText.value = props.text;
  }
};
2.2.3 实时更新与监听
为确保文本在动态场景下正常显示,组件添加了三类监听:
- 组件挂载时初始化:onMounted 中调用 updateDisplayedText,确保初始渲染正确;
- 容器尺寸变化监听:使用 ResizeObserver 监听 text-content 的尺寸变化(如窗口缩放、父容器宽度调整),实时重新计算截断;
- Props 变化监听:通过 watch 监听 text(文本内容)和 reservedWidth(预留宽度)的变化,动态更新显示。
scss
let resizeObserver;
onMounted(() => {
  updateDisplayedText();
  // 监听容器尺寸变化
  resizeObserver = new ResizeObserver(() => updateDisplayedText());
  const textContent = document.getElementById('textContent');
  if (textContent) resizeObserver.observe(textContent);
});
onUnmounted(() => {
  if (resizeObserver) resizeObserver.disconnect(); // 销毁监听,避免内存泄漏
});
// 监听Props变化
watch(() => props.text, updateDisplayedText);
watch(() => props.reservedWidth, updateDisplayedText);
3. 完整组件代码
xml
<template>
  <div class="text-container" ref="container">
    <div class="text-content" id="textContent">
      {{ displayedText }}
      <!-- 剩余空间占位符:仅当reservedWidth>0时显示 -->
      <div class="placeholder-box" id="placeholderBox" v-if="reservedWidth">
        <slot name="placeholder"></slot> <!-- 插槽:放置额外元素(按钮、图标等) -->
      </div>
    </div>
  </div>
</template>
<script setup>
/**
 * 文本截断组件,支持以下功能:
 * 1. 根据容器宽度和预留宽度自动计算可显示字符数
 * 2. 支持最大行数限制(maxLines)
 * 3. 实时响应容器尺寸变化
 * 4. 正确处理中英文字符宽度差异
 */
import { ref, watch, onMounted, onUnmounted } from 'vue';
const props = defineProps({
  /** 需显示的原始文本 */
  text: {
    type: String,
    required: true
  },
  /** 预留宽度(px):为额外元素(如按钮)预留的空间 */
  reservedWidth: {
    type: Number,
    default: 0,
    required: true
  },
  /** 最大显示行数 */
  maxLines: {
    type: Number,
    default: 2
  }
});
const container = ref(null);
const displayedText = ref(props.text); // 最终显示的截断文本
/**
 * 计算文本度量信息
 * @param {string} text - 要测量的文本
 * @returns {object} 包含宽度、高度和边界框信息的对象
 * 注意:使用中文字符'中'作为基准测量字符宽度,适配中英文混排
 */
const calculateTextMetrics = (text) => {
  const canvas = document.createElement('canvas');
  const context = canvas.getContext('2d');
  // 获取实际应用的字体样式(确保测量与渲染一致)
  const textContent = document.getElementById('textContent');
  const styles = window.getComputedStyle(textContent);
  const font = `${styles.fontWeight} ${styles.fontSize} ${styles.fontFamily}`;
  context.font = font;
  const metrics = context.measureText(text);
  // 同步设置占位符样式(宽=预留宽度,高=文本行高,垂直对齐文本基线)
  const placeholderBox = document.getElementById('placeholderBox');
  if (placeholderBox) {
    placeholderBox.style.width = `${props.reservedWidth}px`;
    placeholderBox.style.height = `${parseInt(styles.fontSize, 10)}px`;
    placeholderBox.style.bottom = `${metrics.actualBoundingBoxDescent}px`;
  }
  return {
    width: metrics.width, // 文本宽度(px)
    height: parseInt(styles.fontSize, 10), // 文本行高(px)
    actualBoundingBoxAscent: metrics.actualBoundingBoxAscent, // 文本上边界到基线的距离
    actualBoundingBoxDescent: metrics.actualBoundingBoxDescent // 文本下边界到基线的距离
  };
};
/**
 * 更新显示的文本内容,核心截断逻辑
 * 处理逻辑:
 * 1. 计算每行可显示字符数(基于容器宽度-预留宽度)
 * 2. 按maxLines限制逐行截取文本
 * 3. 最后一行超出时添加省略号,前n-1行保持完整
 */
const updateDisplayedText = () => {
  const textContent = document.getElementById('textContent');
  if (!textContent) return;
  // 1. 计算基础参数
  const containerWidth = textContent.offsetWidth;
  const { width: charWidth } = calculateTextMetrics('中'); // 基准字符宽度
  const availableWidth = containerWidth - props.reservedWidth;
  const maxChars = Math.max(0, Math.floor(availableWidth / charWidth)); // 预留后每行最大可显字符
  const totalLineCount = Math.ceil(props.text.length * charWidth / containerWidth); // 文本总行数(无限制时)
  // 2. 按maxLines逐行截取文本
  let lines = [];
  let currentLine = 0;
  let startIndex = 0;
  while (startIndex < props.text.length && currentLine < props.maxLines) {
    const charsPerLine = Math.floor(containerWidth / charWidth); // 每行可显字符(无预留)
    const endIndex = Math.min(startIndex + charsPerLine, props.text.length);
    // 最后一行且文本未处理完:预留3个字符位置给省略号
    if (currentLine === props.maxLines - 1 && endIndex < props.text.length) {
      lines.push(props.text.substring(startIndex, startIndex + Math.max(0, charsPerLine - 3)) + '...');
      break;
    }
    lines.push(props.text.substring(startIndex, endIndex));
    startIndex = endIndex;
    currentLine++;
  }
  // 3. 处理预留宽度的字符限制(确保最后一行不超出可用宽度)
  if (totalLineCount > 1) {
    const lastLine = lines[lines.length - 1];
    if (lastLine.length > maxChars) {
      lines[lines.length - 1] = lastLine.substring(0, Math.max(0, maxChars - 3)) + '...';
    }
    displayedText.value = lines.join('\n');
  } else if (props.text.length > maxChars) {
    displayedText.value = props.text.substring(0, Math.max(0, maxChars - 3)) + '...';
  } else {
    displayedText.value = props.text; // 文本未超出限制,完整显示
  }
};
let resizeObserver; // 监听容器尺寸变化的实例
onMounted(() => {
  updateDisplayedText(); // 初始化文本显示
  // 监听容器尺寸变化(如窗口缩放、父容器宽度调整)
  resizeObserver = new ResizeObserver(() => updateDisplayedText());
  const textContent = document.getElementById('textContent');
  if (textContent) resizeObserver.observe(textContent);
});
onUnmounted(() => {
  if (resizeObserver) resizeObserver.disconnect(); // 销毁监听,避免内存泄漏
});
// 监听Props变化,动态更新文本
watch(() => props.text, updateDisplayedText);
watch(() => props.reservedWidth, updateDisplayedText);
</script>
<style scoped>
.text-container {
  width: 100%; /* 适配父元素宽度 */
}
.text-content {
  white-space: pre-line; /* 保留换行符,自动换行 */
  word-break: break-all; /* 单词超出时强制换行,避免横向溢出 */
  position: relative; /* 为占位元素提供绝对定位上下文 */
}
.placeholder-box {
  min-height: 12px; /* 确保占位元素不塌陷 */
  background-color: transparent; /* 默认透明,用户可自定义 */
  position: absolute; /* 固定在文本末尾 */
  bottom: 0;
  right: 0;
  /* 注意:宽度由JS动态设置(等于reservedWidth) */
}
</style>
4. 使用案例
以下是 3 个典型场景的使用示例,覆盖不同需求场景。
案例 1:商品卡片(多行文本 + 右侧按钮)
需求:商品描述限制 2 行,右侧预留 80px 空间放置 "加入购物车" 按钮。
xml
<template>
  <div class="product-card">
    <img src="/product.jpg" alt="商品图片" class="product-img">
    <h3 class="product-title">2024夏季新款纯棉T恤</h3>
    <!-- 文本截断组件:text=商品描述,reservedWidth=按钮宽度,maxLines=2 -->
    <TextTruncation
      :text="productDesc"
      :reservedWidth="80"
      :maxLines="2"
    >
      <!-- 占位插槽:放置"加入购物车"按钮 -->
      <template #placeholder>
        <button class="add-cart-btn">加入购物车</button>
      </template>
    </TextTruncation>
    <div class="product-price">¥99.00</div>
  </div>
</template>
<script setup>
import TextTruncation from './TextTruncation.vue';
// 商品描述(长文本)
const productDesc = "2024夏季新款纯棉T恤,精选新疆长绒棉,柔软亲肤,透气吸汗,多种颜色可选,适合日常穿搭、通勤、约会等多种场景,尺码齐全(S-XXL),洗后不褪色、不变形。";
</script>
<style scoped>
.product-card {
  width: 300px;
  border: 1px solid #eee;
  border-radius: 8px;
  padding: 16px;
}
.product-img {
  width: 100%;
  height: 200px;
  object-fit: cover;
  border-radius: 4px;
}
.product-title {
  font-size: 16px;
  margin: 8px 0;
}
.add-cart-btn {
  width: 80px;
  height: 24px;
  font-size: 12px;
  background: #ff4400;
  color: #fff;
  border: none;
  border-radius: 4px;
  cursor: pointer;
}
.product-price {
  color: #ff4400;
  font-size: 18px;
  margin-top: 8px;
}
</style>
案例 2:评论列表(多行文本 + 点赞图标)
需求:评论内容限制 3 行,末尾预留 30px 空间放置点赞图标。
xml
<template>
  <div class="comment-list">
    <div class="comment-item" v-for="(comment, idx) in comments" :key="idx">
      <img src="/avatar.jpg" alt="用户头像" class="user-avatar">
      <div class="comment-content">
        <div class="user-name">用户{{ idx + 1 }}</div>
        <!-- 文本截断组件:text=评论内容,reservedWidth=图标宽度,maxLines=3 -->
        <TextTruncation
          :text="comment.content"
          :reservedWidth="30"
          :maxLines="3"
        >
          <!-- 占位插槽:放置点赞图标 -->
          <template #placeholder>
            <div class="like-icon">
              <svg width="16" height="16" viewBox="0 0 24 24" fill="#999">
                <path d="M12 21.35l-1.45-1.32C5.4 15.36 2 12.28 2 8.5 2 5.42 4.42 3 7.5 3c1.74 0 3.41.81 4.5 2.09C13.09 3.81 14.76 3 16.5 3 19.58 3 22 5.42 22 8.5c0 3.78-3.4 6.86-8.55 11.54L12 21.35z"/>
              </svg>
              <span class="like-count">{{ comment.likeCount }}</span>
            </div>
          </template>
        </TextTruncation>
      </div>
    </div>
  </div>
</template>
<script setup>
import TextTruncation from './TextTruncation.vue';
// 评论数据
const comments = [
  {
    content: "这款产品真的超好用!之前买过类似的,但是这个的质量明显更好,而且价格也很实惠,推荐给大家!已经用了一周了,没有任何问题,下次还会回购。",
    likeCount: 24
  },
  {
    content: "第一次购买,体验不错,物流很快,包装也很严实,打开后没有损坏。使用起来很方便,操作简单,新手也能快速上手。唯一的小缺点是颜色比图片稍深一点,但不影响使用。",
    likeCount: 18
  }
];
</script>
<style scoped>
.comment-list {
  width: 600px;
  margin: 0 auto;
}
.comment-item {
  display: flex;
  gap: 12px;
  padding: 16px 0;
  border-bottom: 1px solid #eee;
}
.user-avatar {
  width: 40px;
  height: 40px;
  border-radius: 50%;
  object-fit: cover;
}
.user-name {
  font-size: 14px;
  font-weight: 500;
  margin-bottom: 4px;
}
.like-icon {
  display: flex;
  align-items: center;
  gap: 4px;
  color: #999;
  font-size: 12px;
}
</style>
案例 3:单行标题 + 编辑按钮
需求:列表标题限制 1 行,右侧预留 60px 空间放置 "编辑" 按钮。
xml
<template>
  <div class="setting-list">
    <div class="setting-item" v-for="(item, idx) in settings" :key="idx">
      <!-- 文本截断组件:text=标题,reservedWidth=按钮宽度,maxLines=1 -->
      <TextTruncation
        :text="item.title"
        :reservedWidth="60"
        :maxLines="1"
      >
        <!-- 占位插槽:放置"编辑"按钮 -->
        <template #placeholder>
          <button class="edit-btn">编辑</button>
        </template>
      </TextTruncation>
    </div>
  </div>
</template>
<script setup>
import TextTruncation from './TextTruncation.vue';
// 设置项数据
const settings = [
  { title: "账号与安全设置(包含密码修改、手机绑定、邮箱验证)" },
  { title: "通知设置(消息推送、邮件通知、短信提醒)" },
  { title: "隐私设置(个人信息可见范围、第三方授权管理)" }
];
</script>
<style scoped>
.setting-list {
  width: 400px;
  border: 1px solid #eee;
  border-radius: 8px;
  margin: 20px auto;
}
.setting-item {
  padding: 12px 16px;
  border-bottom: 1px solid #eee;
}
.setting-item:last-child {
  border-bottom: none;
}
.edit-btn {
  width: 60px;
  height: 24px;
  font-size: 12px;
  background: #fff;
  border: 1px solid #ccc;
  border-radius: 4px;
  cursor: pointer;
}
</style>
5. 注意事项
- 预留宽度准确性:reservedWidth 需与占位元素的实际宽度一致(如按钮宽 80px,则 reservedWidth=80),否则可能导致文本与占位元素重叠;
- 字体样式一致性:组件基于 text-content 的实际字体样式测量文本,若父组件修改了字体(如 font-size、font-family),需确保样式能传递到 text-content;
- 兼容性 :ResizeObserver 兼容 Chrome 64+、Firefox 69+、Edge 79+,若需兼容低版本浏览器,需引入 ResizeObserver polyfill;
- 性能优化:组件使用 canvas 测量文本(性能优于 DOM 测量),但频繁更新 text 或 reservedWidth 时,建议添加防抖(如 lodash.debounce),避免多次计算。
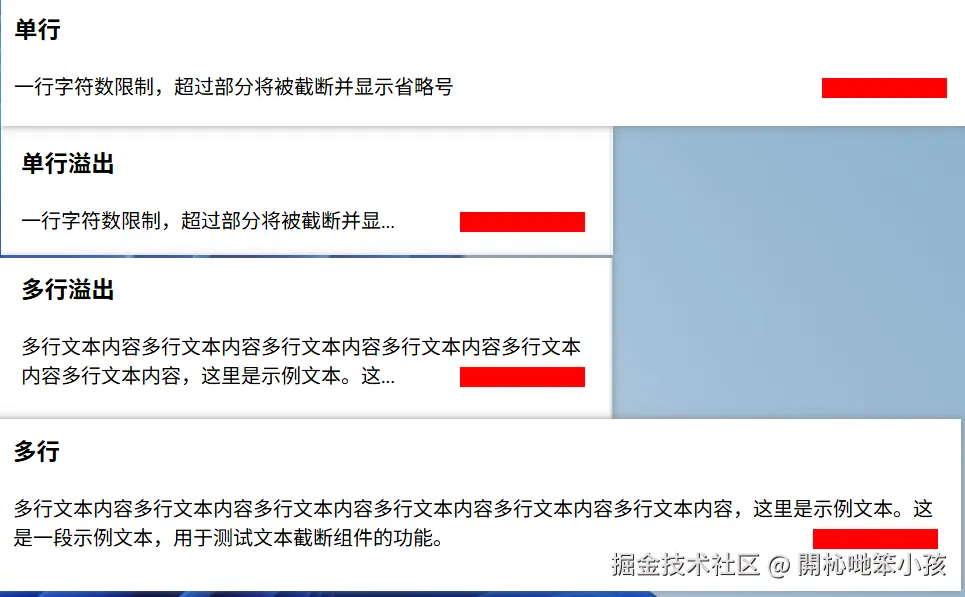
6. 实现效果