在上一篇文章中,我们详细探讨了 Webpack Loader 的工作原理和使用方法。今天,我们将深入 Webpack 的另一个核心概念------Plugin(插件)。插件是 Webpack 的支柱功能,赋予了 Webpack 各种灵活强大的能力。
什么是plugin
与 Loader 用于转换特定类型的模块不同,Plugin 的功能更加广泛。Plugin 可以用于执行范围更广的任务,包括:
- 打包优化:如压缩代码、拆分代码包
- 资源管理:如拷贝静态资源、生成 HTML 文件
- 环境变量注入:定义全局常量
- 服务启动:如开发服务器、热更新
plugin与loader的区别
| 特性 | Loader | Plugin |
|---|---|---|
| 能力范围 | 处理Webpack不能识别的模块 | 在Webpack整个构建过程中干预 |
| 运行时机 | 模块加载时运行 | 在整个编译周期内都能起作用 |
| 配置方式 | 在module.rules中配置 | 在plugins数组中配置 |
| 实现原理 | 函数式,接收源码返回处理结果 | 基于Tapable的事件流机制 |
Plugin的底层原理
Plugin的底层是基于核心库Tapable的发布订阅模式机制在Webpack编译整个过程中的各个阶段进行处理。Webpack也提供了多种钩子(Hooks)类型,便于功能扩展。
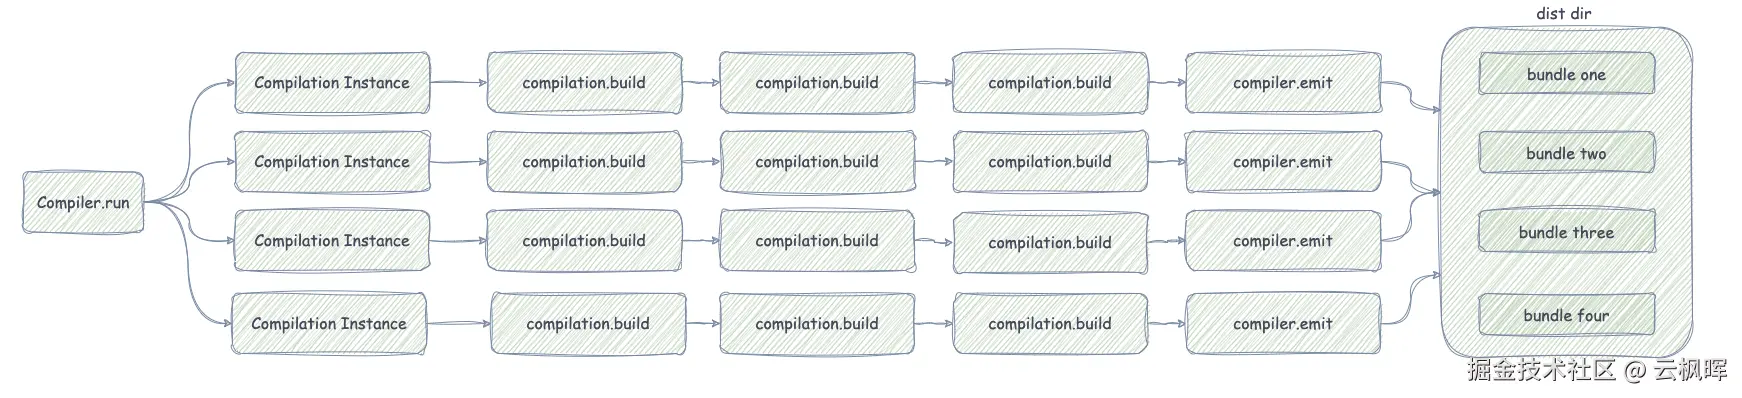
Compiler和Compilation
Webpack整个的编译过程中Compiler和Compilation两个对象,扮演着重要的角色。
- Compiler 编译器实例,包含了完整的配置信息,在
Webpack整个编译过程中只有一个Compiler实例 - Compilation 编译实例,代表一次资源构建,包含了当前模块资源、编译生成资源、变化的文件等信息。
Compiler
Compiler对象是Webpack的核心编译器,代表了完整的Webpack环境配置。它在Webpack的初始化阶段被创建,并在整个构建生命周期中只有一个实例。
主要职责
- 启动和配置:处理
Webpack的配置并初始化 - 控制构建流程:管理整个构建过程的生命周期
- 插件系统:提供
tapable钩子供自定义插件进行扩展功能 - 文件监听:在
watch模式下监听文件变化
再从Webpack的底层源码中看看Compiler具体做了些什么:
实例创建时
js
// lib/Compiler.js
class Compiler {
  constructor(context) {
    this.hooks = {
      // 初始化所有生命周期钩子
      beforeRun: new AsyncSeriesHook(["compiler"]),
      run: new AsyncSeriesHook(["compiler"]),
      beforeCompile: new AsyncSeriesHook(["params"]),
      compile: new SyncHook(["params"]),
      compilation: new SyncHook(["compilation", "params"]),
      // ... 几十个钩子
    };

    this.options = {};
    this.context = context;
    this.outputFileSystem = null;
    this.inputFileSystem = null;
  }
}
运行构建流程
js
// lib/Compiler.js
class Compiler {
  run(callback) {
    // 1. 触发 beforeRun 钩子
    this.hooks.beforeRun.callAsync(this, err => {
      if (err) return callback(err);

      // 2. 触发 run 钩子
      this.hooks.run.callAsync(this, err => {
        if (err) return callback(err);

        // 3. 执行编译
        this.compile(onCompiled);
      });
    });
  }

  compile(callback) {
    // 1. 准备编译参数
    const params = this.newCompilationParams();

    // 2. 触发 beforeCompile 钩子
    this.hooks.beforeCompile.callAsync(params, err => {
      // 3. 触发 compile 钩子
      this.hooks.compile.call(params);

      // 4. 创建 Compilation 实例
      const compilation = this.newCompilation(params);

      // 5. 触发 compilation 钩子(插件可以在这里挂载)
      this.hooks.compilation.call(compilation, params);

      // 6. 执行 Compilation 的构建过程
      compilation.buildModule(err => {
        // 构建完成后进行封包、优化等
        compilation.seal(err => {
          // 触发 afterCompile 钩子
          this.hooks.afterCompile.callAsync(compilation, err => {
            return callback(null, compilation);
          });
        });
      });
    });
  }
}
创建Compilation
js
// lib/Compiler.js
class Compiler {
  newCompilationParams() {
    const params = {
      // 创建模块工厂
      normalModuleFactory: this.createNormalModuleFactory(),
      // 创建上下文模块工厂
      contextModuleFactory: this.createContextModuleFactory(),
      // 创建依赖图工厂
      chunkGraph: this.createChunkGraph()
    };
    return params;
  }

  createNormalModuleFactory() {
    const moduleFactory = new NormalModuleFactory({
      // 配置解析器、加载器等
      resolverFactory: this.resolverFactory,
      options: this.options.module
    });
    return moduleFactory;
  }
}
compile(callback) {
  const params = this.newCompilationParams();
  // 开始编译前hook
  this.hooks.beforeCompile.callAsync(params, (err) => {
    if (err) return callback(err);
    // 执行用户注册的compile事件
    this.hooks.compile.call(params);
    // 创建Compilation实例 编译器
    const compilation = this.newCompilation(params);
    /* 其他代码省略 */
  });
}
运行构建流程
js
// lib/Compiler.js
class Compiler {
  run(callback) {
    // 1. 触发 beforeRun 钩子
    this.hooks.beforeRun.callAsync(this, err => {
      if (err) return callback(err);

      // 2. 触发 run 钩子
      this.hooks.run.callAsync(this, err => {
        if (err) return callback(err);

        // 3. 执行编译
        this.compile(onCompiled);
      });
    });
  }

  compile(callback) {
    // 1. 准备编译参数
    const params = this.newCompilationParams();

    // 2. 触发 beforeCompile 钩子
    this.hooks.beforeCompile.callAsync(params, err => {
      // 3. 触发 compile 钩子
      this.hooks.compile.call(params);

      // 4. 创建 Compilation 实例
      const compilation = this.newCompilation(params);

      // 5. 触发 compilation 钩子(插件可以在这里挂载)
      this.hooks.compilation.call(compilation, params);

      // 6. 执行 Compilation 的构建过程
      compilation.buildModule(err => {
        // 构建完成后进行封包、优化等
        compilation.seal(err => {
          // 触发 afterCompile 钩子
          this.hooks.afterCompile.callAsync(compilation, err => {
            return callback(null, compilation);
          });
        });
      });
    });
  }
}
生成最终文件
js
// lib/Compiler.js
class Compiler {
  emitAssets(compilation, callback) {
    // 1. 触发 emit 钩子(插件可以在这里修改资源)
    this.hooks.emit.callAsync(compilation, err => {
      // 2. 创建输出目录
      this.outputFileSystem.mkdirp(this.options.output.path, err => {
        // 3. 写入所有文件
        this.writeFiles(compilation, err => {
          // 4. 触发 afterEmit 钩子
          this.hooks.afterEmit.callAsync(compilation, err => {
            callback();
          });
        });
      });
    });
  }

  writeFiles(compilation, callback) {
    // 遍历所有编译生成的资源
    for (const [filename, source] of Object.entries(compilation.assets)) {
      // 获取资源内容
      const content = source.source();

      // 写入文件系统
      this.outputFileSystem.writeFile(
        this.outputPath(filename),
        content,
        callback
      );
    }
  }
}
监听文件的变化后重新编译
js
// lib/Compiler.js
class Compiler {
  watch(watchOptions, handler) {
    // 1. 创建监视器
    this.watchMode = true;
    this.watchFileSystem = new NodeWatchFileSystem(this.inputFileSystem);

    // 2. 开始监听文件
    this.watcher = this.watchFileSystem.watch(
      this.getWatchFiles(),
      this.getWatchDirectories(),
      // 文件变化时的回调
      (changedFiles, removedFiles) => {
        // 触发 invalid 钩子
        this.hooks.invalid.callAsync(changedFiles, removedFiles, () => {
          // 重新编译
          this.compile(onCompiled);
        });
      }
    );
  }
}
Compilation
Compilation主要负责Webpack的构建过程。包含了生成依赖图、编译生成bundle和变化的文件等信息。
主要职责
- 模块构建: 负责模块的加载、解析、转换、
- 依赖图的构建:建立模块间的依赖关系
- 资源生成:生成最终的打包文件
- 增量编译:监听模式下只重新编译变化的模块
Compiler和Compilation的关系
再从Webpack的底层源码中看看Compilation具体做了些什么:
Compilation初始化
js
// lib/Compilation.js
class Compilation {
  constructor(compiler, params) {
    this.compiler = compiler;
    this.options = compiler.options;

    // 核心数据结构初始化
    this.modules = new Set();           // 所有模块
    this.chunks = new Set();            // 所有代码块
    this.assets = {};                   // 输出资源
    this.entries = new Map();           // 入口模块
    this.moduleGraph = new ModuleGraph(); // 模块依赖图

    // 工厂实例
    this.moduleFactories = params.moduleFactories;
    this.normalModuleFactory = params.normalModuleFactory;

    // 钩子系统
    this.hooks = {
      buildModule: new SyncHook(["module"]),
      succeedModule: new SyncHook(["module"]),
      finishModules: new SyncHook(["modules"]),
      // ... 更多编译钩子
    };
  }
}
构建模块
Webpack中的Compilation依靠AsyncQueue异步队列实来构建模块。
异步队列类-AsyncQueue
js
// lib/util/AsyncQueue.js
class AsyncQueue {
  constructor({ name, parallelism, processor, getKey }) {
    this._name = name;
    this._parallelism = parallelism; // 并发数
    this._processor = processor;     // 处理器函数
    this._getKey = getKey;           // 获取唯一标识的函数
    this._queued = new Map();        // 等待队列
    this._processing = new Map();    // 处理中队列
    this._entries = new Map();       // 所有条目
  }

  add(item, callback) {
    const key = this._getKey(item);

    // 如果已经在处理或等待中,只添加回调
    if (this._entries.has(key)) {
      // ... 处理重复逻辑
      return;
    }

    // 创建新条目
    const entry = {
      item,
      callback: [callback],
      state: QUEUED_STATE
    };

    this._entries.set(key, entry);
    this._queued.set(key, entry);

    // 尝试启动处理
    this._ensureProcessing();
  }
}
Compilation初始化创建队列
js
// lib/Compilation.js
class Compilation {
  constructor(compiler, params) {
    // 创建模块构建队列
    this._buildModuleQueue = new AsyncQueue({
      name: "build module",
      parallelism: compiler.options.parallelism || 100,
      processor: this._buildModule.bind(this), // 处理器是 _buildModule 方法
      getKey: item => item.module.identifier() // 用模块标识符作为key
    });
  }

  // 添加模块到构建队列
  handleModuleCreation(module, callback) {
    this._buildModuleQueue.add(
      { module, currentProfile: null },
      (err, result) => {
        if (err) return callback(err);

        // 模块构建完成,处理依赖
        this.processModuleDependencies(module, err => {
          callback(err, module);
        });
      }
    );
  }

  // 实际的模块构建处理器
  _buildModule({ module, currentProfile }, callback) {
    // 触发 buildModule 钩子
    this.hooks.buildModule.call(module);

    // 执行模块构建(这是实际的构建逻辑)
    module.build(
      this.options,
      this,
      this.resolverFactory.get("normal", module.resolveOptions),
      this.inputFileSystem,
      (err) => {
        if (err) {
          this.hooks.failedModule.call(module, err);
          return callback(err);
        }

        this.hooks.succeedModule.call(module);
        callback(null, { module, currentProfile });
      }
    );
  }
}Compilation中通过addModule开始调用processModuleDependencies方法异步处理模块依赖
js
// 简化的完整流程
class Compilation {
  // 入口方法 - 添加模块到构建系统
  addModule(module, callback) {
    this.handleModuleCreation(
      {
        factory: module.factory,
        dependencies: module.dependencies,
        context: module.context
      },
      (err, module) => {
        if (err) return callback(err);

        // 模块构建完成后,递归处理其依赖
        this.processModuleDependencies(module, callback);
      }
    );
  }

  // 处理模块依赖(也是异步的)
  processModuleDependencies(module, callback) {
    const dependencies = new Set(module.dependencies);

    // 异步处理所有依赖
    asyncLib.forEach(
      dependencies,
      (dependency, callback) => {
        this.handleModuleCreation(
          {
            factory: this.dependencyFactories.get(dependency.constructor),
            dependencies: [dependency],
            context: module.context,
            issuer: module
          },
          callback
        );
      },
      callback
    );
  }
}在AsyncQueue中通过_ensureProcessing方法并发控制
js
// 队列的并发处理机制
class AsyncQueue {
  _ensureProcessing() {
    // 当并发数未满且有等待任务时,继续处理
    while (this._processing.size < this._parallelism && this._queued.size > 0) {
      const [key, entry] = this._queued.entries().next().value;

      this._queued.delete(key);
      this._processing.set(key, entry);
      entry.state = PROCESSING_STATE;

      // 调用处理器函数
      this._processor(entry.item, (err, result) => {
        this._handleResult(key, entry, err, result);
      });
    }
  }

  _handleResult(key, entry, err, result) {
    this._processing.delete(key);
    this._entries.delete(key);

    // 执行所有回调
    entry.callback.forEach(callback => {
      callback(err, result);
    });

    // 继续处理下一个任务
    this._ensureProcessing();
  }
}Compilation实例通过addEntry方法将入口模块添加到AsyncQueue队列中开始异步构建依赖图最终生成bundle
js
// Webpack 构建的异步流程
compilation.addEntry(context, entry, name, callback) {
  // 1. 创建入口模块
  this._addModuleChain(context, entry, module => {
    // 2. 将入口模块添加到构建队列
    this.handleModuleCreation(module, err => {
      if (err) return callback(err);

      // 3. 所有模块构建完成后进行封包
      this.seal(callback);
    });
  });
}
为什么采用异步队列呢❓
- 避免同时构建太多模块导致内容溢出问题
- 避免相同模块重复构建
- 充分利用多核CPU提高构建速度
- 通过队列可以更好优化构建顺序
常用Plugin配置
HtmlWebpackPlugin
HtmlWebpackPlugin主要自动生成HTML文件并注入打包后的资源
js
const HtmlWebpackPlugin = require('html-webpack-plugin');

module.exports = {
  plugins: [
    new HtmlWebpackPlugin({
      template: './src/index.html',     // 模板文件
      filename: 'index.html',           // 输出文件名
      title: 'My App',                  // HTML title
      minify: {                         // 压缩配置
        removeComments: true,           // 移除注释
        collapseWhitespace: true,       // 折叠空白
        removeAttributeQuotes: true     // 移除属性引号
      },
      chunks: ['main', 'vendor']        // 指定要注入的 chunk
    })
  ]
};
MiniCssExtractPlugin
MiniCssExtractPlugin主要将CSS资源提取到单独的文件中
js
const MiniCssExtractPlugin = require('mini-css-extract-plugin');

module.exports = {
  module: {
    rules: [
      {
        test: /\.css$/,
        use: [
          MiniCssExtractPlugin.loader,  // 代替 style-loader
          'css-loader'
        ]
      }
    ]
  },
  plugins: [
    new MiniCssExtractPlugin({
      filename: 'css/[name].[contenthash:8].css',
      chunkFilename: 'css/[name].[contenthash:8].chunk.css'
    })
  ]
};
DefinePlugin
DefinePlugin插件是Webpack的内置插件,定义了全局变量,在打包时会替换
js
const webpack = require('webpack');

module.exports = {
  plugins: [
    new webpack.DefinePlugin({
      'process.env.NODE_ENV': JSON.stringify(process.env.NODE_ENV),
      'API_BASE_URL': JSON.stringify('https://api.example.com'),
      'APP_VERSION': JSON.stringify(require('./package.json').version)
    })
  ]
};
CopyWebpackPlugin
CopyWebpackPlugin主要是拷贝静态文件到输出目录
js
const CopyWebpackPlugin = require('copy-webpack-plugin');

module.exports = {
  plugins: [
    new CopyWebpackPlugin({
      patterns: [
        {
          from: 'public',               // 源目录
          to: '',                       // 目标目录(相对于输出目录)
          globOptions: {
            ignore: ['**/index.html']   // 忽略文件
          }
        }
      ]
    })
  ]
};
自定义插件
Webpack提供很多钩子(Hooks)给到用户扩展构建应用。将通过构建时间统计插件来展示如何自定义插件
构建时间统计插件
此插件主要功能:
- 构建时间统计
- 多格式输出
- 在开发环境下,构建时间过长给出优化建议
- 构建失败时显示错误信息
- 完整构建信息,如时间、版本、hash值等详细信息
js
/**
 * Webpack 构建时间统计插件
 * 用于统计和展示 Webpack 构建过程的时间信息
 */
class BuildTimePlugin {
  /**
   * 构造函数
   * @param {Object} options 插件配置选项
   * @param {string} options.name 插件名称,默认为 "BuildTimePlugin"
   * @param {string|null} options.outputFile 构建信息输出文件路径,为 null 时不输出文件
   * @param {boolean} options.showInConsole 是否在控制台显示构建信息,默认为 true
   */
  constructor(options = {}) {
    // 合并用户配置和默认配置
    this.options = {
      name: "BuildTimePlugin", // 插件名称
      outputFile: null, // 输出文件路径,null 表示不输出到文件
      showInConsole: true, // 是否在控制台显示信息
      ...options, // 用户自定义配置会覆盖默认配置
    };

    // 初始化时间记录变量
    this.startTime = null; // 构建开始时间戳
    this.endTime = null; // 构建结束时间戳
  }

  /**
   * 应用插件到 Webpack 编译器
   * 这是 Webpack 插件的核心方法,用于注册各种钩子
   * @param {Object} compiler Webpack 编译器实例
   */
  apply(compiler) {
    // 解构配置参数,方便使用
    const { name, showInConsole } = this.options;

    /**
     * 注册 beforeRun 钩子 - 在开始执行构建之前触发
     * 用于记录构建开始时间
     */
    compiler.hooks.beforeRun.tap(name, () => {
      // 记录构建开始时间
      this.startTime = Date.now();

      // 如果配置了在控制台显示,则输出开始信息
      if (showInConsole) {
        console.log("🚀 编译开始...");
      }
    });

    /**
     * 注册 done 钩子 - 在构建完成时触发
     * 用于计算构建时间并输出结果
     * @param {Object} stats 构建统计信息对象
     */
    compiler.hooks.done.tap(name, (stats) => {
      // 记录构建结束时间
      this.endTime = Date.now();
      // 计算构建耗时(毫秒)
      const buildTime = this.endTime - this.startTime;

      // 格式化时间显示,便于阅读
      const formattedTime = this.formatBuildTime(buildTime);

      // 如果配置了在控制台显示,则输出构建结果
      if (showInConsole) {
        console.log(`✅ 编译完成!`);
        console.log(`⏰ 构建时间: ${formattedTime}`);

        // 在开发模式下,如果构建时间过长,显示优化提示
        if (compiler.options.mode === "development") {
          this.showDevelopmentTips(buildTime);
        }
      }

      // 如果配置了输出文件,将构建信息写入文件
      if (this.options.outputFile) {
        this.writeBuildInfo(compiler, buildTime, formattedTime, stats);
      }
    });

    /**
     * 注册 failed 钩子 - 在构建失败时触发
     * 用于处理构建失败的情况
     * @param {Error} error 错误对象
     */
    compiler.hooks.failed.tap(name, (error) => {
      // 如果配置了在控制台显示,则输出失败信息
      if (showInConsole) {
        console.log("❌ 编译失败!");
        console.error(error);
      }
    });
  }

  /**
   * 格式化构建时间
   * 将毫秒转换为更易读的格式
   * @param {number} ms 构建时间(毫秒)
   * @returns {string} 格式化后的时间字符串
   */
  formatBuildTime(ms) {
    // 如果时间小于1秒,显示毫秒
    if (ms < 1000) {
      return `${ms}ms`;
    } else {
      // 如果时间大于等于1秒,显示秒(保留2位小数)
      return `${(ms / 1000).toFixed(2)}s`;
    }
  }

  /**
   * 将构建信息写入文件
   * @param {Object} compiler Webpack 编译器实例
   * @param {number} buildTime 构建时间(毫秒)
   * @param {string} formattedTime 格式化后的构建时间
   * @param {Object} stats 构建统计信息对象
   */
  writeBuildInfo(compiler, buildTime, formattedTime, stats) {
    // 引入文件系统模块
    const fs = require("fs");
    const path = require("path");

    try {
      // 构建完整的输出文件路径
      // compiler.options.output.path 是 Webpack 配置的输出目录
      const outputPath = path.join(
        compiler.options.output.path,
        this.options.outputFile
      );

      // 构建信息对象,包含各种有用的构建数据
      const buildInfo = {
        buildTime, // 构建耗时(毫秒)
        buildTimeReadable: formattedTime, // 可读的构建时间
        buildDate: new Date().toISOString(), // 构建完成时间(ISO格式)
        buildTimestamp: Date.now(), // 构建完成时间戳
        hash: stats.hash, // 构建哈希值
        version: stats.version, // Webpack 版本
        assets: Object.keys(stats.compilation.assets).length, // 资源文件数量
      };

      // 确保输出目录存在
      const dir = path.dirname(outputPath);
      if (!fs.existsSync(dir)) {
        // 递归创建目录
        fs.mkdirSync(dir, { recursive: true });
      }

      // 将构建信息写入文件
      // JSON.stringify 的第三个参数 2 表示使用2个空格缩进,美化输出
      fs.writeFileSync(outputPath, JSON.stringify(buildInfo, null, 2));
    } catch (error) {
      // 文件写入失败时的错误处理
      console.warn("⚠️ 构建信息写入失败:", error.message);
    }
  }

  /**
   * 显示开发模式下的优化提示
   * 当构建时间过长时,给出优化建议
   * @param {number} buildTime 构建时间(毫秒)
   */
  showDevelopmentTips(buildTime) {
    // 如果构建时间超过10秒,显示优化提示
    if (buildTime > 10000) {
      console.log("💡 提示: 构建时间较长,建议检查:");
      console.log("   - 是否使用了不必要的大型依赖");
      console.log("   - 是否可以优化 Webpack 配置");
      console.log("   - 考虑使用缓存或增量构建");
    }
  }
}

// 导出插件类
module.exports = BuildTimePlugin;
小结
通过本文的探讨,我们深入了解了 Webpack Plugin 的核心机制和应用实践:
核心理解
- Plugin 与 Loader 的差异:Loader 专注于模块转换,而 Plugin 拥有更广泛的能力范围,可以在整个编译生命周期中干预构建过程
- 基于 Tapable 的事件流机制:Plugin 的本质是基于发布订阅模式,通过钩子(Hooks)系统扩展 Webpack 功能
架构原理
-
Compiler 与 Compilation 的分工:
- Compiler:编译器实例,控制整个构建生命周期,全局唯一
- Compilation:编译实例,负责具体的模块构建和资源生成
-
异步队列构建机制:Webpack 通过 AsyncQueue 实现高效的并发构建和增量编译
实践应用
- 丰富的插件生态:HtmlWebpackPlugin、MiniCssExtractPlugin 等提供了开箱即用的功能
- 灵活的自定义能力:通过理解 Plugin 的工作原理,我们可以开发满足特定需求的定制化插件
开发启示
- 合理选择干预时机:根据需求在适当的钩子阶段执行逻辑
- 关注构建性能:避免在频繁触发的钩子中执行重操作
- 完善的错误处理:确保插件的稳定性和可调试性
Webpack Plugin 的强大之处在于其高度可扩展的架构设计,理解这套机制不仅有助于我们更好地使用现有插件,更为我们解决特定构建需求提供了无限可能。