系列文章<九>(从LED显示屏的偏色问题问题到手机影像):从LED冬奥会、奥运会及春晚等大屏,到手机小屏,快来挖一挖里面都有什么
- 偏色问题:从传统工程到AI底层的完整解决方案
-
- 一、问题定义:偏色问题的本质
-
- [1.1 偏色现象分类](#1.1 偏色现象分类)
- [1.2 偏色问题的根本原因分析](#1.2 偏色问题的根本原因分析)
- 二、传统工程解决方案(基于传统全链路)
-
- [2.1 驱动芯片级解决方案](#2.1 驱动芯片级解决方案)
- [2.2 画质引擎级解决方案](#2.2 画质引擎级解决方案)
- 三、AI底层视觉解决方案
-
- [3.1 基于深度学习的偏色检测](#3.1 基于深度学习的偏色检测)
- [3.2 智能颜色校正网络](#3.2 智能颜色校正网络)
- [3.3 损失函数设计](#3.3 损失函数设计)
- 四、工程化落地方案
-
- [4.1 全链路集成方案](#4.1 全链路集成方案)
- [4.2 实际产品化案例](#4.2 实际产品化案例)
- [5.1 技术要点](#5.1 技术要点)
- [5.2 解决方案设计题](#5.2 解决方案设计题)
- [5.3 实际编码](#5.3 实际编码)
巨人的肩膀:
- https://github.com/tensorlayer/SRGAN
- chrome-extension://bpoadfkcbjbfhfodiogcnhhhpibjhbnh/pdf/index.html?file=https%3A%2F%2Fopenaccess.thecvf.com%2Fcontent_cvpr_2017%2Fpapers%2FLedig_Photo-Realistic_Single_Image_CVPR_2017_paper.pdf
- 佛佛里打的小可爱~~~~!~~~~
系列文章规划:以解决的LED"偏色"等相关问题为切入点,系统拆解其与手机影像ISP(图像信号处理器)中3A算法、AI超分、HDR 等模块的共性技术原理。深入剖析LED显示问题(如闪烁、色块)与手机拍照问题(如色彩断层、低光照噪点)在底层信号处理层面的关联。中间会夹杂讲解类似如下内容:
- 详解全灰阶校正 、Gamma标定等关键技术如何在LED显示与手机影像两大领域共通应用。
- 探讨AI技术(如AI超分、AI HDR)如何借鉴传统ISP流程解决画质问题。
- 即:LED显示屏的核心痛点与对应的AI解决方案。
往期文章如下:
系列文章<一>(从LED显示问题到非LED领域影像画质优化:揭秘跨领域的核心技术):从LED冬奥会、奥运会及春晚等大屏,到手机小屏,快来挖一挖里面都有什么
系列文章<二>(从LED低灰不起灰、跳灰、过曝问题到手机影像:Gamma映射的跨领域技术解析):从LED冬奥会、奥运会及春晚等大屏,到手机小屏,快来挖一挖里面都有什么
...待补充
偏色问题:从传统工程到AI底层的完整解决方案
一、问题定义:偏色问题的本质
1.1 偏色现象分类
python
class ColorDeviationAnalyzer:
    """基于你实际经验的偏色分类器"""

    def __init__(self):
        self.deviation_types = {
            'yellow_deviation': {  # RG偏高,缺B
                'symptoms': '画面整体偏黄,白色不纯',
                'rgb_ratio': [1.1, 1.05, 0.9],  # R,G增强,B减弱
                'common_causes': ['蓝色LED衰减', 'B通道驱动不足', '色温校准偏差']
            },
            'purple_deviation': {  # RB偏高,缺G
                'symptoms': '画面偏紫,肤色异常',
                'rgb_ratio': [1.1, 0.9, 1.05],
                'common_causes': ['绿色通道问题', 'Gamm曲线失真', '信号串扰']
            },
            'cyan_deviation': {   # GB偏高,缺R
                'symptoms': '画面偏青,红色系失真',
                'rgb_ratio': [0.9, 1.05, 1.1],
                'common_causes': ['红色LED老化', 'R通道电流不足', '白平衡偏移']
            }
}-
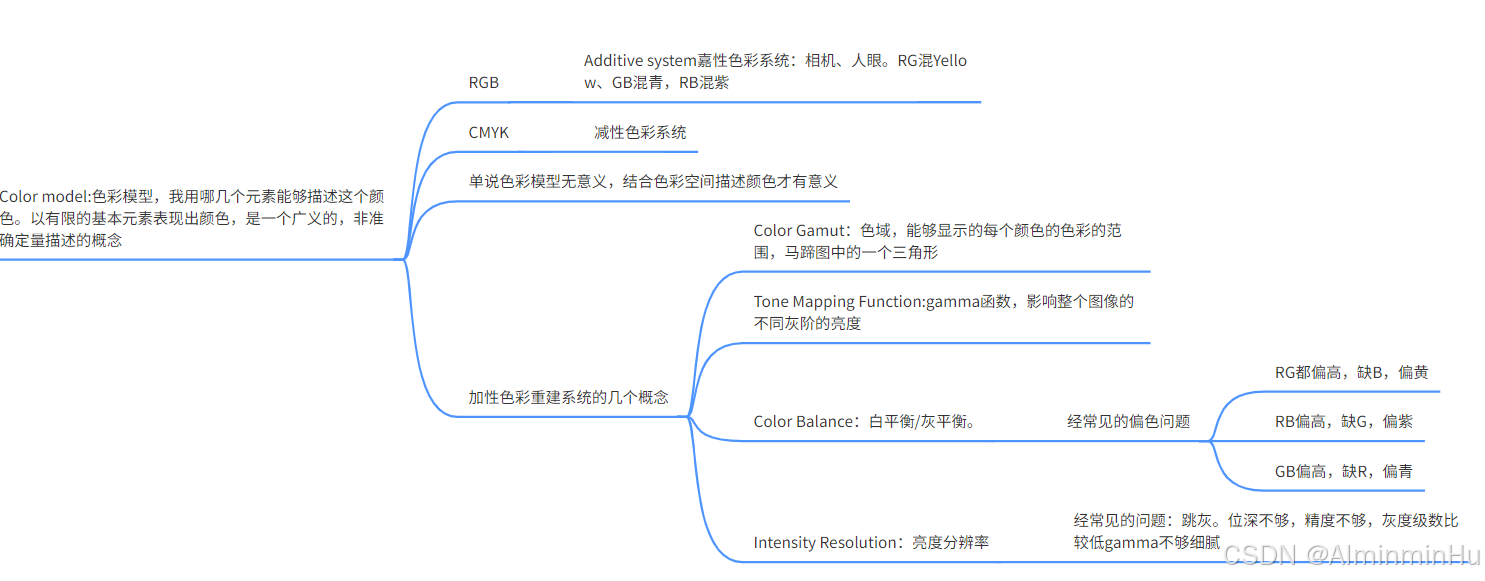
Color model:色彩模型,我用哪几个元素能够描述这个颜色。以有限的基本元素表现出颜色,是一个广义的,非准确定量描述的概念
-
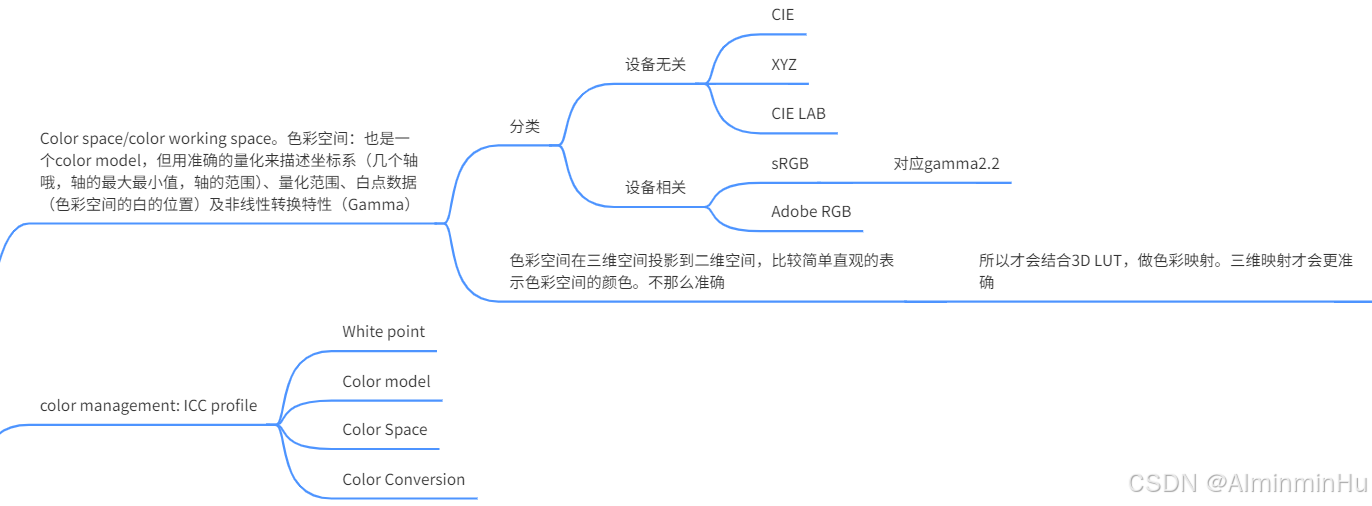
Color space/color working space。色彩空间:也是一个color model,但用准确的量化来描述坐标系(几个轴哦,轴的最大最小值,轴的范围)、量化范围、白点数据(色彩空间的白的位置)及非线性转换特性(Gamma)
-
色彩重建
- 色彩重建的过程:Scene,通过曝光,进入到成像系统中,经过lens、filter、sensor等进入到ISP中,图像信号进来之后你要进行gamma校正等,对应的我们的裸屏阶段做的事情。再到Color filter array interpolation,变成每个像素RGB都有的图像,然后根据白平衡,先把白适配对,找到类似的参考点,然后根据显示要求,把图像转换到标准的色彩空间下,然后根据应用再进一步转换色彩空间。
- 色彩重建的数学表达:反射率、光谱功率、接收函数等进行积分,得到XYZ;光源进行抽样量化得到矩阵,根据反射率、感光设备(眼睛等)显示特性;
1.2 偏色问题的根本原因分析
硬件层面:
- LED灯珠衰减不一致
- 驱动电流匹配精度不足(基于PWM+PAM经验)
- 光学材料色温偏移
信号处理层面:
- Gamma曲线失真(gamma过曝问题)
- 色彩空间转换误差
- 信号传输损失
算法层面:
- 白平衡算法不准确
- 颜色校正矩阵误差
- 非线性映射失真
二、传统工程解决方案(基于传统全链路)
2.1 驱动芯片级解决方案
python
class ICLevelColorCorrection:
    """驱动芯片级颜色校正 - 基于裸屏开发"""

    def __init__(self):
        self.correction_parameters = {
            'current_matching': {
                'r_current_ratio': 1.0,
                'g_current_ratio': 1.0,
                'b_current_ratio': 1.0,
                'adjustment_granularity': 0.01  # 1%精度
            },
            'pwm_modulation': {
                'pwm_precision': 10,  # 10-bit PWM
                'duty_cycle_adjustment': True,
                'min_duty_cycle': 0.1  # 防止低灰偏色
            },
            'gamma_correction': {
                'gamma_value': 2.2,
                'low_gray_compensation': True,
                'piecewise_correction': True  # 分段Gamma校正
            }
        }

    def hardware_color_calibration(self, measured_colors, target_colors):
        """硬件级颜色校准"""
        # 基于实际测量的颜色数据
        color_difference = self.calculate_color_difference(measured_colors, target_colors)

        # 调整驱动参数
        correction_factors = self.optimize_correction_factors(color_difference)

        # 应用到底层驱动
        self.apply_ic_parameters(correction_factors)

        return correction_factors

    def real_time_color_monitoring(self, frame_data):
        """实时颜色监控 - 基于画质引擎经验"""
        # 提取颜色特征
        color_features = self.extract_color_features(frame_data)

        # 检测偏色趋势
        deviation_trend = self.detect_deviation_trend(color_features)

        # 动态调整参数
        if deviation_trend > self.threshold:
            self.adaptive_correction(deviation_trend)
2.2 画质引擎级解决方案
python
class ColorEngine:
    """画质引擎颜色处理 - 基于画质引擎开发经验"""

    def __init__(self):
        self.color_processing_pipeline = {
            'white_balance': {
                'method': 'gray_world',  # 灰度世界法
                'adaptive': True,
                'reference_white': [255, 255, 255]
            },
            'color_matrix_correction': {
                'ccm_matrix': np.eye(3),  # 颜色校正矩阵
                'dynamic_adjustment': True
            },
            'gamma_management': {
                'lut_size': 1024,
                'piecewise_gamma': True,
                'low_end_enhancement': True  # 低灰增强
            }
        }

    def process_color_deviation(self, input_frame, deviation_type):
        """处理特定类型的偏色"""
        if deviation_type == 'yellow_deviation':
            # 降低R,G,增强B
            correction_matrix = np.array([
                [0.95, 0, 0],
                [0, 0.95, 0],
                [0, 0, 1.1]
            ])
        elif deviation_type == 'purple_deviation':
            # 降低R,B,增强G
            correction_matrix = np.array([
                [0.95, 0, 0],
                [0, 1.1, 0],
                [0, 0, 0.95]
            ])
        else:  # cyan_deviation
            # 降低G,B,增强R
            correction_matrix = np.array([
                [1.1, 0, 0],
                [0, 0.95, 0],
                [0, 0, 0.95]
            ])

        corrected_frame = self.apply_color_matrix(input_frame, correction_matrix)
        return corrected_frame
三、AI底层视觉解决方案
3.1 基于深度学习的偏色检测
python
import torch
import torch.nn as nn
import torch.nn.functional as F

class ColorDeviationDetector(nn.Module):
    """偏色检测网络 - 结合你的深度学习经验"""

    def __init__(self, num_classes=3):
        super().__init__()

        # 特征提取 backbone
        self.backbone = nn.Sequential(
            nn.Conv2d(3, 64, 3, padding=1),
            nn.ReLU(inplace=True),
            nn.MaxPool2d(2),

            nn.Conv2d(64, 128, 3, padding=1),
            nn.ReLU(inplace=True),
            nn.MaxPool2d(2),

            nn.Conv2d(128, 256, 3, padding=1),
            nn.ReLU(inplace=True),
            nn.AdaptiveAvgPool2d(1)
        )

        # 颜色统计特征
        self.color_statistics = nn.Sequential(
            nn.Linear(256, 128),
            nn.ReLU(inplace=True),
            nn.Linear(128, 64)
        )

        # 分类头
        self.classifier = nn.Sequential(
            nn.Linear(256 + 64, 128),
            nn.ReLU(inplace=True),
            nn.Dropout(0.5),
            nn.Linear(128, num_classes)
        )

        # 回归头(偏色程度)
        self.regressor = nn.Sequential(
            nn.Linear(256 + 64, 64),
            nn.ReLU(inplace=True),
            nn.Linear(64, 3)  # RGB三个通道的偏色程度
        )

    def forward(self, x):
        # 主干特征
        backbone_features = self.backbone(x)
        backbone_features = backbone_features.view(backbone_features.size(0), -1)

        # 颜色统计特征
        color_stats = self.calculate_color_statistics(x)
        color_features = self.color_statistics(color_stats)

        # 特征融合
        combined_features = torch.cat([backbone_features, color_features], dim=1)

        # 输出
        classification = self.classifier(combined_features)
        regression = self.regressor(combined_features)

        return classification, regression

    def calculate_color_statistics(self, x):
        """计算颜色统计特征 - 基于你的色彩知识"""
        batch_size = x.size(0)

        # 均值、方差、偏度等统计量
        mean_rgb = torch.mean(x, dim=[2, 3])
        std_rgb = torch.std(x, dim=[2, 3])

        # 颜色分布特征
        hist_features = self.compute_color_histogram(x)

        # 白平衡特征
        wb_features = self.compute_white_balance_features(x)

        stats = torch.cat([mean_rgb, std_rgb, hist_features, wb_features], dim=1)
        return stats
3.2 智能颜色校正网络
python
class IntelligentColorCorrection(nn.Module):
    """智能颜色校正网络 - 端到端解决方案"""

    def __init__(self):
        super().__init__()

        # 编码器
        self.encoder = nn.Sequential(
            nn.Conv2d(3, 64, 3, padding=1),
            nn.ReLU(inplace=True),
            nn.Conv2d(64, 128, 3, padding=1),
            nn.ReLU(inplace=True),
            nn.Conv2d(128, 256, 3, padding=1),
            nn.ReLU(inplace=True)
        )

        # 颜色注意力模块
        self.color_attention = ColorAttentionModule(256)

        # 校正参数预测
        self.correction_predictor = nn.Sequential(
            nn.AdaptiveAvgPool2d(1),
            nn.Flatten(),
            nn.Linear(256, 128),
            nn.ReLU(inplace=True),
            nn.Linear(128, 9)  # 3x3颜色校正矩阵
        )

        # Gamma校正预测
        self.gamma_predictor = nn.Sequential(
            nn.Linear(256, 64),
            nn.ReLU(inplace=True),
            nn.Linear(64, 3)  # RGB三个Gamma值
        )

    def forward(self, x):
        # 特征提取
        features = self.encoder(x)

        # 颜色注意力
        attended_features = self.color_attention(features)

        # 预测校正参数
        color_matrix = self.correction_predictor(attended_features)
        color_matrix = color_matrix.view(-1, 3, 3)

        gamma_values = torch.sigmoid(self.gamma_predictor(attended_features)) * 3.0 + 0.5

        # 应用校正
        corrected = self.apply_correction(x, color_matrix, gamma_values)

        return corrected, color_matrix, gamma_values

    def apply_correction(self, x, color_matrix, gamma_values):
        """应用颜色校正"""
        batch_size, channels, height, width = x.shape

        # 颜色矩阵校正
        x_flat = x.view(batch_size, channels, -1)
        corrected_flat = torch.bmm(color_matrix, x_flat)
        corrected = corrected_flat.view(batch_size, channels, height, width)

        # Gamma校正
        gamma_corrected = torch.pow(corrected, gamma_values.view(batch_size, 3, 1, 1))

        return torch.clamp(gamma_corrected, 0, 1)

class ColorAttentionModule(nn.Module):
    """颜色注意力模块"""

    def __init__(self, channels):
        super().__init__()
        self.channels = channels

        self.color_attention = nn.Sequential(
            nn.Conv2d(channels, channels // 8, 1),
            nn.ReLU(inplace=True),
            nn.Conv2d(channels // 8, channels, 1),
            nn.Sigmoid()
        )

    def forward(self, x):
        attention_weights = self.color_attention(x)
        return x * attention_weights
3.3 损失函数设计
python
class ColorCorrectionLoss(nn.Module):
    """颜色校正损失函数 - 结合传统色彩知识"""

    def __init__(self, weights=None):
        super().__init__()
        self.weights = weights or {
            'mse': 1.0,
            'color_constancy': 0.3,
            'perceptual': 0.2,
            'saturation': 0.1
        }

        self.mse_loss = nn.MSELoss()
        self.l1_loss = nn.L1Loss()

    def color_constancy_loss(self, pred, target):
        """颜色恒常性损失"""
        pred_gray = torch.mean(pred, dim=1, keepdim=True)
        target_gray = torch.mean(target, dim=1, keepdim=True)

        pred_rg_ratio = pred[:, 0:1] / (pred[:, 1:2] + 1e-8)
        target_rg_ratio = target[:, 0:1] / (target[:, 1:2] + 1e-8)

        pred_gb_ratio = pred[:, 1:2] / (pred[:, 2:3] + 1e-8)
        target_gb_ratio = target[:, 1:2] / (target[:, 2:3] + 1e-8)

        ratio_loss = (self.l1_loss(pred_rg_ratio, target_rg_ratio) +
                     self.l1_loss(pred_gb_ratio, target_gb_ratio))

        return ratio_loss

    def saturation_preservation_loss(self, pred, target):
        """饱和度保持损失"""
        pred_saturation = torch.std(pred, dim=1)
        target_saturation = torch.std(target, dim=1)

        return self.l1_loss(pred_saturation, target_saturation)

    def forward(self, pred, target):
        mse_loss = self.mse_loss(pred, target)
        color_constancy_loss = self.color_constancy_loss(pred, target)
        saturation_loss = self.saturation_preservation_loss(pred, target)

        total_loss = (self.weights['mse'] * mse_loss +
                     self.weights['color_constancy'] * color_constancy_loss +
                     self.weights['saturation'] * saturation_loss)

        return total_loss, {
            'mse': mse_loss.item(),
            'color_constancy': color_constancy_loss.item(),
            'saturation': saturation_loss.item()
        }
四、工程化落地方案
4.1 全链路集成方案
python
class FullLinkColorSolution:
    """全链路颜色解决方案 - 结合全链路架构"""

    def __init__(self):
        self.components = {
            'hardware_calibration': ICLevelColorCorrection(),
            'traditional_engine': ColorEngine(),
            'ai_correction': IntelligentColorCorrection(),
            'quality_assessment': ColorQualityEvaluator()
        }

        self.workflow = [
            'hardware_pre_calibration',
            'real_time_monitoring',
            'ai_assisted_correction',
            'quality_verification'
        ]

    def process_frame(self, input_frame, metadata=None):
        """处理单帧图像"""
        results = {}

        # 1. 硬件预校正
        if metadata and 'ic_parameters' in metadata:
            hardware_corrected = self.components['hardware_calibration'].apply_ic_parameters(
                input_frame, metadata['ic_parameters']
            )
            results['hardware_corrected'] = hardware_corrected
        else:
            hardware_corrected = input_frame

        # 2. 实时偏色检测
        deviation_type, confidence = self.detect_color_deviation(hardware_corrected)
        results['deviation_analysis'] = {
            'type': deviation_type,
            'confidence': confidence,
            'severity': self.assess_deviation_severity(hardware_corrected)
        }

        # 3. AI智能校正
        if confidence > 0.7:  # 高置信度偏色
            ai_corrected, correction_matrix, gamma_values = self.components['ai_correction'](
                hardware_corrected
            )
            results['ai_correction'] = {
                'corrected_frame': ai_corrected,
                'correction_matrix': correction_matrix,
                'gamma_values': gamma_values
            }
            final_output = ai_corrected
        else:
            # 使用传统引擎
            traditional_corrected = self.components['traditional_engine'].process_color_deviation(
                hardware_corrected, deviation_type
            )
            results['traditional_correction'] = traditional_corrected
            final_output = traditional_corrected

        # 4. 质量验证
        quality_metrics = self.components['quality_assessment'].evaluate(
            final_output, input_frame
        )
        results['quality_metrics'] = quality_metrics

        return final_output, results

    def detect_color_deviation(self, frame):
        """检测偏色类型和置信度"""
        # 使用传统方法快速检测
        gray_world_balance = self.gray_world_white_balance(frame)
        deviation_from_neutral = np.abs(gray_world_balance - 1.0)

        if deviation_from_neutral[0] > 0.1 and deviation_from_neutral[1] > 0.1:
            return 'yellow_deviation', 0.8
        elif deviation_from_neutral[0] > 0.1 and deviation_from_neutral[2] > 0.1:
            return 'purple_deviation', 0.8
        elif deviation_from_neutral[1] > 0.1 and deviation_from_neutral[2] > 0.1:
            return 'cyan_deviation', 0.8
        else:
            return 'minimal_deviation', 0.3
4.2 实际产品化案例
python
class ProductLevelColorOptimization:
    """产品级颜色优化 - 基于实际项目经验"""

    def __init__(self, product_type):
        self.product_type = product_type
        self.optimization_strategies = {
            'mobile_display': {
                'priority': 'color_accuracy',
                'constraints': ['power_consumption', 'real_time'],
                'target_deltaE': '< 3.0',
                'allowed_correction_latency': '16ms'
            },
            'led_video_wall': {
                'priority': 'uniformity',
                'constraints': ['brightness_consistency', 'color_uniformity'],
                'target_deltaE': '< 5.0',
                'correction_granularity': 'per_panel'
            },
            'broadcast_monitor': {
                'priority': 'color_fidelity',
                'constraints': ['wide_gamut', 'high_precision'],
                'target_deltaE': '< 1.5',
                'color_space': 'DCI-P3'
            }
        }

    def optimize_for_product(self, input_params):
        """根据产品类型优化参数"""
        strategy = self.optimization_strategies[self.product_type]

        optimized_params = input_params.copy()

        if strategy['priority'] == 'color_accuracy':
            # 手机显示:强调颜色准确性
            optimized_params.update({
                'color_correction_strength': 0.8,
                'gamma_precision': 'high',
                'real_time_adaptation': True
            })
        elif strategy['priority'] == 'uniformity':
            # LED视频墙:强调均匀性
            optimized_params.update({
                'local_correction': True,
                'brightness_compensation': True,
                'color_matching_tolerance': 0.05
            })
        elif strategy['priority'] == 'color_fidelity':
            # 广播监视器:强调色彩保真
            optimized_params.update({
                'color_management': True,
                'wide_gamut_support': True,
                'high_bit_depth': True
            })

        return optimized_params

    def validate_solution(self, corrected_results, product_requirements):
        """验证解决方案满足产品要求"""
        validation_report = {}

        # 颜色准确性验证
        color_accuracy = self.measure_color_accuracy(corrected_results)
        validation_report['color_accuracy'] = {
            'deltaE': color_accuracy,
            'requirement_met': color_accuracy < product_requirements['max_deltaE']
        }

        # 性能验证
        processing_time = self.measure_processing_time(corrected_results)
        validation_report['performance'] = {
            'processing_time_ms': processing_time * 1000,
            'requirement_met': processing_time < product_requirements['max_processing_time']
        }

        # 功耗验证(移动设备重要)
        if self.product_type == 'mobile_display':
            power_impact = self.estimate_power_impact(corrected_results)
            validation_report['power_impact'] = {
                'additional_power_mw': power_impact,
                'requirement_met': power_impact < product_requirements['max_power_increase']
            }

        return validation_report
5.1 技术要点
基础理论层:
python
INTERVIEW_KNOWLEDGE_POINTS = {
    'color_science': {
        'color_spaces': ['RGB', 'HSV', 'LAB', 'YUV'],
        'color_transforms': ['RGB2LAB', 'RGB2YUV', 'Gamma校正'],
        'color_difference': ['DeltaE', 'CIEDE2000', '色差感知均匀性']
    },
    'image_processing': {
        'white_balance': ['灰度世界法', '完美反射法', '基于学习的白平衡'],
        'color_correction': ['颜色矩阵校正', '查找表校正', '基于深度学习的校正'],
        'tone_mapping': ['Gamma曲线', 'S曲线', '局部色调映射']
    },
    'deep_learning': {
        'network_architectures': ['CNN', 'UNet', 'GAN', 'Transformer'],
        'loss_functions': ['MSE', 'Perceptual Loss', 'GAN Loss', 'Color-specific Loss'],
        'optimization': ['知识蒸馏', '模型剪枝', '量化部署']
    }
}
5.2 解决方案设计题
典型问题:
"假设小米手机在低光环境下出现黄色偏色,请你设计一个完整的解决方案,从传感器数据到最终显示输出。"
回答框架:
python
def solution_design_interview():
    """解决方案设计框架"""

    solution = {
        'problem_analysis': {
            'root_cause': '低光环境下传感器噪声导致白平衡失效',
            'impact_areas': ['肤色还原', '白色准确性', '整体色温'],
            'constraints': ['实时处理', '低功耗', '硬件兼容']
        },
        'technical_approach': {
            'sensor_level': '多帧降噪 + 改进的AWB算法',
            'isp_pipeline': '自适应颜色矩阵 + 动态Gamma校正',
            'ai_assisted': '轻量级偏色检测网络 + 智能校正',
            'display_tuning': '基于内容的动态色温调整'
        },
        'implementation_strategy': {
            'phase1': '传统算法优化(1-2个月)',
            'phase2': 'AI模型集成(2-3个月)',
            'phase3': '全链路调优(1-2个月)'
        },
        'evaluation_metrics': {
            'objective': 'DeltaE < 3.0, PSNR > 35dB',
            'subjective': '用户满意度 > 4.5/5.0',
            'performance': '处理延迟 < 16ms, 功耗增加 < 5%'
        }
    }

    return solution
5.3 实际编码
典型编码题:
python
def interview_coding_test():
    """面试编码测试 - 颜色校正算法实现"""

    # 题目:实现一个自适应的颜色校正函数
    def adaptive_color_correction(image, reference_colors=None):
        """
        参数:
            image: 输入图像 (H, W, 3)
            reference_colors: 参考颜色值 [(R,G,B), ...]

        返回:
            corrected_image: 校正后的图像
            correction_matrix: 使用的校正矩阵
        """
        # 1. 自动白平衡
        balanced_image = auto_white_balance(image)

        # 2. 颜色矩阵估计
        if reference_colors:
            # 基于参考颜色的精确校正
            correction_matrix = estimate_correction_matrix(image, reference_colors)
        else:
            # 基于统计的自动校正
            correction_matrix = estimate_statistical_correction(balanced_image)

        # 3. 应用校正
        corrected_image = apply_color_matrix(balanced_image, correction_matrix)

        # 4. Gamma调整
        final_image = adaptive_gamma_correction(corrected_image)

        return final_image, correction_matrix

    # 需要实现的关键函数
    def auto_white_balance(image):
        """自动白平衡"""
        # 基于灰度世界假设
        avg_r = np.mean(image[:,:,0])
        avg_g = np.mean(image[:,:,1])
        avg_b = np.mean(image[:,:,2])

        avg_gray = (avg_r + avg_g + avg_b) / 3.0

        # 计算增益
        gain_r = avg_gray / avg_r
        gain_g = avg_gray / avg_g
        gain_b = avg_gray / avg_b

        # 应用增益
        balanced = image.copy()
        balanced[:,:,0] = np.clip(image[:,:,0] * gain_r, 0, 255)
        balanced[:,:,1] = np.clip(image[:,:,1] * gain_g, 0, 255)
        balanced[:,:,2] = np.clip(image[:,:,2] * gain_b, 0, 255)

return balanced.astype(np.uint8)作者简介:现任西安诺瓦星云科技股份有限公司软件工程师,深度参与LED显示画质引擎开发与全链路效果调试,专注AI与传统图像处理的融合创新。
欢迎交流:如果您在显示画质、手机影像领域有类似的技术挑战或合作想法,欢迎通过CSDN私信交流。
-
如果想了解一些成像系统、图像、人眼、颜色等等的小知识,快去看看视频吧 :
- 抖音:数字图像哪些好玩的事,咱就不照课本念,轻轻松松谝闲传
- 快手:数字图像哪些好玩的事,咱就不照课本念,轻轻松松谝闲传
- B站:数字图像哪些好玩的事,咱就不照课本念,轻轻松松谝闲传
- 认准一个头像,保你不迷路:

- 认准一个头像,保你不迷路:
-
您要是也想站在文章开头的巨人的肩膀啦,可以动动您发财的小指头,然后把您的想要展现的名称和公开信息发我,这些信息会跟随每篇文章,屹立在文章的顶部哦
