目录
- 一、路由的核心概念
- 二、前端路由的两种实现方式
*- Hash 模式
-
- History 模式
- 三、主流框架中的路由实践
*- Vue Router 实战
-
- React Router 实战
- 四、路由高级特性
*- 嵌套路由
-
- 动态路由
-
- 路由守卫
-
- 路由懒加载
- 五、常见问题与优化方案
- 六、个人总结与展望
一、路由的核心概念
路由(Routing)是指从源到目的地的信息传输路径选择过程。在前端开发中,路由则是根据 URL 地址展示对应的页面内容,并实现页面之间的无刷新切换。
前端路由的核心价值在于:
- 单页应用(SPA)的基础:无需刷新整个页面,仅更新部分 DOM 内容
- URL 与页面状态的同步:通过 URL 即可还原页面状态
- 提升用户体验:减少页面加载时间,实现流畅的页面切换
二、前端路由的两种实现方式
1. Hash 模式
Hash 模式利用 URL 中的 # 后面的内容(哈希值)来实现路由。哈希值的变化不会触发浏览器的页面刷新,但会触发 hashchange 事件。
实现原理:
- 通过监听
window.onhashchange事件来捕获哈希值变化 - 根据当前哈希值渲染对应的页面内容
代码示例:
javascript
// 简单的 Hash 路由实现
class HashRouter {
  constructor() {
    this.routes = {}; // 存储路由规则
    this.currentPath = ''; // 当前路径

    // 初始化路由
    this.init();
  }

  // 初始化
  init() {
    // 监听 hash 变化
    window.addEventListener('hashchange', () => {
      this.currentPath = window.location.hash.slice(1) || '/';
      this.render();
    });

    // 页面加载时触发一次
    window.addEventListener('load', () => {
      this.currentPath = window.location.hash.slice(1) || '/';
      this.render();
    });
  }

  // 注册路由
  route(path, callback) {
    this.routes[path] = callback;
  }

  // 渲染页面
  render() {
    const callback = this.routes[this.currentPath] || this.routes['*'];
    callback && callback();
  }

  // 跳转路由
  push(path) {
    window.location.hash = path;
  }
}

// 使用示例
const router = new HashRouter();

// 注册路由
router.route('/', () => {
  console.log('首页');
  document.getElementById('app').innerHTML = '<h1>首页</h1>';
});

router.route('/about', () => {
  console.log('关于我们');
  document.getElementById('app').innerHTML = '<h1>关于我们</h1>';
});

router.route('*', () => {
  console.log('404页面');
  document.getElementById('app').innerHTML = '<h1>404 Not Found</h1>';
});

// 跳转路由
// router.push('/about');
2. History 模式
History 模式利用 HTML5 提供的 History API 来实现路由。通过 pushState 和 replaceState 方法可以修改浏览器的历史记录,并且不会触发页面刷新。
实现原理:
- 使用
history.pushState()或history.replaceState()修改 URL - 监听
popstate事件(浏览器前进 / 后退按钮触发) - 结合拦截点击事件实现页面跳转
代码示例:
javascript
// 简单的 History 路由实现
class HistoryRouter {
  constructor() {
    this.routes = {};
    this.currentPath = '';

    this.init();
  }

  init() {
    // 监听 popstate 事件
    window.addEventListener('popstate', () => {
      this.currentPath = window.location.pathname;
      this.render();
    });

    // 页面加载时
    window.addEventListener('load', () => {
      this.currentPath = window.location.pathname;
      this.render();
    });

    // 拦截所有链接点击事件
    this.handleLinkClicks();
  }

  // 处理链接点击
  handleLinkClicks() {
    document.addEventListener('click', (e) => {
      const target = e.target;
      if (target.tagName === 'A' && target.getAttribute('data-router')) {
        e.preventDefault();
        const path = target.getAttribute('href');
        this.push(path);
      }
    });
  }

  // 注册路由
  route(path, callback) {
    this.routes[path] = callback;
  }

  // 渲染页面
  render() {
    const callback = this.routes[this.currentPath] || this.routes['*'];
    callback && callback();
  }

  // 跳转路由
  push(path) {
    history.pushState({}, '', path);
    this.currentPath = path;
    this.render();
  }

  // 替换路由
  replace(path) {
    history.replaceState({}, '', path);
    this.currentPath = path;
    this.render();
  }
}

// 使用示例
const router = new HistoryRouter();

router.route('/', () => {
  document.getElementById('app').innerHTML = '<h1>首页</h1>';
});

router.route('/about', () => {
  document.getElementById('app').innerHTML = '<h1>关于我们</h1>';
});

router.route('/user/:id', (params) => {
  document.getElementById('app').innerHTML = `<h1>用户中心</h1><p>用户ID: ${params.id}</p>`;
});

router.route('*', () => {
  document.getElementById('app').innerHTML = '<h1>404 Not Found</h1>';
});

// 跳转路由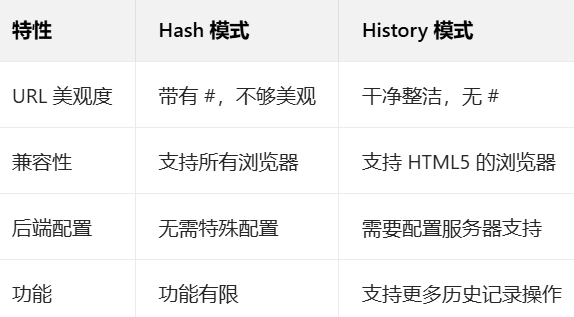
// router.push('/user/123');两种模式对比:
三、主流框架中的路由实践
1. Vue Router 实战
Vue Router 是 Vue.js 官方的路由管理器,与 Vue.js 深度集成。
安装:
bash
npm install vue-router基本使用:
javascript
// router/index.js
import Vue from 'vue'
import Router from 'vue-router'
import Home from '@/components/Home'
import About from '@/components/About'
import User from '@/components/User'
import NotFound from '@/components/NotFound'

Vue.use(Router)

export default new Router({
  mode: 'history', // 使用 history 模式
  routes: [
    {
      path: '/',
      name: 'Home',
      component: Home
    },
    {
      path: '/about',
      name: 'About',
      component: About
    },
    {
      path: '/user/:id',
      name: 'User',
      component: User,
      props: true // 将路由参数传递给组件 props
    },
    {
      path: '*',
      component: NotFound
    }
  ]
})
在 Vue 组件中使用:
bash
<!-- App.vue -->
<template>
  <div id="app">
    <router-link to="/">首页</router-link>
    <router-link to="/about">关于我们</router-link>
    <router-link :to="{ name: 'User', params: { id: 123 } }">用户中心</router-link>

    <router-view/>
  </div>
</template>

<script>
export default {
  name: 'App'
}
</script>
2. React Router 实战
React Router 是 React 生态系统中最常用的路由库。
安装:
bash
npm install react-router-dom基本使用:
javascript
// App.js
import React from 'react';
import { BrowserRouter as Router, Route, Link, Switch } from 'react-router-dom';
import Home from './components/Home';
import About from './components/About';
import User from './components/User';
import NotFound from './components/NotFound';

function App() {
  return (
    <Router>
      <div>
        <nav>
          <Link to="/">首页</Link> |
          <Link to="/about">关于我们</Link> |
          <Link to="/user/123">用户中心</Link>
        </nav>

        <Switch>
          <Route path="/" exact component={Home} />
          <Route path="/about" component={About} />
          <Route path="/user/:id" component={User} />
          <Route component={NotFound} />
        </Switch>
      </div>
    </Router>
  );
}

export default App;在组件中获取路由参数:
javascript
// User.js
import React from 'react';
import { useParams } from 'react-router-dom';

function User() {
  const { id } = useParams();

  return (
    <div>
      <h1>用户中心</h1>
      <p>用户ID: {id}</p>
    </div>
  );
}

export default User;
四、路由高级特性
1. 嵌套路由
嵌套路由允许在一个路由组件内部渲染另一个路由组件,实现页面的层级结构。
Vue Router 嵌套路由示例:
javascript
// router/index.js
const router = new Router({
  routes: [
    {
      path: '/dashboard',
      component: Dashboard,
      children: [
        {
          path: 'home', // 子路由路径不要加 /
          component: Home
        },
        {
          path: 'profile',
          component: Profile
        }
      ]
    }
  ]
});
2. 动态路由
动态路由允许在路由路径中定义参数,例如 /user/:id,其中 id 可以是任意值。
Vue Router 动态路由示例:
javascript
const router = new Router({
  routes: [
    {
      path: '/user/:id',
      component: User,
      props: (route) => ({
        id: route.params.id,
        name: route.query.name
      })
    }
  ]
});
3. 路由守卫
路由守卫用于在路由跳转前进行权限验证、数据预加载等操作。
Vue Router 路由守卫示例:
java
const router = new Router({
  routes: [
    {
      path: '/admin',
      component: Admin,
      meta: { requiresAuth: true } // 需要认证
    }
  ]
});

// 全局前置守卫
router.beforeEach((to, from, next) => {
  if (to.meta.requiresAuth) {
    // 检查是否登录
    if (localStorage.getItem('token')) {
      next();
    } else {
      next('/login');
    }
  } else {
    next();
  }
});

// 路由独享守卫
router.beforeEnter((to, from, next) => {
  // 检查是否有权限访问该路由
  if (hasPermission()) {
    next();
  } else {
    next('/403');
  }
});

// 组件内守卫
export default {
  beforeRouteEnter(to, from, next) {
    // 在组件渲染前执行
    next(vm => {
      // 通过 vm 访问组件实例
      vm.fetchData();
    });
  },
  beforeRouteUpdate(to, from, next) {
    // 路由参数变化时执行
    this.id = to.params.id;
    this.fetchData();
    next();
  },
  beforeRouteLeave(to, from, next) {
    // 离开路由时执行
    if (confirm('确定要离开吗?')) {
      next();
    } else {
      next(false);
    }
  }
}
4. 路由懒加载
路由懒加载(代码分割)可以将不同路由对应的组件分割成不同的代码块,当路由被访问时才加载对应的代码,从而优化首屏加载速度。
Vue Router 路由懒加载示例:
javascript
const router = new Router({
  routes: [
    {
      path: '/home',
      component: () => import('@/components/Home') // 懒加载
    },
    {
      path: '/about',
      component: () => import(/* webpackChunkName: "about" */ '@/components/About') // 命名 chunk
    }
  ]
});
五、个人总结与展望
总结
路由是现代前端开发不可或缺的一部分,它不仅是单页应用的基础,也是提升用户体验的关键技术。通过本文的学习,我们了解了:
- 路由的核心概念和两种实现方式(Hash 模式和 History 模式)
- 主流框架(Vue 和 React)中的路由实践
- 路由的高级特性,如嵌套路由、动态路由、路由守卫和路由懒加载
- 常见问题及解决方案
在实际项目开发中,应根据项目需求选择合适的路由模式和实现方案。对于简单项目,可以使用 Hash 模式;对于需要更好 SEO 和 URL 美观度的项目,可以选择 History 模式,但需要注意服务器配置。