flutter_Boots 是咸鱼开源的三方框架,主要是为原生和flutter之间混合跳转提供的解决方案,下面说一下集成flutter_Boots的步骤和如何在项目中使用flutter_Boots。
-
创建原生工程和flutter module
- 使用xcode创建iOS app原生工程,这个比较简单,这里面就不去贴图了。
- 创建flutter module,执行命令 flutter create -t module my_flutter_module。
- 这样在本地就把iOS工程和flutter module创建好了,如下图:

-
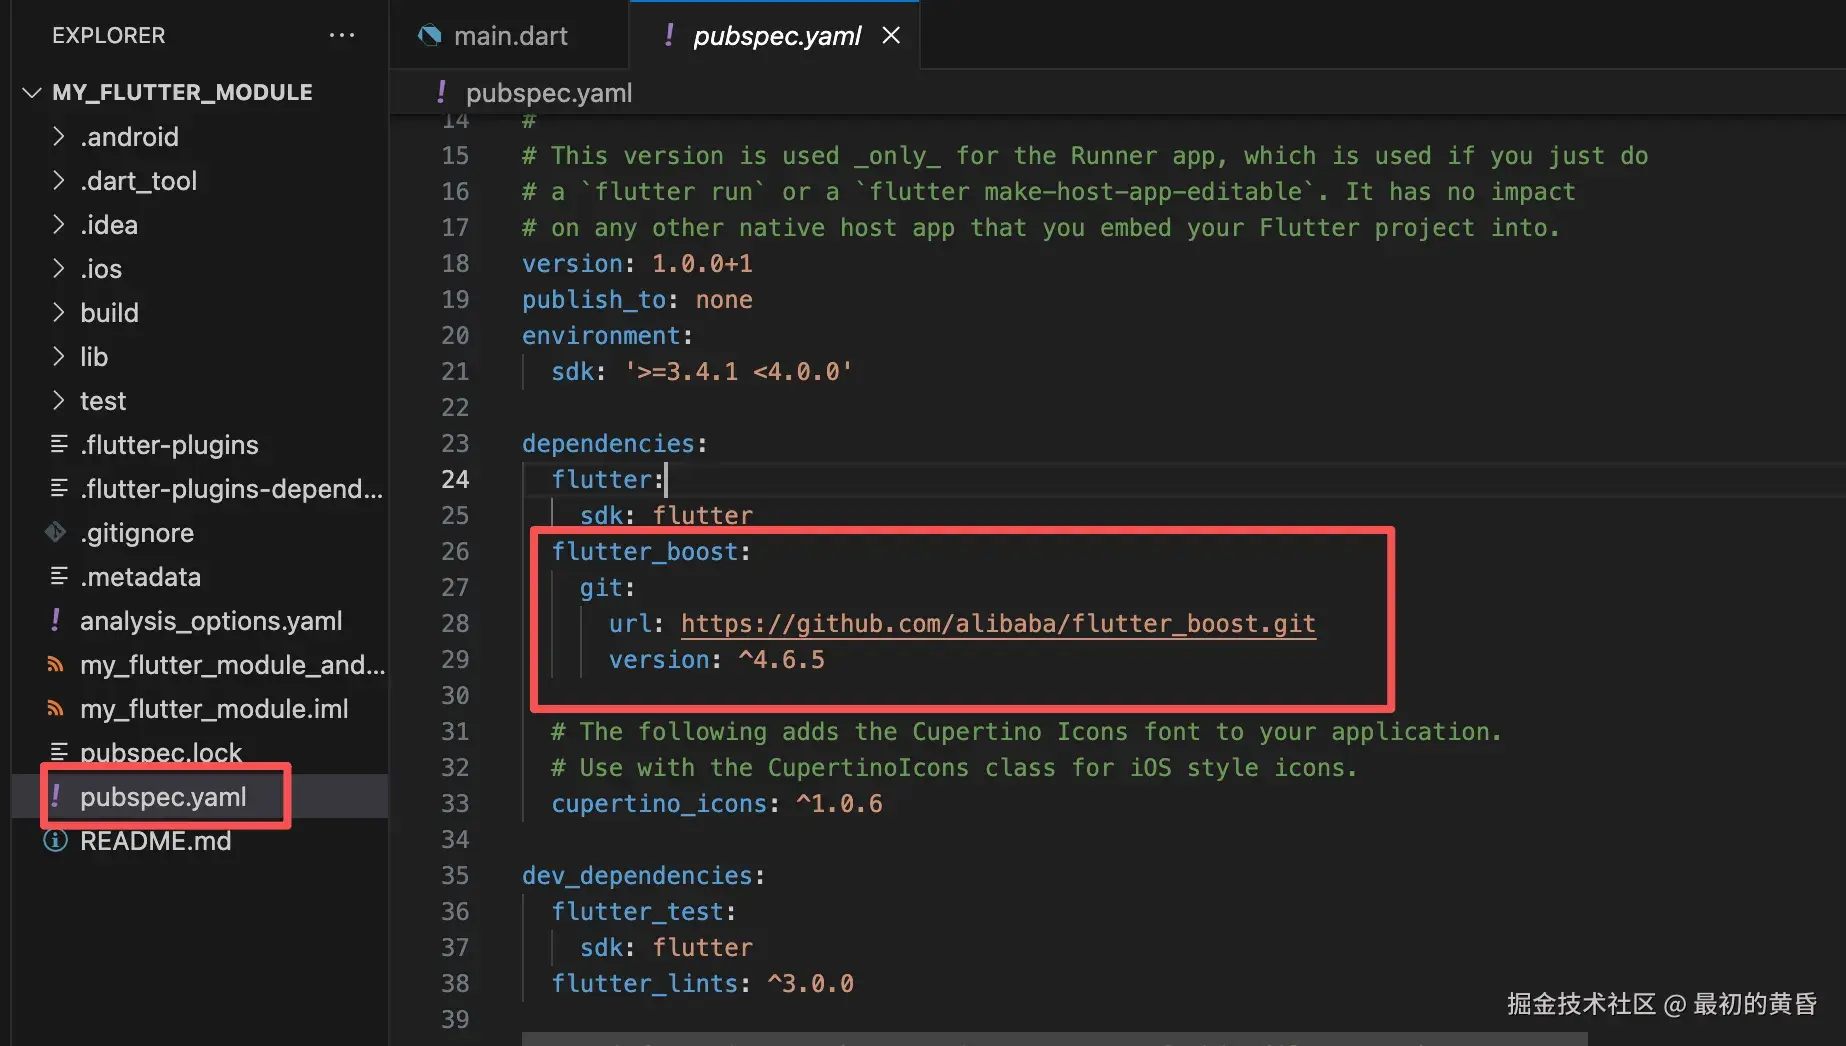
flutter安装flutter_Boots依赖
- 需要注意的是,flutter_boost的高版本需要使用git这种方式去安装依赖。
- 安装截图配置依赖,然后执行命令 flutter pub get按钮依赖。
-
ios 配置pod
- cd my_ios_app
- pod init
- 修改podfile文件
- pod install
ruby# Uncomment the next line to define a global platform for your project platform :ios, '13.0' flutter_application_path = '../my_flutter_module' load File.join(flutter_application_path, '.ios', 'Flutter', 'podhelper.rb') target 'my_ios_app' do # Comment the next line if you don't want to use dynamic frameworks use_frameworks! install_all_flutter_pods(flutter_application_path) # Pods for my_ios_app end post_install do |installer| flutter_post_install(installer) if defined?(flutter_post_install) end -
flutter 编写flutter_boost集成代码
-
导入flutter_boost
arduinoimport 'package:flutter_boost/flutter_boost.dart'; -
创建CustomFlutterBinding
scalaclass CustomFlutterBinding extends WidgetsFlutterBinding with BoostFlutterBinding {} -
测试页面
phpclass DefaultPage extends StatelessWidget { const DefaultPage({super.key}); @override Widget build(BuildContext context) { return Scaffold( appBar: AppBar(title: const Text('Flutter Boost')), body: Center( child: Column( mainAxisAlignment: MainAxisAlignment.center, children: [ ElevatedButton( onPressed: () { BoostNavigator.instance.push('/one', arguments: {'msg': 'hello from default page 1'}); }, child: const Text('go to page one'), ), ElevatedButton( onPressed: () { BoostNavigator.instance.push('/two', arguments: {'msg': 'hello from default page 2'}); }, child: const Text('go to page two'), ), ElevatedButton( onPressed: () { BoostNavigator.instance.push('/home', arguments: {'msg': 'hello from default page 2'}); }, child: const Text('go to page native home'), ) ], ), ), ); } } class OnePage extends StatelessWidget { const OnePage({super.key, required this.pramas}); final Map pramas; @override Widget build(BuildContext context) { return Scaffold( appBar: AppBar(title: const Text('page one')), body: Text('page one, 参数: ${pramas['msg']}'), ); } } class TwoPage extends StatelessWidget { const TwoPage({super.key, required this.pramas}); final Map pramas; @override Widget build(BuildContext context) { return Scaffold( appBar: AppBar(title: const Text('page two')), body: Text('page two, 参数: ${pramas['msg']}'), ); } } -
编写widget和路由代码
typescriptvoid main() { CustomFlutterBinding(); runApp(const MyApp()); } class MyApp extends StatefulWidget { const MyApp({super.key}); @override State<StatefulWidget> createState() => _MyAppState(); } class _MyAppState extends State<MyApp> { @override Widget build(BuildContext context) { return FlutterBoostApp(routeFactory); } Widget appBuilder(Widget home) { return MaterialApp( home: home, debugShowCheckedModeBanner: true, builder: (_, __) { return home; }, ); } } Route<dynamic>? routeFactory( RouteSettings settings, bool isContainerPage, String? uniqueId) { final pramas = (settings.arguments as Map?) ?? {}; switch (settings.name) { case '/': return MaterialPageRoute( settings: settings, builder: (_) => const DefaultPage()); case '/one': return MaterialPageRoute( settings: settings, builder: (_) => OnePage(pramas: pramas)); case '/two': return MaterialPageRoute( settings: settings, builder: (_) => TwoPage(pramas: pramas)); default: return null; } }flutter端代码集成完毕。
-
-
iOS端代码集成
-
先创建一个BoostDelegate继承FlutterBoostDelegate,里面主要的逻辑就是实现push原生、push flutter、pop的方法.
swiftimport Foundation import flutter_boost class BoostDelegate: NSObject, FlutterBoostDelegate { //push导航栏 var navigationController: UINavigationController? //记录返回flutter侧返回结果列表 var resultTable: Dictionary<String, ([AnyHashable: Any]?) -> Void> = [:] func pushNativeRoute(_ pageName: String!, arguments: [AnyHashable : Any]!) { let isPresent = arguments["isPresent"] as? Bool ?? false let isAnimated = arguments["isAnimated"] as? Bool ?? true var targetViewController = UIViewController() if pageName == "/home" { targetViewController = HomeViewController() } if isPresent { navigationController?.present(targetViewController, animated: isAnimated) } else { navigationController?.pushViewController(targetViewController, animated: isAnimated) } } func pushFlutterRoute(_ options: FlutterBoostRouteOptions!) { let vc: FBFlutterViewContainer = FBFlutterViewContainer() vc.setName(options.pageName, uniqueId:options.uniqueId, params: options.arguments, opaque: options.opaque) let isPresent = options.arguments["isPresent"] as? Bool ?? false let isAnimated = options.arguments["isAnimated"] as? Bool ?? true //对这个页面设置结果 resultTable[options.pageName] = options.onPageFinished if (isPresent || !options.opaque) { navigationController?.present(vc, animated: isAnimated) } else { navigationController?.pushViewController(vc, animated: isAnimated) } } func popRoute(_ options: FlutterBoostRouteOptions!) { //如果当前被present的vc是container,那么就执行dismiss逻辑 if let vc = self.navigationController?.presentedViewController as? FBFlutterViewContainer,vc.uniqueIDString() == options.uniqueId{ //这里分为两种情况,由于UIModalPresentationOverFullScreen下,生命周期显示会有问题 //所以需要手动调用的场景,从而使下面底部的vc调用viewAppear相关逻辑 if vc.modalPresentationStyle == .overFullScreen { //这里手动beginAppearanceTransition触发页面生命周期 self.navigationController?.topViewController?.beginAppearanceTransition(true, animated: false) vc.dismiss(animated: true) { self.navigationController?.topViewController?.endAppearanceTransition() } }else{ //正常场景,直接dismiss vc.dismiss(animated: true, completion: nil) } }else{ self.navigationController?.popViewController(animated: true) } //否则直接执行pop逻辑 //这里在pop的时候将参数带出,并且从结果表中移除 if let onPageFinshed = resultTable[options.pageName] { onPageFinshed(options.arguments) resultTable.removeValue(forKey: options.pageName) } } }
-
-
修改Appdelegate文件
swiftvar boostDelegate = BoostDelegate() func application(_ application: UIApplication, didFinishLaunchingWithOptions launchOptions: [UIApplication.LaunchOptionsKey: Any]?) -> Bool { // Override point for customization after application launch. FlutterBoost.instance().setup(application, delegate: boostDelegate, callback: { engine in }) return true } -
添加跳转交互
-
跳转flutter
iniif let appDelegate = UIApplication.shared.delegate as? AppDelegate { appDelegate.boostDelegate.navigationController = self.navigationController } let ops = FlutterBoostRouteOptions() ops.pageName = "/" ops.arguments = ["msg":"app"] FlutterBoost.instance().open(ops) -
跳转原生
phpElevatedButton( onPressed: () { BoostNavigator.instance.push('/home', arguments: {'msg': 'hello from default page 2'}); }, child: const Text('go to page native home'), )
-
通过以上的集成步骤和代码编写,我们就可以流畅的在flutter和原生之间互相跳转了。