一、环境版本说明(兼容不踩坑)
| 组件 | 推荐版本 |
|---|---|
| SpringBoot | 2.2.13 |
| Elasticsearch | 6.8.23 |
| Spring Data Elasticsearch | 随 Boot 版本自动匹配 |
| JDK | 1.8 |
| IDEA | 2022+ |
二、IDEA 手动创建 SpringBoot 项目
- 新建空 Maven 项目
- File → New → Project → 选择
Maven,JDK 选 1.8/11,下一步 - 填写 Group、Artifact(微服务模块名,如
es-service),完成创建 - 删除
src以外多余文件,手动补全 SpringBoot 结构
- pom.xml 引入核心依赖
XML
<?xml version="1.0" encoding="UTF-8"?>
<project xmlns="http://maven.apache.org/POM/4.0.0"
         xmlns:xsi="http://www.w3.org/2001/XMLSchema-instance"
         xsi:schemaLocation="http://maven.apache.org/POM/4.0.0 http://maven.apache.org/xsd/maven-4.0.0.xsd">
    <modelVersion>4.0.0</modelVersion>

    <!-- 父工程SpringBoot -->
    <parent>
        <groupId>org.springframework.boot</groupId>
        <artifactId>spring-boot-starter-parent</artifactId>
        <version>2.2.13.RELEASE</version>
        <relativePath/>
    </parent>

    <groupId>org.example</groupId>
    <artifactId>Elasticsearch-demo-service</artifactId>
    <version>1.0-SNAPSHOT</version>
    <name>es-service</name>

    <properties>
        <maven.compiler.source>8</maven.compiler.source>
        <maven.compiler.target>8</maven.compiler.target>
        <project.build.sourceEncoding>UTF-8</project.build.sourceEncoding>
        <!-- 与 ES 6.8.23 服务端版本对齐 -->
        <elasticsearch.version>6.8.23</elasticsearch.version>
    </properties>

    <dependencies>
        <!-- SpringBoot Web 微服务基础 -->
        <dependency>
            <groupId>org.springframework.boot</groupId>
            <artifactId>spring-boot-starter-web</artifactId>
        </dependency>

        <!-- SpringData Elasticsearch 核心依赖 -->

        <dependency>
            <groupId>org.springframework.boot</groupId>
            <artifactId>spring-boot-starter-data-elasticsearch</artifactId>
        </dependency>

        <!-- ES 6.8 REST 客户端,版本由 elasticsearch.version 统一管理 -->
        <dependency>
            <groupId>org.elasticsearch.client</groupId>
            <artifactId>elasticsearch-rest-high-level-client</artifactId>
        </dependency>

        <!-- lombok简化实体类 -->
        <dependency>
            <groupId>org.projectlombok</groupId>
            <artifactId>lombok</artifactId>
            <optional>true</optional>
        </dependency>

        <!-- 测试 -->
        <dependency>
            <groupId>org.springframework.boot</groupId>
            <artifactId>spring-boot-starter-test</artifactId>
            <scope>test</scope>
        </dependency>

    </dependencies>

    <build>
        <plugins>
            <plugin>
                <groupId>org.springframework.boot</groupId>
                <artifactId>spring-boot-maven-plugin</artifactId>
                <configuration>
                    <excludes>
                        <exclude>
                            <goupid>org.projectlombok</goupid>
                            <artifactId>lombok</artifactId>
                        </exclude>
                    </excludes>
                </configuration>
            </plugin>
        </plugins>
    </build>

</project>
刷新 Maven,等待依赖下载完成。
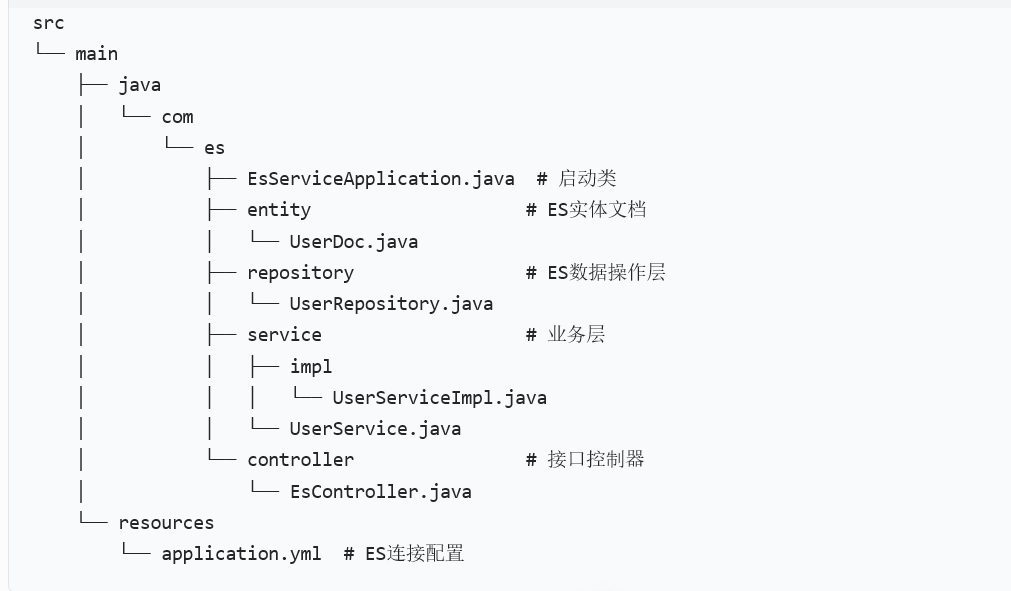
三、项目目录手动创建(标准微服务分层)
四、配置文件 application.yml ES 连接
XML
server:
  port: 8081 # 微服务端口,避免冲突
spring:
  elasticsearch:
    rest:
      # ES 6.8 REST 地址,多个节点逗号分隔
      uris: http://192.168.1.4:9200
      # 无账号密码留空,有认证填写
      username:
      password:
      connection-timeout: 10s
      read-timeout: 30s
五、编写启动类 EsServiceApplication.java
java
@SpringBootApplication(exclude = {
        RestClientAutoConfiguration.class,
        ElasticsearchDataAutoConfiguration.class
})
@EnableElasticsearchRepositories(basePackages = "com.es.repository")
public class EsServiceApplication {
    public static void main(String[] args) {
        SpringApplication.run(EsServiceApplication.class,args);
    }
}
六、ES 文档实体类 UserDoc(对应 ES 索引)
注解:@Document、@Id、@Field
java
package com.es.entity;


import lombok.AllArgsConstructor;
import lombok.Data;
import lombok.NoArgsConstructor;
import org.springframework.data.annotation.Id;
import org.springframework.data.elasticsearch.annotations.Document;
import org.springframework.data.elasticsearch.annotations.Field;
import org.springframework.data.elasticsearch.annotations.FieldType;

// indexName:ES索引名;type:ES6.x 必填;createIndex = true 项目启动自动创建索引
@Document(indexName = "user_info", type = "doc", createIndex = true)
@Data
@NoArgsConstructor
@AllArgsConstructor
public class UserDoc {

    // ES文档唯一ID
    @Id
    private Long id;

    // type字段类型,text支持分词,keyword不分词
    @Field(type = FieldType.Text, analyzer = "ik_max_word")
    private String username;

    @Field(type = FieldType.Keyword)
    private String phone;

    @Field(type = FieldType.Integer)
    private Integer age;

    @Field(type = FieldType.Text, analyzer = "ik_max_word")
    private String address;
}
分词器 ik 需要提前在 ES 安装 ik 分词插件,否则去掉analyzer属性。
七、Repository 持久层(SpringDataES,类似 MybatisPlus)
无需写 SQL,内置 CRUD、分页、条件查询
java
@Repository
public interface UserRepository extends ElasticsearchRepository<UserDoc, Long> {

    // 自定义根据用户名模糊分页查询(方法名自动解析查询)
    Page<UserDoc> findByUsernameLike(String username, Pageable pageable);
}
八、业务层 Service
- UserService 接口
java
public interface UserService {
    // 新增/更新文档
    void saveUser(UserDoc userDoc);

    // 根据ID查询
    UserDoc getUserById(Long id);

    // 根据ID删除
    void deleteUser(Long id);

    // 分页模糊查询用户名
    Page<UserDoc> searchUser(String keyword, Integer pageNum, Integer pageSize);
}- UserServiceImpl 实现类
java
package com.es.service.impl;

import com.es.entity.UserDoc;
import com.es.repository.UserRepository;
import com.es.service.UserService;
import org.springframework.data.domain.Page;
import org.springframework.data.domain.PageRequest;
import org.springframework.data.domain.Pageable;
import org.springframework.stereotype.Service;

import javax.annotation.Resource;

@Service
public class UserServiceImpl implements UserService {

    @Resource
    private UserRepository userRepository;

    @Override
    public void saveUser(UserDoc userDoc) {
        userRepository.save(userDoc);
    }

    @Override
    public UserDoc getUserById(Long id) {
        return userRepository.findById(id).orElse(null);
    }

    @Override
    public void deleteUser(Long id) {
        userRepository.deleteById(id);
    }

    @Override
    public Page<UserDoc> searchUser(String keyword, Integer pageNum, Integer pageSize) {
        // ES分页页码从0开始
        Pageable pageable = PageRequest.of(pageNum - 1, pageSize);
        return userRepository.findByUsernameLike(keyword, pageable);
    }
}
九、Controller 对外微服务接口
java
package com.es.controller;

import com.es.entity.UserDoc;
import com.es.service.UserService;
import org.springframework.data.domain.Page;
import org.springframework.web.bind.annotation.*;

import javax.annotation.Resource;

@RestController
@RequestMapping("/es/user")
public class EsController {

    @Resource
    private UserService userService;

    // 新增/修改
    @PostMapping("/save")
    public String save(@RequestBody UserDoc userDoc) {
        userService.saveUser(userDoc);
        return "操作成功";
    }

    // 根据id查询
    @GetMapping("/{id}")
    public UserDoc get(@PathVariable Long id) {
        return userService.getUserById(id);
    }

    // 删除
    @DeleteMapping("/{id}")
    public String delete(@PathVariable Long id) {
        userService.deleteUser(id);
        return "删除成功";
    }

    // 分页搜索
    @GetMapping("/search")
    public Page<UserDoc> search(
            @RequestParam String keyword,
            @RequestParam(defaultValue = "1") Integer pageNum,
            @RequestParam(defaultValue = "10") Integer pageSize
    ) {
        return userService.searchUser(keyword, pageNum, pageSize);
    }
}
十、前置准备:启动 Elasticsearch
- 解压 ES6.8.23,执行
bin/elasticsearch启动 - 访问:http://127.0.0.1:9200 出现 json 代表启动成功
- 关闭防火墙、跨域(可选),避免连接拒绝
十一、启动项目测试接口
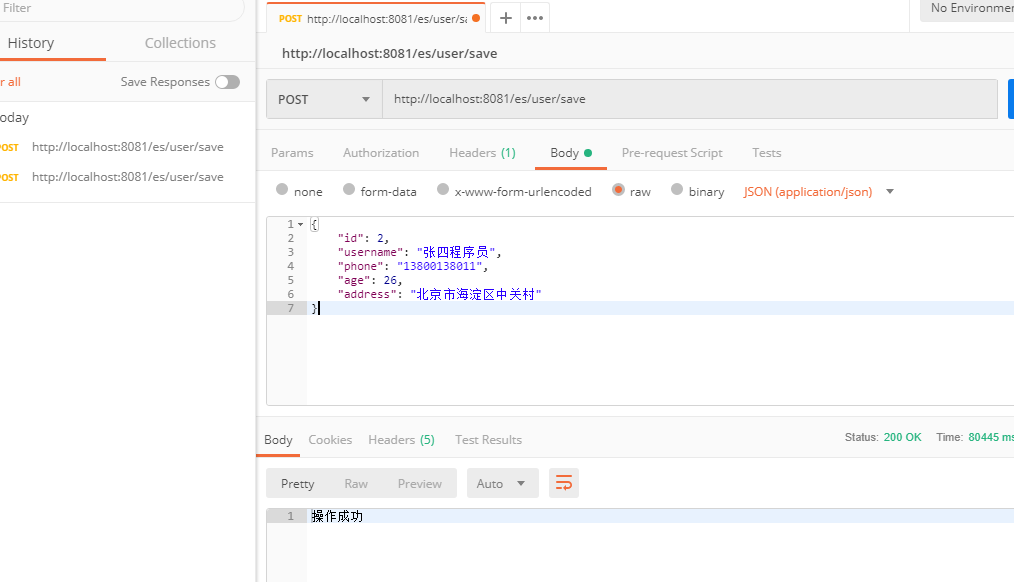
1. 新增数据 POST http://localhost:8081/es/user/save
请求体 JSON:
java
{
    "id": 1,
    "username": "张三程序员",
    "phone": "13800138000",
    "age": 26,
    "address": "北京市海淀区中关村"
}
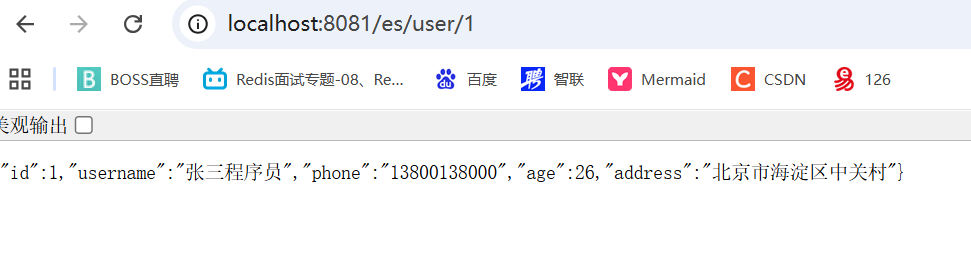
2. 查询 GET http://localhost:8081/es/user/1
3. 模糊搜索 GET http://localhost:8081/es/user/search?keyword=张三 & pageNum=1&pageSize=10

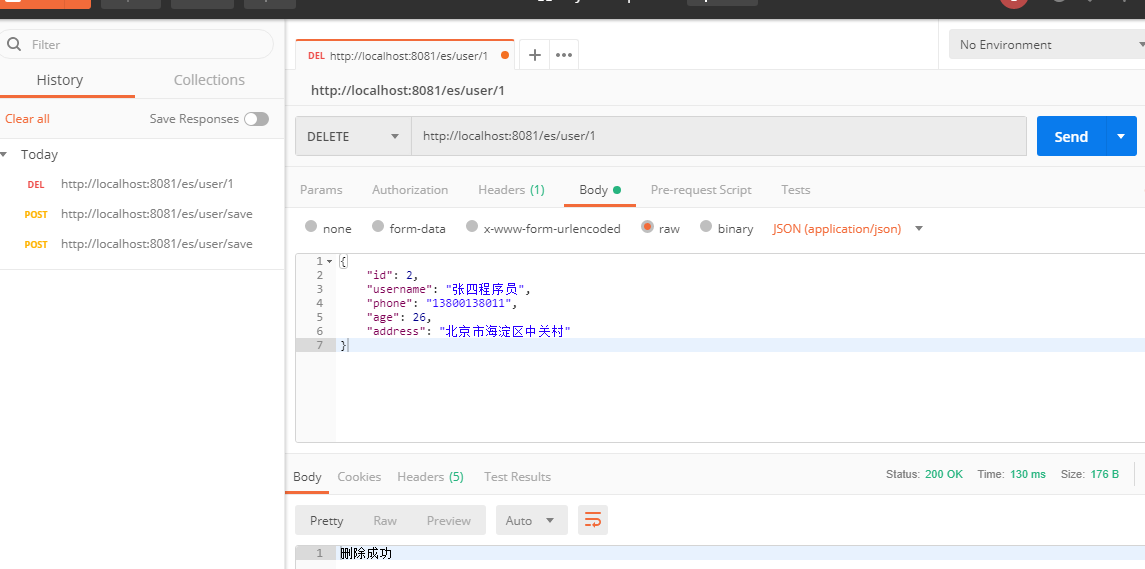
4. 删除 DELETE http://localhost:8081/es/user/1