提示:基于之前I2C 基础知识了解:设备树配置、配置GPIO、I2C驱动框架的了解,这里在此基础上进行I2C 通信。
文章目录
- 前言
- 一、参考资料
- 二、知识点分析
-
- 搞清楚需求-IIC驱动程序
- [IIC 用到的api](#IIC 用到的api)
-
- [i2c_master_send / i2c_master_recv](#i2c_master_send / i2c_master_recv)
- i2c_transfer
- 三大函数核心区别对照
- 结构体-i2c_msg-i2c_client
- [IIC 读操作](#IIC 读操作)
- [IIC 写操作](#IIC 写操作)
- [IIC 调用](#IIC 调用)
- 三、驱动源码实现-实现IIC读写
- 四、驱动验证
- 总结
前言
在之前I2C基础上进行I2C 通信,打通通信知识点。
一、参考资料
之前基础笔记:
关联内容:
二、知识点分析
搞清楚需求-IIC驱动程序
如上,我们最终目的是什么,就是在之前IIC 驱动框架的基础上进行IIC通讯,让IIC工作起来。
那么如何验证,在之前程序基础上进行了IIC 读写操作并调用读写来验证IIC 。
IIC 用到的api
这里仅从IIC 通讯案例中涉及到的api 来进行讲解。
i2c_master_send / i2c_master_recv
路径:kernel/include/linux/i2c.h
具体源码如下:
java
/**
 * i2c_master_send - issue a single I2C message in master transmit mode
 * @client: Handle to slave device
 * @buf: Data that will be written to the slave
 * @count: How many bytes to write, must be less than 64k since msg.len is u16
 *
 * Returns negative errno, or else the number of bytes written.
 */
static inline int i2c_master_send(const struct i2c_client *client,
				  const char *buf, int count)
{
	return i2c_transfer_buffer_flags(client, (char *)buf, count, 0);
};


/**
 * i2c_master_recv - issue a single I2C message in master receive mode
 * @client: Handle to slave device
 * @buf: Where to store data read from slave
 * @count: How many bytes to read, must be less than 64k since msg.len is u16
 *
 * Returns negative errno, or else the number of bytes read.
 */
static inline int i2c_master_recv(const struct i2c_client *client,
				  char *buf, int count)
{
	return i2c_transfer_buffer_flags(client, buf, count, I2C_M_RD);
};
其实就是单收发报文,然后都调用了 i2c_transfer_buffer_flags
i2c_transfer
如上分析 i2c_master_send / i2c_master_recv 都是指向 i2c_transfer_buffer_flags,那么我们看看 i2c_transfer_buffer_flags 方法函数源码,如下:
路径:kernel/drivers/i2c/i2c-core-base.c
java
/**
 * i2c_transfer_buffer_flags - issue a single I2C message transferring data
 *			       to/from a buffer
 * @client: Handle to slave device
 * @buf: Where the data is stored
 * @count: How many bytes to transfer, must be less than 64k since msg.len is u16
 * @flags: The flags to be used for the message, e.g. I2C_M_RD for reads
 *
 * Returns negative errno, or else the number of bytes transferred.
 */
int i2c_transfer_buffer_flags(const struct i2c_client *client, char *buf,
			      int count, u16 flags)
{
	int ret;
	struct i2c_msg msg = {
		.addr = client->addr,
		.flags = flags | (client->flags & I2C_M_TEN),
		.len = count,
		.buf = buf,
	};

	ret = i2c_transfer(client->adapter, &msg, 1);

	/*
	 * If everything went ok (i.e. 1 msg transferred), return #bytes
	 * transferred, else error code.
	 */
	return (ret == 1) ? count : ret;
}
EXPORT_SYMBOL(i2c_transfer_buffer_flags);
继续看 i2c_transfer 源码,如下
java
/**
 * i2c_transfer - execute a single or combined I2C message
 * @adap: Handle to I2C bus
 * @msgs: One or more messages to execute before STOP is issued to
 *	terminate the operation; each message begins with a START.
 * @num: Number of messages to be executed.
 *
 * Returns negative errno, else the number of messages executed.
 *
 * Note that there is no requirement that each message be sent to
 * the same slave address, although that is the most common model.
 */
int i2c_transfer(struct i2c_adapter *adap, struct i2c_msg *msgs, int num)
{
	int ret;

	/* REVISIT the fault reporting model here is weak:
	 *
	 *  - When we get an error after receiving N bytes from a slave,
	 *    there is no way to report "N".
	 *
	 *  - When we get a NAK after transmitting N bytes to a slave,
	 *    there is no way to report "N" ... or to let the master
	 *    continue executing the rest of this combined message, if
	 *    that's the appropriate response.
	 *
	 *  - When for example "num" is two and we successfully complete
	 *    the first message but get an error part way through the
	 *    second, it's unclear whether that should be reported as
	 *    one (discarding status on the second message) or errno
	 *    (discarding status on the first one).
	 */

	if (adap->algo->master_xfer) {
#ifdef DEBUG
		for (ret = 0; ret < num; ret++) {
			dev_dbg(&adap->dev,
				"master_xfer[%d] %c, addr=0x%02x, len=%d%s\n",
				ret, (msgs[ret].flags & I2C_M_RD) ? 'R' : 'W',
				msgs[ret].addr, msgs[ret].len,
				(msgs[ret].flags & I2C_M_RECV_LEN) ? "+" : "");
		}
#endif

		if (in_atomic() || irqs_disabled()) {
			ret = i2c_trylock_bus(adap, I2C_LOCK_SEGMENT);
			if (!ret)
				/* I2C activity is ongoing. */
				return -EAGAIN;
		} else {
			i2c_lock_bus(adap, I2C_LOCK_SEGMENT);
		}

		ret = __i2c_transfer(adap, msgs, num);
		i2c_unlock_bus(adap, I2C_LOCK_SEGMENT);

		return ret;
	} else {
		dev_dbg(&adap->dev, "I2C level transfers not supported\n");
		return -EOPNOTSUPP;
	}
}
EXPORT_SYMBOL(i2c_transfer);
三大函数核心区别对照
综合上面源码,看注释就可以明白区别,这里直接对照表如下:
| 对比维度 | i2c_master_send / i2c_master_recv | i2c_transfer |
|---|---|---|
| 支持消息数量 | 仅单条 i2c_msg | 支持多条连续 msg 数组 |
| 总线时序 | 单次传输结束必发 STOP,断开总线 | 多条消息中间无 STOP,连续占用总线 |
| 传入句柄 | struct i2c_client(设备) | struct i2c_adapter(硬件总线) |
| 读写控制 | 固定纯写 / 纯读,无法混合 | 每条 msg 可独立配置读写标志 |
| 使用门槛 | 简单,新手友好 | 稍复杂,需要手动构造 i2c_msg |
| 寄存器读取 | ❌ 无法实现 | ✅ 唯一能实现先写后读时序 |
| 典型场景 | 简单单发、单纯只读 | 触摸 / 传感器寄存器读写、多段连续 I2C 报文 |
所以 大多数场景我们用的是 i2c_transfer 方法,只是需要自己去拼接 i2c_msg 结构体。
java
	struct i2c_msg msg = {
		.addr = client->addr,
		.flags = flags | (client->flags & I2C_M_TEN),
		.len = count,
		.buf = buf,
	};
结构体-i2c_msg-i2c_client
路径:include/uapi/linux/i2c.h ,i2c_msg这个是永远传输i2c 数据,读写中会用到,可以理解为通信介质。
java
struct i2c_msg {
	__u16 addr;	/* slave address			*/
	__u16 flags;
#define I2C_M_RD		0x0001	/* read data, from slave to master */
					/* I2C_M_RD is guaranteed to be 0x0001! */
#define I2C_M_TEN		0x0010	/* this is a ten bit chip address */
#define I2C_M_DMA_SAFE		0x0200	/* the buffer of this message is DMA safe */
					/* makes only sense in kernelspace */
					/* userspace buffers are copied anyway */
#define I2C_M_RECV_LEN		0x0400	/* length will be first received byte */
#define I2C_M_NO_RD_ACK		0x0800	/* if I2C_FUNC_PROTOCOL_MANGLING */
#define I2C_M_IGNORE_NAK	0x1000	/* if I2C_FUNC_PROTOCOL_MANGLING */
#define I2C_M_REV_DIR_ADDR	0x2000	/* if I2C_FUNC_PROTOCOL_MANGLING */
#define I2C_M_NOSTART		0x4000	/* if I2C_FUNC_NOSTART */
#define I2C_M_STOP		0x8000	/* if I2C_FUNC_PROTOCOL_MANGLING */
	__u16 len;		/* msg length				*/
	__u8 *buf;		/* pointer to msg data			*/
};
具体核心参数说明如下:
java
struct i2c_msg {
	__u16 addr;     // I2C从设备7位地址
	__u16 flags;    // 传输控制标志位(多个宏按位或组合)
	__u16 len;      // 当前这条消息要传输的字节数量
	__u8 *buf;      // 数据缓冲区指针,存放收发的字节数据
};
i2c_client 结构体定义如下:
java
struct i2c_client {
	unsigned short flags;		/* div., see below		*/
	unsigned short addr;		/* chip address - NOTE: 7bit	*/
					/* addresses are stored in the	*/
					/* _LOWER_ 7 bits		*/
	char name[I2C_NAME_SIZE];
	struct i2c_adapter *adapter;	/* the adapter we sit on	*/
	struct device dev;		/* the device structure		*/
	int init_irq;			/* irq set at initialization	*/
	int irq;			/* irq issued by device		*/
	struct list_head detected;
#if IS_ENABLED(CONFIG_I2C_SLAVE)
	i2c_slave_cb_t slave_cb;	/* callback for slave mode	*/
#endif
};
IIC 读操作
java
//i2c 读函数
int ft5x06_read_reg(u8 reg_addr)
{
u8 data; //i2c 通讯,以最小8位为最小单位
// i2c_transfer标准读写流程:先写寄存器地址,再读数据
struct i2c_msg msgs[2] = {
[0] = {
.addr = ft5x06_client->addr, // I2C从机地址0x38
.flags = 0, // 标志0 = I2C写操作
.len = sizeof(reg_addr), // 长度1字节(寄存器地址)
.buf = ®_addr, // 缓冲区:要读取的寄存器号
},
[1] = {
.addr = ft5x06_client->addr,
.flags = I2C_M_RD, // I2C_M_RD = 读操作标志
.len = sizeof(data), // 读取1字节返回值
.buf = &data, // 读到的数据存入data
},
};
// i2c_transfer:发起一组I2C消息,返回成功执行的msg数量
// ARRAY_SIZE(msgs)=2,必须两条消息都执行成功才算读取正常
if (i2c_transfer(ft5x06_client->adapter, msgs, ARRAY_SIZE(msgs)) != ARRAY_SIZE(msgs)){
return -EIO; // 读写失败,返回IO错误码
}
return data; // 返回寄存器读到的值
}那么构造从机地址 addr从哪里来? 在 方法 int ft5x06_probe(struct i2c_client *client, const struct i2c_device_id *id) 也就是 probe 函数中的 i2c_client 指针变量中去取
所以在程序中定义全局变量:struct i2c_client *ft5x06_client; ,然后赋值
java
int ft5x06_probe(struct i2c_client *client, const struct i2c_device_id *id)
{
.....
    ft5x06_client = client;
.....
IIC 写操作
写操作其实跟简单,对比读操作来说:
java
void ft5x06_write_reg(u8 reg_addr, u8 data, u16 len)
{
	u8 buff[256]; // 本地缓冲区,最大255字节数据+1字节寄存器地址
	struct i2c_msg msgs[] = {
		[0] = {
			.addr = ft5x06_client->addr,
			.flags = 0, // 纯写操作
			.len = len + 1, // 总长度 = 寄存器地址1字节 + 有效数据长度
			.buf = buff,
		},
	};
	buff[0] = reg_addr;          // 缓冲区首字节:寄存器地址
	memcpy(&buff[1], &data, len); // 后续空间拷贝待写入数据
	// 发起I2C写传输
	if (i2c_transfer(ft5x06_client->adapter, msgs, ARRAY_SIZE(msgs)) != ARRAY_SIZE(msgs)) {
		return; // 写入失败直接退出,无错误返回、无打印
	}
}
IIC 调用
接下来就开始调用了,如下:
java
int ft5x06_probe(struct i2c_client *client, const struct i2c_device_id *id)
{

    int ret=0;

    int value=0;
    ft5x06_client = client;


    ....................
    ft5x06_write_reg(0x80,0x4b,1);
    value = ft5x06_read_reg(0x80);

    printk("reg  0x80 is %#x\n",value);


    return 0;
}
有人会问,未删除传递寄存器地址0x80,哪里来的??? 那当然是数据手册里面找的,不是瞎写的。
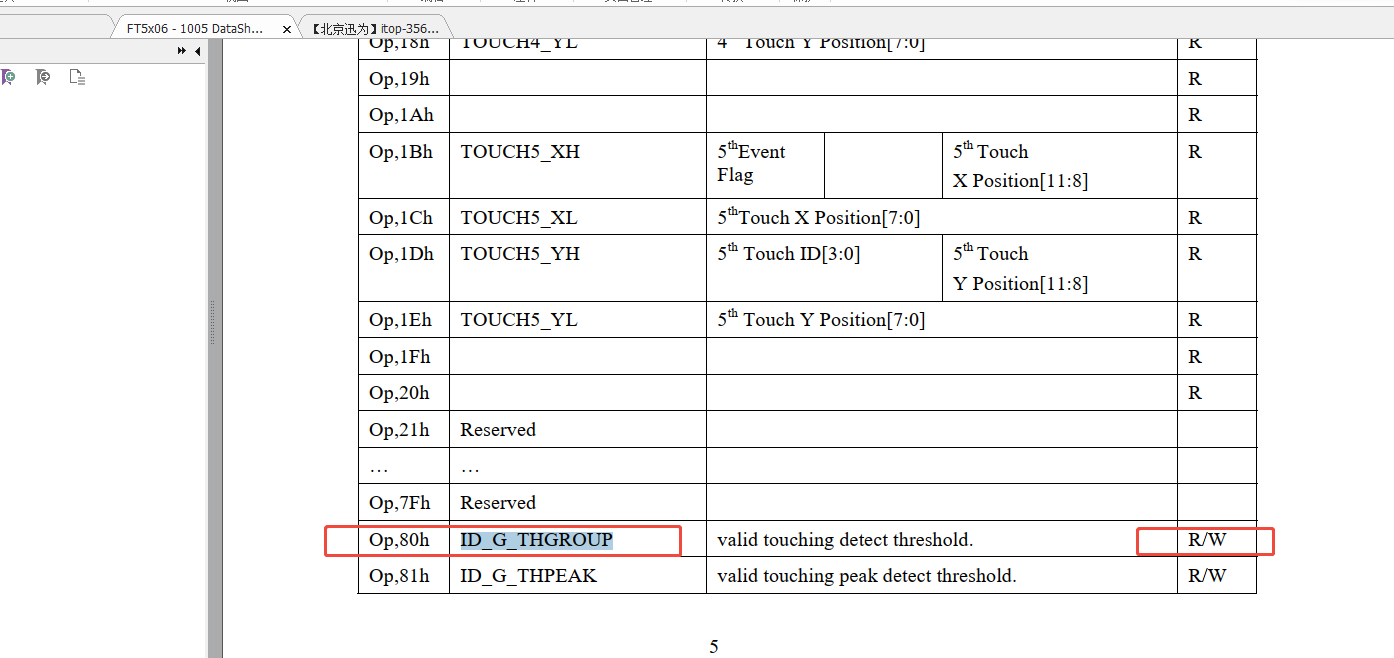
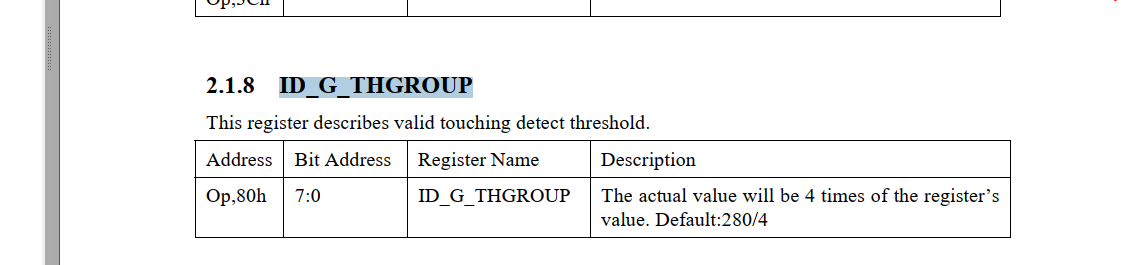
三、驱动源码实现-实现IIC读写
java
#include <linux/init.h>
#include <linux/module.h>
#include <linux/i2c.h>
#include <linux/of_device.h>
#include <linux/gpio/consumer.h>
#include <linux/delay.h>
#include <linux/interrupt.h>
struct gpio_desc *reset_gpio;
struct gpio_desc *irq_gpio;
struct i2c_client *ft5x06_client;
//i2c 读函数
int ft5x06_read_reg(u8 reg_addr)
{
u8 data; //i2c 通讯,以最小8位为最小单位
// i2c_transfer标准读写流程:先写寄存器地址,再读数据
struct i2c_msg msgs[2] = {
[0] = {
.addr = ft5x06_client->addr, // I2C从机地址0x38
.flags = 0, // 标志0 = I2C写操作
.len = sizeof(reg_addr), // 长度1字节(寄存器地址)
.buf = ®_addr, // 缓冲区:要读取的寄存器号
},
[1] = {
.addr = ft5x06_client->addr,
.flags = I2C_M_RD, // I2C_M_RD = 读操作标志
.len = sizeof(data), // 读取1字节返回值
.buf = &data, // 读到的数据存入data
},
};
// i2c_transfer:发起一组I2C消息,返回成功执行的msg数量
// ARRAY_SIZE(msgs)=2,必须两条消息都执行成功才算读取正常
if (i2c_transfer(ft5x06_client->adapter, msgs, ARRAY_SIZE(msgs)) != ARRAY_SIZE(msgs)){
return -EIO; // 读写失败,返回IO错误码
}
return data; // 返回寄存器读到的值
}
// // 为什么一个是u8 类型,一个是u16类型:因为u8是用来i2c通讯的,u16是用來賦值給i2c_msg 的
void ft5x06_write_reg(u8 reg_addr, u8 data, u16 len)
{
u8 buff[256]; // 本地缓冲区,最大255字节数据+1字节寄存器地址:就是要
struct i2c_msg msgs[] = {
[0] = {
.addr = ft5x06_client->addr,
.flags = 0, // 纯写操作
.len = len + 1, // 总长度 = 寄存器地址1字节 + 有效数据长度
.buf = buff,
},
};
buff[0] = reg_addr; // 缓冲区首字节:寄存器地址
memcpy(&buff[1], &data, len); // 后续空间拷贝待写入数据
// 发起I2C写传输
if (i2c_transfer(ft5x06_client->adapter, msgs, ARRAY_SIZE(msgs)) != ARRAY_SIZE(msgs)) {
return; // 写入失败直接退出,无错误返回、无打印
}
}
irqreturn_t ft5x06_handler(int irq,void *args){
printk("==========ft5x06_handler==========\n");
return IRQ_RETVAL(IRQ_HANDLED);
}
int ft5x06_probe(struct i2c_client *client, const struct i2c_device_id *id)
{
int ret=0;
int value=0;
ft5x06_client = client;
printk(KERN_INFO "###### This is ft5x06 probe ######\n");
// 获取复位GPIO描述符
reset_gpio = gpiod_get_optional(&client->dev, "reset", 0); // 第二个参数是属性(reset-gpios)前缀reset
if (reset_gpio == NULL)
{
printk("gpiod_get_optional reset_gpio error\n");
return -1;
}
// 获取中断GPIO描述符
irq_gpio = gpiod_get_optional(&client->dev, "interrupts", 0); // 第二个参数是属性(interrupts-gpio)前缀interrupts
if (irq_gpio == NULL)
{
printk("gpiod_get_optional irq_gpio error\n");
return -1;
}
gpiod_direction_output(reset_gpio, 0);
ssleep(5);
gpiod_direction_output(reset_gpio, 1);
ret = request_irq(client->irq,ft5x06_handler,IRQF_TRIGGER_FALLING | IRQF_ONESHOT,"ft5x06_irq",NULL);
if (ret < 0)
{
printk("request_irq request error\n");
return -1;
}
ft5x06_write_reg(0x80,0x4b,1);
value = ft5x06_read_reg(0x80);
printk("reg 0x80 is %#x\n",value);
return 0;
}
int ft5x06_remove(struct i2c_client *client)
{
printk(KERN_INFO "###### This is ft5x06_remove ######\n");
return 0;
}
static const struct of_device_id ft5x06_id[] = {
{ .compatible = "my-ft5x06" },
{ /* Sentinel */ },
};
// 关键补充
MODULE_DEVICE_TABLE(of, ft5x06_id);
static struct i2c_driver ft5x06_driver = {
.driver = {
.owner = THIS_MODULE,
.name = "my-ft5x06",
.of_match_table = ft5x06_id,
},
.probe = ft5x06_probe,
.remove = ft5x06_remove,
};
static int __init ft5x06_driver_init(void)
{
int ret;
ret = i2c_add_driver(&ft5x06_driver);
if (ret < 0) {
printk(KERN_ERR "i2c_add_driver failed ret=%d\n", ret);
return ret;
}
printk(KERN_INFO "###### ft5x06 driver register success ######\n");
return 0;
}
static void __exit ft5x06_driver_exit(void)
{
i2c_del_driver(&ft5x06_driver);
printk(KERN_INFO "###### ft5x06 driver unregister ######\n");
}
module_init(ft5x06_driver_init);
module_exit(ft5x06_driver_exit);
MODULE_LICENSE("GPL");四、驱动验证
编译后,make 编译.ko 文件,然后加载驱动验证,结果如下:
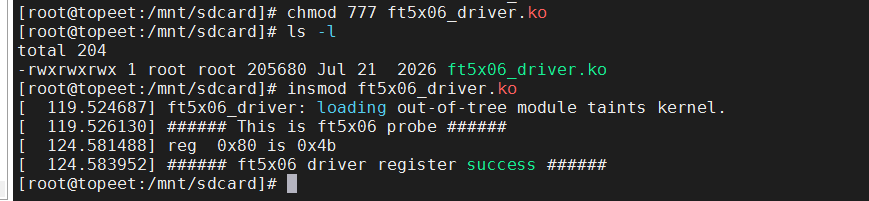
总结
- 这里其实就是一个简单的IIC通讯,还没有涉及到实际的功能,就是验证IIC通不通,读写寄存器
- 这里重点还是理解思路、对于读写操作和api 操作要熟悉。