配置 HTTP 代理 HTTP proxy
- [1. Proxies](#1. Proxies)
- [2. curl](#2. curl)
-
- [2.1. Environment](#2.1. Environment)
- [2.2. Proxy protocol prefixes](#2.2. Proxy protocol prefixes)
- [3. Use an HTTP proxy (使用 HTTP 代理)](#3. Use an HTTP proxy (使用 HTTP 代理))
-
- [3.1. Using the examples (使用示例)](#3.1. Using the examples (使用示例))
-
- [3.1.1. Linux or macOS](#3.1.1. Linux or macOS)
- [3.1.2. Windows Command Prompt](#3.1.2. Windows Command Prompt)
- [3.2. Authenticating to a proxy (向代理进行身份验证)](#3.2. Authenticating to a proxy (向代理进行身份验证))
-
- [3.2.1. Linux or macOS](#3.2.1. Linux or macOS)
- [3.2.2. Windows Command Prompt](#3.2.2. Windows Command Prompt)
- [4. 配置 HTTP 代理 (HTTP proxy)](#4. 配置 HTTP 代理 (HTTP proxy))
-
- [4.1. Linux 系统配置 `http_proxy` 和 `https_proxy` 环境变量](#4.1. Linux 系统配置
http_proxy和https_proxy环境变量) - [4.2. Windows 系统配置 `http_proxy` 和 `https_proxy` 环境变量](#4.2. Windows 系统配置
http_proxy和https_proxy环境变量) -
- [4.2.1. cmd](#4.2.1. cmd)
- [4.2.2. PowerShell](#4.2.2. PowerShell)
- [4.1. Linux 系统配置 `http_proxy` 和 `https_proxy` 环境变量](#4.1. Linux 系统配置
- [5. 为 WSL2 (Windows Subsystem for Linux 2) 配置 HTTP 代理](#5. 为 WSL2 (Windows Subsystem for Linux 2) 配置 HTTP 代理)
-
- [5.1. `wsl --list --verbose`](#5.1.
wsl --list --verbose) - [5.2. 在 Windows 系统上配置 Cl* for Windows](#5.2. 在 Windows 系统上配置 Cl* for Windows)
- [5.3. 在 WSL2 (Windows Subsystem for Linux 2) 系统上配置](#5.3. 在 WSL2 (Windows Subsystem for Linux 2) 系统上配置)
- [5.4. 为 git 设置代理](#5.4. 为 git 设置代理)
- [5.1. `wsl --list --verbose`](#5.1.
- References
1. Proxies
https://www.gnu.org/software/wget/manual/html_node/Proxies.html
proxy UK [ˈprɒk.si] US [ˈprɑːk.si]:n. 代理人,代表,代理权,代表权Proxies are special-purpose HTTP servers designed to transfer data from remote servers to local clients.
Wget supports proxies for both HTTP and FTP retrievals. The standard way to specify proxy location, which Wget recognizes, is using the following environment variables:
http_proxyhttps_proxy
If set, the http_proxy and https_proxy variables should contain the URLs of the proxies for HTTP and HTTPS connections respectively.
ftp_proxy
This variable should contain the URL of the proxy for FTP connections. It is quite common that http_proxy and ftp_proxy are set to the same URL.
no_proxy
This variable should contain a comma-separated list of domain extensions proxy should not be used for. For instance, if the value of no_proxy is '.mit.edu', proxy will not be used to retrieve documents from MIT.
Some proxy servers require authorization to enable you to use them. The authorization consists of username and password, which must be sent by Wget.
You may specify your username and password either through the proxy URL or through the command-line options. Assuming that the company's proxy is located at 'proxy.company.com' at port 8001, a proxy URL location containing authorization data might look like this:
http://hniksic:mypassword@proxy.company.com:8001/2. curl
https://curl.se/docs/manpage.html
curl is a tool for transferring data from or to a server using URLs. It supports these protocols: DICT, FILE, FTP, FTPS, GOPHER, GOPHERS, HTTP, HTTPS, IMAP, IMAPS, LDAP, LDAPS, MQTT, POP3, POP3S, RTMP, RTMPS, RTSP, SCP, SFTP, SMB, SMBS, SMTP, SMTPS, TELNET, TFTP, WS and WSS.
2.1. Environment
The environment variables can be specified in lower case or upper case. The lower case version has precedence. "http_proxy" is an exception as it is only available in lower case.
环境变量可以以小写或大写形式指定,小写版本优先。"http_proxy" 是个例外,因为它仅以小写形式提供。
precedence UK [ˈpres.ɪ.dəns] US [ˈpres.ə.dens]:n. 优先,优先权2.2. Proxy protocol prefixes
The proxy string may be specified with a protocol:// prefix to specify alternative proxy protocols.
If no protocol is specified in the proxy string or if the string does not match a supported one, the proxy is treated as an HTTP proxy.
http://
Makes it use it as an HTTP proxy. The default if no scheme prefix is used.
https://
Makes it treated as an HTTPS proxy.
3. Use an HTTP proxy (使用 HTTP 代理)
https://docs.aws.amazon.com/cli/latest/userguide/cli-configure-proxy.html
3.1. Using the examples (使用示例)
The following examples show the environment variable name in all uppercase letters. However, if you specify a variable twice using different cases, the lowercase letters take precedence. We recommend that you define each variable only once to avoid system confusion and unexpected behavior.
以下示例显示了全部使用大写字母的环境变量名称。但是,如果使用不同的大小写指定一个变量两次,则优先使用小写字母。建议您只定义每个变量一次,以避免系统混淆和意外行为。
3.1.1. Linux or macOS
$ export HTTP_PROXY=http://10.15.20.25:1234
$ export HTTP_PROXY=http://proxy.example.com:1234
$ export HTTPS_PROXY=http://10.15.20.25:5678
$ export HTTPS_PROXY=http://proxy.example.com:5678

$ export NO_PROXY=169.254.169.254
将 NO_PROXY 环境变量设置为无需代理的主机或域名。
3.1.2. Windows Command Prompt
- To set for current session only (仅为当前会话设置)
Using set to set an environment variable changes the value used until the end of the current command prompt session, or until you set the variable to a different value.
使用 set 设置环境变量会更改使用的值,直到当前命令提示符会话结束,或者直到您将该变量设置为其他值。
C:\> set HTTP_PROXY=http://10.15.20.25:1234
C:\> set HTTP_PROXY=http://proxy.example.com:1234
C:\> set HTTPS_PROXY=http://10.15.20.25:5678
C:\> set HTTPS_PROXY=http://proxy.example.com:5678

C:\> set NO_PROXY=169.254.169.254-
To set for all sessions (为所有会话设置)
C:> setx HTTP_PROXY http://10.15.20.25:1234
C:> setx HTTP_PROXY http://proxy.example.com:1234
C:> setx HTTPS_PROXY http://10.15.20.25:5678
C:> setx HTTPS_PROXY http://proxy.example.com:5678C:> setx NO_PROXY 169.254.169.254
Using setx to set an environment variable changes the value used in both the current command prompt session and all command prompt sessions that you create after running the command. It does not affect other command shells that are already running at the time you run the command.
使用 setx 设置环境变量会更改当前命令提示符会话和运行该命令后创建的所有命令提示符会话中使用的值。它不影响在运行该命令时已经运行的其他命令 shell。
3.2. Authenticating to a proxy (向代理进行身份验证)
The AWS CLI supports HTTP Basic authentication. Specify the username and password in the proxy URL, as follows.
3.2.1. Linux or macOS
$ export HTTP_PROXY=http://username:password@proxy.example.com:1234
$ export HTTPS_PROXY=http://username:password@proxy.example.com:5678
3.2.2. Windows Command Prompt
- To set for current session only (仅为当前会话设置)
Using set to set an environment variable changes the value used until the end of the current command prompt session, or until you set the variable to a different value.
使用 set 设置环境变量会更改使用的值,直到当前命令提示符会话结束,或者直到您将该变量设置为其他值。
C:\> set HTTP_PROXY=http://username:password@proxy.example.com:1234
C:\> set HTTPS_PROXY=http://username:password@proxy.example.com:5678-
To set for all sessions (为所有会话设置)
C:> setx HTTP_PROXY http://username:password@proxy.example.com:1234
C:> setx HTTPS_PROXY http://username:password@proxy.example.com:5678
Using setx to set an environment variable changes the value used in both the current command prompt session and all command prompt sessions that you create after running the command. It does not affect other command shells that are already running at the time you run the command.
使用 setx 设置环境变量会更改当前命令提示符会话和运行该命令后创建的所有命令提示符会话中使用的值。它不影响在运行该命令时已经运行的其他命令 shell。
4. 配置 HTTP 代理 (HTTP proxy)
You can configure the HTTP_PROXY and HTTPS_PROXY environment variables with either the DNS domain names or IP addresses and port numbers that your proxy servers use.
使用 HTTP 代理需要配置环境变量 http_proxy 和 https_proxy。
4.1. Linux 系统配置 http_proxy 和 https_proxy 环境变量
ProxyServer 为代理服务器的域名或者 IP,port 为端口号。如果你的代理服务器需要用户名和密码才能访问,需要填写上面的 username 和 password 部分,否则的话,可以省略这两部分。
-
为当前用户临时配置环境变量
export http_proxy="http://username:password@ProxyServer:port"
export https_proxy="https://username:password@ProxyServer:port"export http_proxy="http://ProxyServer:port"
export https_proxy="https://ProxyServer:port"With Authentication
export HTTP_PROXY=[username]:[password]@[proxy-web-or-IP-address]:[port-number]
export HTTPS_PROXY=[username]:[password]@[proxy-web-or-IP-address]:[port-number]
export FTP_PROXY=[username]:[password]@ [proxy-web-or-IP-address]:[port-number]
export NO_PROXY=localhost,127.0.0.1Without Authentication
export HTTP_PROXY=[proxy-web-or-IP-address]:[port-number]
export HTTPS_PROXY=[proxy-web-or-IP-address]:[port-number]
export FTP_PROXY=[proxy-web-or-IP-address]:[port-number]
export NO_PROXY=localhost,127.0.0.1
通过 export 指令临时设置代理:
(base) yongqiang@yongqiang:~$ export http_proxy="http://192.105.9.13:7890"
(base) yongqiang@yongqiang:~$ export https_proxy="https://192.105.9.13:7890"
查看代理:
(base) yongqiang@yongqiang:~$ env | grep -i proxy
https_proxy=https://192.105.9.13:7890
http_proxy=http://192.105.9.13:7890
(base) yongqiang@yongqiang:~$
临时取消代理:
(base) yongqiang@yongqiang:~$ unset http_proxy
(base) yongqiang@yongqiang:~$ unset https_proxy
查看代理:
(base) yongqiang@yongqiang:~$ env | grep -i proxy
(base) yongqiang@yongqiang:~$
测试方法:
wget www.google.com
curl www.google.com
wget --proxy http://192.105.9.13:7890 www.google.com
curl --proxy http://192.105.9.13:7890 www.google.com
(base) yongqiang@yongqiang:~$ wget www.google.com
--2024-06-01 23:30:18-- http://www.google.com/
Connecting to 192.105.9.13:7890... connected.
Proxy request sent, awaiting response... 302 Found
Location: http://www.google.com.hk/url?sa=p&hl=zh-CN&pref=hkredirect&pval=yes&q=http://www.google.com.hk/&ust=1717255848963743&usg=AOvVaw3YRiYLmVQtcHhr0aEN_TJG [following]
--2024-06-01 23:30:19-- http://www.google.com.hk/url?sa=p&hl=zh-CN&pref=hkredirect&pval=yes&q=http://www.google.com.hk/&ust=1717255848963743&usg=AOvVaw3YRiYLmVQtcHhr0aEN_TJG
Reusing existing connection to 192.105.9.13:7890.
Proxy request sent, awaiting response... 302 Found
Location: http://www.google.com.hk/ [following]
--2024-06-01 23:30:19-- http://www.google.com.hk/
Reusing existing connection to 192.105.9.13:7890.
Proxy request sent, awaiting response... 200 OK
Length: unspecified [text/html]
Saving to: 'index.html.1'
index.html.1 [ <=> ] 19.33K --.-KB/s in 0.01s
2024-06-01 23:30:20 (1.98 MB/s) - 'index.html.1' saved [19794]
(base) yongqiang@yongqiang:~$
(base) yongqiang@yongqiang:~$ curl www.google.com
<HTML><HEAD><meta http-equiv="content-type" content="text/html;charset=utf-8">
<TITLE>302 Moved</TITLE></HEAD><BODY>
<H1>302 Moved</H1>
The document has moved
<A HREF="http://www.google.com.hk/url?sa=p&hl=zh-CN&pref=hkredirect&pval=yes&q=http://www.google.com.hk/&ust=1717294991706701&usg=AOvVaw2Ej1rgvrxOVAsV8uF9jM2M">here</A>.
</BODY></HTML>
(base) yongqiang@yongqiang:~$- 为当前用户永久配置环境变量
在 ~/.bashrc 文件中添加如下内容,可将 http_proxy 和 https_proxy 永久配置在当前用户的环境变量中。
export http_proxy="http://username:password@ProxyServer:port"
export https_proxy="https://username:password@ProxyServer:port"

export http_proxy="http://ProxyServer:port"
export https_proxy="https://ProxyServer:port"

# With Authentication
export HTTP_PROXY=[username]:[password]@[proxy-web-or-IP-address]:[port-number]
export HTTPS_PROXY=[username]:[password]@[proxy-web-or-IP-address]:[port-number]
export FTP_PROXY=[username]:[password]@ [proxy-web-or-IP-address]:[port-number]
export NO_PROXY=localhost,127.0.0.1"

# Without Authentication
export HTTP_PROXY=[proxy-web-or-IP-address]:[port-number]
export HTTPS_PROXY=[proxy-web-or-IP-address]:[port-number]
export FTP_PROXY=[proxy-web-or-IP-address]:[port-number]
export NO_PROXY=localhost,127.0.0.1
永久环境变量配置完毕后,注销并重新登录,配置生效。
To force apply your new proxy settings in the current Terminal session, execute the source command:
source ~/.bashrc- 为所有用户永久配置环境变量
在 /etc/environment 或 /etc/profile 文件中添加如下内容,可将 http_proxy 和 https_proxy 永久配置在所有用户的环境变量中。
export http_proxy="http://username:password@ProxyServer:port"
export https_proxy="https://username:password@ProxyServer:port"

export http_proxy="http://ProxyServer:port"
export https_proxy="https://ProxyServer:port"

# With Authentication
export HTTP_PROXY=[username]:[password]@[proxy-web-or-IP-address]:[port-number]
export HTTPS_PROXY=[username]:[password]@[proxy-web-or-IP-address]:[port-number]
export FTP_PROXY=[username]:[password]@ [proxy-web-or-IP-address]:[port-number]
export NO_PROXY=localhost,127.0.0.1"

# Without Authentication
export HTTP_PROXY=[proxy-web-or-IP-address]:[port-number]
export HTTPS_PROXY=[proxy-web-or-IP-address]:[port-number]
export FTP_PROXY=[proxy-web-or-IP-address]:[port-number]
export NO_PROXY=localhost,127.0.0.1
永久环境变量配置完毕后,注销并重新登录,配置生效。
To force apply your new proxy settings in the current Terminal session, execute the source command:
source /etc/profile4.2. Windows 系统配置 http_proxy 和 https_proxy 环境变量
4.2.1. cmd
ProxyServer 为代理服务器的域名或者 IP,port 为端口号。如果你的代理服务器需要用户名和密码才能访问,需要填写上面的 username 和 password 部分,否则的话,可以省略这两部分。
-
临时环境变量
set http_proxy=http://username:password@ProxyServer:port
set https_proxy=https://username:password@ProxyServer:portset http_proxy=http://ProxyServer:port
set https_proxy=https://ProxyServer:port -
永久环境变量
将 http_proxy 和 https_proxy 永久配置在当前用户的环境变量中。
setx "http_proxy" "http://username:password@ProxyServer:port"
setx "https_proxy" "https://username:password@ProxyServer:port"

setx "http_proxy" "http://ProxyServer:port"
setx "https_proxy" "https://ProxyServer:port"
永久环境变量配置完毕后,将在新打开的终端中生效,当前终端不会立即生效。
4.2.2. PowerShell
ProxyServer 为代理服务器的域名或者 IP,port 为端口号。如果你的代理服务器需要用户名和密码才能访问,需要填写上面的 username 和 password 部分,否则的话,可以省略这两部分。
-
临时环境变量
env:http_proxy="http://username:password@ProxyServer:port" env:https_proxy="https://username:password@ProxyServer:port"
env:http_proxy="http://ProxyServer:port" env:https_proxy="https://ProxyServer:port"
-
永久环境变量
将 http_proxy 和 https_proxy 永久配置在当前用户的环境变量中。
[environment]::SetEnvironmentvariable("http_proxy", "http://username:password@ProxyServer:port", "User")
[environment]::SetEnvironmentvariable("https_proxy", "https://username:password@ProxyServer:port", "User")

[environment]::SetEnvironmentvariable("http_proxy", "http://ProxyServer:port", "User")
[environment]::SetEnvironmentvariable("https_proxy", "https://ProxyServer:port", "User")
永久环境变量配置完毕后,将在新打开的终端中生效,当前终端不会立即生效。
5. 为 WSL2 (Windows Subsystem for Linux 2) 配置 HTTP 代理
5.1. wsl --list --verbose
C:\Users\cheng>wsl --list --verbose
NAME STATE VERSION
* Ubuntu-20.04 Running 2
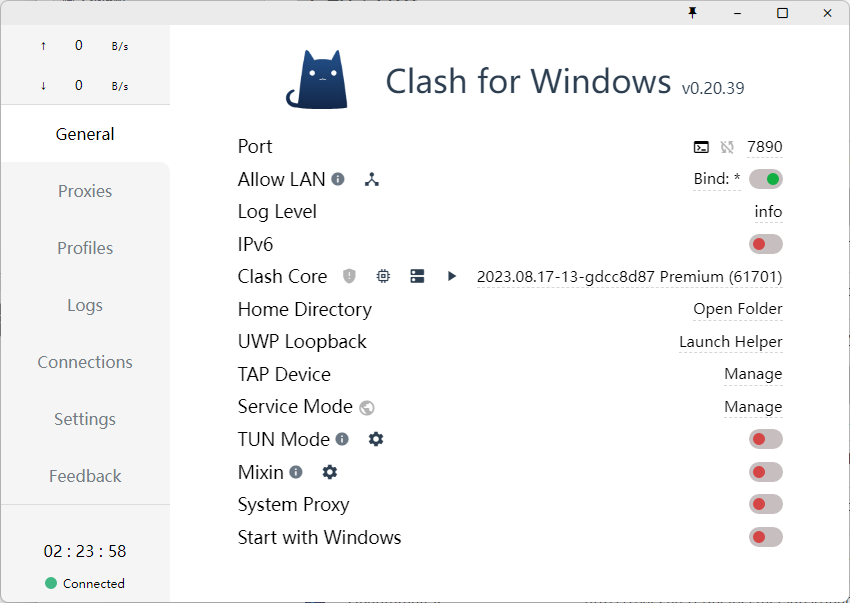
C:\Users\cheng>5.2. 在 Windows 系统上配置 Cl* for Windows
Cl* for Windows Download - Cl*.for.Windows-0.20.39-win.7z
E:\software\Cl*.for.Windows-0.20.39-win\Cl* for Windows.exe
- General
允许局域网代理 Allow LAN
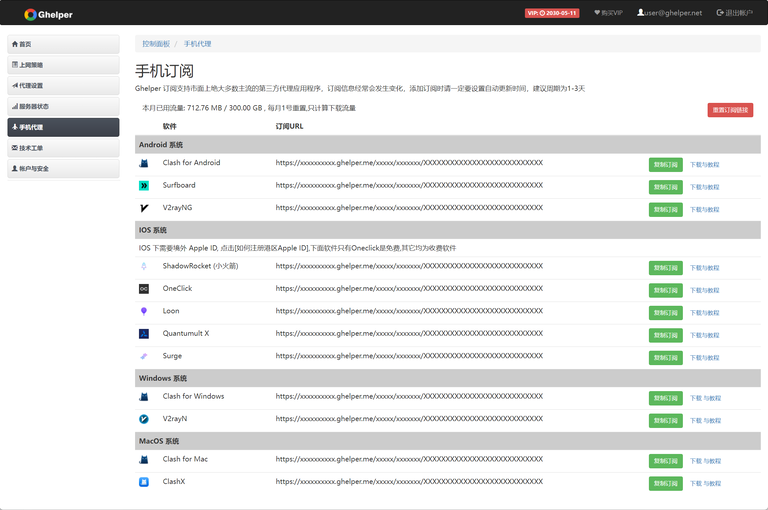
在 Gh* 控制面板里点击左侧导航栏手机代理,找到 Cl* for Windows 订阅地址并点击复制。
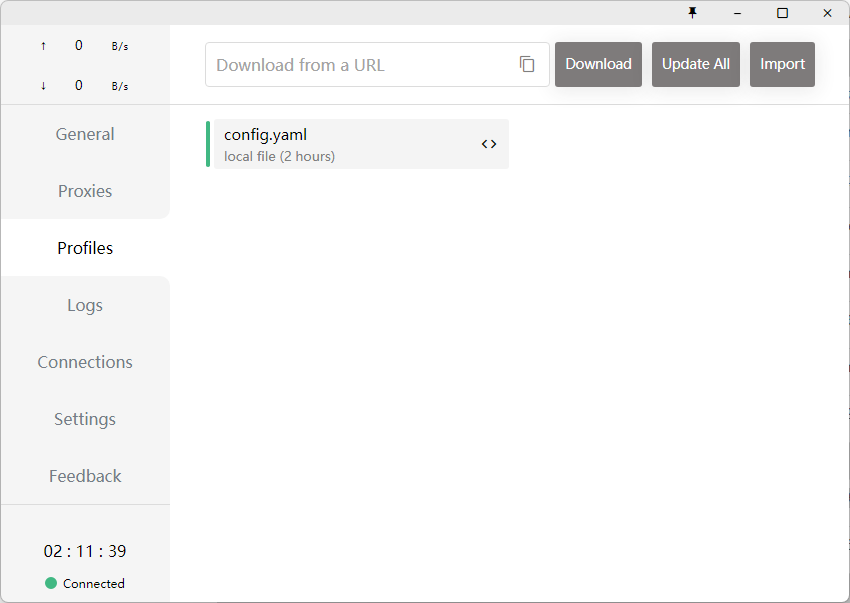
- Profiles
在 Profiles 页面顶部,粘贴 Cl* 配置订阅链接,随后点击 Download 下载配置文件。下载成功后,Cl* for Windows 将自动切换至下载的配置文件。
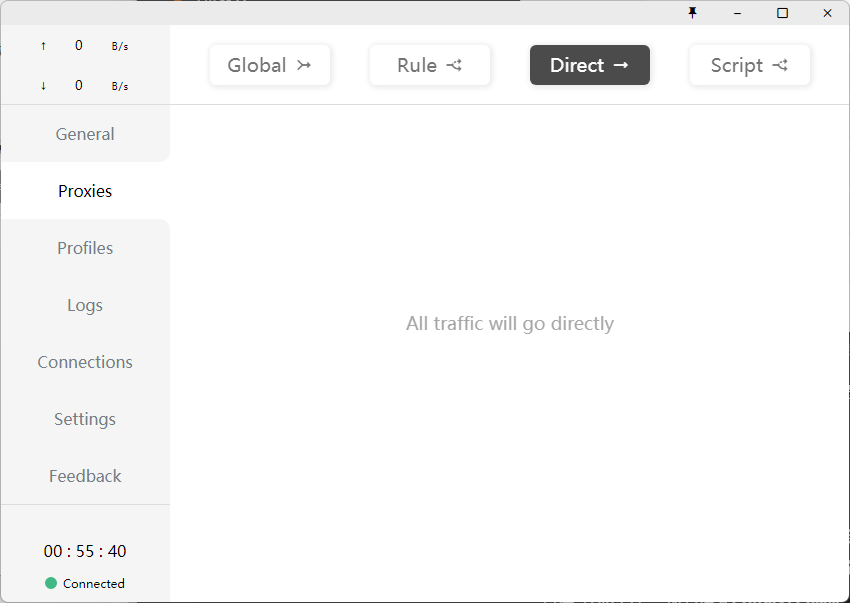
- Proxies
切换代理模式为规则 (Rule)。
全局 (Global):所有请求直接发往代理服务器,代理所有流量
规则 (Rule):所有请求根据配置文件规则进行分流,只代理国外流量
直连 (Direct):所有请求直接发往目的地,不代理任何流量
5.3. 在 WSL2 (Windows Subsystem for Linux 2) 系统上配置
通过 export 指令临时设置代理:
(base) yongqiang@yongqiang:~$ export http_proxy="http://192.105.9.13:7890"
(base) yongqiang@yongqiang:~$ export https_proxy="https://192.105.9.13:7890"
查看代理:
(base) yongqiang@yongqiang:~$ env | grep -i proxy
https_proxy=https://192.105.9.13:7890
http_proxy=http://192.105.9.13:7890
(base) yongqiang@yongqiang:~$
测试方法:
wget www.google.com
curl www.google.com

wget --proxy http://192.105.9.13:7890 www.google.com
curl --proxy http://192.105.9.13:7890 www.google.com
5.4. 为 git 设置代理
临时设置 git 代理:
# Without Authentication
git config --global http.proxy http://192.105.9.13:7890
git config --global https.proxy https://192.105.9.13:7890

# With Authentication
git config --global http.proxy http://username:password@192.105.9.13:7890
git config --global https.proxy https://username:password@192.105.9.13:7890
取消 git 代理:
git config --global --unset http.proxy
git config --global --unset https.proxy
git 的任何全局设置都可以用 git config --global --unset * 来取消。
查看 git 代理:
git config --global --get http.proxy
git config --global --get https.proxy
查看 git 全局设置:
git config --global -l查看 git 的全局设置。如果设置 git 代理成功,则列表输出会有以 http.proxy= and https.proxy= 开头的行。如果取消 git 代理成功,则以 http.proxy= and https.proxy= 开头的行将不会出现在列表输出中。
使用以下命令查看并修改 git 的配置,git 的默认编辑器会打开 ~/.gitconfig 文件。
git config --global --edit

(base) yongqiang@yongqiang:~$ git config --global http.proxy http://192.105.9.13:7890
(base) yongqiang@yongqiang:~$ git config --global https.proxy https://192.105.9.13:7890
(base) yongqiang@yongqiang:~$
(base) yongqiang@yongqiang:~$ git config --global -l
user.email=***@163.com
user.name=***@163.com
core.editor=vim
filter.lfs.clean=git-lfs clean -- %f
filter.lfs.smudge=git-lfs smudge -- %f
filter.lfs.process=git-lfs filter-process
filter.lfs.required=true
https.proxy=https://192.105.9.13:7890
http.proxy=http://192.105.9.13:7890
(base) yongqiang@yongqiang:~$
References
1 Yongqiang Cheng, https://yongqiang.blog.csdn.net/
2 配置 HTTP 代理, https://support.huaweicloud.com/usermanual-hcli/hcli_22_001.html
3 Use an HTTP proxy, https://docs.aws.amazon.com/cli/latest/userguide/cli-configure-proxy.html
4 Define proxy settings, https://help.ubuntu.com/stable/ubuntu-help/net-proxy.html.en