窗口设计
这里的代码放在py文件最前面或者最后面都无所谓
python
# 创建主窗口
window = tk.Tk()
window.title("图像目标检测系统")
window.geometry('1000x650')  # 设置窗口大小

# 创建背景画布并使用grid布局管理器
canvas_background = tk.Canvas(window, width=1000, height=650, bg="#e6f2ff")
canvas_background.grid(row=0, column=0, columnspan=2, rowspan=4, sticky='nsew')  # 使用grid管理器

# 加载背景图像
background_image = Image.open(r"图标/5.jpg")  # 替换为您的背景图像路径
background_image = background_image.resize((1000, 650), Image.Resampling.LANCZOS)  # 调整图像大小以适应窗口
background_photo = ImageTk.PhotoImage(background_image)

# 在背景画布上绘制背景图像
canvas_background.create_image(0, 0, anchor='nw', image=background_photo)
canvas_background.image = background_photo  # 保持对图像的引用

# 加载按钮图片
upload_img = Image.open(r"图标/3.jpg")  # 替换为您的上传按钮图片路径
upload_img = upload_img.resize((100, 50), Image.Resampling.LANCZOS)  # 调整图片大小
upload_img = ImageTk.PhotoImage(upload_img)

start_detection_img = Image.open(r"图标/2.jpg")  # 替换为您的开始检测按钮图片路径
start_detection_img = start_detection_img.resize((100, 50), Image.Resampling.LANCZOS)  # 调整图片大小
start_detection_img = ImageTk.PhotoImage(start_detection_img)

img_intensification_img = Image.open(r"图标/1.jpg")  # 替换为您的图像增强按钮图片路径
img_intensification_img = img_intensification_img.resize((100, 50), Image.Resampling.LANCZOS)  # 调整图片大小
img_intensification_img = ImageTk.PhotoImage(img_intensification_img)

# 创建两个画布区域
canvas_left = tk.Canvas(window, width=224, height=224, bg="#e6f2ff")
canvas_right = tk.Canvas(window, width=224, height=224, bg="#e6f2ff")
# 加载图片
waiting_image = Image.open(r"图标/8.jpg")  # 替换为您的图片路径
detected_image = Image.open(r"图标/7.jpg")  # 替换为您的图片路径
waiting_image = waiting_image.resize((200, 50), Image.Resampling.LANCZOS)
detected_image = detected_image.resize((200, 50), Image.Resampling.LANCZOS)
waiting_photo = ImageTk.PhotoImage(waiting_image)
detected_photo = ImageTk.PhotoImage(detected_image)
# 将两个画布区域放置在主窗口中
canvas_left.grid(row=1, column=0, padx=10, pady=10, sticky='nsew')
canvas_right.grid(row=1, column=1, padx=10, pady=10, sticky='nsew')

# 创建标签
label_waiting_image = tk.Label(window, image=waiting_photo, font=("Arial", 16), bg="#e6f2ff")
label_detected_image = tk.Label(window, image=detected_photo, font=("Arial", 16), bg="#e6f2ff")

# 定位标签
label_waiting_image.grid(row=0, column=0, padx=10, pady=10, sticky='nsew')
label_detected_image.grid(row=0, column=1, padx=10, pady=10, sticky='nsew')

# 设置标签的图片
label_waiting_image.config(image=waiting_photo)
label_detected_image.config(image=detected_photo)


# 创建按钮并放置在主窗口上
button_upload = tk.Button(window, image=upload_img, command=upload_image, relief="flat", borderwidth=0, background='#e6f2ff', activebackground='#e6f2ff')
button_start_detection = tk.Button(window, image=start_detection_img, command=start_detection, relief="flat", borderwidth=0, background='#e6f2ff', activebackground='#e6f2ff')
img_intensification = tk.Button(window, image=img_intensification_img, command=img_inten, relief="flat", borderwidth=0, background='#e6f2ff', activebackground='#e6f2ff')

# 将按钮放置在主窗口上
button_upload.place(x=155,y=495)
button_start_detection.place(x=755,y=495)
img_intensification.place(x=455,y=495)


# 运行主窗口
window.mainloop()
1.导入需要用到的包
python
import torch.nn as nn
import tkinter as tk
from tkinter import filedialog, messagebox
from PIL import Image, ImageTk
import torch
from torchvision import transforms, models
from efficientnet_pytorch import EfficientNet
import numpy as np
import cv2
2.加载模型
这里加载了模型需要的可以联系我
python
class EfficientNetModel(nn.Module):
    def __init__(self, num_classes=10, pretrained=True):
        super(EfficientNetModel, self).__init__()
        # 加载预训练的EfficientNet模型
        self.efficientnet = EfficientNet.from_name('efficientnet-b3')
        #
        # if pretrained:
        #     # 加载预训练权重
        #     self.efficientnet.load_state_dict(
        #         torch.load(r'D:\python\pytorch\Vehicle identification\save pth\efficientnet-b3-5fb5a3c3.pth'))

        # 获取EfficientNet模型的最后一层全连接层的输入特征数量
        num_ftrs = self.efficientnet._fc.in_features
        # 将EfficientNet模型的最后一层全连接层替换为一个新的全连接层,输出特征数量设置为num_classes
        self.efficientnet._fc = nn.Linear(num_ftrs, num_classes)

    # forward方法定义了前向传播过程
    def forward(self, x):
        return self.efficientnet(x)


# Example usage
model = EfficientNetModel(num_classes=12)


# 加载训练好的模型参数
model_path = 'best_EfficientNet_b3_updata1.pth'
model.load_state_dict(torch.load(model_path, map_location=torch.device('cpu')))
model.eval()
3.定义图像转换
python
# 定义图像转换
transform = transforms.Compose([
    transforms.Resize((224, 224)),  # ResNet-50 的输入图像大小
    transforms.ToTensor(),
    transforms.Normalize(mean=[0.485, 0.456, 0.406], std=[0.229, 0.224, 0.225]),  # ResNet-50 的标准化
])
4.定义车类标签
python
classes = ['皮卡', '敞篷车', '跑车', '掀背两箱车', '小型面包车', 'SUV', '轿车', '厢式货车', '旅行车', '公共汽车', '消防车', '出租车']5.定义全局变量
python
# 初始化全局变量
selected_image_path = None
label_text = None
right_canvas_image = None
6.几个方法
python
def upload_image():
    global selected_image_path, label_text
    file_path = filedialog.askopenfilename()
    if file_path:
        selected_image_path = file_path
        image = Image.open(file_path)
        original_width, original_height = image.size

        # 计算宽高比
        aspect_ratio = original_width / original_height

        # 根据画布尺寸和宽高比计算新尺寸
        canvas_width = 500
        canvas_height = 300
        new_width = canvas_width
        new_height = int(new_width / aspect_ratio)
        if new_height > canvas_height:
            new_height = canvas_height
            new_width = int(new_height * aspect_ratio)

        # 调整图片大小
        image = image.resize((new_width, new_height), Image.Resampling.LANCZOS)

        # 居中图片
        photo = ImageTk.PhotoImage(image)
        canvas_left.create_image((canvas_width - new_width) / 2, (canvas_height - new_height) / 2, anchor='nw', image=photo)
        canvas_left.image = photo  # Keep a reference!

        # 创建图片的标签
        if label_text is None:
            label_text = tk.Label(window, text="", font=("Arial", 16))
            label_text.grid(row=3, column=0, columnspan=2, padx=10, pady=10)

def start_detection():
    global right_canvas_image
    if selected_image_path is not None:
        image = Image.open(selected_image_path)
        input_image = transform(image).unsqueeze(0)
        with torch.no_grad():
            outputs = model(input_image)
            _, predicted = torch.max(outputs, 1)
            label = classes[predicted.item()]
            probabilities = torch.nn.functional.softmax(outputs, dim=1)
            max_probability = probabilities[0][predicted].item()
            label_text.config(text=f"{label} - {max_probability:.2f}")

        # 显示图片在右侧画布
        image = Image.open(selected_image_path)  # 重新打开图片以避免被转换影响
        original_width, original_height = image.size
        aspect_ratio = original_width / original_height
        canvas_width = 500
        canvas_height = 300
        new_width = canvas_width
        new_height = int(new_width / aspect_ratio)
        if new_height > canvas_height:
            new_height = canvas_height
            new_width = int(new_height * aspect_ratio)
        image = image.resize((new_width, new_height), Image.Resampling.LANCZOS)
        photo = ImageTk.PhotoImage(image)

        # 检查是否已经创建了右侧画布的图片
        if right_canvas_image is None:
            right_canvas_image = canvas_right.create_image((canvas_width - new_width) / 2, (canvas_height - new_height) / 2, anchor='nw', image=photo)
        else:
            canvas_right.itemconfig(right_canvas_image, image=photo)
        canvas_right.image = photo  # Keep a reference!
    else:
        messagebox.showwarning("警告", "请先选择一张图像")


    # 将标签放置在图片上
    label_text.grid(row=1, column=1, padx=10, pady=10, sticky='n')

def replaceZeroes(data):
    min_nonzero = min(data[np.nonzero(data)])
    data[data == 0] = min_nonzero
    return data


def MSR(img, scales):
    weight = 1 / 3.0
    scales_size = len(scales)
    h, w = img.shape[:2]
    log_R = np.zeros((h, w), dtype=np.float32)

    for i in range(scales_size):
        img = replaceZeroes(img)
        L_blur = cv2.GaussianBlur(img, (scales[i], scales[i]), 0)
        L_blur = replaceZeroes(L_blur)
        dst_Img = cv2.log(img / 255.0)
        dst_Lblur = cv2.log(L_blur / 255.0)
        dst_Ixl = cv2.multiply(dst_Img, dst_Lblur)
        log_R += weight * cv2.subtract(dst_Img, dst_Ixl)

    dst_R = cv2.normalize(log_R, None, 0, 255, cv2.NORM_MINMAX)
    log_uint8 = cv2.convertScaleAbs(dst_R)
    return log_uint8

def img_inten():
    global selected_image_path, right_canvas_image
    if selected_image_path is not None:
        # 读取图像
        image = Image.open(selected_image_path)
        # 转换为OpenCV格式
        image = cv2.cvtColor(np.array(image), cv2.COLOR_RGB2BGR)

        # 应用MSR算法
        scales = [15, 101, 301]  # 可根据需要调整
        b_gray, g_gray, r_gray = cv2.split(image)
        b_gray = MSR(b_gray, scales)
        g_gray = MSR(g_gray, scales)
        r_gray = MSR(r_gray, scales)
        enhanced_image = cv2.merge([b_gray, g_gray, r_gray])

        # 转换回PIL图像格式
        enhanced_image = Image.fromarray(cv2.cvtColor(enhanced_image, cv2.COLOR_BGR2RGB))

        # 调整图像大小以适应模型输入
        enhanced_image = enhanced_image.resize((224, 224), Image.Resampling.LANCZOS)

        # 转换图像为模型可以接受的格式
        input_image = transform(enhanced_image).unsqueeze(0)

        # 使用模型进行检测
        with torch.no_grad():
            outputs = model(input_image)
            _, predicted = torch.max(outputs, 1)
            label = classes[predicted.item()]
            probabilities = torch.nn.functional.softmax(outputs, dim=1)
            max_probability = probabilities[0][predicted].item()

        # 显示增强后的图像和检测结果在右侧画布
        enhanced_image = enhanced_image.resize((500, 300), Image.Resampling.LANCZOS)
        photo = ImageTk.PhotoImage(enhanced_image)
        if right_canvas_image is None:
            right_canvas_image = canvas_right.create_image((500 - 500) / 2, (300 - 300) / 2, anchor='nw', image=photo)
        else:
            canvas_right.itemconfig(right_canvas_image, image=photo)
        canvas_right.image = photo  # Keep a reference!

        # 更新标签文本
        label_text.config(text=f"{label} - {max_probability:.2f}")
    else:
        messagebox.showwarning("警告", "请先选择一张图像")
全部代码:
这里直接用是用不了的,只是给大家提供一个思路,模型可以自己训练,有需要的可以联系我,我把整个代码给你。
python
import torch.nn as nn
import tkinter as tk
from tkinter import filedialog, messagebox
from PIL import Image, ImageTk
import torch
from torchvision import transforms, models
from efficientnet_pytorch import EfficientNet
import numpy as np
import cv2
class EfficientNetModel(nn.Module):
def __init__(self, num_classes=10, pretrained=True):
super(EfficientNetModel, self).__init__()
# 加载预训练的EfficientNet模型
self.efficientnet = EfficientNet.from_name('efficientnet-b3')
#
# if pretrained:
# # 加载预训练权重
# self.efficientnet.load_state_dict(
# torch.load(r'D:\python\pytorch\Vehicle identification\save pth\efficientnet-b3-5fb5a3c3.pth'))
# 获取EfficientNet模型的最后一层全连接层的输入特征数量
num_ftrs = self.efficientnet._fc.in_features
# 将EfficientNet模型的最后一层全连接层替换为一个新的全连接层,输出特征数量设置为num_classes
self.efficientnet._fc = nn.Linear(num_ftrs, num_classes)
# forward方法定义了前向传播过程
def forward(self, x):
return self.efficientnet(x)
# Example usage
model = EfficientNetModel(num_classes=12)
# 加载训练好的模型参数
model_path = 'best_EfficientNet_b3_updata1.pth'
model.load_state_dict(torch.load(model_path, map_location=torch.device('cpu')))
model.eval()
# 定义图像转换
transform = transforms.Compose([
transforms.Resize((224, 224)), # ResNet-50 的输入图像大小
transforms.ToTensor(),
transforms.Normalize(mean=[0.485, 0.456, 0.406], std=[0.229, 0.224, 0.225]), # ResNet-50 的标准化
])
# 类别标签(请根据您的实际类别名称设置)
classes = ['皮卡', '敞篷车', '跑车', '掀背两箱车', '小型面包车', 'SUV', '轿车', '厢式货车', '旅行车', '公共汽车', '消防车', '出租车']
# 初始化全局变量
selected_image_path = None
label_text = None
right_canvas_image = None
def upload_image():
global selected_image_path, label_text
file_path = filedialog.askopenfilename()
if file_path:
selected_image_path = file_path
image = Image.open(file_path)
original_width, original_height = image.size
# 计算宽高比
aspect_ratio = original_width / original_height
# 根据画布尺寸和宽高比计算新尺寸
canvas_width = 500
canvas_height = 300
new_width = canvas_width
new_height = int(new_width / aspect_ratio)
if new_height > canvas_height:
new_height = canvas_height
new_width = int(new_height * aspect_ratio)
# 调整图片大小
image = image.resize((new_width, new_height), Image.Resampling.LANCZOS)
# 居中图片
photo = ImageTk.PhotoImage(image)
canvas_left.create_image((canvas_width - new_width) / 2, (canvas_height - new_height) / 2, anchor='nw', image=photo)
canvas_left.image = photo # Keep a reference!
# 创建图片的标签
if label_text is None:
label_text = tk.Label(window, text="", font=("Arial", 16))
label_text.grid(row=3, column=0, columnspan=2, padx=10, pady=10)
def start_detection():
global right_canvas_image
if selected_image_path is not None:
image = Image.open(selected_image_path)
input_image = transform(image).unsqueeze(0)
with torch.no_grad():
outputs = model(input_image)
_, predicted = torch.max(outputs, 1)
label = classes[predicted.item()]
probabilities = torch.nn.functional.softmax(outputs, dim=1)
max_probability = probabilities[0][predicted].item()
label_text.config(text=f"{label} - {max_probability:.2f}")
# 显示图片在右侧画布
image = Image.open(selected_image_path) # 重新打开图片以避免被转换影响
original_width, original_height = image.size
aspect_ratio = original_width / original_height
canvas_width = 500
canvas_height = 300
new_width = canvas_width
new_height = int(new_width / aspect_ratio)
if new_height > canvas_height:
new_height = canvas_height
new_width = int(new_height * aspect_ratio)
image = image.resize((new_width, new_height), Image.Resampling.LANCZOS)
photo = ImageTk.PhotoImage(image)
# 检查是否已经创建了右侧画布的图片
if right_canvas_image is None:
right_canvas_image = canvas_right.create_image((canvas_width - new_width) / 2, (canvas_height - new_height) / 2, anchor='nw', image=photo)
else:
canvas_right.itemconfig(right_canvas_image, image=photo)
canvas_right.image = photo # Keep a reference!
else:
messagebox.showwarning("警告", "请先选择一张图像")
# 将标签放置在图片上
label_text.grid(row=1, column=1, padx=10, pady=10, sticky='n')
def replaceZeroes(data):
min_nonzero = min(data[np.nonzero(data)])
data[data == 0] = min_nonzero
return data
def MSR(img, scales):
weight = 1 / 3.0
scales_size = len(scales)
h, w = img.shape[:2]
log_R = np.zeros((h, w), dtype=np.float32)
for i in range(scales_size):
img = replaceZeroes(img)
L_blur = cv2.GaussianBlur(img, (scales[i], scales[i]), 0)
L_blur = replaceZeroes(L_blur)
dst_Img = cv2.log(img / 255.0)
dst_Lblur = cv2.log(L_blur / 255.0)
dst_Ixl = cv2.multiply(dst_Img, dst_Lblur)
log_R += weight * cv2.subtract(dst_Img, dst_Ixl)
dst_R = cv2.normalize(log_R, None, 0, 255, cv2.NORM_MINMAX)
log_uint8 = cv2.convertScaleAbs(dst_R)
return log_uint8
def img_inten():
global selected_image_path, right_canvas_image
if selected_image_path is not None:
# 读取图像
image = Image.open(selected_image_path)
# 转换为OpenCV格式
image = cv2.cvtColor(np.array(image), cv2.COLOR_RGB2BGR)
# 应用MSR算法
scales = [15, 101, 301] # 可根据需要调整
b_gray, g_gray, r_gray = cv2.split(image)
b_gray = MSR(b_gray, scales)
g_gray = MSR(g_gray, scales)
r_gray = MSR(r_gray, scales)
enhanced_image = cv2.merge([b_gray, g_gray, r_gray])
# 转换回PIL图像格式
enhanced_image = Image.fromarray(cv2.cvtColor(enhanced_image, cv2.COLOR_BGR2RGB))
# 调整图像大小以适应模型输入
enhanced_image = enhanced_image.resize((224, 224), Image.Resampling.LANCZOS)
# 转换图像为模型可以接受的格式
input_image = transform(enhanced_image).unsqueeze(0)
# 使用模型进行检测
with torch.no_grad():
outputs = model(input_image)
_, predicted = torch.max(outputs, 1)
label = classes[predicted.item()]
probabilities = torch.nn.functional.softmax(outputs, dim=1)
max_probability = probabilities[0][predicted].item()
# 显示增强后的图像和检测结果在右侧画布
enhanced_image = enhanced_image.resize((500, 300), Image.Resampling.LANCZOS)
photo = ImageTk.PhotoImage(enhanced_image)
if right_canvas_image is None:
right_canvas_image = canvas_right.create_image((500 - 500) / 2, (300 - 300) / 2, anchor='nw', image=photo)
else:
canvas_right.itemconfig(right_canvas_image, image=photo)
canvas_right.image = photo # Keep a reference!
# 更新标签文本
label_text.config(text=f"{label} - {max_probability:.2f}")
else:
messagebox.showwarning("警告", "请先选择一张图像")
# ... [剩余的代码] ...
# 创建主窗口
window = tk.Tk()
window.title("图像目标检测系统")
window.geometry('1000x650') # 设置窗口大小
# 创建背景画布并使用grid布局管理器
canvas_background = tk.Canvas(window, width=1000, height=650, bg="#e6f2ff")
canvas_background.grid(row=0, column=0, columnspan=2, rowspan=4, sticky='nsew') # 使用grid管理器
# 加载背景图像
background_image = Image.open(r"图标/5.jpg") # 替换为您的背景图像路径
background_image = background_image.resize((1000, 650), Image.Resampling.LANCZOS) # 调整图像大小以适应窗口
background_photo = ImageTk.PhotoImage(background_image)
# 在背景画布上绘制背景图像
canvas_background.create_image(0, 0, anchor='nw', image=background_photo)
canvas_background.image = background_photo # 保持对图像的引用
# 加载按钮图片
upload_img = Image.open(r"图标/3.jpg") # 替换为您的上传按钮图片路径
upload_img = upload_img.resize((100, 50), Image.Resampling.LANCZOS) # 调整图片大小
upload_img = ImageTk.PhotoImage(upload_img)
start_detection_img = Image.open(r"图标/2.jpg") # 替换为您的开始检测按钮图片路径
start_detection_img = start_detection_img.resize((100, 50), Image.Resampling.LANCZOS) # 调整图片大小
start_detection_img = ImageTk.PhotoImage(start_detection_img)
img_intensification_img = Image.open(r"图标/1.jpg") # 替换为您的图像增强按钮图片路径
img_intensification_img = img_intensification_img.resize((100, 50), Image.Resampling.LANCZOS) # 调整图片大小
img_intensification_img = ImageTk.PhotoImage(img_intensification_img)
# 创建两个画布区域
canvas_left = tk.Canvas(window, width=224, height=224, bg="#e6f2ff")
canvas_right = tk.Canvas(window, width=224, height=224, bg="#e6f2ff")
# 加载图片
waiting_image = Image.open(r"图标/8.jpg") # 替换为您的图片路径
detected_image = Image.open(r"图标/7.jpg") # 替换为您的图片路径
waiting_image = waiting_image.resize((200, 50), Image.Resampling.LANCZOS)
detected_image = detected_image.resize((200, 50), Image.Resampling.LANCZOS)
waiting_photo = ImageTk.PhotoImage(waiting_image)
detected_photo = ImageTk.PhotoImage(detected_image)
# 将两个画布区域放置在主窗口中
canvas_left.grid(row=1, column=0, padx=10, pady=10, sticky='nsew')
canvas_right.grid(row=1, column=1, padx=10, pady=10, sticky='nsew')
# 创建标签
label_waiting_image = tk.Label(window, image=waiting_photo, font=("Arial", 16), bg="#e6f2ff")
label_detected_image = tk.Label(window, image=detected_photo, font=("Arial", 16), bg="#e6f2ff")
# 定位标签
label_waiting_image.grid(row=0, column=0, padx=10, pady=10, sticky='nsew')
label_detected_image.grid(row=0, column=1, padx=10, pady=10, sticky='nsew')
# 设置标签的图片
label_waiting_image.config(image=waiting_photo)
label_detected_image.config(image=detected_photo)
# 创建按钮并放置在主窗口上
button_upload = tk.Button(window, image=upload_img, command=upload_image, relief="flat", borderwidth=0, background='#e6f2ff', activebackground='#e6f2ff')
button_start_detection = tk.Button(window, image=start_detection_img, command=start_detection, relief="flat", borderwidth=0, background='#e6f2ff', activebackground='#e6f2ff')
img_intensification = tk.Button(window, image=img_intensification_img, command=img_inten, relief="flat", borderwidth=0, background='#e6f2ff', activebackground='#e6f2ff')
# 将按钮放置在主窗口上
button_upload.place(x=155,y=495)
button_start_detection.place(x=755,y=495)
img_intensification.place(x=455,y=495)
# 运行主窗口
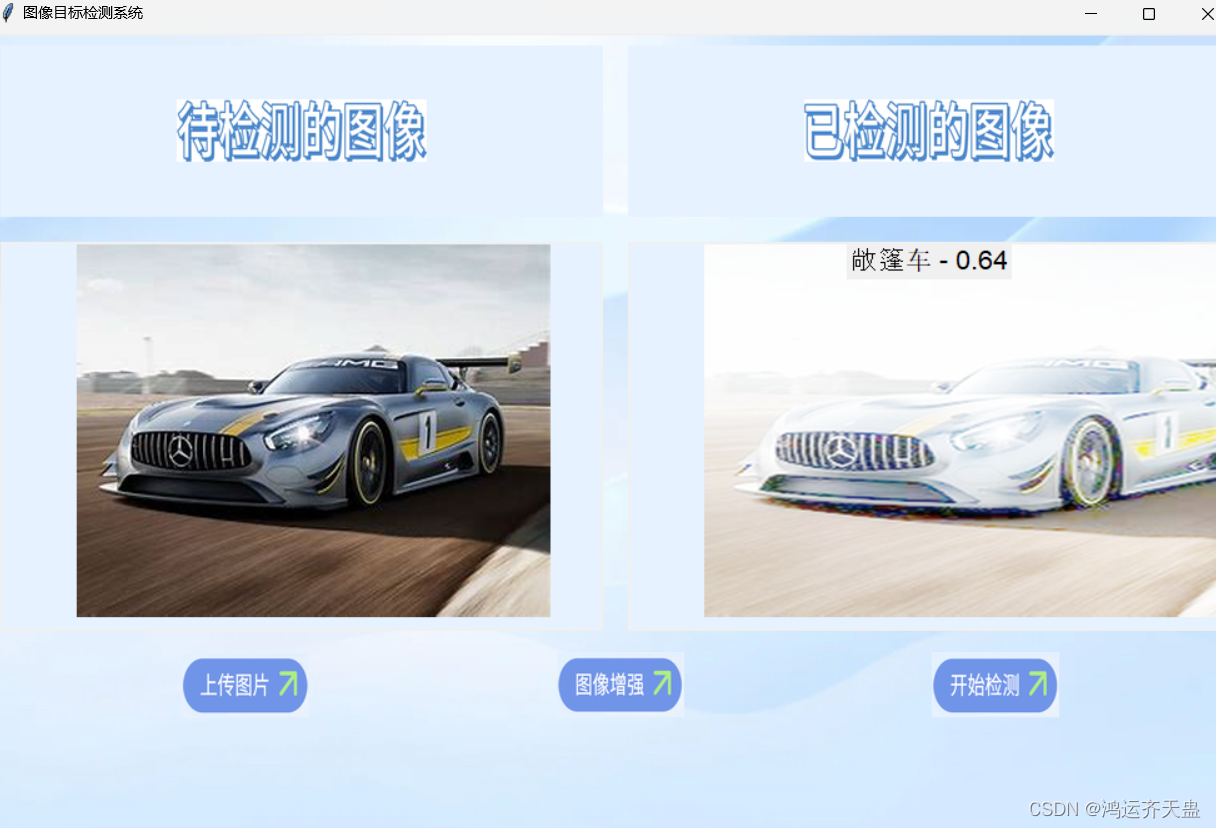
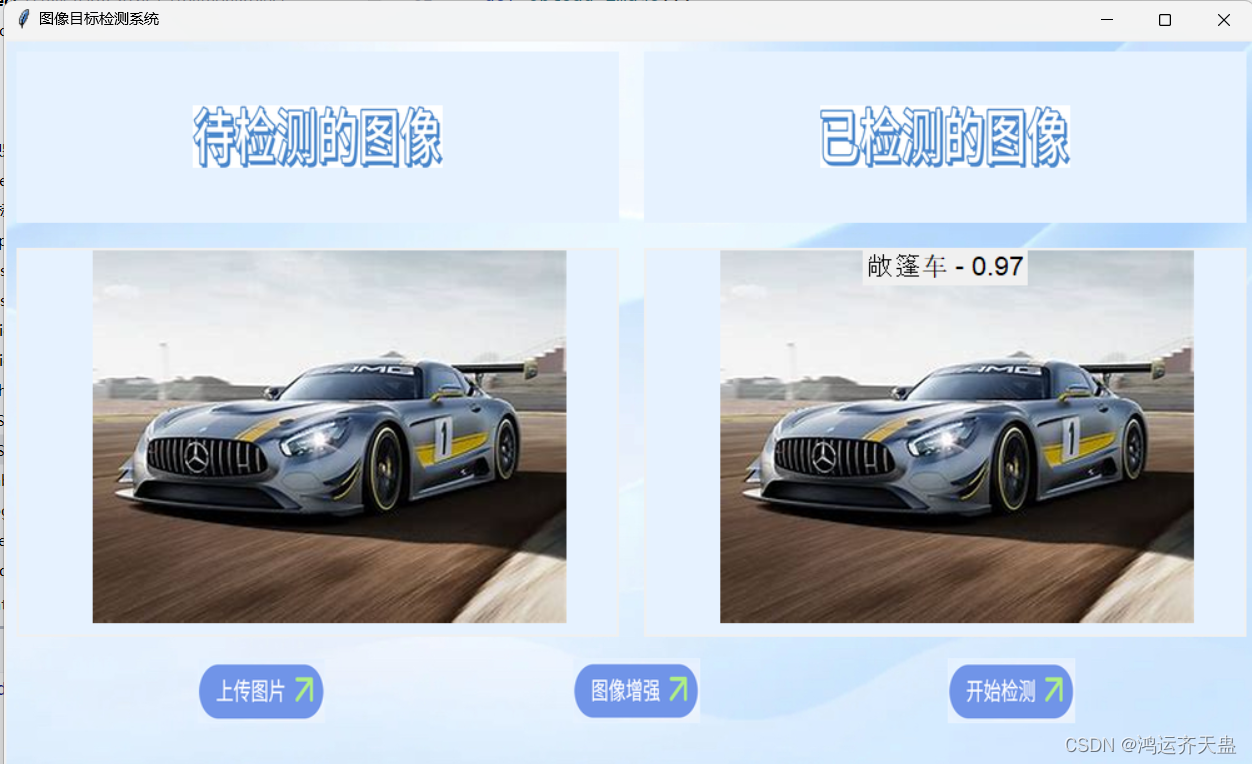
window.mainloop()代码实现效果
图像增强效果
这里图像增强本应该导致准确率增强,可能代码实现错误,不过不太重要,只是给大家提供思路