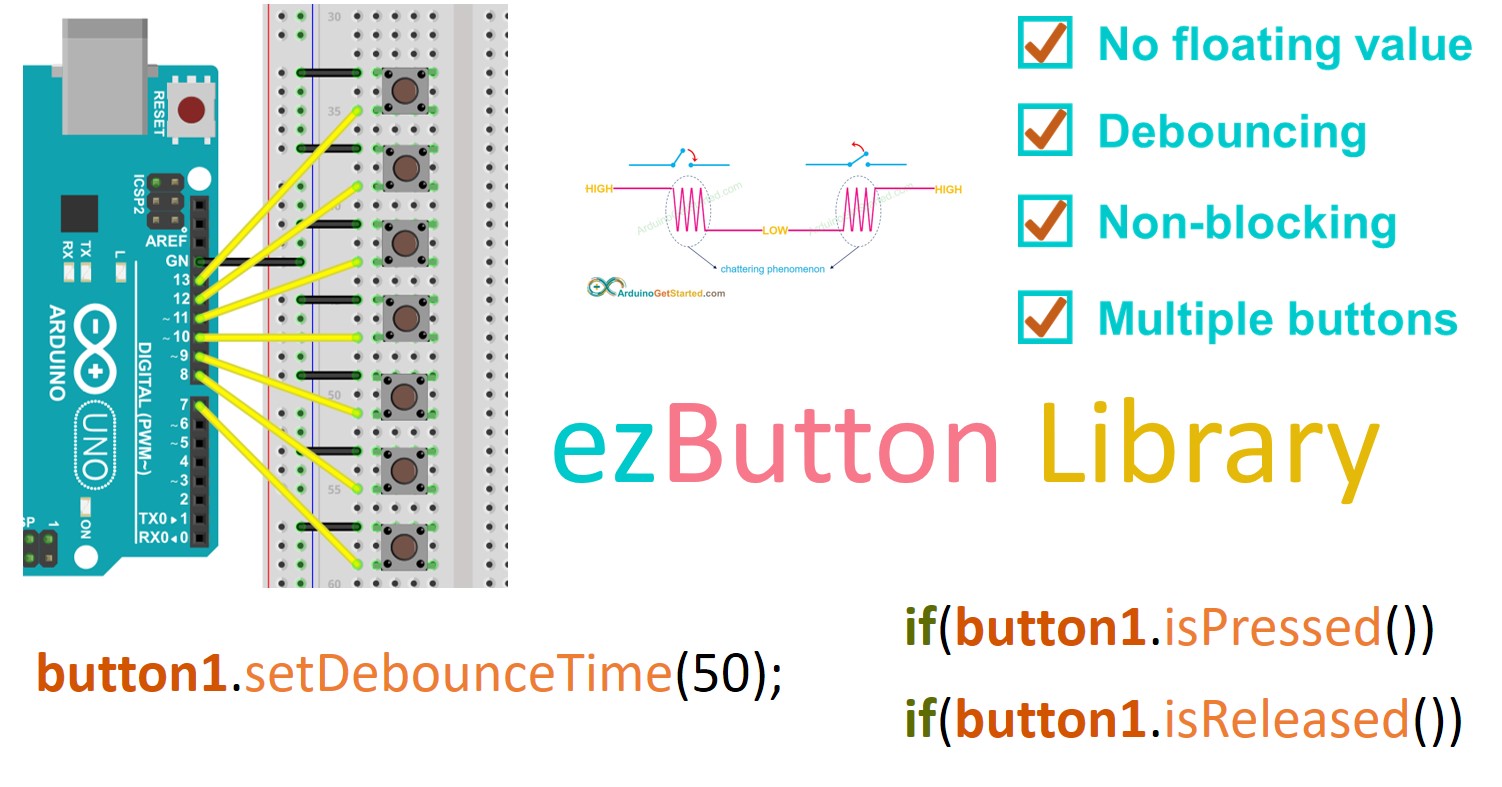
ezButton-按钮库
使用按钮时,初学者通常会遇到以下麻烦:
- Floating input issue 浮动输入问题
- Chattering issue 抖动问题
- Detecting the pressed and released events
检测按下和释放的事件 - Managing timestamp when debouncing for multiple buttons
在多个按钮去抖动时管理时间戳
The ezButton (easy button) library is designed to solve all of the above problems and make it easy to use for not only beginners but also experienced users. It is created by ArduioGetStarted.com .
ezButton(简易按钮)库旨在解决上述所有问题,不仅对初学者而且对有经验的用户都易于使用。它是由 ArduioGetStarted.com 创建的。
The library can be used for push button, momentary switches, toggle switch, magnetic contact switch (door sensor)...
该库可用于按钮、瞬时开关、拨动开关、磁接触开关(门传感器)...
Library Features 库功能
- Uses the internal pull-up resistor to avoid the floating value
使用内部上拉电阻器来避免浮点值 - Supports debounce to eliminate the chattering phenomenon
支持去抖动,消除抖动现象 - Supports the pressed and released events
支持按下和释放事件 - Supports the counting (for FALLING, RISING and BOTH)
支持计数(用于 FALLING、RISING 和 BOTH) - Easy to use with multiple buttons
易于使用,带有多个按钮 - All functions are non-blocking
所有功能都是非阻塞的
※ NOTE THAT: ※ 注意事项:
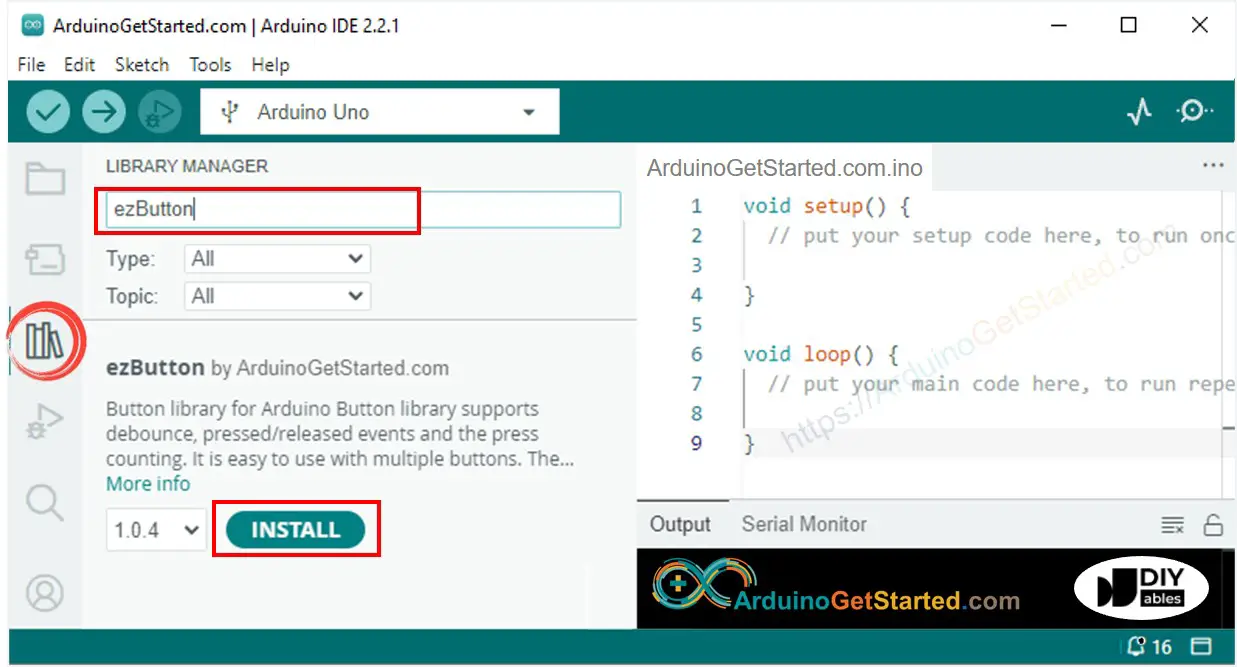
How To Install Library 如何安装库
-
Navigate to the Libraries icon on the left bar of the Arduino IDE.
导航到 Arduino IDE 左侧栏上的 Libraries 图标。
Search "ezButton" , then find the button library by ArduinoGetStarted
搜索"ezButton",然后通过ArduinoGetStarted找到按钮库
Click Install button to install ezButton library.
单击"安装"按钮以安装 ezButton 库。
Or you can download it on Github
或者您可以在 Github 上下载它
 Examples 例子
- Example - Single Button
示例 - 单按钮 - Example - Single Button Events
示例 - 单按钮事件 - Example - Single Button Debounce
示例 - 单按钮去抖 - Example - Single Button All
示例 - 全部单按钮 - Example - Multiple Button All
示例 - 多按钮 - Example - Button Count
示例 - 按钮计数 - Example - Button Array
示例 - 按钮数组
 Functions 功能
- `ezButton()``
setDebounceTime()getState()getStateRaw()isPressed()isReleased()setCountMode()getCount()resetCount()loop()
References 参考
 ezButton()
Description 描述
This function creates a new instance of the ezButton class that represents a particular button attached to your Arduino board.
此函数创建 ezButton 类的新实例,该类表示连接到 Arduino 板的特定按钮。
Syntax 语法
ezButton(pin)
Parameters 参数
pin: int - Arduino's pin that connects to the button.
pin: int - 连接到按钮的 Arduino 引脚。
Return 返回
A new instance of the ezButton class.
ezButton 类的新实例。
Example 例
ezButton button(7);
setDebounceTime()
Description 描述
This function is used to set the debounce time. The debounce time takes effect on getState(), isPressed(), isReleased() and getCount().
此函数用于设置去抖动时间。去抖动时间对 getState()、isPressed()、isReleased() 和 getCount() 生效。
Syntax 语法
button.setDebounceTime(time);
Parameters 参数
time: unsigned long - debounce time in milliseconds
时间:无符号长整数 - 去抖动时间(以毫秒为单位)
Return 返回
None 没有
Example 例
#include <ezButton.h>

ezButton button(7);  // create ezButton object that attach to pin 7;

void setup() {
  button.setDebounceTime(100); // set debounce time to 100 milliseconds
}

void loop() {}
getState()
Description 描述
This function returns the state of the button. If the debounce time is set, the returned state is the state after debouncing. We MUST call button .loop() function before using this function.
此函数返回按钮的状态。如果设置了去抖动时间,则返回的状态是去抖动后的状态。在使用此函数之前,我们必须调用 button.loop() 函数。
Syntax 语法
button.getState();
Parameters 参数
None 没有
Return 返回
The state of button. Since the ezButton library used the internal pull-up resistor, the state will be HIGH (1) when no press, and LOW (0) when pressed. If the debounce time is set, the returned state is the state after debouncing.
按钮的状态。由于ezButton库使用内部上拉电阻,因此不按下时状态为高电平(1),按下时状态为低电平(0)。如果设置了去抖动时间,则返回的状态是去抖动后的状态。
Example 例
#include <ezButton.h>

ezButton button(7);  // create ezButton object that attach to pin 7;

void setup() {

}

void loop() {
  button.loop(); // MUST call the loop() function first

  int btnState = button.getState();
}
getStateRaw()
This function returns the current state of the button without debouncing. It is equivalent to digitalRead().
此函数返回按钮的当前状态,而不进行去抖动。它等同于 digitalRead()。
Description 描述
Syntax 语法
button.getStateRaw()
Parameters 参数
None 没有
Return 返回
The current state of button without debouncing.
按钮的当前状态,没有去抖动。
Example 例
#include <ezButton.h>

ezButton button(7);  // create ezButton object that attach to pin 7;

void setup() {

}

void loop() {
  int btnState = button.getStateRaw();
}
isPressed()
Description 描述
This function check whether a button is pressed or not. We MUST call button.loop() function before using this function.
此功能检查按钮是否被按下。在使用此函数之前,我们必须调用 button.loop() 函数。
Syntax 语法
button.isPressed()
Parameters 参数
None 没有
Return 返回
true if the button is pressed, false otherwise
如果按下按钮,则为 true,否则为 false
Example 例
#include <ezButton.h>

ezButton button(7);  // create ezButton object that attach to pin 7;

void setup() {
  Serial.begin(9600);
}

void loop() {
  button.loop(); // MUST call the loop() function first

  if(button.isPressed())
    Serial.println("The button is pressed");
}
isReleased()
Description 描述
This function check whether a button is released or not. We MUST call button .loop() function before using this function.
此功能检查按钮是否被释放。在使用此函数之前,我们必须调用 button.loop() 函数。
Syntax 语法
button.isReleased()
Parameters 参数
None 没有
Return 返回
true if the button is released, false otherwise
如果释放按钮,则为 true,否则为 false
Example 例
#include <ezButton.h>

ezButton button(7);  // create ezButton object that attach to pin 7;

void setup() {
  Serial.begin(9600);
}

void loop() {
  button.loop(); // MUST call the loop() function first

  if(button.isReleased())
    Serial.println("The button is released");
}
setCountMode()
Description 描述
This function sets the count mode.
此函数设置计数模式。
Syntax 语法
button.setCountMode(mode)
Parameters 参数
mode: int - count mode. The available count modes include: COUNT_FALLING, COUNT_RISING and COUNT_BOTH.
mode: int - 计数模式。可用的计数模式包括:COUNT_FALLING、COUNT_RISING和COUNT_BOTH。
Return 返回
None 没有
Example 例
#include <ezButton.h>

ezButton button(7);  // create ezButton object that attach to pin 7;

void setup() {
  Serial.begin(9600);
  button.setDebounceTime(100); // set debounce time to 100 milliseconds
  button.setCountMode(COUNT_FALLING);
}

void loop() {
  button.loop(); // MUST call the loop() function first

  unsigned long count = button.getCount();
  Serial.println(count);
}
getCount()
Description 描述
This function returns the count value. We MUST call button .loop() function before using this function.
此函数返回计数值。在使用此函数之前,我们必须调用 button.loop() 函数。
Syntax 语法
button.getCount()
Parameters 参数
None. 没有。
Return 返回
The count value. If the debounce time is set, the returned value is the value after debouncing.
计数值。如果设置了去抖动时间,则返回的值为去抖动后的值。
Example 例
#include <ezButton.h>

ezButton button(7);  // create ezButton object that attach to pin 7;

void setup() {
  Serial.begin(9600);
  button.setDebounceTime(100); // set debounce time to 100 milliseconds
  button.setCountMode(COUNT_FALLING);
}

void loop() {
  button.loop(); // MUST call the loop() function first

  unsigned long count = button.getCount();
  Serial.println(count);
}
resetCount()
Description 描述
This function set the counter value to 0.
此函数将计数器值设置为 0。
Syntax 语法
button.resetCount()
Parameters 参数
None. 没有。
Return 返回
None. 没有。
Example 例
#include <ezButton.h>

ezButton button(7);  // create ezButton object that attach to pin 7;

void setup() {
  Serial.begin(9600);
  button.setCountMode(COUNT_FALLING);
}

void loop() {
  button.loop(); // MUST call the loop() function first

  unsigned long count = button.getCount();
  if(count >= 100)
    button.resetCount();
}
loop() 循环()
loop() 循环()
Description 描述
This function does debounce and updates the state of the button. It MUST be called before using getState(), isPressed(), isReleased() and getCount() functions.
此函数会去抖动并更新按钮的状态。在使用 getState()、isPressed()、isReleased() 和 getCount() 函数之前,必须调用它。
Syntax 语法
button.loop(); button.loop();
Parameters 参数
None 没有
Return 返回
None 没有
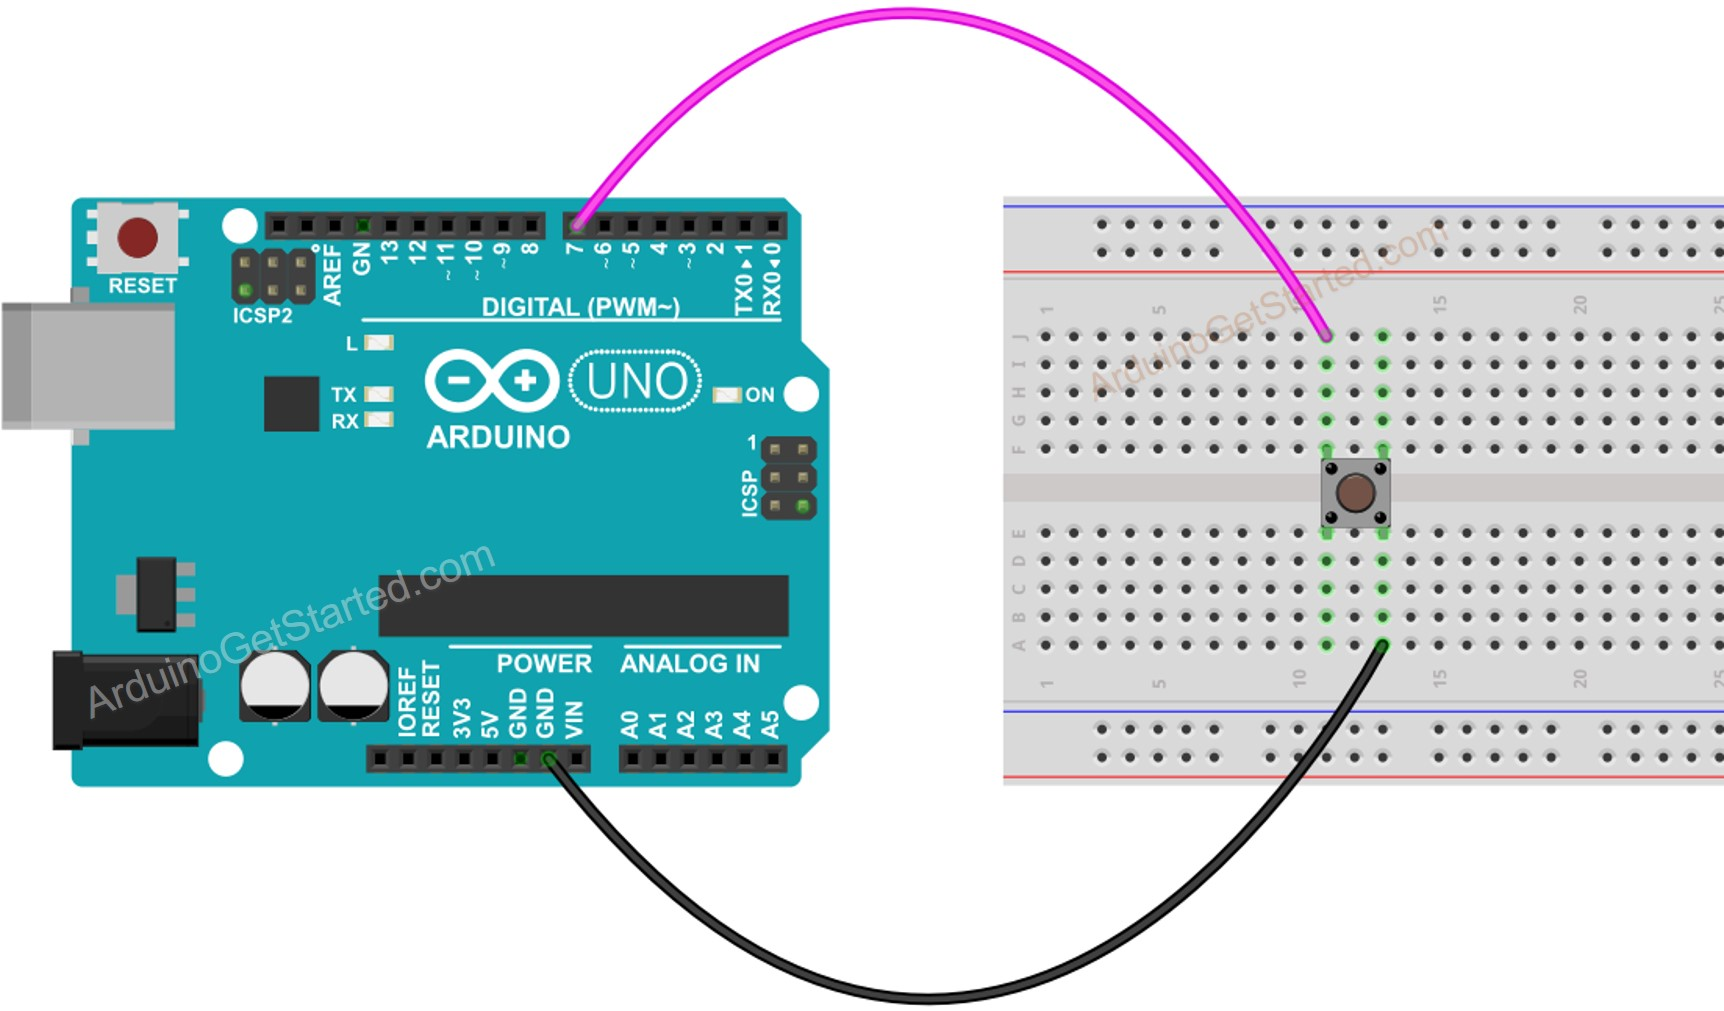
## 单个按钮Example
Wiring Diagram
#include <ezButton.h>

ezButton button(7);  // create ezButton object that attach to pin 7;

void setup() {
  Serial.begin(9600);
  button.setDebounceTime(50); // set debounce time to 50 milliseconds
}

void loop() {
  button.loop(); // MUST call the loop() function first

  if(button.isPressed())
    Serial.println("The button is pressed");

  if(button.isReleased())
    Serial.println("The button is released");
}

#include <ezButton.h>

ezButton button(7);  // create ezButton object that attach to pin 7;

void setup() {
  Serial.begin(9600);
  button.setDebounceTime(100); // set debounce time to 100 milliseconds
}

void loop() {
  button.loop(); // MUST call the loop() function first

  int btnState = button.getState();
  Serial.println(btnState);

  if(button.isPressed())
    Serial.println("The button is pressed");

  if(button.isReleased())
    Serial.println("The button is released");
}
按钮数组
Wiring Diagram
/*
* Created by ArduinoGetStarted.com
*
* This example code is in the public domain
*
* Tutorial page: https://arduinogetstarted.com/tutorials/arduino-button-library
*
* This example shows how to use array of button.
*/
#include <ezButton.h>
const int BUTTON_NUM = 5;
const int BUTTON_1_PIN = 2;
const int BUTTON_2_PIN = 3;
const int BUTTON_3_PIN = 4;
const int BUTTON_4_PIN = 5;
const int BUTTON_5_PIN = 6;
ezButton buttonArray[] = {
ezButton(BUTTON_1_PIN),
ezButton(BUTTON_2_PIN),
ezButton(BUTTON_3_PIN),
ezButton(BUTTON_4_PIN),
ezButton(BUTTON_5_PIN)
};
void setup() {
Serial.begin(9600);
for (byte i = 0; i < BUTTON_NUM; i++) {
buttonArray[i].setDebounceTime(50); // set debounce time to 50 milliseconds
}
}
void loop() {
for (byte i = 0; i < BUTTON_NUM; i++)
buttonArray[i].loop(); // MUST call the loop() function first
for (byte i = 0; i < BUTTON_NUM; i++) {
if (buttonArray[i].isPressed()) {
Serial.print("The button ");
Serial.print(i + 1);
Serial.println(" is pressed");
}
if (buttonArray[i].isReleased()) {
Serial.print("The button ");
Serial.print(i + 1);
Serial.println(" is released");
}
}
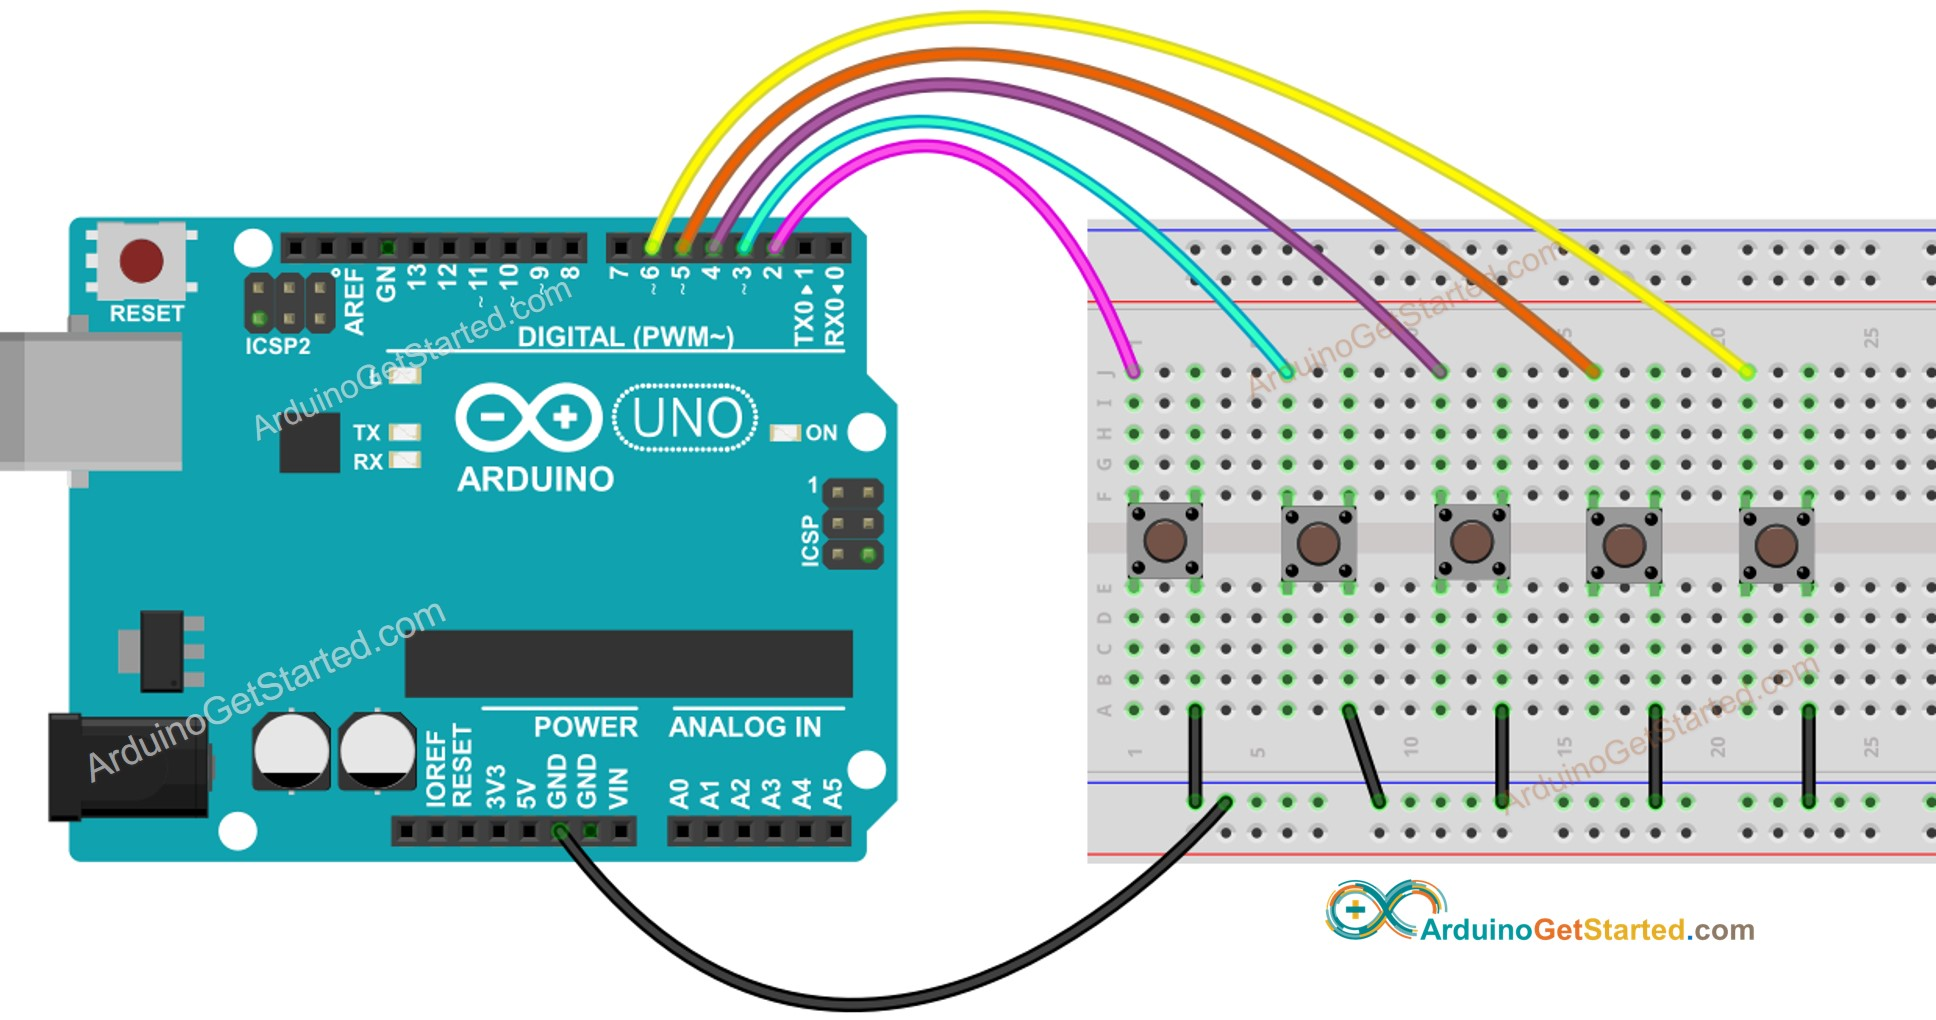
}多个按钮
Wiring Diagram
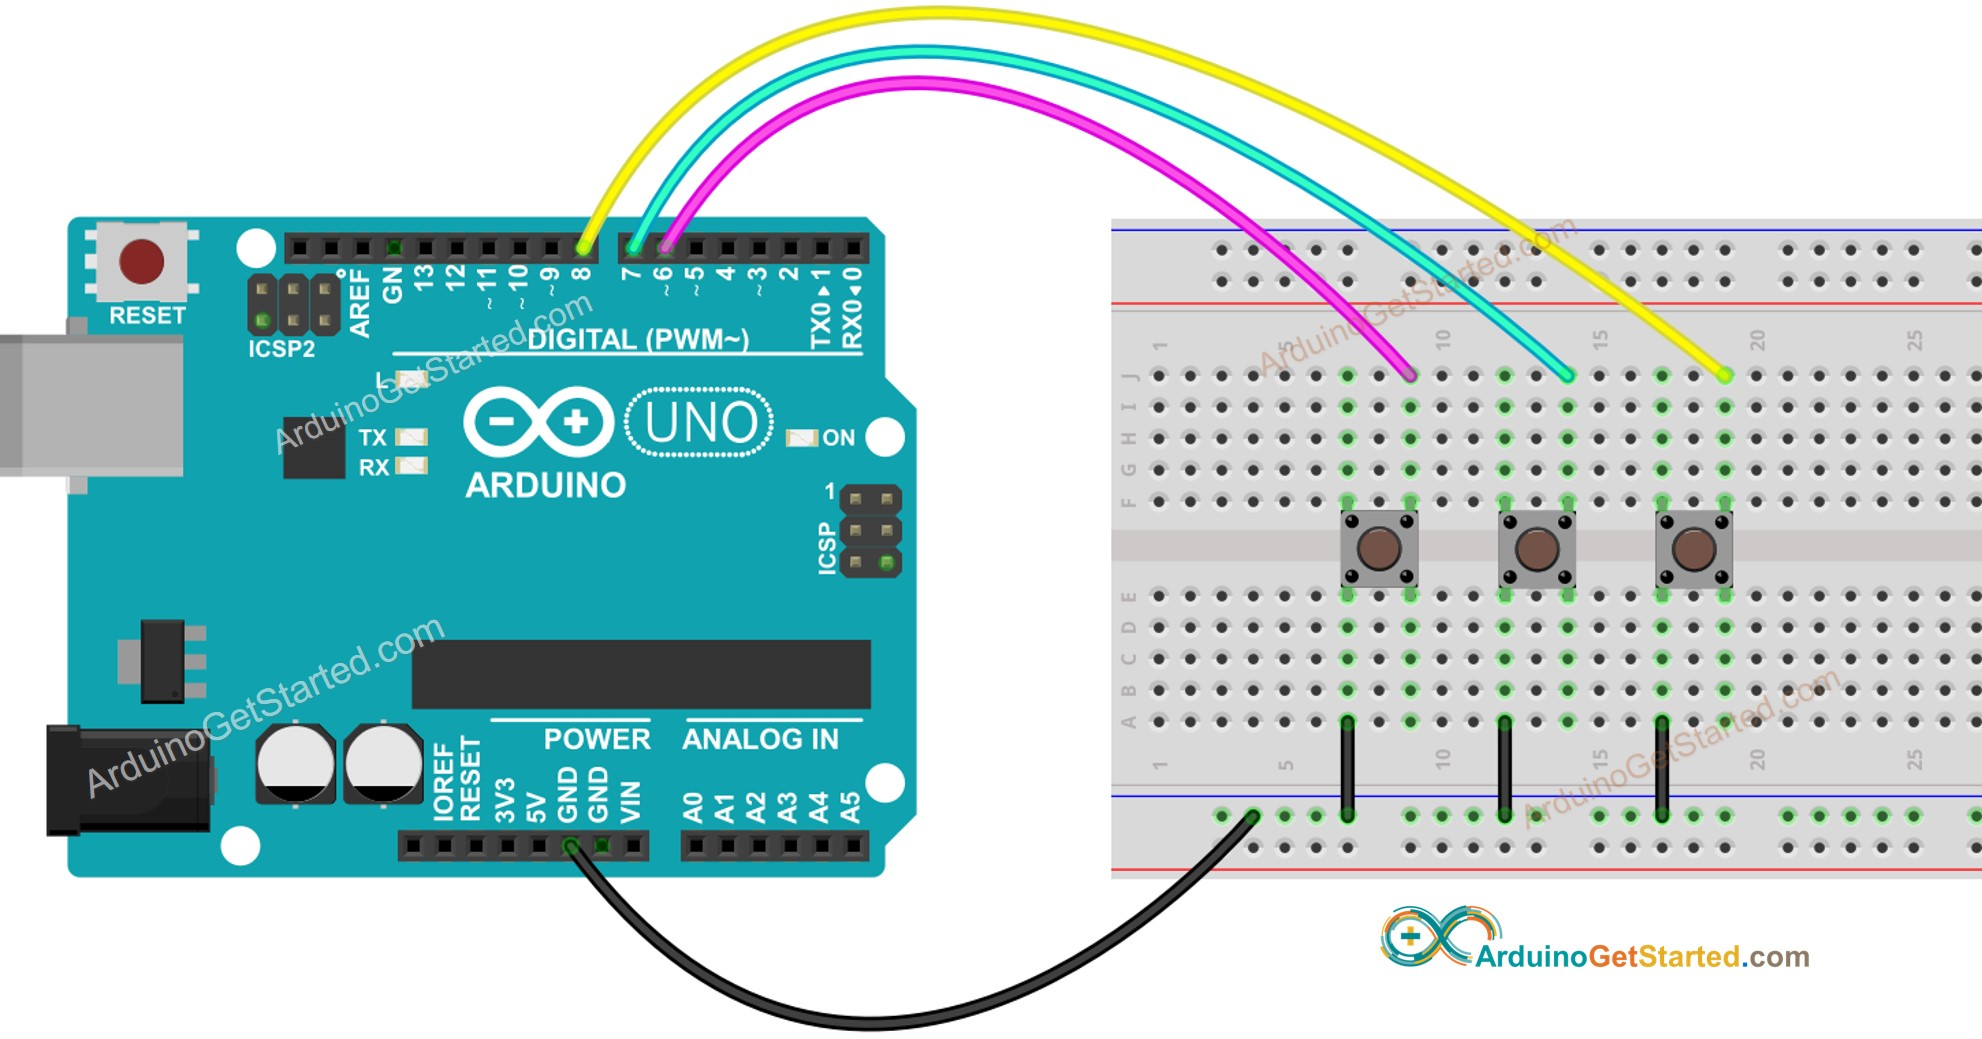
This image is created using Fritzing. Click to enlarge image
Arduino Code
Quick Steps
-
Install ezButton library. See How To
-
Connect Arduino to PC via USB cable
-
Open Arduino IDE, select the right board and port
-
On Arduino IDE, Go to File Examples ezButton 05.MultipleButtonAll example
/*
- Created by ArduinoGetStarted.com
- This example code is in the public domain
- Tutorial page: https://arduinogetstarted.com/tutorials/arduino-button-library
- This example:
-
- uses debounce for multiple buttons.
-
- reads state of multiple buttons
-
- detects the pressed and released events of multiple buttons
*/
- detects the pressed and released events of multiple buttons
#include <ezButton.h>
ezButton button1(6); // create ezButton object that attach to pin 6;
ezButton button2(7); // create ezButton object that attach to pin 7;
ezButton button3(8); // create ezButton object that attach to pin 8;void setup() {
Serial.begin(9600);
button1.setDebounceTime(50); // set debounce time to 50 milliseconds
button2.setDebounceTime(50); // set debounce time to 50 milliseconds
button3.setDebounceTime(50); // set debounce time to 50 milliseconds
}void loop() {
button1.loop(); // MUST call the loop() function first
button2.loop(); // MUST call the loop() function first
button3.loop(); // MUST call the loop() function firstint btn1State = button1.getState(); int btn2State = button2.getState(); int btn3State = button3.getState(); Serial.print("button 1 state: "); Serial.println(btn1State); Serial.print("button 2 state: "); Serial.println(btn2State); Serial.print("button 3 state: "); Serial.println(btn3State); if(button1.isPressed()) Serial.println("The button 1 is pressed"); if(button1.isReleased()) Serial.println("The button 1 is released"); if(button2.isPressed()) Serial.println("The button 2 is pressed"); if(button2.isReleased()) Serial.println("The button 2 is released"); if(button3.isPressed()) Serial.println("The button 3 is pressed"); if(button3.isReleased()) Serial.println("The button 3 is released");}
-
Click Upload button on Arduino IDE to upload code to Arduino