1、环境
操作系统:龙蜥os 7.9
bash
firewall-cmd --permanent --zone=public --remove-service=ssh
firewall-cmd --permanent --zone=public --add-rich-rule='rule family=ipv4 source address=10.90.101.1 port port=22 protocol=tcp accept'
firewall-cmd --reload
2、安装NFS
(1)安装依赖
bash
yum -y install epel-release(2)安装 NFS 依赖包
bash
yum -y install nfs-utils rpcbind(3)启动 NFS
bash
systemctl enable rpcbind nfs-server nfs-lock nfs-idmap
systemctl start rpcbind nfs-server nfs-lock nfs-idmap
(4)配置防火墙规则
bash
firewall-cmd --permanent --zone=public --add-rich-rule='rule family="ipv4" source address="10.99.51.0/24" service name="nfs" accept'
firewall-cmd --permanent --zone=public --add-rich-rule='rule family="ipv4" source address="10.99.51.0/24" service name="mountd" accept'
firewall-cmd --permanent --zone=public --add-rich-rule='rule family="ipv4" source address="10.99.51.0/24" service name="rpc-bind" accept'

firewall-cmd --reload

#查看规则
firewall-cmd --list-all
(5)配置 NFS
bash
mkdir /data
chmod 777 -R /data

vi /etc/exports
bash
/data 10.99.51.*(rw,sync,all_squash,anonuid=0,anongid=0)(6)让 exports 配置生效
bash
exportfs -a3、安装mysql
(1)设置 Repo
bash
yum -y localinstall http://mirrors.ustc.edu.cn/mysql-repo/mysql57-community-release-el7.rpm(2)Yum 方式安装 MySQL
bash
yum install -y mysql-community-server报错解决:出现gpgkey问题,改yum源 不检查

(3)配置 MySQL
bash
if [ ! "$(cat /usr/bin/mysqld_pre_systemd | grep -v ^\# | grep initialize-insecure )" ]; then
    sed -i "s@--initialize @--initialize-insecure @g" /usr/bin/mysqld_pre_systemd
fi
(4) 启动 MySQL
bash
systemctl enable mysqld
systemctl start mysqld
(5)配置数据库授权
bash
mysql -uroot
bash
Welcome to the MySQL monitor.  Commands end with ; or \g.
Your MySQL connection id is 2
Server version: 5.7.32 MySQL Community Server (GPL)

Copyright (c) 2000, 2020, Oracle and/or its affiliates. All rights reserved.

Oracle is a registered trademark of Oracle Corporation and/or its
affiliates. Other names may be trademarks of their respective
owners.

Type 'help;' or '\h' for help. Type '\c' to clear the current input statement.

mysql> create database jumpserver default charset 'utf8';
Query OK, 1 row affected (0.00 sec)

mysql> set global validate_password_policy=LOW;
Query OK, 0 rows affected (0.00 sec)

mysql> create user 'jumpserver'@'%' identified by 'KXOeyNgDeTdpeu9q';
Query OK, 0 rows affected (0.00 sec)

mysql> grant all on jumpserver.* to 'jumpserver'@'%';
Query OK, 0 rows affected, 1 warning (0.00 sec)

mysql> flush privileges;
Query OK, 0 rows affected (0.00 sec)

mysql> exit
Bye
报错处理

bash
INSTALL PLUGIN validate_password SONAME 'validate_password.so';重启下mysqld
bash
systemctl restart mysqld
bash
mysql> set global validate_password_policy=LOW;
(6)配置防火墙
bash
firewall-cmd --permanent --add-rich-rule="rule family="ipv4" source address="10.99.51.0/24" port protocol="tcp" port="3306" accept"
firewall-cmd --reload
4、部署 Redis 服务
(1)设置 Repo
bash
yum -y install epel-release https://repo.ius.io/ius-release-el7.rpm(2) Yum 方式安装 Redis
bash
yum install -y redis6(3) 配置 Redis
bash
sed -i "s/bind 127.0.0.1/bind 0.0.0.0/g" /etc/redis/redis.conf
sed -i "561i maxmemory-policy allkeys-lru" /etc/redis/redis.conf
sed -i "481i requirepass KXOeyNgDeTdpeu9q" /etc/redis/redis.conf
(4)启动 Redis
bash
systemctl enable redis
systemctl start redis
(5)配置防火墙
bash
firewall-cmd --permanent --add-rich-rule="rule family="ipv4" source address="10.99.51.0/24" port protocol="tcp" port="6379" accept"
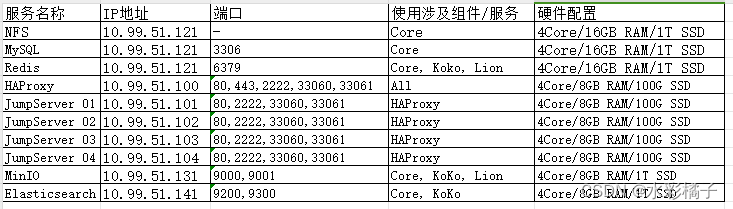
firewall-cmd --reload5、部署 JumpServer 01 节点
(1)安装 NFS 依赖包
bash
yum -y install nfs-utils
showmount -e 10.99.51.121
(2)创建挂载 NFS 目录
bash
mkdir -p /opt/jumpserver/core/data(3)配置 NFS 共享目录开机自动挂载
bash
echo "10.99.51.121:/data /opt/jumpserver/core/data nfs defaults 0 0" >> /etc/fstab
mount -a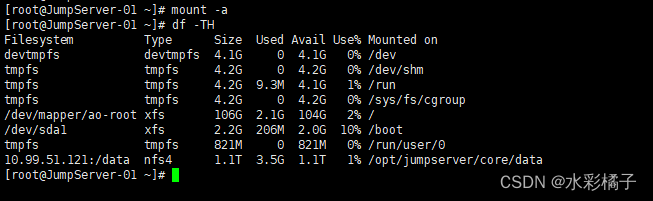
(4)下载 jumpserver-install 软件包
bash
cd /opt
yum -y install wget
wget https://github.com/jumpserver/installer/releases/download/v3.10.10/jumpserver-installer-v3.10.10.tar.gz
tar -xf jumpserver-installer-v3.10.10.tar.gz
cd jumpserver-installer-v3.10.10
(5)修改临时配置文件
bash
vi config-example.txt以下秘钥key 密码登 自行修改正确-这只是示例
bash
# JumpServer configuration file example.
#
# 如果不了解用途可以跳过修改此配置文件, 系统会自动填入
# 完整参数文档 https://docs.jumpserver.org/zh/v3/guide/env/

################################## 镜像配置 ###################################
#
# 国内连接 docker.io 会超时或下载速度较慢, 开启此选项使用华为云镜像加速
# 取代旧版本 DOCKER_IMAGE_PREFIX
#
DOCKER_IMAGE_MIRROR=1

# 镜像拉取规则 Always, IfNotPresent
# Always 表示每次都会拉取最新镜像, IfNotPresent 表示本地不存在镜像时才会拉取
#
# IMAGE_PULL_POLICY=Always

################################## 安装配置 ###################################
#
# JumpServer 数据库持久化目录, 默认情况下录像、任务日志都在此目录
# 请根据实际情况修改, 升级时备份的数据库文件(.sql)和配置文件也会保存到该目录
#
VOLUME_DIR=/opt/jumpserver

# 加密密钥, 迁移请保证 SECRET_KEY 与旧环境一致, 请勿使用特殊字符串
# (*) Warning: Keep this value secret.
# (*) 勿向任何人泄露 SECRET_KEY
#
SECRET_KEY=xxxx

# 组件向 core 注册使用的 token, 迁移请保持 BOOTSTRAP_TOKEN 与旧环境一致,
# 请勿使用特殊字符串
# (*) Warning: Keep this value secret.
# (*) 勿向任何人泄露 BOOTSTRAP_TOKEN
#
BOOTSTRAP_TOKEN=xxxx

# 日志等级 INFO, WARN, ERROR
#
LOG_LEVEL=ERROR

# JumpServer 容器使用的网段, 请勿与现有的网络冲突, 根据实际情况自行修改
#
DOCKER_SUBNET=192.168.250.0/24

# ipv6 nat, 正常情况下无需开启
# 如果宿主不支持 ipv6 开启此选项将会导致无法获取真实的客户端 ip 地址
#
USE_IPV6=0
DOCKER_SUBNET_IPV6=fc00:1010:1111:200::/64

################################# MySQL 配置 ##################################
# 外置 MySQL 需要输入正确的 MySQL 信息, 内置 MySQL 系统会自动处理
# (*) 密码部分不得包含单引号和双引号
#
DB_HOST=10.99.51.121
DB_PORT=3306
DB_USER=jumpserver
DB_PASSWORD=xxxx
DB_NAME=jumpserver

# 如果外置 MySQL 需要开启 TLS/SSL 连接, 参考 https://docs.jumpserver.org/zh/v3/installation/security_setup/mysql_ssl/
#
# DB_USE_SSL=true

################################# Redis 配置 ##################################
# 外置 Redis 需要请输入正确的 Redis 信息, 内置 Redis 系统会自动处理
# (*) 密码部分不得包含单引号和双引号
#
REDIS_HOST=10.99.51.121
REDIS_PORT=6379
REDIS_PASSWORD=xxxx

# 如果使用外置 Redis Sentinel, 请手动填写下面内容
#
# REDIS_SENTINEL_HOSTS=mymaster/192.168.100.1:26379,192.168.100.1:26380,192.168.100.1:26381
# REDIS_SENTINEL_PASSWORD=your_sentinel_password
# REDIS_PASSWORD=your_redis_password
# REDIS_SENTINEL_SOCKET_TIMEOUT=5

# 如果外置 Redis 需要开启 TLS/SSL 连接, 参考 https://docs.jumpserver.org/zh/v3/installation/security_setup/redis_ssl/
#
# REDIS_USE_SSL=true

################################## 访问配置 ###################################
# 对外提供服务端口, 如果与现有服务冲突请自行修改
#
HTTP_PORT=80
SSH_PORT=2222
MAGNUS_MYSQL_PORT=33061
MAGNUS_MARIADB_PORT=33062
MAGNUS_REDIS_PORT=63790
MAGNUS_POSTGRESQL_PORT=54320
MAGNUS_SQLSERVER_PORT=14330
MAGNUS_ORACLE_PORTS=30000-30030

################################# HTTPS 配置 #################################
# 参考 https://docs.jumpserver.org/zh/v3/installation/proxy/ 配置
#
# HTTPS_PORT=443
# SERVER_NAME=your_domain_name
# SSL_CERTIFICATE=your_cert
# SSL_CERTIFICATE_KEY=your_cert_key
#

# Nginx 文件上传下载大小限制
#
CLIENT_MAX_BODY_SIZE=4096m

################################## 组件配置 ###################################
# 组件注册使用, 默认情况下向 core 容器注册, 集群环境需要修改为集群 vip 地址
#
CORE_HOST=http://core:8080
PERIOD_TASK_ENABLED=true

# Core Session 定义,
# SESSION_COOKIE_AGE 表示闲置多少秒后 session 过期,
# SESSION_EXPIRE_AT_BROWSER_CLOSE=true 表示关闭浏览器即 session 过期
#
# SESSION_COOKIE_AGE=86400
SESSION_EXPIRE_AT_BROWSER_CLOSE=false

# 可信任 DOMAINS 定义,
# 定义可信任的访问 IP, 请根据实际情况修改, 如果是公网 IP 请改成对应的公网 IP,
# DOMAINS="demo.jumpserver.org:443"
# DOMAINS="172.17.200.191:80"
# DOMAINS="demo.jumpserver.org:443,172.17.200.191:80"
DOMAINS=

# 配置不需要启动的组件, 默认所有组件都会开启, 如果不需要某个组件可以通过设置 {组件名称}_ENABLED 为 0 关闭
# CORE_ENABLED=0
# CELERY_ENABLED=0
# KOKO_ENABLED=0
# LION_ENABLED=0
# MAGNUS_ENABLED=0
# CHEN_ENABLED=0
# KAEL_ENABLED=0
# PANDA_ENABLED=0
# WEB_ENABLED=0

# Lion 开启字体平滑, 优化体验
#
JUMPSERVER_ENABLE_FONT_SMOOTHING=true

################################# XPack 配置 #################################
# XPack 包, 开源版本设置无效
#
RDP_PORT=3389
XRDP_PORT=3390

################################## 其他配置 ##################################
# 终端使用宿主 HOSTNAME 标识, 首次安装自动生成
#
SERVER_HOSTNAME=${HOSTNAME}

# 使用内置 SLB, 如果 Web 页面获取到的客户端 IP 地址不正确, 请将 USE_LB 设置为 0
# USE_LB 设置为 1 时, 使用配置 proxy_set_header X-Forwarded-For $remote_addr
# USE_LB 设置为 0 时, 使用配置 proxy_set_header X-Forwarded-For $proxy_add_x_forwarded_for
USE_LB=1

# 当前运行的 JumpServer 版本号, 安装和升级完成后自动生成
#
CURRENT_VERSION=

# KoKo Lion 配置
SHARE_ROOM_TYPE=redis                                            # KoKo Lion 使用 redis 共享
REUSE_CONNECTION=False                                           # Koko 禁用连接复用
(6)执行脚本安装 JumpServer 服务
bash
./jmsctl.sh install根据提示选择 是还是不是即可

(7)启动 JumpServer 服务
bash
./jmsctl.sh start(8)设置防火墙规则
bash
firewall-cmd --permanent --zone=public --add-rich-rule='rule family=ipv4 source address=10.90.101.1 port port=80 protocol=tcp accept'
firewall-cmd --permanent --zone=public --add-rich-rule='rule family=ipv4 source address=10.90.101.1 port port=2222 protocol=tcp accept'
firewall-cmd --reload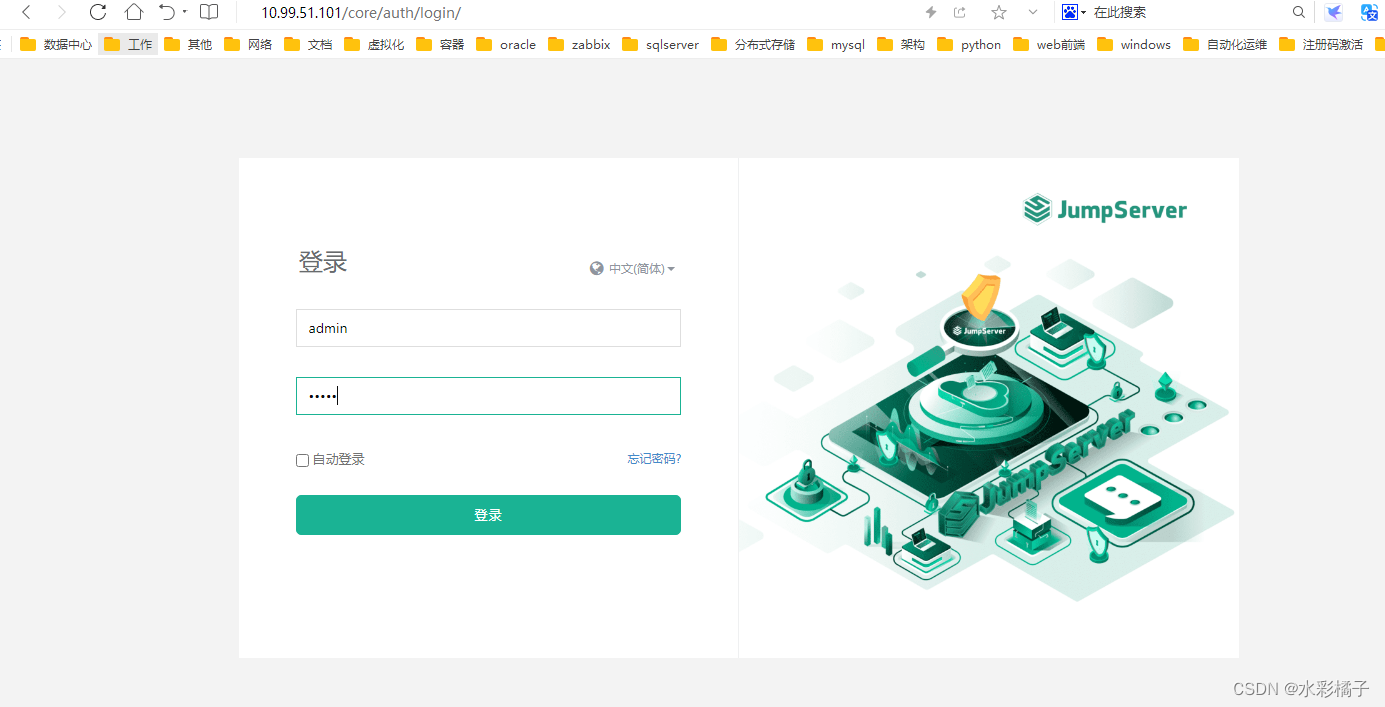
6、部署 JumpServer 02 节点
同 jumpserver 01 节点