哈喽,大家好,我是明智
书接上回:如何保证服务发布过程中流量无损?
在上篇文章中咱们留了两个问题:
-
服务如何响应停机信号
SIGTERM,即kill -15 -
探针如何实现?
本文咱们就来解决这两个问题,同时分享一下笔者在落地优雅启停的过程中踩过的坑
服务如何响应停机信号
在java中我们可以直接利用通过Runtime来注册一个停机的钩子函数
go
Runtime.getRuntime().addShutdownHook(new Thread(
  new Runnable() {
    @Override
    public void run() {
      // 实现自己的停机逻辑,例如:关闭资源、等待请求处理完成等....
      System.out.println("我被kill了");
    }
  }
));
在SpringBoot环境下,默认已经给我们注册了这个钩子:
❝
org.springframework.boot.SpringApplication#refreshContext
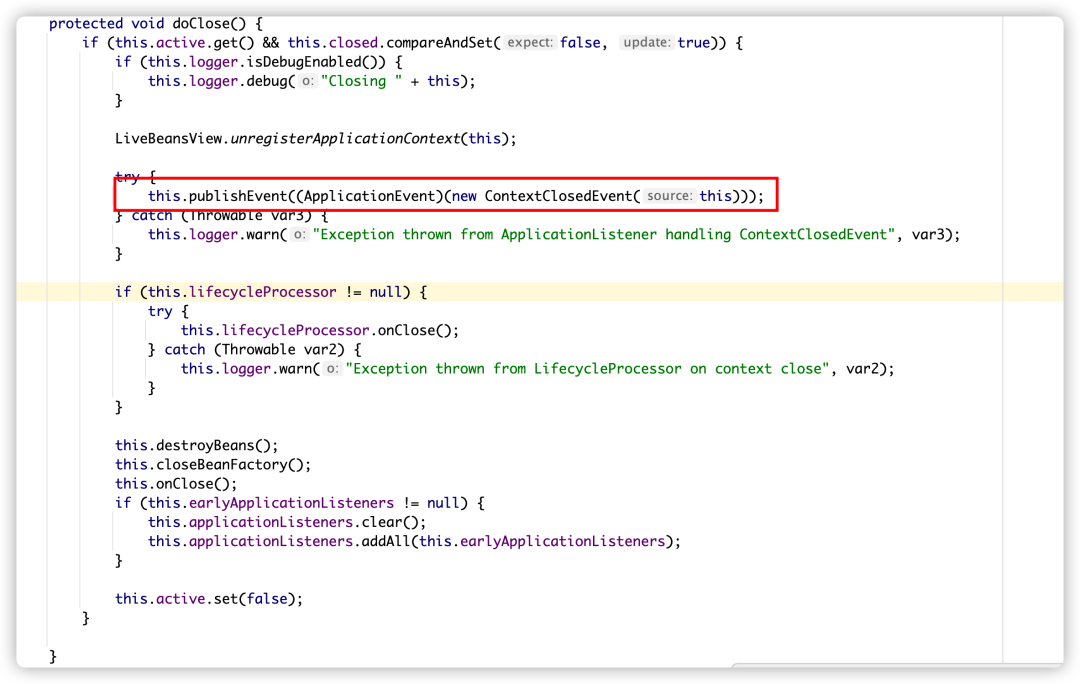
在这个钩子函数中,Spring容器会去执行自己的doClose方法关闭容器

跟踪这个doClose方法会发现,关闭容器的第一步会发送一个ContextClosedEvent事件

因此在SpringBoot环境下我们只需要实现一个事件监听器就可以捕捉到应用的停机信号,实现优雅停机
go
@Component
public class MyShutdownHook implements ApplicationListener<ContextClosedEvent> {
    @Override
    public void onApplicationEvent(ContextClosedEvent event) {

        // 优雅停机。。。

    }
}
利用SpringBootActuator实现探针
在上篇文章中,咱们提到了需要配置K8s的探针,配置如下:
go
apiVersion: apps/v1
kind: Deployment
spec:
  template:
    spec:
      containers:
      # 在containers下添加两个指针
        livenessProbe:
          httpGet:
            path: /actuator/health/liveness
            port: 8080
          # pod启动后延迟60s探测
          initialDelaySeconds: 45
          # 每30s测一次
          periodSeconds: 10
          # 每次探测最大超时时间3s
          timeoutSeconds: 3
          # 连续6次探测失败则重启pod
          failureThreshold: 3
        readinessProbe:
            httpGet:
              path: /actuator/health/liveness
              port: 8080
            initialDelaySeconds: 45
            periodSeconds: 10
            timeoutSeconds: 3
            failureThreshold: 3
其中需要实现两个接口:
-
/actuator/health/liveness,用于存活探测 -
/actuator/health/liveness,用于就绪探测
如何实现这两个接口呢?
我们只需要接入spring boot actuator,再进行一些简单配置即可
第一步:引入依赖
go
<dependency>
    <groupId>org.springframework.boot</groupId>
    <artifactId>spring-boot-starter-actuator</artifactId>
</dependency>第二步:添加配置
go
endpoints:
  web:
    exposure:
      include: health
endpoint:
  health:
    group:
      liveness:
        include:
          - ping
      readiness:
        include:
          - "*"
show-details: alwaysendpoints.web.exposure.include代表服务需要暴露哪些actuator的端点,咱们这里只讨论健康检查,因此只打开health端点
在上面的配置中通过endpoint.health.group将health端点分为两组:liveness、readiness,对应咱们在探针中配置的livenessProbe跟readinessProbe
在liveness探测中,我只配置了ping,其作用相当于访问下面这样的一个接口:
go
@RestController("/health")
public class HealthCheck {
    @GetMapping
    public String check(){
        return "ok";
    }
}对于readiness探测,配置了*,代表要对所有的组件进行检查
我们可以通过访问:localhost:8080/actuator/health/readiness来确认目前检查了哪些组件,其返回格式如下:
go
{
  "status": "DOWN",
  "components": {
    "custom": {
      "status": "DOWN",
      "details": {
        "message": "My application is healthy!"
      }
    },
    "db": {
      "status": "UP",
      "details": {
        "database": "MySQL",
        "validationQuery": "isValid()"
      }
    },
    "mongo": {
      "status": "DOWN",
      "details": {
        "error": "org.springframework.data.mongodb.UncategorizedMongoDbException: Exception authenticating MongoCredential{mechanism=SCRAM-SHA-1}; nested exception is com.mongodb.MongoSecurityException: Exception authenticating MongoCredential"
      }
    },
    "ping": {
      "status": "UP"
    }
  }
}通过这个接口的访问信息,咱们也可以发现目前我这个服务的mongoDB是无法连接的,另外有一个定制的端点custom是挂掉的。需要注意的是,只要有一个端点检查是down的状态,整个检查就是不通过的。
定制一个检查的端点也非常简单,如下:
go
// 需要在endpoint.health.group.readiness.include中添加这个custom端点
@Component("custom")
public class CustomHealthCheck extends AbstractHealthIndicator {
    @Override
    protected void doHealthCheck(Health.Builder builder) throws Exception {

        if (检查不通过) {
            builder.down().withDetail("reason", "我挂掉了").withException(new RuntimeException("测试异常"));
        } else {
            builder.up();
        }

    }
}
踩过的坑
-
添加liveness跟readiness探针后, healthcheck会根据配置判断组件的状态, 如果组件状态异常,会导致pod重启, 在特殊场景下, 组件异常并不需要重启, 需要使用方自行判断。可以通过
http://localhost:8080/actuator/health/readiness跟http://localhost:8080/actuator/health/liveness确认当前应用配置了哪些组件举例场景:redis挂掉, 但是在服务中, redis缓存允许穿透或者异常, redis挂掉不应该重启机器, 这个在healthcheck中,redis状态异常不应该触发liveness和readness失败
-
initialDelaySeconds的值应该根据应用启动时间进行合理设置,如果设置过短,会导致pod反复被kill无法正常启动
-
整个优雅启停的上线应该分为两步
-
代码改造,接入SpringBootActuator
-
deployment文件更新
推荐的做法是,代码改造完成后先上线,上线之后选择某一个pod测试服务的liveness跟readiness探测接口,确认探测接口的调用对服务没有影响后再apply改动过的deployment文件。笔者在实际落地的时候就碰到过某些测试环境没问题,上线之后只要调用redis的探测,服务立马宕机,之后就进入不断重启、宕机的死循环,并且,回滚的时候需要同时操作deployment文件跟回滚代码,那种感觉别提有多酸爽
作者简介:
-
大三退学,创业、求职、自考,一路升级
-
7年it从业经验,多个开源社区contributor
-
专注分享成长路上的所悟所得
-
长期探索
个人成长|职业发展|副业探索
往期推荐:
