系列文章目录
HarmonyOS Next 系列之省市区弹窗选择器实现(一)
HarmonyOS Next 系列之验证码输入组件实现(二)
HarmonyOS Next 系列之底部标签栏TabBar实现(三)
HarmonyOS Next 系列之HTTP请求封装和Token持久化存储(四)
HarmonyOS Next 系列之从手机选择图片或拍照上传功能实现(五)
HarmonyOS Next 系列之可移动悬浮按钮实现(六)
文章目录
前言
HarmonyOS Next(基于API11)实现一个可移动的悬浮按钮
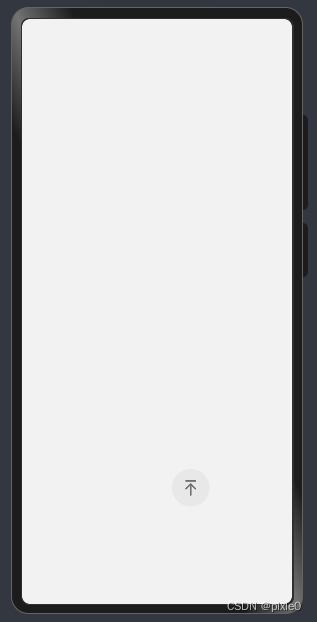
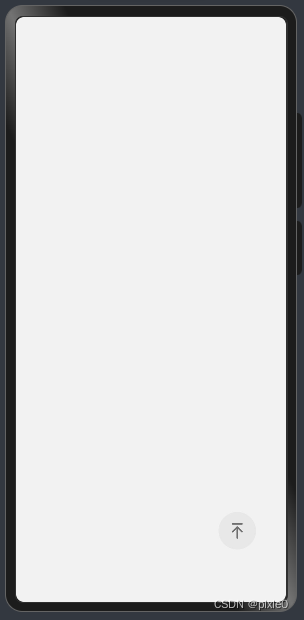
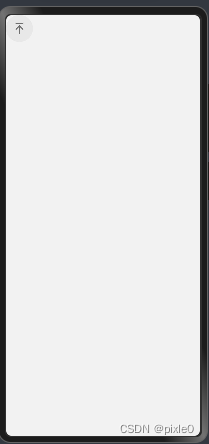
ps:为演示作用,这边和后续代码例子随便用回到顶部图标来做演示,实际可自定义替换
一、实现原理分析
1、布局方面:使用Stack容器,让悬浮按钮堆叠在页面之上,通过postion属性x,y设置悬浮按钮位置(x,y为相对页面左上角距离)
2、事件处理:在移动过程中通过监听touch事件,获取手指在屏幕上位置与初始触摸点位置比较,计算悬浮按钮的偏移量,动态更新悬浮按钮x,y值。
二、API简单回顾
touch触摸事件
1、触摸类型TouchType
| 名称 | 描述 |
|---|---|
| Down | 手指按下时触发。 |
| Up | 手指抬起时触发。 |
| Move | 手指按压态在屏幕上移动时触发。 |
2、手指信息TouchObject
| 名称 | 描述 |
|---|---|
| type | 触摸事件的类型 |
| windowX | 触摸点相对于应用窗口左上角的X坐标。 |
| windowY | 触摸点相对于应用窗口左上角的Y坐标。 |
说明:以x轴为例,计算两个触摸点(A、B)水平方向距离只需B.windowX-A.windowX,而在我们实现悬浮按钮处理过程中这个A点就是手指刚按下去触摸点的windowX,B点就是移动过程中触摸点的windowX,在移动过程中不断计算这个差值后更新悬浮按钮坐标就能让其跟着手指移动。当然在这个过程中还需要考虑悬浮按钮移出屏幕情况,需要规避和限制。
ps:windowX、windowY单位为vp
三、规避和限制移动范围
为了让悬浮按钮不移出屏幕,需要限制x、y大小
最小值很容易想到x>=0,y>=0,也即悬浮按钮在最左上角
最大值位置在页面右下角
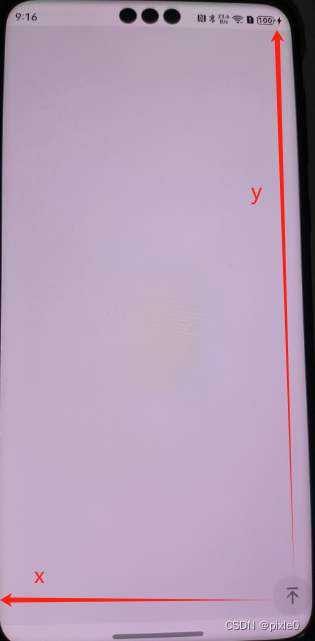
假设悬浮按钮半径为R ,窗口宽为winWidth 、窗口高winHeight ,状态栏高statusHeight ,底部规避区域高:bottomHeight
x最大值=winWidth-2R
y最大值=winHeight-2R-statusHeight-bottomHeight
所以x范围为0~(winWidth-2R),y范围0 ~(winHeight-2R-statusHeight-bottomHeight)
四、窗口宽高、状态栏高度、底部规避区域高度获取
1、窗口宽高获取
javascript
import { window } from '@kit.ArkUI'
.....
.....
.....
 window.getLastWindow(getContext(this), (err, windowClass) => {
      if (!err.code) {
        //获取窗口宽高
        let windowProperties = windowClass.getWindowProperties()
        this.winWidth = px2vp(windowProperties.windowRect.width)
        this.winHeight = px2vp(windowProperties.windowRect.height)
      }
    })
2、状态栏高度获取
javascript
import { window } from '@kit.ArkUI'
.....
.....
.....
 window.getLastWindow(getContext(this), (err, windowClass) => {
      if (!err.code) {
        //获取状态栏高度
        this.statusHeight = px2vp(windowClass.getWindowAvoidArea(window.AvoidAreaType.TYPE_SYSTEM).topRect.height)
      }
    })
2、底部规避区域高度获取
javascript
import { window } from '@kit.ArkUI'
.....
.....
.....
window.getLastWindow(getContext(this), (err, windowClass) => {
      if (!err.code) {
        //获取手机底部规避区域高度
        this.bottomAvoidAreaHeight = px2vp(windowClass.getWindowAvoidArea(window.AvoidAreaType.TYPE_NAVIGATION_INDICATOR)
          .bottomRect.height)
      }
    })
ps:需要注意的是上述获取到的宽高单位都是px需要统一转成vp单位,方便和windowXY进行计算
四、完整代码实现
SuspensionButton .ets
javascript
import {  window } from '@kit.ArkUI'

@Entry
@Component
struct SuspensionButton {
  @State statusHeight: number = 0 //状态栏高度
  @State bottomAvoidAreaHeight: number = 0 //手机底部规避区域高度
  @State curLeft: number = 0 //当前悬浮按钮距离窗口左边距离
  @State curTop: number = 0 //当前悬浮按钮距离窗口顶部距离
  private startLeft: number = 0 //开始移动那一刻悬浮按钮距离窗口左边距离
  private startTop: number = 0 //开始移动那一刻悬浮按钮距离窗口顶部距离
  private startX: number = 0 //开始移动触摸点x坐标,相对窗口左上角
  private startY: number = 0 //开始移动触摸点y坐标,相对窗口左上角
  private radius: number = 25 //悬浮按钮半径,单位vp
  private winWidth: number = 0 //窗口宽度
  private winHeight: number = 0 //窗口高度

  aboutToAppear() {
    this.getWindowInfo()

  }

  //获取窗口尺寸信息
  getWindowInfo() {
    window.getLastWindow(getContext(this), (err, windowClass) => {
      if (!err.code) {
        //状态栏高度
        this.statusHeight = px2vp(windowClass.getWindowAvoidArea(window.AvoidAreaType.TYPE_SYSTEM).topRect.height)
        //获取手机底部规避区域高度
        this.bottomAvoidAreaHeight = px2vp(windowClass.getWindowAvoidArea(window.AvoidAreaType.TYPE_NAVIGATION_INDICATOR)
          .bottomRect
          .height)

        //获取窗口宽高
        let windowProperties = windowClass.getWindowProperties()
        this.winWidth = px2vp(windowProperties.windowRect.width)
        this.winHeight = px2vp(windowProperties.windowRect.height)

        //设置初始位置位于屏幕右下角,演示设置可根据实际调整
        this.curLeft=this.winWidth*0.8
        this.curTop=this.winHeight*0.8
      }
    })
  }

  build() {

    Stack() {
      Column(){
        //页面内容

      }.width('100%').height('100%')

      //悬浮按钮
      Row() {
        Image($r('app.media.top')).width(25)
      }
      .width(this.radius * 2)
      .height(this.radius * 2)
      .justifyContent(FlexAlign.Center)
      .borderRadius(this.radius)
      .backgroundColor('#E8E8E8')
      .position({
        x: this.curLeft,
        y: this.curTop
      })
      .onTouch((event: TouchEvent) => {
        //手指按下记录初始触摸点坐标、悬浮按钮位置
        if (event.type === TouchType.Down) {
          this.startX = event.touches[0].windowX
          this.startY = event.touches[0].windowY
          this.startLeft = this.curLeft
          this.startTop = this.curTop

        }
        //手指拖动
        else if (event.type === TouchType.Move) {
          let touch = event.touches[0]

          //计算悬浮球与左边距离(x坐标), 当前悬浮球距离左边=开始位置(x轴)+(当前触摸点x坐标-开始移动触摸点x坐标)
          let curLeft = this.startLeft + (touch.windowX - this.startX)
          //限制悬浮球不能移除屏幕左边
          curLeft = Math.max(0, curLeft)
          //限制悬浮球不能移除屏幕右边
          this.curLeft = Math.min(this.winWidth - 2 * this.radius, curLeft)

          //计算悬浮球与顶部距离(y坐标), 当前悬浮球距离顶部=开始位置(y轴)+(当前触摸点y坐标-开始移动触摸点y坐标)
          let curTop = this.startTop + (touch.windowY - this.startY)
          //限制悬浮球不能移除屏幕上边
          curTop = Math.max(0, curTop)
          //限制悬浮球不能移除屏幕下边
          this.curTop = Math.min(this.winHeight - 2 * this.radius - this.bottomAvoidAreaHeight - this.statusHeight, curTop)
        }
      })

    }.width('100%')
    .height('100%')
    .backgroundColor('#f2f2f2')

  }
}
运行效果

五、其他说明
如果是想实现悬浮窗原理也一样,只不过把悬浮按钮半径计算拆开为x,y2个方向,根据悬浮窗宽高替换带入计算即可。
如果想实现不可移动悬浮按钮,类似案例中回到顶部固定在页面右下角,只需要把触摸事件去掉即可。