Nginx是一款非常优秀的HTTP服务器软件,性能比tomcat更优秀,它支持高达50 000个并发连接数,拥有强大的静态资源处理能力,运行稳定,内存、CPU等系统资源消耗非常低。目前很多大型网站都应用Nginx服务器作为后端网站程序的反向代理及负载均衡器,提升整个站点的负载并发能力。
一、nginx负载均衡
Nginx负载均衡是通过反向代理实现的,还可以将nginx接收到的请求转发给多个后端应用服务器处理。
1、Nginx代理类型
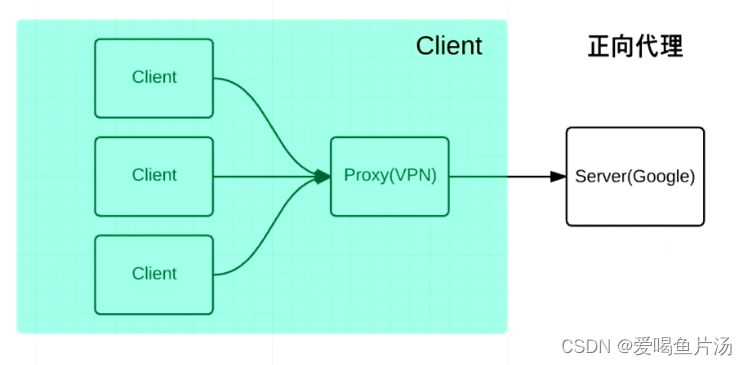
1)nginx 正向代理
++代理客户端++去访问服务端,服务端不知道真实的客户端地址。客户端先将请求发送给正向代理服务器,再由正向代理服务器将请求转发给服务端。如果由客户端直接发送请求给服务端可能延时大或访问不了。比如VPN。
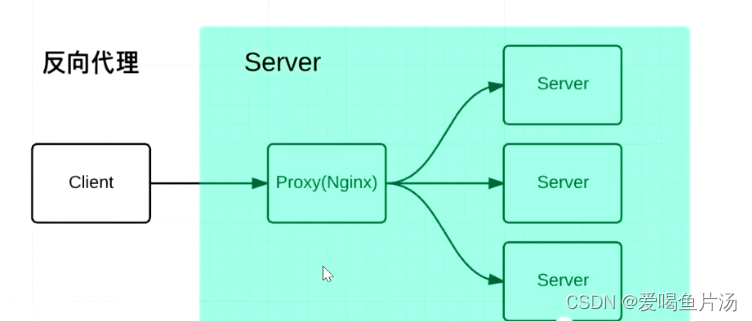
2) nginx 反向代理
++代理服务端,++客户端访问代理服务器时,代理服务器会将请求转发给后端其他应用服务端处理,客户端并不知道访问的真实服务端的地址,比如我们访问百度、淘宝这些大型网站,他们不可能只有一台服务器支持所有并发,想要支持几百万几千万的并发需要组成一个服务器集群,并不是服务端的每个服务器的ip地址都要一一记录进行访问,而是直接访问作为前端代理服务器的ip地址,由代理服务器转发请求给后端的应用服务器处理返回。
2、部署反向代理
准备两台服务器,一台做nginx服务器做前端,IP地址为192.168.170.20;一台做后端服务器,tomcat服务器IP地址为192.168.170.200。通过配置实现客户端访问nginx的ip地址访问到tomcat的网页文件。(这里省略部署tomcat服务的步骤,前面内容有详细步骤)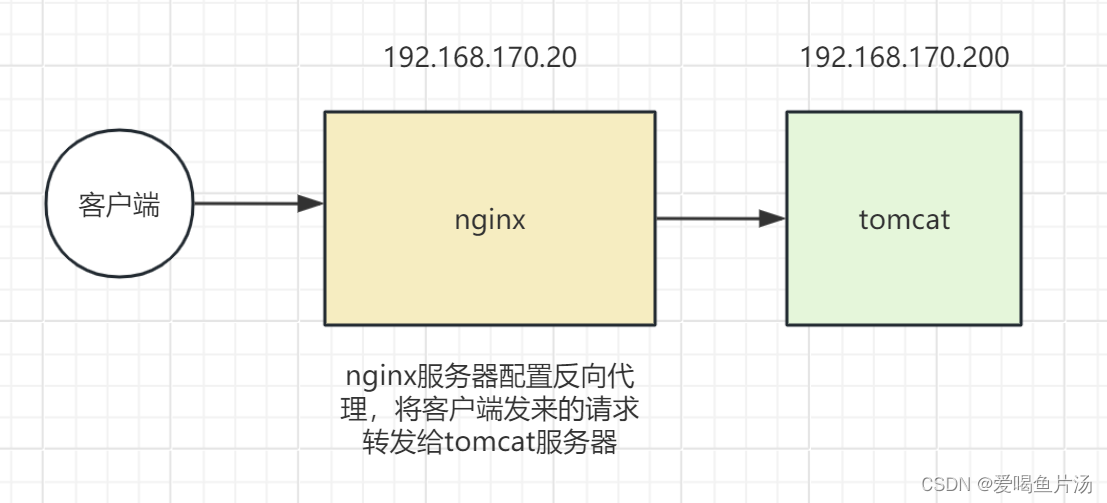
第一步:部署nginx服务器并创建网页文件
bash
cd /opt/
rm -rf *
rz -E
tar xf nginx-1.26.0.tar.gz
yum -y install pcre-devel zlib-devel openssl-devel gcc gcc-c++ make
useradd -M -s /sbin/nologin nginx
cd nginx-1.26.0/
./configure --prefix=/usr/local/nginx --user=nginx --group=nginx --with-http_stub_status_module
make -j2 && make install
ln -s /usr/local/nginx/sbin/nginx /usr/local/sbin/
nginx -t
cd /usr/lib/systemd/system
vim nginx.service
systemctl daemon-reload
systemctl start nginx
systemctl enable nginx
netstat -lntp | grep nginx

[root@pyx system]# cd /usr/local/nginx/html/
[root@pyx html]# ls
50x.html  index.html
[root@pyx html]# mkdir xy101
[root@pyx html]# ls
50x.html  index.html  xy101
[root@pyx html]# cp index.html xy101/
[root@pyx html]# cd xy101/
[root@pyx xy101]# ls
index.html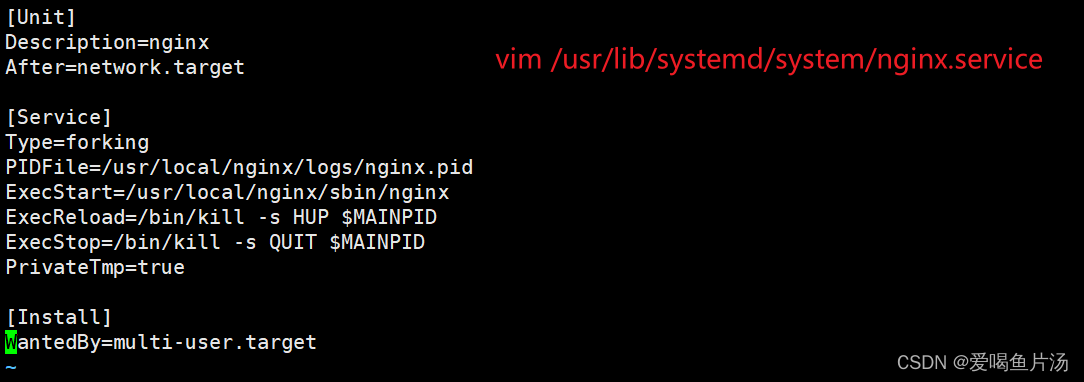

第二步:tomcat服务器开启服务,并创建网页文件
bash
[root@centOS2 ~]# cd /usr/local/tomcat/bin/
[root@centOS2 bin]# ls
bootstrap.jar       commons-daemon-native.tar.gz  makebase.sh       tomcat-juli.jar
catalina.bat        configtest.bat                setclasspath.bat  tomcat-native.tar.gz
catalina.sh         configtest.sh                 setclasspath.sh   tool-wrapper.bat
catalina-tasks.xml  daemon.sh                     shutdown.bat      tool-wrapper.sh
ciphers.bat         digest.bat                    shutdown.sh       version.bat
ciphers.sh          digest.sh                     startup.bat       version.sh
commons-daemon.jar  makebase.bat                  startup.sh
[root@centOS2 bin]# ./startup.sh
Using CATALINA_BASE:   /usr/local/tomcat
Using CATALINA_HOME:   /usr/local/tomcat
Using CATALINA_TMPDIR: /usr/local/tomcat/temp
Using JRE_HOME:        /usr/local/jdk1.8.0_391/jre
Using CLASSPATH:       /usr/local/tomcat/bin/bootstrap.jar:/usr/local/tomcat/bin/tomcat-juli.jar
Tomcat started.
[root@centOS2 bin]# netstat -lntp | grep :8080
tcp6       0      0 :::8080                 :::*                    LISTEN      6104/java

[root@centOS2 bin]# cd /usr/local/tomcat/webapps/
[root@centOS2 webapps]# ls
docs  examples  host-manager  manager  ROOT  xy101  xy102
[root@centOS2 webapps]# cd xy101
[root@centOS2 xy101]# ls
index.html
[root@centOS2 xy101]# cd ..
[root@centOS2 webapps]# cp xy101/index.html ./
[root@centOS2 webapps]# ls
docs  examples  host-manager  index.html  manager  ROOT  xy101  xy102
第三步:配置nginx服务器的conf文件
bash
[root@pyx xy101]# cd /usr/local/nginx/conf
[root@pyx conf]# vim nginx.conf
[root@pyx conf]# nginx -t
nginx: the configuration file /usr/local/nginx/conf/nginx.conf syntax is ok
nginx: configuration file /usr/local/nginx/conf/nginx.conf test is successful
[root@pyx conf]# systemctl restart nginx.service 

反向代理的优势
- 隐藏真实服务器;
- 负载均衡便于横向扩充后端动态服务;
- 动静分离,提升系统健壮性
三、nginx 动静分离
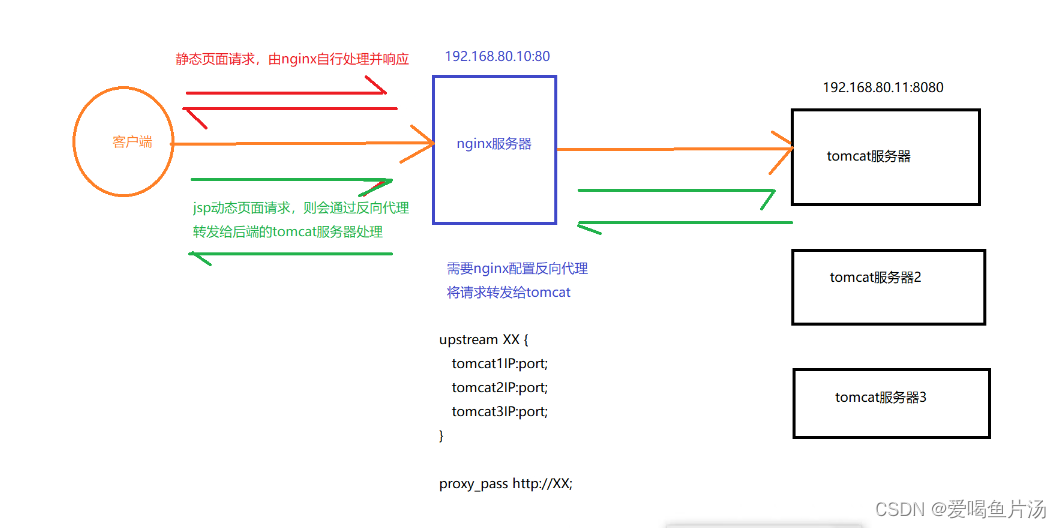
服务端接收来自客户端的请求中,既有静态资源也有动态资源,静态资源由Nginx提供服务,(nginx处理静态页面性能比tomcat强大,吞吐量、请求量等性能是tomcat的六倍左右)。而动态资源会由Nginx代理转发至后端的其他应用服务器处理(比如php动态页面转发给php服务器处理,jsp动态页面转发给tomcat服务器处理)。
如果后端服务器有多台,nginx服务器需要在upsteam XX服务池称 中定义每个后端服务器的ip地址,然后再用proxy_pass http://XX(服务器名称);就能实现后端服务器的负载均衡。(下面拓补图仅作展示原理作用)。
Nginx静态处理优势
- Nginx处理静态页面的效率远高于Tomcat的处理能力
- 若Tomcat的请求量为1000次,则Nginx的请求量为6000次
- Tomcat每秒的吞吐量为0.6M,Nginx的每秒吞吐量为3.6M
- Nginx处理静态资源的能力是Tomcat处理的6倍
nginx七层反向代理实现动静分离。实验准备2台tomcat服务器192.168.170.40,一台nginx服务器192.168.170.20,此时我的虚拟机192.168.170.200上是在《tomcat部署与优化》博客中已经部署了tomcat多实例,这里可以用上。
①tomcat服务器192.168.170.200远程发送tomcat服务器已经安装的目录到192.168.170.40
bash
#tomcat服务器192.168.170.200
[root@centOS2]# cd /usr/local/
[root@centOS2 local]# scp -r tomcat 192.168.170.40:`pwd`
The authenticity of host '192.168.170.30 (192.168.170.30)' can't be established.
ECDSA key fingerprint is SHA256:RKvhkwuiOA7PYYJ2yuDGCvJlRKnz8Ng7TF9VBbxFMVI.
ECDSA key fingerprint is MD5:3e:ba:46:01:3f:7d:f6:c7:3d:34:30:02:28:ec:7d:56.
Are you sure you want to continue connecting (yes/no)? yes
Warning: Permanently added '192.168.170.40' (ECDSA) to the list of known hosts.
root@192.168.170.30's password:

#tomcat服务器192.168.170.40
[root@pyx ~]# cd /usr/local/
[root@pyx local]# ls
bin  etc  games  include  lib  lib64  libexec  sbin  share  src  tomcat
[root@pyx local]# ./tomcat/bin/startup.sh
Using CATALINA_BASE:   /usr/local/tomcat
Using CATALINA_HOME:   /usr/local/tomcat
Using CATALINA_TMPDIR: /usr/local/tomcat/temp
Using JRE_HOME:        /usr
Using CLASSPATH:       /usr/local/tomcat/bin/bootstrap.jar:/usr/local/tomcat/bin/tomcat-juli.jar
Tomcat started.
②tomcat服务器192.168.170.200准备好测试文件
bash
#tomcat服务器192.168.170.200准备jsp网页文件
[root@centOS2]# cd /usr/local/tomcat/webapps/
[root@centOS2 webapps]# ls
docs  examples  host-manager  index.html  manager  ROOT  xy101  xy102
[root@centOS2 webapps]# cd xy101/
[root@centOS2 xy101]# ls
index.html  test.jsp
[root@centOS2 xy101]# vim test.jsp 

bash
#复制修改网页测试文件到多实例中
[root@centOS2]# cd /usr/local/tomcat/webapps/xy101/
[root@centOS2 xy101]# ls
index.html  test.jsp
[root@centOS2 xy101]# mkdir /usr/local/tomcat2/webapps/xy101/
[root@centOS2 xy101]# cp test.jsp /usr/local/tomcat2/webapps/xy101/
[root@centOS2 xy101]# mkdir /usr/local/tomcat3/webapps/xy101/
[root@centOS2 xy101]# cp test.jsp /usr/local/tomcat3/webapps/xy101/
[root@centOS2 xy101]# cd /usr/local/tomcat2/webapps/xy101/
[root@centOS2 xy101]# vim test.jsp
[root@centOS2 xy101]# cd /usr/local/tomcat3/webapps/xy101/
[root@centOS2 xy101]# vim test.jsp


#启动多实例
[root@centOS2 xy101]# /usr/local/tomcat2/bin/startup.sh
Using CATALINA_BASE:   /usr/local/tomcat2
Using CATALINA_HOME:   /usr/local/tomcat2
Using CATALINA_TMPDIR: /usr/local/tomcat2/temp
Using JRE_HOME:        /usr/local/jdk1.8.0_391/jre
Using CLASSPATH:       /usr/local/tomcat2/bin/bootstrap.jar:/usr/local/tomcat2/bin/tomcat-juli.jar
Tomcat started.
[root@centOS2 xy101]# /usr/local/tomcat3/bin/startup.sh
Using CATALINA_BASE:   /usr/local/tomcat3
Using CATALINA_HOME:   /usr/local/tomcat3
Using CATALINA_TMPDIR: /usr/local/tomcat3/temp
Using JRE_HOME:        /usr/local/jdk1.8.0_391/jre
Using CLASSPATH:       /usr/local/tomcat3/bin/bootstrap.jar:/usr/local/tomcat3/bin/tomcat-juli.jar
Tomcat started.
验证多实例网页文件


③tomcat服务器192.168.170.40也准备好jsp动态网页
bash
#tomcat服务器192.168.170.200远程传输网页测试文件到192.168.170.40
[root@centOS2 xy101]# scp test.jsp 192.168.170.40:`pwd`
root@192.168.170.40's password:
test.jsp                                               100%  189   137.2KB/s   00:00

#tomcat服务器192.168.170.40修改测试文件内容

④nginx服务器192.168.170.20的xy101目录中有静态文件,想实现访问nginx服务器静态页面的时候直接由nginx处理,访问动态页面的时候由nginx转发给tomcat处理的效果。
在http块中配置使用upstream定义后端服务器列表;在server配置块中,用户请求的静态网页可以通过location匹配直接跳转页面,动态网页则使用location匹配用户请求的动态页面的URL路径,用proxy_pass代理转发,实现动静分离。
bash
[root@pyx ~]# cd /usr/local/nginx/
[root@pyx nginx]# ls
client_body_temp  fastcgi_temp  logs        sbin       uwsgi_temp
conf              html          proxy_temp  scgi_temp
[root@pyx nginx]# cd html/
[root@pyx html]# ls
50x.html  index.html  xy101
[root@pyx html]# cd xy101/
[root@pyx xy101]# ls
index.html
[root@pyx xy101]# cd /usr/local/nginx/conf/
[root@pyx conf]# vim nginx.conf
[root@pyx conf]# nginx -t
nginx: the configuration file /usr/local/nginx/conf/nginx.conf syntax is ok
nginx: configuration file /usr/local/nginx/conf/nginx.conf test is successful
[root@pyx conf]# systemctl restart nginx.service 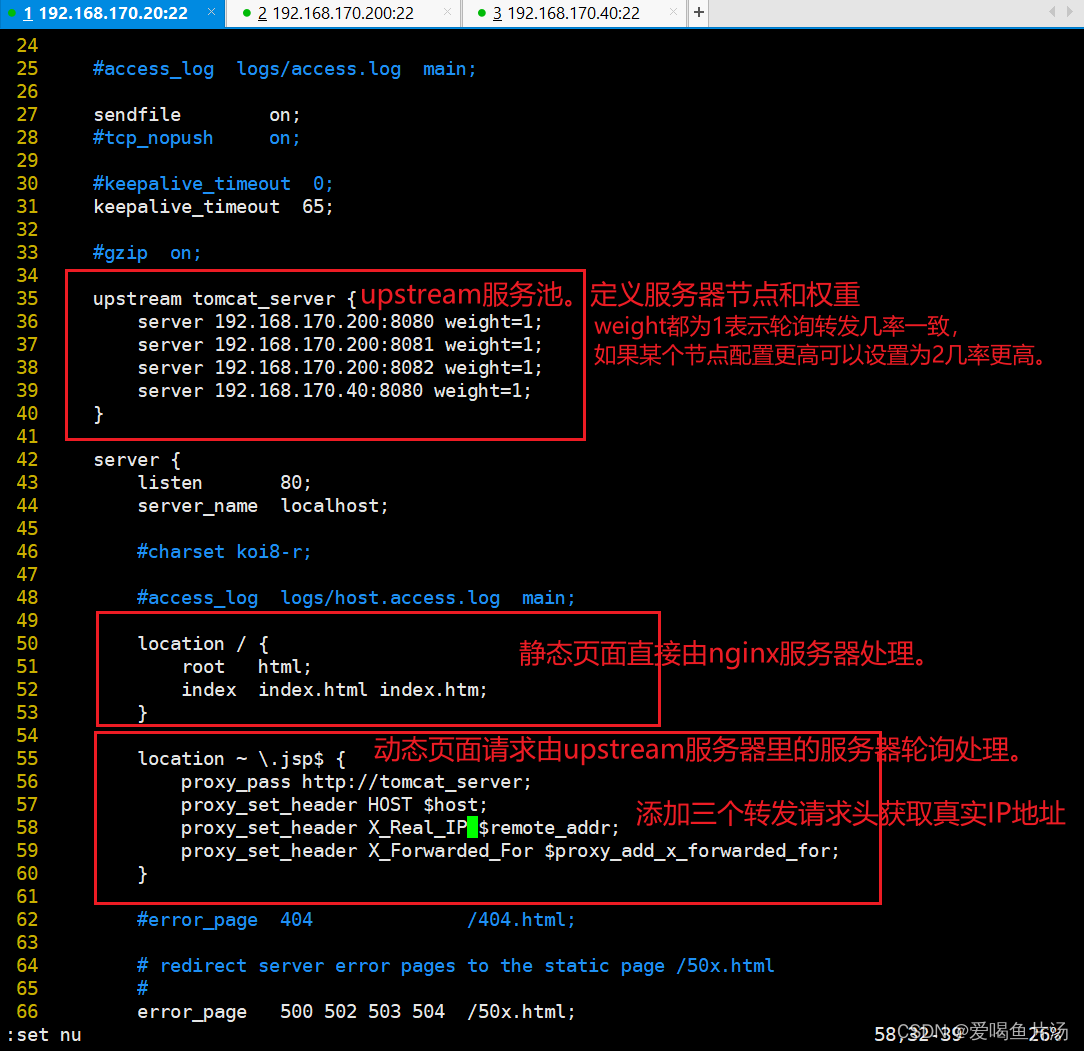
验证动静分离效果


四、nginx的反向代理类型
1、七层反向代理
七层反向代理基于http、https、mail等七层应用协议的代理转发(根据用户访问请求的URL路径来转发请求),通常用于 动静分离 等应用场景。部署参考上面的动静分离配置。
七层反向代理配置
1)在http配置块中使用upstream定义后端服务器列表名称和节点参数
bash
http {
    upstream 服务器池名称 {
        server IP1:PORT1 weight=1;
        server IP2:PORT2 weight=1;
        ......
    }
2)在server配置块中使用location匹配用户请求的动态页面的URL路径,使用 proxy_pass 基于协议代理转发
bash
    server {
        ......
        location ~ .*\.jsp$ {
            proxy_pass http://服务器池名称;

            #用于为后端服务器获取真实的客户端地址
            proxy_set_header HOST $host;
            proxy_set_header X_Real_IP $remote_addr;
            proxy_set_header X_Forwarded_For $proxy_add_x_forwarded_for;
        }
    ......
    }
2、四层反向代理
四层反向代理基于 IP 和 端口 实现的代理转发(根据用户请求的IP和端口来转发请求),通常用于做 网关访问入口的负载均衡器 等应用场景。
1)编译安装时需要添加 stream 四层代理模块 ./configure --with-stream
2)在 http 配置块同层级,一般在 http 配置块上面添加 stream 配置块,在 stream 配置块里使用upstream定义后端服务器列表名称和节点参数以及使用server配置块定义监听端口和转发配置
bash
stream {
    upstream 服务器池名称 {
        server IP1:PORT1 weight=1;
        server IP2:PORT2 weight=1;
        ......
    }

    server {
        listen IP:PORT;
        proxy_pass 服务器池名称;
    }
}

http {....}
四层反向代理 比 七层反向代理 转发性能更高于;
七层反向代理 比 四层反向代理 转发功能更多、更灵活
3、群集系统案例部署(不完整)
通过将Nginx与后端多台服务器结合,可以构建一个高性能的群集系统。Nginx Server负责接收和分发请求,nginx web服务器处理静态页面请求,而后端Tomcat和php服务器则负责处理业务逻辑。当集群中的某个Tomcat发生故障时,Nginx可以自动将请求转发到其他正常运行的Tomcat服务器上,保证了系统的稳定性和可靠性。
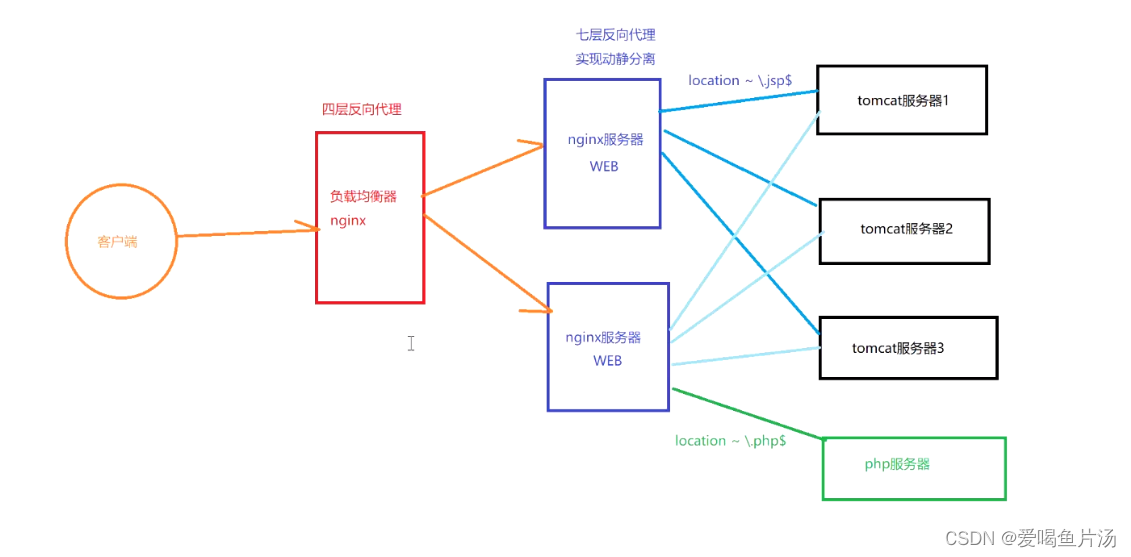
实验准备:
nginx服务器192.168.170.20做四层反向代理负载均衡器
nginx-web服务器192.168.170.101
nginx-web服务器192.168.170.102
tomcat服务器192.168.170.40
tomcat服务器192.168.170.200
php服务器192.168.170.110
1.部署nginx负载均衡器(四层代理)
bash
systemctl stop firewalld
setenforce 0

#安装所需开发包和编译环境、编译器
yum -y install pcre-devel zlib-devel openssl-devel gcc gcc-c++ make

#创建程序用户,便于准确控制访问
useradd -M -s /sbin/nologin nginx

#解压nginx文件
cd /opt
tar zxvf nginx-1.12.0.tar.gz -C /opt/

cd nginx-1.12.0/
./configure \
--prefix=/usr/local/nginx \
--user=nginx \
--group=nginx \
--with-file-aio \                                    #启用文件修改支持
--with-http_stub_status_module \                    #启用状态统计
--with-http_gzip_static_module \                    #启用 gzip静态压缩
--with-http_flv_module \                            #启用 flv模块,提供对 flv 视频的伪流支持
--with-http_ssl_module                                #启用 SSL模块,提供SSL加密功能
--with-stream                                        #启用 stream模块,提供4层调度
----------------------------------------------------------------------------------------------------------
./configure \
--prefix=/usr/local/nginx \                           # 指定安装目录为 /usr/local/nginx
--user=nginx \                                         # 指定运行 nginx 的用户为 nginx
--group=nginx \                                        # 指定运行 nginx 的用户组为 nginx
--with-file-aio \                                      # 启用文件异步IO支持
--with-http_stub_status_module \                       # 启用 HTTP Stub 状态模块,用于获取 nginx 的运行状态
--with-http_gzip_static_module \                       # 启用 HTTP gzip 静态压缩模块,用于对静态文件进行 gzip 压缩
--with-http_flv_module \                               # 启用 HTTP FLV 模块,提供对 FLV 视频的伪流支持
--with-http_ssl_module \                               # 启用 HTTP SSL 模块,提供 SSL 加密功能
--with-stream                                           # 启用 Stream 模块,提供 4 层调度功
bash
#编译及安装
make && make install

#软链接便于系统识别nginx操作命令
ln -s /usr/local/nginx/sbin/nginx /usr/local/sbin/
bash
#添加nginx系统服务以便系统管理启动、停止、重启
vim /lib/systemd/system/nginx.service
[Unit]
Description=nginx
After=network.target
[Service]
Type=forking
PIDFile=/usr/local/nginx/logs/nginx.pid
ExecStart=/usr/local/nginx/sbin/nginx
ExecrReload=/bin/kill -s HUP $MAINPID
ExecrStop=/bin/kill -s QUIT $MAINPID
PrivateTmp=true
[Install]
WantedBy=multi-user.target

#赋权及开启服务、开启开机自启
chmod 754 /lib/systemd/system/nginx.service
systemctl start nginx.service
systemctl enable nginx.service
bash
vim /usr/local/nginx/
stream {
    upstream nginx_server {
        server 192.168.170.101:80 weight=1;
        server 192.168.170.102:80 weight=1;
    }

    server {
	    listen 192.168.170.20:2468;
		proxy_pass nginx_server;    #四层代理不需要带协议,基于端口转发的
	}
}

http {....}
bash
nginx -t
systemctl restart nginx
2.部署2台nginx服务器,创建网页文件
附nginx一键部署脚本,与yum安装方法目录不同
bash#!/bin/bash #======编译安装nginx服务====== #安装所需开发包和编译环境、编译器 yum -y install pcre-devel zlib-devel openssl-devel gcc gcc-c++ make #创建程序用户,便于准确控制访问 useradd -M -s /sbin/nologin nginx #解压安装包 cd /opt tar zxvf nginx-1.12.0.tar.gz -C /opt/ #指定安装路径、指定用户名、组名、启用模块以支持统计状态 cd nginx-1.12.0/ ./configure --prefix=/usr/local/nginx --user=nginx --group=nginx --with-http_stub_status_module --with-file-aio --with-http_gzip_static_module --with-http_flv_module --with-http_ssl_module --with-stream #编译及安装 make && make install #软链接便于系统识别nginx操作命令 ln -s /usr/local/nginx/sbin/nginx /usr/local/sbin/ #添加nginx系统服务 echo '[Unit] Description=nginx After=network.target [Service] Type=forking PIDFile=/usr/local/nginx/logs/nginx.pid ExecStart=/usr/local/nginx/sbin/nginx ExecReload=/bin/kill -s HUP $MAINPID ExecStop=/bin/kill -s QUIT $MAINPID PrivateTmp=true [Install] WantedBy=multi-user.target' > /lib/systemd/system/nginx.service #赋权及开启服务、开启开机自启 chmod 754 /lib/systemd/system/nginx.service systemctl daemon-reload systemctl start nginx systemctl enable nginx
bash
yum install -y nginx
systemctl start nginx
vim /etc/nginx/conf.d
在http配置块中使用upstream定义后端服务器列表名称和节点参数。
bash
http {
    upstream tomcat_server {
        server IP1:PORT1 weight=1;
        server IP2:PORT2 weight=1;
        ......
    }
在server配置块中使用location匹配用户请求的动态页面的URL路径,使用 proxy_pass 基于协议代理转发。
bash
	location ~ .*\.jsp$ {
		proxy_pass http://服务器池名称;
	    proxy_set_header HOST $host;
        proxy_set_header X_Real_IP $remote_addr;
        proxy_set_header X_Forwarded_For $proxy_add_x_forwarded_for;
	}
关闭长连接,防止对实验结果有影响
bash
keepalive_timeout =0;
bash
nginx -t  #检查语法
systemctl restart nginx
cd /usr/share/nginx/html
mkdir xy101
cd xy101/
vim test.html
3.部署2台tomcat服务器,并准备文件
bash
systemctl stop firewalld
setenforce 0

#解压安装JDK
tar zxvf jdk-8u91-linux-x64.tar.gz -C /usr/local/

#设置JDK环境变量
vim /etc/profile
export JAVA_HOME=/usr/local/jdk1.8.0_91
export JRE_HOME=${JAVA_HOME}/jre
export CLASSPATH=.:${JAVA_HOME}/lib:${JRE_HOME}/lib
export PATH=${JAVA_HOME}/bin:${JRE_HOME}/bin:$PATH

#刷新配置文件,使配置生效
source /etc/profile

#解压tomcat
tar zxvf apache-tomcat-8.5.16.tar.gz

#将文件移动至/usr/local/下并重命名
mv /opt/apache-tomcat-8.5.16/ /usr/local/tomcat

#tomcat启动关闭脚本位置
/usr/local/tomcat/bin/shutdown.sh
/usr/local/tomcat/bin/startup.sh

#重新加载服务,并开启,查看是否成功启动
/usr/local/tomcat/bin/startup.sh
lsof -i:8080
netstat -ntap | grep 8080
4.验证
五、Nginx的负载均衡模式
Nginx的负载均衡模式,也叫调度模式、调度算法、调度策略,在 upstream 配置块里设置。
1、rr 轮询 负载均衡模式,自带。是nginx的默认调度模式,按照时间顺序逐一分配请求;
2、least_conn 最少连接,自带。优先将请求分配给当前连接数最少的节点;
3、weight 加权轮询,自带。使用weight参数设置权重,weight值越高的节点被分配请求的概率越大;
4、ip_hash ,自带。 根据客户端IP做hash缓存调度,会将请求分配给固定的一个节点;
5、url_hash,第三方。根据客户端请求访问的URL路径做hash缓存调度,会将请求分配给固定的一个节点。需要另外按照第三方模块支持
6、fair,第三方。优先将请求分配给响应时间最少的节点。需要另外按照第三方模块支持;
7、random,随机分配请求;
8、hash nginx全局变量 consistent,一致性hash算法,根据nginx全局变量的值来做hash缓存调度;比如 hash $remote_addr consistent 根据客户端ip做hash缓存调度,是ip_hash的加强版。
举例:
upstream 服务器池名称 {
server IP1:PORT1 weight=权重 max_fails=最大的失败次数 fail_timeout=暂停服务的时间 max_conns=最大并发连接数;
......
least_conn;/ip_hash;/hash request_uri;/fair;/random;/hash remote_addr consistent;
}
Nginx负载均衡如何实现会话保持?
1)ip_hash 或 一致性hash算法 基于客户端IP做hash缓存将请求发送给同一个后端节点服务器来实现会话保持,但是此方法容易导致负载失衡问题
2)sticky_cookie_insert 基于cookie来判断实现会话保持
upstream backend {
server ...... ;
sticky_cookie_insert srv_id expires=浏览器中保持cookie的时间 domain=cookie的域名 path=cookie的路径;
}
3)后端应用服务器自身通过相关机制设置,使用缓存数据库为后端节点服务器做session同步复制实现会话保持