一、HAProxy介绍
HAProxy是法国开发者威利塔罗(Willy Tarreau)在2000年使用C语言开发的一个开源软件,是一款具备高并发(一万以上)、高性能的TCP和HTTP负载均衡器,支持基于cookie的持久性,自动故障切换,支持正则表达式及web状态统计,目前最新TLS版本为2.2。
HAProxy是可提供高可用性、负载均衡以及基于TcP和HTTP应用的代理,是免费、快速并且可靠的一种解决方案。HProxy非常适用于并发大(并发达1w以上) web站点,这些站点通常又需要会话保持或七层处理。HAProxy的运行模式使得它可以很简单安全的整合至当前的架构中,同时可以保护web服务器不被暴露到网络上。
支持功能
-
TCP 和 HTTP反向代理
-
SSL/TSL服务器
-
可以针对HTTP请求添加cookie,进行路由后端服务器
-
可平衡负载至后端服务器,并支持持久连接
-
支持所有主服务器故障切换至备用服务器 keepalive
-
支持专用端口实现监控服务
-
支持停止接受新连接请求,而不影响现有连接
-
可以在双向添加,修改或删除HTTP报文首部字段
-
响应报文压缩
-
支持基于pattern实现连接请求的访问控制
-
通过特定的URI(url)为授权用户提供详细的状态信息
二、HAProxy的主要特性有:
-
可靠性和稳定性非常好,可以与硬件级的F5负载均衡设备相媲美;
-
最高可以同时维护40000-50000个并发连接,单位时间内处理的最大请求数为20000个,最大处理能力可达10Git/s;
-
支持多达8种负载均衡算法,同时也支持会话保持;
-
支持虚拟机主机功能,从而实现web负载均衡更加灵活;
-
支持连接拒绝、全透明代理等独特的功能;
-
拥有强大的ACL支持,用于访问控制; sendfile
-
其独特的弹性二x树数据结构,使数据结构的复杂性上升到了0(1),即数据的查寻速度不会随着数据条日的增加而速度有所下降;·支持客户端的keepalive功能,减少客户端与haproxy的多次三次握手导致资源浪费,让多个请求在一个tcp连接中完成;
-
支持TCP加速,零复制功能,类似于mmap机制;
-
支持响应池(response buffering) ;
-
支持RDP协议;
-
基于源的粘性,类似nginx的ip hash功能,把来自同一客户端的请求在一定时间内始终调度到上游的同一服务器;·更好统计数据接口,其web接口显示后端集群中各个服务器的接收、发送、拒绝、错误等数据的统计信息;
-
详细的健康状态检测,web接口中有关于对上游服务器的健康检测状态,并提供了一定的管理功能;
-
基于流量的健康评估机制;
-
基于http认证;
-
基于命令行的管理接口;
-
日志分析器,可对日志进行分析
三、HAProxy负载均衡策略非常多,常见的有如下8种:
官方文档:HAProxy version 2.4.15 - Configuration Manual
静态调度算法:不管后端,按照调度器的算法进行 分配
动态调度算法:会考虑后端服务器的负载情况, 直接动态的调整算法 , 发送指令给进程 , 直接生效
-
roundrobin,表示简单的轮询 rr
-
static-rr,表示根据权重
-
leastconn,表示最少连接者先处理
-
source,表示根据请求源IP,
-
uri,表示根据请求的URI,做cdn需使用;
-
url param,表示根据请求的URl参数' balance url param'requires an URL parameter name
-
hdr(name),表示根据HTTP请求头来锁定每一次HTTP请求;
-
rdp-cookie (name),表示根据据cookie(name)来锁定并哈希每一次TCP请求。
-
randaom 基于hash结果的随机数, 来调度,权重越大越容易被调度
调度算法的 对比:
| nginx | haproxy | lvs |
|---|---|---|
| rr(轮询) | rr | rr |
| 加权轮询 | static-rr | wrr 加权 |
| ip hash | 最小连接 | 源地址 hash SH |
| url hash | source 根据源地址 | 目的地址 hash DH |
| cookie hash | 根据请求来调度 | 默认 wlc 加权最小连接 |
| fair | 根据cookie 来调度 | lc 最小连接 |
| 最小连接 | 根据请求头 | SED初始连接高权重优先 |
| NQ 每个人都有一个链接后 再使用 初始链接高权重 | ||
-
lvs 是 内核中的功能, nginx haproxy 是第三方实现的功能
-
lvs 只能提供四层负载均衡无法提供7层负载(无法控制 7层协议 http 头部 url 等)功能单一
-
nginx, haproxy 可以实现 4层和7层负载, 功能较多, 但是 性能不如lvs , lvs> haproxy > nginx
-
hproxy 对比 nginx 性能优越, 功能又单一了,haprox只做反向代理。
-
lvs 没有 后端服务器健康性检测, nginx和haproxy 有后端服务器健康性检测
4层 性能好 功能少 只能控制 四层协议 端口 ip
7层 性能弱 功能多 可以控制 7层协议 http
四、 LVS、Nginx、HAproxy的区别:
-
IVS基于Linux操作系统实现软负载均衡,而HAProxy和Nginx是基于第三方应用实现的软负载均衡;
-
LVS是可实现4层的IP负载均衡技术,无法实现基于目录、URL的转发。而HAProxy和Nginx都可以实现4层和7层技术,HAProxy可提供TCP和HTTP应用的负载均衡综合解决方案;
-
LVs因为工作在TCP模型的第四层,其状态监测功能单一,而HAProxy在状态监测方面功能更丰富、强大,可支持端口、URI等多种状态检测方式;
-
HAProxy功能强大,但整体性能低于4层模式的IVS负载均衡。
-
Ngrinx主要用于web服务器或缓存服务器。Nginx的upstream模块虽然也支持群集功能,但是对群集节点健康检查功能不强,性能没有Haproxy好。
五、安装haproxy
5.1 yum 安装
CentOS 7 的默认的base仓库中包含haproxy的安装包文件,但是版本比较旧,是1.5.18的版本,距离当前版本已经有较长时间没有更新,由于版本比较旧所以有很多功能不支持,如果对功能和性能没有要求可以使用此版本,否则推荐使用新版本。
[root@centos7 ~]# yum install haproxy -y
#验证haproxy版本
[root@centos7 ~]# haproxy -v
HA-Proxy version 1.5.18 2016/05/10
Copyright 2000-2016 Willy Tarreau <willy@haproxy.org>
[root@localhost ~]#yum info haproxy
#15.18版本
已加载插件:fastestmirror, langpacks
Loading mirror speeds from cached hostfile
* base: mirrors.nju.edu.cn
* epel: mirrors.bfsu.edu.cn
* extras: mirrors.ustc.edu.cn
* updates: mirrors.nju.edu.cn
可安装的软件包
名称 :haproxy
架构 :x86_64
版本 :1.5.18
发布 :9.el7_9.1
大小 :835 k
源 :updates/7/x86_64
简介 : TCP/HTTP proxy and load balancer for high availability environments
网址 :http://www.haproxy.org/
协议 : GPLv2+
描述 : HAProxy is a TCP/HTTP reverse proxy which is particularly suited for high
: availability environments. Indeed, it can:
: - route HTTP requests depending on statically assigned cookies
: - spread load among several servers while assuring server persistence
: through the use of HTTP cookies
: - switch to backup servers in the event a main server fails
: - accept connections to special ports dedicated to service monitoring
: - stop accepting connections without breaking existing ones
: - add, modify, and delete HTTP headers in both directions
: - block requests matching particular patterns
: - report detailed status to authenticated users from a URI
: intercepted by the application5.2 第三方 rpm -ivh 安装包
官方没有提供rpm相关的包,可以通过第三方仓库的rpm包
从第三方网站下载rpm包:https://pkgs.org/download/haproxy
基于互联网第三方仓库在线安装
[root@localhost data]#wget http://mirror.centos.org/centos/7/sclo/x86_64/rh/Packages/r/rh-haproxy18-haproxy-1.8.24-3.el7.x86_64.rpm
[root@localhost data]#yum install -y rh-haproxy18-haproxy-1.8.24-3.el7.x86_64.rpm
#有依赖关系
已加载插件:fastestmirror, langpacks
正在检查 rh-haproxy18-haproxy-1.8.24-3.el7.x86_64.rpm: rh-haproxy18-haproxy-1.8.24-3.el7.x86_64
rh-haproxy18-haproxy-1.8.24-3.el7.x86_64.rpm 将被安装
正在解决依赖关系
--> 正在检查事务
---> 软件包 rh-haproxy18-haproxy.x86_64.0.1.8.24-3.el7 将被 安装
--> 正在处理依赖关系 rh-haproxy18-runtime,它被软件包 rh-haproxy18-haproxy-1.8.24-3.el7.x86_64 需要
Loading mirror speeds from cached hostfile
* base: mirrors.nju.edu.cn
* epel: mirrors.bfsu.edu.cn
* extras: mirrors.ustc.edu.cn
* updates: mirrors.nju.edu.cn
--> 正在处理依赖关系 rh-haproxy18-runtime,它被软件包 rh-haproxy18-haproxy-1.8.24-3.el7.x86_64 需要
--> 解决依赖关系完成
错误:软件包:rh-haproxy18-haproxy-1.8.24-3.el7.x86_64 (/rh-haproxy18-haproxy-1.8.24-3.el7.x86_64)
需要:rh-haproxy18-runtime
您可以尝试添加 --skip-broken 选项来解决该问题
您可以尝试执行:rpm -Va --nofiles --nodigest
下载地址
http://mirror.centos.org/centos/7/sclo/x86_64/rh/Packages/r/rh-haproxy18-haproxy-1.8.24-3.el7.x86_64.rpm
[root@localhost data]#rpm -ql rh-haproxy18-haproxy
[root@localhost data]#vim /usr/lib/systemd/system/rh-haproxy18-haproxy.service
[root@localhost data]#systemctl start rh-haproxy18-haproxy.service
[root@localhost data]#/opt/rh/rh-haproxy18/root/usr/sbin/haproxy -v
HA-Proxy version 1.8.24 2020/02/15
Copyright 2000-2020 Willy Tarreau <willy@haproxy.org>
第三方yum仓库
yum install centos-release-scl-rh
yum install rh-haproxy18-haproxy
5.3 编译安装
1.5 基础功能 稳定
2.0 新特性
编译安装HAProxy 2.0 LTS版本,更多源码包下载地址:HAProxy - The Reliable, High Perf. TCP/HTTP Load Balancer
5.3.1 解决lua环境
HAProxy 支持基于lua实现功能扩展,lua是一种小巧的脚本语言,于1993年由巴西里约热内卢天主教大学(Pontifical Catholic University of Rio de Janeiro)里的一个研究小组开发,其设计目的是为了嵌入应用程序中,从而为应用程序提供灵活的扩展和定制功能。
Lua 官网:<www.lua.org>
Lua 应用场景
-
游戏开发
-
独立应用脚本
-
Web 应用脚本
-
扩展和数据库插件,如MySQL Proxy
-
安全系统,如入侵检测系统
由于CentOS7 之前版本自带的lua版本比较低并不符合HAProxy要求的lua最低版本(5.3)的要求,因此需要编译安装较新版本的lua环境,然后才能编译安装HAProxy,过程如下:
#当前系统版本
[root@centos7 ~]#lua -v
Lua 5.1.4 Copyright (C) 1994-2008 Lua.org, PUC-Rio
https://www.lua.org/ftp/lua-5.4.6.tar.gz
curl -R -O http://www.lua.org/ftp/lua-5.4.6.tar.gz
tar zxf lua-5.4.6.tar.gz
cd lua-5.4.6
make all test
cd src
./lua -v
ln -s lua-5.4.6 lua
/usr/local/lua/src/ 编译安装 haproxy
yum -y install gcc openssl-devel pcre-devel systemd-devel
#安装依赖环境
tar xf haproxy-2.2.11.tar.gz
cd haproxy-2.2.11/
#查看安装方法
[root@centos7 haproxy-2.1.3]#ll Makefile
-rw-rw-r-- 1 root root 40812 Feb 12 23:18 Makefile
[root@centos7 haproxy-2.1.3]#cat README
[root@centos7 haproxy-2.1.3]#cat INSTALL
mkdir /usr/local/lua
cp -r src/ /usr/local/lua/
make ARCH=x86_64 TARGET=linux-glibc USE_PCRE=1 USE_OPENSSL=1 USE_ZLIB=1 USE_SYSTEMD=1 USE_LUA=1 LUA_INC=/data/lua/src/ LUA_LIB=/data/lua/src/
make install PREFIX=/apps/haproxy
ln -s /apps/haproxy/sbin/haproxy /usr/sbin/
haproxy -v
haproxy -h 查看帮助
[root@centos7 ~]#vim /usr/lib/systemd/system/haproxy.service
tee /usr/lib/systemd/system/haproxy.service <<eof
[Unit]
Description=HAProxy Load Balancer
After=syslog.target network.target
[Service]
ExecStartPre=/usr/sbin/haproxy -f /etc/haproxy/haproxy.cfg -c -q
ExecStart=/usr/sbin/haproxy -Ws -f /etc/haproxy/haproxy.cfg -p /var/lib/haproxy/haproxy.pid
ExecReload=/bin/kill -USR2 $MAINPID
LimitNOFILE=100000
[Install]
WantedBy=multi-user.target
eof
###############建立文件########################
mkdir /etc/haproxy
vim /etc/haproxy/haproxy.cfg
global
maxconn 100000
chroot /apps/haproxy
stats socket /var/lib/haproxy/haproxy.sock mode 600 level admin
uid 99
gid 99
daemon
#nbproc 4
#cpu-map 1 0
#cpu-map 2 1
#cpu-map 3 2
#cpu-map 4 3
pidfile /var/lib/haproxy/haproxy.pid
log 127.0.0.1 local3 info
defaults
option http-keep-alive
option forwardfor
maxconn 100000
mode http
timeout connect 300000ms
timeout client 300000ms
timeout server 300000ms
listen stats
mode http
bind 0.0.0.0:9999
stats enable
log global
stats uri /haproxy-status
stats auth haadmin:123456
listen web_port
bind 0.0.0.0:8899
mode http
log global
server web1 127.0.0.1:8080 check inter 3000 fall 2 rise 5
mkdir /var/lib/haproxy
#pid 文件路径
#设置用户和目录权限
[root@centos7 ~]# useradd -r -s /sbin/nologin haproxy
[root@centos7 ~]# systemctl enable --now haproxy六、配置文件详解
官方地址配置文件官方帮助文档
http://cbonte.github.io/haproxy-dconv/
http://cbonte.github.io/haproxy-dconv/2.4/configuration.html
https://www.haproxy.org/download/2.5/doc/configuration.txt
HAProxy 的配置文件haproxy.cfg由两大部分组成,分别是global和proxies部分
- global:全局配置段
进程及安全配置相关的参数
性能调整相关参数
Debug参数- proxies:代理配置段
defaults:为frontend, backend, listen提供默认配置
frontend:前端,相当于nginx中的server {}    定义虚拟机       监听 分配请求
backend:后端,相当于nginx中的upstream {}         真实服务器
listen:同时拥有前端和后端配置,配置简单,生产推荐使用  前端 和后端 更简单
6.1global配置
官方文档:http://cbonte.github.io/haproxy-dconv/2.4/configuration.html#3详细讲解:
chroot #锁定运行目录,类似于 ftp中的禁锢
deamon #以守护进程运行
stats socket /var/lib/haproxy/haproxy.sock mode 600 level admin process 1 #socket文件 进程件通信
user, group, uid, gid #运行haproxy的用户身份
nbproc n #开启的haproxy worker 进程数,默认进程数是一个,保持与 淳朴个数相同
#nbthread 1 #和多进程 nbproc配置互斥(版本有关,CentOS8的haproxy1.8无此问题),指定每个haproxy进程开启的线程数,默认为每个进程一个线程
#如果同时启用nbproc和nbthread 会出现以下日志的错误,无法启动服务
Apr 7 14:46:23 haproxy haproxy: [ALERT] 097/144623 (1454) : config : cannot
enable multiple processes if multiple threads are configured. Please use either
nbproc or nbthread but not both.
cpu-map 1 0 #绑定haproxy worker 进程至指定CPU,将第1个work进程绑定至0号CPU
cpu-map 2 1 #绑定haproxy worker 进程至指定CPU,将第2个work进程绑定至1号CPU
maxconn n #每个haproxy进程的最大并发连接数
maxsslconn n #每个haproxy进程ssl最大连接数,用于haproxy配置了证书的场景下
maxconnrate n #每个进程每秒创建的最大连接数量
spread-checks n #后端server状态check随机提前或延迟百分比时间,建议2-5(20%-50%)之间,默认值0
pidfile #指定pid文件路径
log 127.0.0.1 local2 info #定义全局的syslog服务器;日志服务器需要开启UDP协议,最多可以定义两个6.1.1 状态页
listen stats
mode http
bind 0.0.0.0:9999
stats enable
log global
stats uri /haproxy-status
stats auth haadmin:123456
http://192.168.10.10:9999/haproxy-status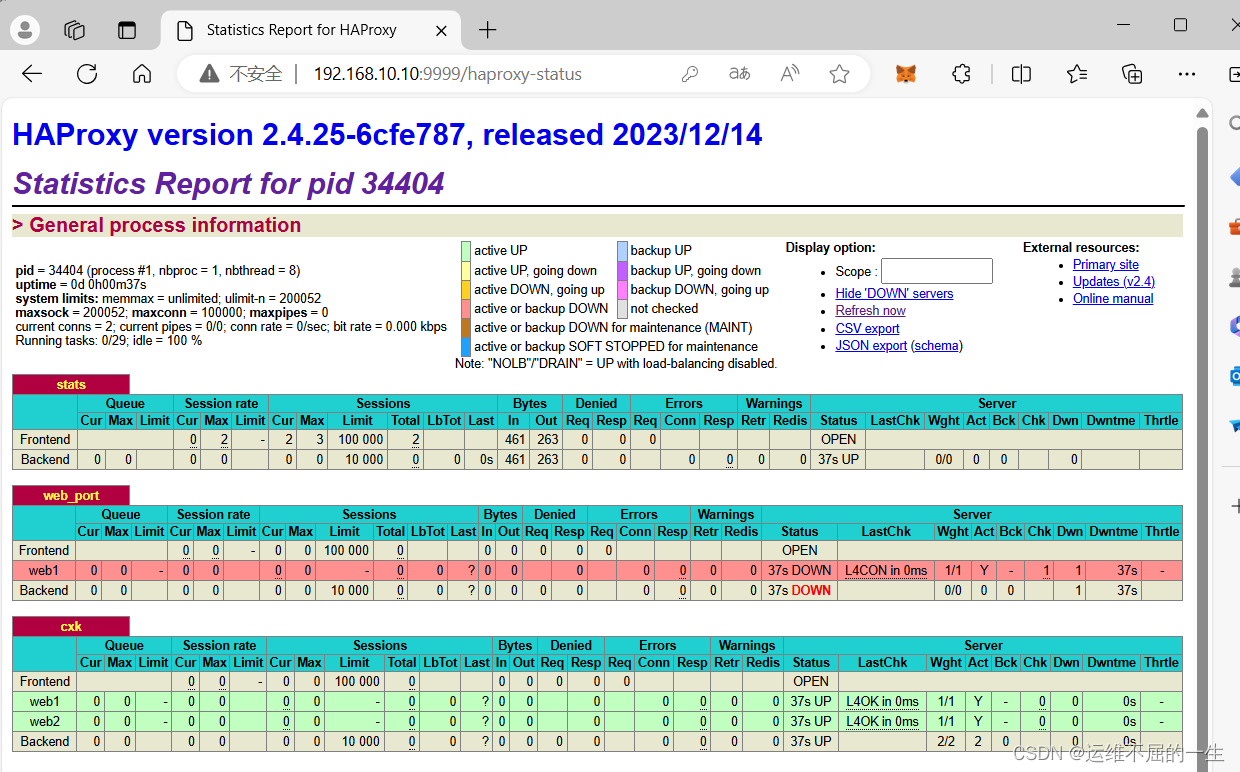
6.1.2 指定进程线程个数
进程与线程会有冲突
nbproc n #开启的haproxy work 进程数,默认进程数是一个
#nbthread 1 #和多进程 nbproc配置互斥(版本有关,CentOS8的haproxy1.8无此问题),指定每个haproxy进程开启的线程数,默认为每个进程一个线程
#如果同时启用nbproc和nbthread 会出现以下日志的错误,无法启动服务Apr 714:46:23 haproxy haproxy: [ALERT] 097/144623 (1454) : config : cannot enable multiple processes if multiple threads are configured. Please use either nbproc or nbthread but not both.
实际操作:
nbproc 4
nbthread 2
放入全局配置6.1.3 cpu亲缘性
nbproc  2
cpu-map 1  0     #绑定haproxy worker 进程至指定CPU,将第1个work进程绑定至0号CPU
cpu-map 2  1     #绑定haproxy worker 进程至指定CPU,将第2个work进程绑定至1  号CPU

ps axo pid,cmd,psr |grep haproxy6.1.4多进程和多线程线程
范例:多进程和socket文件
[root@centos7 ~]#vim /etc/haproxy/haproxy.cfg
global
maxconn 100000
chroot /apps/haproxy
stats socket /var/lib/haproxy/haproxy.sock1 mode 600 level admin process 1
stats socket /var/lib/haproxy/haproxy.sock2 mode 600 level admin process 2
uid 99
gid 99
daemon
nbproc 2
[root@centos7 ~]#systemctl restart haproxy
[root@centos7 ~]#pstree -p |grep haproxy
|-haproxy(2634)-+-haproxy(2637)
| `-haproxy(2638)
[root@centos7 ~]#ll /var/lib/haproxy
total 4
-rw-r--r-- 1 root root 5 Mar 31 18:49 haproxy.pid
srw------- 1 root root 0 Mar 31 18:49 haproxy.sock1
srw------- 1 root root 0 Mar 31 18:49 haproxy.sock26.1. 5 日志
HAproxy本身不记录客户端的访问日志.此外为减少服务器负载,一般生产中HAProxy不记录日志.也可以配置HAProxy利用rsyslog服务记录日志到指定日志文件服务器中
#在global配置项定义:
log 127.0.0.1 local{1-7} info #基于syslog记录日志到指定设备,级别有(err、warning、info、debug)
listen web_port
 bind 127.0.0.1:80
 mode http
 log global #开启当前web_port的日志功能,默认不记录日志
 server web1  127.0.0.1:8080 check inter 3000 fall 2 rise 5
例子: 传给远端服务器
ha服务器加入以下配置
log 127.0.0.1 local3 info
log 192.168.10.10 local6 info
systemctl restart haproxy.service
101服务器 要开udp 端口
vim /etc/rsyslog.conf
14 # Provides UDP syslog reception
15 $ModLoad imudp
16 $UDPServerRun 514
72 # Save boot messages also to boot.log
73 local7.* /var/log/boot.log
74 local6.* /var/log/haproxy.log
systemctl restart rsyslog.service
本机 打开端口就可以了
6.2 Proxies配置
官方文档:HAProxy version 2.1.12 - Configuration Manual
defaults [<name>] #默认配置项,针对以下的frontend、backend和listen生效,可以多个name也可以没有name
frontend <name>   #前端servername,类似于Nginx的一个虚拟主机 server和LVS服务集群。
backend <name>   #后端服务器组,等于nginx的upstream和LVS中的RS服务器
listen  <name>   #将frontend和backend合并在一起配置,相对于frontend和backend配置更简洁,生产常用
注意:name字段只能使用大小写字母,数字,'-'(dash),'_'(underscore),'.' (dot)和 ':'(colon),并且严格区分大小写
6.2.1 Proxies配置-defaults
defaults 配置参数:
option redispatch               #当server Id对应的服务器挂掉后,强制定向到其他健康的服务器,重新派发
option abortonclose             #当服务器负载很高时,自动结束掉当前队列处理比较久的连接,针对业务情况选择开启
option http-keep-alive          #开启与客户端的会话保持
option forwardfor               #透传客户端真实IP至后端web服务器
mode http|tcp                   #设置默认工作类型,使用TCP服务器性能更好,减少压力
timeout http-keep-alive 120s    #session 会话保持超时时间,此时间段内会转发到相同的后端服务器
timeout connect 120s            #客户端请求从haproxy到后端server最长连接等待时间(TCP连接之前),默认单位ms
timeout server 600s             #客户端请求从haproxy到后端服务端的请求处理超时时长(TCP连接之后),默认单位ms,如果超时,会出现502错误,此值建议设置较大些,防止502错误
timeout client 600s             #设置haproxy与客户端的最长非活动时间,默认单位ms,建议和timeout server相同
timeout check   5s              #对后端服务器的默认检测超时时间
default-server inter 1000 weight 3   #指定后端服务器的默认设置
6.2.2Proxies配置-listen 简化配置
使用listen替换 frontend和backend的配置方式,可以简化设置,通常只用于TCP协议的应用
#官网业务访问入口
listen WEB_PORT_80    #业务名称
   bind 10.0.0.7:80   #ip加端口
   mode http          #默认 可以不写
   option forwardfor  #透传客户端真实IP至后端web服务器
   server web1   10.0.0.17:8080   check inter 3000 fall 3 rise 5
   server web2   10.0.0.27:8080   check inter 3000 fall 3 rise 5
例子: 默认无后端健康性检测,
listen  cxk
 bind 192.168.10.10:80
 mode http
 log global
 server rs1  192.168.10.20:80
 server rs2  192.168.10.30:80
加入健康性检测 check
listen wyf
bind 192.168.10.10:80
mode http
log global
server rs1 192.168.10.20:80 check
server rs2 192.168.10.30:80 check
#
tcpdump -i ens33 -nn port 80 6.2.3 Proxies配置-frontend
frontend 配置参数:
bind: #指定HAProxy的监听地址,可以是IPV4或IPV6,可以同时监听多个IP或端口,可同时用于listen字段中
#格式:
bind [<address>]:<port_range> [, ...] [param*]
#注意:如果需要绑定在非本机的IP,需要开启内核参数:net.ipv4.ip_nonlocal_bind=1
backlog <backlog> #针对所有server配置,当前端服务器的连接数达到上限后的后援队列长度,注意:不支持backend范例:
listen http_proxy #监听http的多个IP的多个端口和sock文件
bind :80,:443,:8801-8810
bind 10.0.0.1:10080,10.0.0.1:10443
bind /var/run/ssl-frontend.sock user root mode 600 accept-proxy
listen http_https_proxy #https监听
bind :80
bind :443 ssl crt /etc/haproxy/site.pem #公钥和私钥公共文件
listen http_https_proxy_explicit #监听ipv6、ipv4和unix sock文件
bind ipv6@:80
bind ipv4@public_ssl:443 ssl crt /etc/haproxy/site.pem
bind unix@ssl-frontend.sock user root mode 600 accept-proxy
listen external_bind_app1 #监听file descriptor
bind "fd@${FD_APP1}"例子:
frontend ky26_web_port #可以采用后面形式命名:业务-服务-端口号
   bind :80,:8080
   bind 10.0.0.7:10080,:8801-8810,10.0.0.17:9001-9010
   mode http|tcp     #指定负载协议类型
   use_backend <backend_name>  #调用的后端服务器组名称
6.2.4Proxies配置-backend
定义一组后端服务器,backend服务器将被frontend进行调用。
注意: backend 的名称必须唯一,并且必须在listen或frontend中事先定义才可以使用,否则服务无法启动
mode http|tcp     #指定负载协议类型,和对应的frontend必须一致
option #配置选项
server   #定义后端real server,必须指定IP和端口
server 配置
#针对一个server配置
check #对指定real进行健康状态检查,如果不加此设置,默认不开启检查,只有check后面没有其它配置也可以启用检查功能
 #默认对相应的后端服务器IP和端口,利用TCP连接进行周期性健康性检查,注意必须指定端口才能实现健康性检查
 addr <IP>   #可指定的健康状态监测IP,可以是专门的数据网段,减少业务网络的流量
 port <num> #指定的健康状态监测端口
 inter <num> #健康状态检查间隔时间,默认2000 ms
 fall <num>   #后端服务器从线上转为线下的检查的连续失效次数,默认为3
 rise <num>   #后端服务器从下线恢复上线的检查的连续有效次数,默认为2
weight <weight> #默认为1,最大值为256,0(状态为蓝色)表示不参与负载均衡,但仍接受持久连接
backup #将后端服务器标记为备份状态,只在所有非备份主机down机时提供服务,类似Sorry Server
disabled #将后端服务器标记为不可用状态,即维护状态,除了持久模式,将不再接受连接,状态为深黄色,优雅下线,不再接受新用户的请求
redirect prefix http://www.baidu.com/ #将请求临时(302)重定向至其它URL,只适用于http模式
redir http://www.baidu.com       #将请求临时(302)重定向至其它URL,只适用于http模式
maxconn <maxconn> #当前后端server的最大并发连接数
例子:前后端 实际操作例子
frontend cxk
bind 192.168.10.10:80
use_backend web
backend web
server rs1 192.168.10.20:80 check
server rs2 192.168.10.30:80 check
backend web1
server rs1 192.168.10.101:80 check
server rs2 192.168.10.102:80 check
生产环境中 也可以使用 IP地址来替换
backend web
server 192.168.10.20 192.168.10.20:80 check
server 192.168.10.30 192.168.10.30:80 check例子: 跳转到baidu
frontend cxk
bind 192.168.10.10:80
use_backend web
backend web
server rs1 192.168.10.20:80 check
server rs2 192.168.10.30:80 check redir http://www.baidu.com6.2.5 子配置文件
当业务众多时,将所有配置都放在一个配置文件中,会造成维护困难。可以考虑按业务分类,将配置信息拆分,放在不同的子配置文件中,从而达到方便维护的目的。
例子:
#创建子配置目录
[root@centos7 ~]#mkdir /etc/haproxy/conf.d/
[root@localhost data]#sed -n '38,$p' /etc/haproxy/haproxy.cfg
[root@localhost data]#sed -n '38,$p' /etc/haproxy/haproxy.cfg > /etc/haproxy/conf.d/test.cfg
# 注意配置文件名要以 cfg 结尾
[root@localhost data]#vim /etc/haproxy/haproxy.cfg
#注释掉原来的 38行开始
[root@localhost data]#vim /usr/lib/systemd/system/haproxy.service
# 将子配置文件的 位置加入进来
[Unit]
Description=HAProxy Load Balancer
After=syslog.target network.target
[Service]
ExecStartPre=/usr/sbin/haproxy -f /etc/haproxy/haproxy.cfg -f /etc/haproxy/conf.d/ -c -q
ExecStart=/usr/sbin/haproxy -Ws -f /etc/haproxy/haproxy.cfg -f /etc/haproxy/conf.d/ -p /var/lib/haproxy/haproxy.pid
ExecReload=/bin/kill -USR2 $MAINPID
LimitNOFILE=100000
[Install]
WantedBy=multi-user.target
[root@localhost data]#systemctl daemon-reload
七、 调度算法
HAProxy通过固定参数 balance 指明对后端服务器的调度算法,该参数可以配置在listen或backend选项中。
HAProxy的调度算法分为静态和动态调度算法,但是有些算法可以根据参数在静态和动态算法中相互转换。
官方文档:HAProxy version 2.1.12 - Configuration Manual
7.1静态算法
静态算法:按照事先定义好的规则轮询公平调度,不关心后端服务器的当前负载、连接数和响应速度等,且无法实时修改权重(只能为0和1,不支持其它值),只能靠重启HAProxy生效
7.1.1 socat工具
对服务器动态权重和其它状态可以利用 socat工具进行调整,Socat 是 Linux 下的一个多功能的网络工具,名字来由是Socket CAT,相当于netCAT的增强版.Socat 的主要特点就是在两个数据流之间建立双向通道,且支持众多协议和链接方式。如 IP、TCP、 UDP、IPv6、Socket文件等
范例:利用工具socat 对服务器动态权重调整
[root@centos7 ~]#yum -y install socat
#查看帮助
[root@centos7 ~]#socat -h
[root@centos7 ~]#echo "help" | socat stdio /var/lib/haproxy/haproxy.sock
#查看 soket文件的帮助, 这个只是 haproxy 软件的帮助
[root@localhost data]#echo "show backend" | socat stdio /var/lib/haproxy/haproxy.sock
#查看 后端服务器的名称
# name
stats
cxk
[root@centos7 ~]#echo "show info" | socat stdio /var/lib/haproxy/haproxy.sock
#查看 haproxy 的版本信息
[root@localhost data]#echo "get weight cxk/web1" | socat stdio /var/lib/haproxy/haproxy.sock
#查看服务器的权重 cxk 是后端的名字 web1是 真实服务器的名字
1 (initial 1)
修改权重
由于有多个进程所以在发送指令的时候不确定发给谁所以最好一个sock 文件对应一个进程
[root@localhost data]#echo "set weight cxk/web1 3" | socat stdio /var/lib/haproxy/haproxy.sock
[root@localhost data]#echo "get weight cxk/web1" | socat stdio /var/lib/haproxy/haproxy.sock
3 (initial 1)
修改配置文件
[root@localhost data]#vim /etc/haproxy/haproxy.cfg
#全局配置下添加
stats socket /var/lib/haproxy/haproxy.sock1 mode 600 level admin process 1
stats socket /var/lib/haproxy/haproxy.sock2 mode 600 level admin process 2
[root@localhost data]#systemctl restart haproxy.service
[root@localhost data]#
[root@localhost data]#
[root@localhost data]#ll /var/lib/haproxy/
总用量 4
-rw-r--r--. 1 root root 6 6月 20 15:29 haproxy.pid
srw-------. 1 root root 0 6月 20 12:30 haproxy.sock
srw-------. 1 root root 0 6月 20 15:29 haproxy.sock1
srw-------. 1 root root 0 6月 20 15:29 haproxy.sock2
#
[root@localhost data]#echo "set weight cxk/web1 3" | socat stdio /var/lib/haproxy/haproxy.sock1
[root@localhost data]#echo "set weight cxk/web1 3" | socat stdio /var/lib/haproxy/haproxy.sock2
禁用后端服务器
[root@localhost data]#echo "disable server    cxk/web1 " | socat stdio /var/lib/haproxy/haproxy.sock1
[root@localhost data]#echo "disable server    cxk/web1 " | socat stdio /var/lib/haproxy/haproxy.sock2
上线下线脚本
[root@centos7 ~]#cat haproyx_host_up_down.sh
. /etc/init.d/functions
case $1 in
up)
   echo "set weight cxk/$2 1" | socat stdio  /var/lib/haproxy/haproxy.sock
   [ $? -eq 0 ] && action "$2 is up"
   ;;
down)
    echo "set weight cxk/$2 0" | socat stdio /var/lib/haproxy/haproxy.sock
   [ $? -eq 0 ] && action "$2 is down"
   ;;
*)
    echo "Usage: `basename $0` up|down IP"
   ;;
esac
7.1.2 static-rr
static-rr:基于权重的轮询调度,不支持运行时利用socat进行权重的动态调整(只支持0和1,不支持其它值)及后端服务器慢启动,其后端主机数量没有限制,相当于LVS中的 wrr
官方解释
static-rr   Each server is used in turns, according to their weights.
              This algorithm is as similar to roundrobin except that it is
              static, which means that changing a server's weight on the
              fly will have no effect. On the other hand, it has no design
              limitation on the number of servers, and when a server goes
              up, it is always immediately reintroduced into the farm, once
              the full map is recomputed. It also uses slightly less CPU to
              run (around -1%).
设置
listen web_host
bind 10.0.0.7:80,:8801-8810,10.0.0.7:9001-9010
mode http
log global
balance static-rr
server web1 10.0.0.17:80 weight 1 check inter 3000 fall 2 rise 5
server web2 10.0.0.27:80 weight 2 check inter 3000 fall 2 rise 5
backend cxk
balance static-rr
server web1 192.168.10.20:80
server web2 192.168.10.30:80
测试是否可以动态修改
[root@localhost data]#echo "set weight cxk/web1 2" |socat stdio /var/lib/haproxy/haproxy.sock1
Backend is using a static LB algorithm and only accepts weights '0%' and '100%'.
7.1.3 first
first:根据服务器在列表中的位置,自上而下进行调度,但是其只会当第一台服务器的连接数达到上限,新请求才会分配给下一台服务,因此会忽略服务器的权重设置,此方式使用较少不支持用socat进行动态修改权重,可以设置0和1,可以设置其它值但无效
backend cxk
balance first
server web1 192.168.10.20:80 check maxconn 10
server web2 192.168.100.30:80
maxconn 最大链接数设置好后可以测试
while true;do curl http://10.0.0.7/index.html ; sleep 0.1;done7.2 动态算法
动态算法:基于后端服务器状态进行调度适当调整,优先调度至当前负载较低的服务器,且权重可以在haproxy运行时动态调整无需重启。
7.2.1 roundrobin (默认算法)
roundrobin:基于权重的轮询动态调度算法,支持权重的运行时调整,不同于lvs中的rr轮训模式,HAProxy中的roundrobin支持慢启动(新加的服务器会逐渐增加转发数),其每个后端backend中最多支持4095个real server,支持对real server权重动态调整,roundrobin为默认调度算法,此算法使用广泛
roundrobin  Each server is used in turns, according to their weights.
              This is the smoothest and fairest algorithm when the server's
              processing time remains equally distributed. This algorithm
              is dynamic, which means that server weights may be adjusted
              on the fly for slow starts for instance. It is limited by
              design to 4095 active servers per backend. Note that in some
              large farms, when a server becomes up after having been down
              for a very short time, it may sometimes take a few hundreds
              requests for it to be re-integrated into the farm and start
              receiving traffic. This is normal, though very rare. It is
              indicated here in case you would have the chance to observe
              it, so that you don't worry.
例子:
listen web_host
bind 10.0.0.7:80,:8801-8810,10.0.0.7:9001-9010
mode http
log global
balance roundrobin
server web1 10.0.0.17:80 weight 1 check inter 3000 fall 2 rise 5
server web2 10.0.0.27:80 weight 2 check inter 3000 fall 2 rise 5
[root@localhost data]#echo "get weight cxk/web1" |socat stdio /var/lib/haproxy/haproxy.sock
#注意此处修改了 haproxy 的 进程模式
[root@localhost data]#curl 192.168.10.10
7.2.2 leastconn
leastconn 加权的最少连接的动态,支持权重的运行时调整和慢启动,即:根据当前连接最少的后端服务器而非权重进行优先调度(新客户端连接),比较适合长连接的场景使用,比如:MySQL等场景。
listen web_host
 bind 10.0.0.7:80,:8801-8810,10.0.0.7:9001-9010
 mode http
 log global
 balance leastconn
 server web1 10.0.0.17:80 weight 1 check inter 3000 fall 2 rise 5
 server web2 10.0.0.27:80 weight 1 check inter 3000 fall 2 rise 5
7.2.3 random
在1.9版本开始增加 random的负载平衡算法,其基于随机数作为一致性hash的key,随机负载平衡对于大型服务器场或经常添加或删除服务器非常有用,支持weight的动态调整,weight较大的主机有更大概率获取新请求
random配置实例
listen web_host
 bind 10.0.0.7:80,:8801-8810,10.0.0.7:9001-9010
 mode http
 log global
 balance random
 server web1 10.0.0.17:80 weight 1 check inter 3000 fall 2 rise 5
 server web2 10.0.0.27:80 weight 1 check inter 3000 fall 2 rise 5
7.3其他算法
其它算法即可作为静态算法,又可以通过选项成为动态算法
7.3.1source
源地址hash,基于用户源地址hash并将请求转发到后端服务器,后续同一个源地址请求将被转发至同一个后端web服务器。此方式当后端服务器数据量发生变化时,会导致很多用户的请求转发至新的后端服务器,默认为静态方式,但是可以通过hash-type选项进行更改这个算法一般是在不插入Cookie的TCP模式下使用,也可给不支持会话cookie的客户提供最好的会话粘性,适用于session会话保持但不支持cookie和缓存的场景源地址有两种转发客户端请求到后端服务器的服务器选取计算方式,分别是取模法和一致性hash
配置示例
listen web_host
 bind 10.0.0.7:80,:8801-8810,10.0.0.7:9001-9010
 mode tcp
 log global
 balance source
 hash-type map-based
 server web1  10.0.0.17:80 weight 1 check inter 3000 fall 2 rise 3
 server web2  10.0.0.27:80 weight 1 check inter 3000 fall 2 rise 3


 #不支持动态调整权重值
[root@haproxy ~]#echo "set weight web_host/10.0.0.27 10" | socat stdio
/var/lib/haproxy/haproxy.sock
Backend is using a static LB algorithm and only accepts weights '0%' and '100%'.
#只能动态上线和下线
[root@haproxy ~]#echo "set weight web_host/10.0.0.27 0" | socat stdio
/var/lib/haproxy/haproxy.sock
[root@haproxy conf.d]#echo "get weight web_host/10.0.0.27" | socat stdio
/var/lib/haproxy/haproxy.sock
0 (initial 1)7.3.1.1一致性 hash
一致性哈希,当服务器的总权重发生变化时,对调度结果影响是局部的,不会引起大的变动,hash(o)mod n ,该hash算法是动态的,支持使用 socat等工具进行在线权重调整,支持慢启动
listen web_host
 bind 10.0.0.7:80,:8801-8810,10.0.0.7:9001-9010
 mode tcp
 log global
 balance source
 hash-type consistent
 server web1 10.0.0.17:80 weight 1 check inter 3000 fall 2 rise 5
 server web2 10.0.0.27:80 weight 1 check inter 3000 fall 2 rise 5
7.3.2 uri
基于对用户请求的URI的左半部分或整个uri做hash,再将hash结果对总权重进行取模后,根据最终结果将请求转发到后端指定服务器,适用于后端是缓存服务器场景,默认是静态算法,也可以通过hash-type指定map-based和consistent,来定义使用取模法还是一致性hash。
listen web_host
 bind 10.0.0.7:80,:8801-8810,10.0.0.7:9001-9010
 mode http
 log global
 balance uri
 #hash-type consistent
 server web1 10.0.0.17:80 weight 1 check inter 3000 fall 2 rise 5
 server web2 10.0.0.27:80 weight 1 check inter 3000 fall 2 rise 5
7.3.3 url_param
url_param对用户请求的url中的 params 部分中的一个参数key对应的value值作hash计算,并由服务器总权重相除以后派发至某挑出的服务器;通常用于追踪用户,以确保来自同一个用户的请求始终发往同一个real server,如果无没key,将按roundrobin算法
假设:
url = http://www.laowang.com/foo/bar/index.php?key=value
则:
host = "www.laowang.com"
url_param = "key=value"
配置
listen web_host
 bind 10.0.0.7:80,:8801-8810,10.0.0.7:9001-9010
 mode http
 log global
 balance url_param userid #url_param hash
 server web1 10.0.0.17:80 weight 1 check inter 3000 fall 2 rise 5
 server web2 10.0.0.27:80 weight 1 check inter 3000 fall 2 rise 5
测试
curl http://192.168.91.100/index.html?userid=zhou7.3.4 hdr
针对用户每个http头部(header)请求中的指定信息做hash,此处由 name 指定的http首部将会被取出并做hash计算,然后由服务器总权重取模以后派发至某挑出的服务器,如果无有效值,则会使用默认的轮询调度。
配置示例
listen web_host
 bind 10.0.0.7:80,:8801-8810,10.0.0.7:9001-9010
 mode http
 log global
 balance hdr(User-Agent)
 #balance hdr(host)

 server web1 10.0.0.17:80 weight 1 check inter 3000 fall 2 rise 5
 server web2 10.0.0.27:80 weight 1 check inter 3000 fall 2 rise 5
测试访问
[root@centos7~]#curl -v http://10.0.0.7/index.html
[root@centos7 ~]#curl -vA 'firefox' http://10.0.0.7/index.html
[root@centos7 ~]#curl -vA 'chrome' http://10.0.0.7/index.html
附录
详解
chroot #锁定运行目录
deamon #以守护进程运行,后台运行
stats socket /var/lib/haproxy/haproxy.sock mode 600 level admin process 1 #socket文件
user, group, uid, gid #运行haproxy的用户身份
nbproc n #开启的haproxy work 进程数,默认进程数是一个
#nbthread 1 #和多进程 nbproc配置互斥(版本有关,CentOS8的haproxy1.8无此问题),指定每个haproxy进程开启的线程数,默认为每个进程一个线程
#如果同时启用nbproc和nbthread 会出现以下日志的错误,无法启动服务Apr 714:46:23 haproxy haproxy: [ALERT] 097/144623 (1454) : config : cannot enable multiple processes if multiple threads are configured. Please use either nbproc or nbthread but not both.
cpu-map 1 0 #绑定haproxy worker 进程至指定CPU,将第1个work进程绑定至0号CPU
cpu-map 2 1 #绑定haproxy worker 进程至指定CPU,将第2个work进程绑定至1 号CPU
#ps axo pid,cmd,psr |grep haproxy
maxconn n #每个haproxy进程的最大并发连接数
maxsslconn n #每个haproxy进程ssl最大连接数,用于haproxy配置了证书的场景下
maxconnrate n #每个进程每秒创建的最大连接数量
spread-checks n #后端server状态check随机提前或延迟百分比时间,建议2-5(20%-50%)之间,默认值0
pidfile #指定pid文件路径
log 127.0.0.1 local2 info #定义全局的syslog服务器;日志服务器需要开启UDP协议,最多可以定义两个
defaults
log global #引入global定义的日志格式
mode http #模式为http(7层代理http,4层代理tcp)
option httplog #日志类别为http日志格式
option dontlognull #不记录健康检查日志信息
retries 3 #检查节点服务器失败次数,连续达到3次,则反馈不可用
redispatch #当服务器负载很高时,自动结束当前队列处理比较久的连接
maxconn 2000 #最大连接数,此处的数值不能大于全局里的数值
contimeout 5000 #设置连接超时时间,默认单位是毫秒
clitimeout 50000 #设置客户端超时时间,默认单位是毫秒
srvtimeout 50000 #设置服务器超时时间,默认单位是毫秒
#以下是新版本中的
timeout http-request 10s #默认http请求超时时间
timeout queue 1m #默认队列超时时间
timeout connect 10s #默认连接超时时间,新版本中替代
timeout client 1m
timeout server 1m
timeout http-keep-alive
timeout check 10s
defaults [<name>] #默认配置项,针对以下的frontend、backend和listen生效,可以多个name也可以没有name
frontend <name> #前端servername,类似于Nginx的一个虚拟主机 server和LVS服务集群。
backend <name> #后端服务器组,等于nginx的upstream和LVS中的RS服务器
listen <name> #将frontend和backend合并在一起配置,相对于frontend和backend配置更简
洁,生产常用
使用listen替换 frontend和backend的配置方式,可以简化设置,通常只用于TCP协议的应用
#官网业务访问入口
listen webcluster 0.0.0.0:80
option httpchk GET /test.html
balance roundrobin
server inst1 192.168.10.20:80 check inter 2000 fall 3
server inst2 192.168.10.30:80 check inter 2000 fall 3