配置LVS-NAT模式
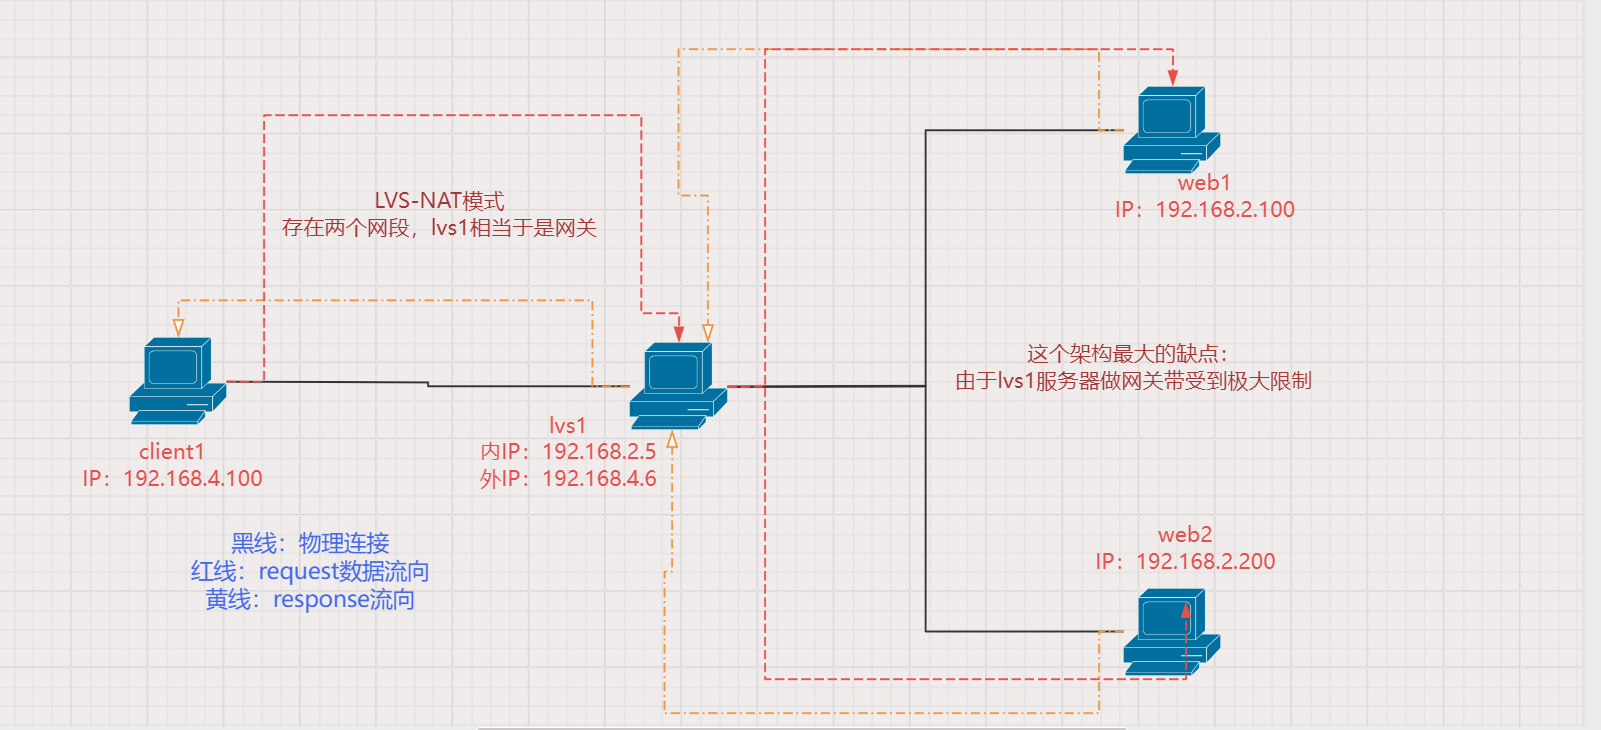
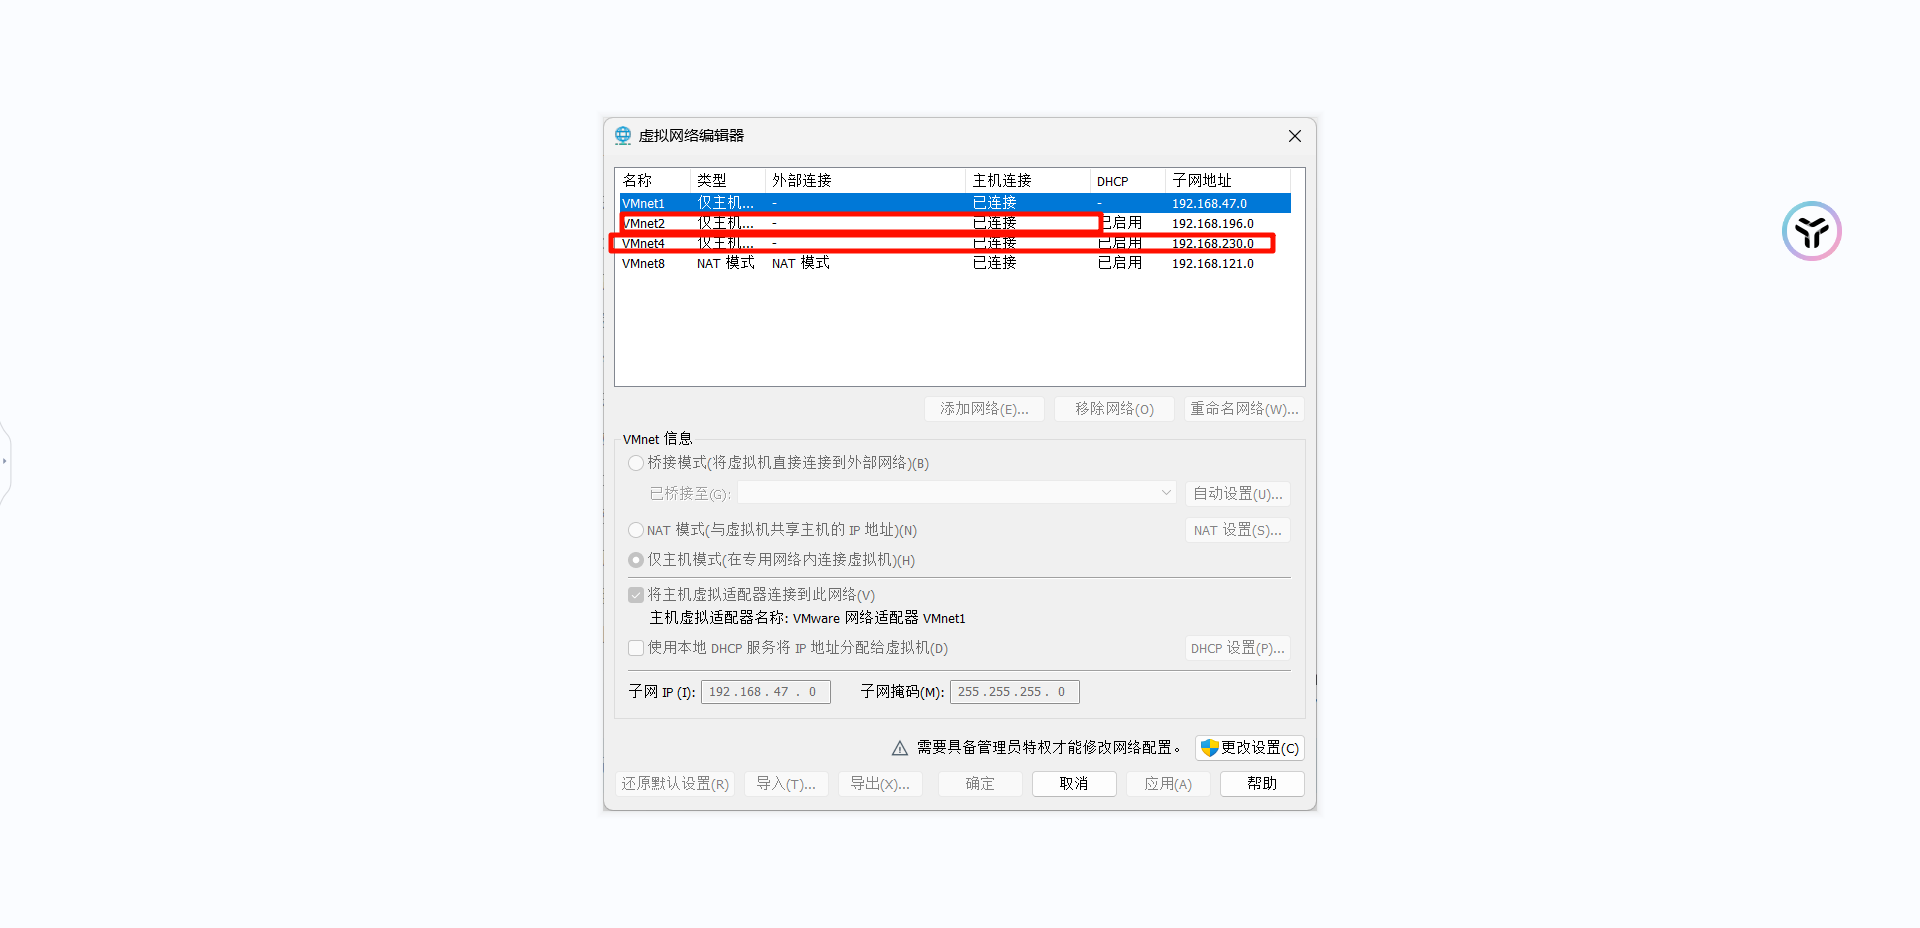
由于我们要进行LVS-NAT模式集群搭建。首先在VMware中添加两个虚拟网段
VMnet2:做内网的网段
VMnet4:做外网的网段
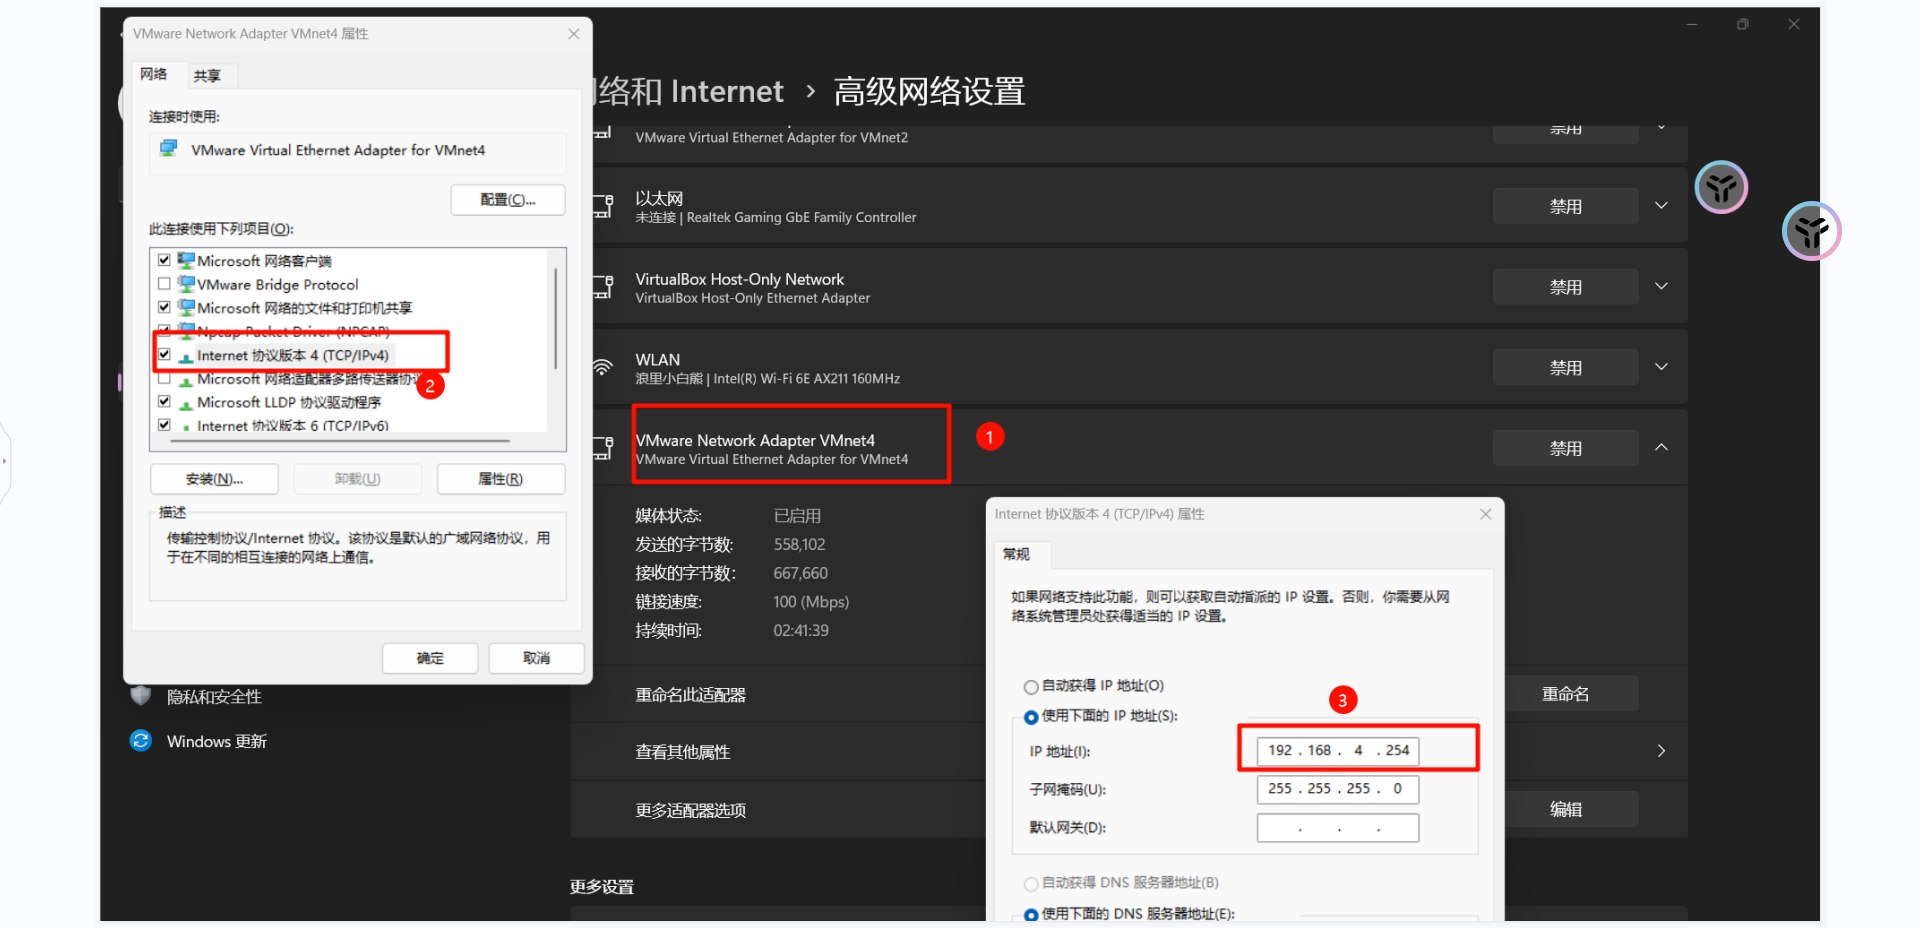
然后修改Window网卡IP
修改VMware Virtual Ethernet Adapter for VMnet4的IP为:192.168.4.254
修改VMware Virtual Ethernet Adapter for VMnet2的IP为:192.168.2.254

至此虚拟网络配置完成
由于我们要实现LVS-NAT模式,设备主机信息如下,充当负载均衡的设备需要两张网卡,分别做内网和外网。同时负载均衡设备充当网关client1:192.168.4.100(外网)
lvs1:192.168.4.5(外网网关)
192.168.2.5(内网网关)
web1:192.168.2.100(内网)
web2:192.168.2.200(内网)
所有虚拟机的网络连接方式:自定义,分别选择VMnet2和VMnet4
1、虚拟机配置及网络参数配置
(1)、网络基础配置
sh
# client1
nmcli connection modify eth0  ipv4.method manual ipv4.addresses 192.168.4.100/24 autoconnect yes
nmcli connection up eth0
# lvs1
nmcli connection modify eth0  ipv4.method manual ipv4.addresses 192.168.4.5/24 autoconnect yes
nmcli connection modify eth1  ipv4.method manual ipv4.addresses 192.168.2.5/24 autoconnect yes
nmcli connection up eth0
nmcli connection up eth1
# web1
nmcli connection modify eth0  ipv4.method manual ipv4.addresses 192.168.2.100/24 autoconnect yes
nmcli connection up eth0
# web2
nmcli connection modify eth0  ipv4.method manual ipv4.addresses 192.168.2.200/24 autoconnect yes
nmcli connection up eth0
(2)、yum仓库配置
我们使用ansible完成所有主机的yum仓库配置
sh
# 配置ansible实现环境
[root@ansible:192.168.4.66 ~]$mkdie cluster
[root@ansible:192.168.4.66 ~]$cp ansible/ansible.cfg cluster/
[root@ansible:192.168.4.66 ~]$cd cluster/
[root@ansible:192.168.4.66 ~/cluster]$vim inventory
[clients]
client1 ansible_host=192.168.4.100

[webservers]
web1 ansible_host=192.168.2.100
web2 ansible_host=192.168.2.200

[lvs]
lvs1 ansible_host=192.168.4.5


[all:vars]
ansible_ssh_user=root
ansible_ssh_pass=123
yaml
# 编写剧本
---
- name: yum
  hosts: all
  tasks:
    - name: create yum
      yum_repolist:
        file: local_yum_house.repo
        name: Myapp
        description: 'myapp'
        baseurl: file:///mnt/mydvd/Appstream
        gpgcheck: 0
        enable: 1
      yum_repolist:
        file: local_yum_house.repo
        name: MyBase
        description: 'myBase'
        baseurl: file:///mnt/mydvd/BaseOS
        gpgcheck: 0
        enable: 1
(3)、开启lvs1路由转发功能
由于在LVS-NAT架构中lvs1是网关,因此需要开启lvs的路由转发功能
sh
[root@lvs1:192.168.4.5 /etc/yum.repos.d]$vim /etc/sysctl.conf
net.ipv4.ip_forward=1

# 开启此功能后,client就可以ping通web服务器了
[root@client1:192.168.4.100 ~]$ping 192.168.2.100
PING 192.168.2.100 (192.168.2.100) 56(84) bytes of data.
64 bytes from 192.168.2.100: icmp_seq=1 ttl=63 time=3.100 ms
64 bytes from 192.168.2.100: icmp_seq=2 ttl=63 time=0.355 ms
也可以通过ansible的sysctl模块实现
作用:修改内核参数
参数:
name:内核参数名字
value:值
sysctl_set:是否立即生效
sysctl_file:写入配置文件,开机可以自动加载
yaml
 ---
 - name:  config  sysctl
   hosts: lvs1
   tasks:
     - name: ip_forward start
       sysctl:
         name: net.ipv4.ip_forward
         value: '1'
         sysctl_file: /etc/sysctl.conf
         sysctl_set: yes
2、在webserver中安装nginx
编写剧本
yaml
---
- name: nginx
  hosts: webservers
  tasks:
    - name: stop httpd
      service:
        name: httpd
        state: stopped
        enabled: no
    - name: stop firewalld
      service:
        name: firewalld
        state: stopped
        enabled: no
    - name: install nginx
      yum:
        name: nginx
        state: present
    - name: upload index.html
      template:
        src: ./files/index.html
        dest: /usr/share/nginx/html/index.html
    - name: start nignx
      service:
        name: nginx
        state: started
        enabled: yes
3、在lvs上安装ipvsadm
yaml
---
- name: install ipvsadm
  hosts: lvs1
  vars:
    pkg: ipvsadm
  roles:
    - pkgs
4、设置虚拟主机
ipvsadm
-A:添加虚拟服务器
-E:编辑虚拟服务器
-D:删除虚拟服务器
-t:添加tcp服务器
-u:添加udp服务器
-s:指定调度算法。轮询rr、加权轮询wrr、最少连接lc、加权最少连接wlc
-a:再添加虚拟服务器后,向虚拟服务器中加入真实服务器
-r:指定真实服务器
-w:设置权重
-m:指定工作模式
-g:制定工作模式为DR
sh
[root@lvs1:192.168.4.5 ~]$ipvsadm -A -t 192.168.4.5:80 -s rr
[root@lvs1:192.168.4.5 ~]$ipvsadm -Ln
IP Virtual Server version 1.2.1 (size=4096)
Prot LocalAddress:Port Scheduler Flags
  -> RemoteAddress:Port           Forward Weight ActiveConn InActConn
TCP  192.168.4.5:80 rr
[root@lvs1:192.168.4.5 ~]$ipvsadm -a -t  192.168.4.5:80 -r 192.168.2.100:80 -m
[root@lvs1:192.168.4.5 ~]$ipvsadm -a -t  192.168.4.5:80 -r 192.168.2.200:80 -m
[root@lvs1:192.168.4.5 ~]$ipvsadm -Ln
IP Virtual Server version 1.2.1 (size=4096)
Prot LocalAddress:Port Scheduler Flags
  -> RemoteAddress:Port           Forward Weight ActiveConn InActConn
TCP  192.168.4.5:80 rr
  -> 192.168.2.100:80             Masq    1      0          0
  -> 192.168.2.200:80             Masq    1      0          0


#  修改调度模式为加权轮询,修改权重
[root@lvs1:192.168.4.5 ~]$ipvsadm -E -t 192.168.4.5:80 -s wrr
[root@lvs1:192.168.4.5 ~]$ipvsadm -e -t 192.168.4.5:80 -r 192.168.2.200 -m -w 2
[root@lvs1:192.168.4.5 ~]$ipvsadm -ln
IP Virtual Server version 1.2.1 (size=4096)
Prot LocalAddress:Port Scheduler Flags
  -> RemoteAddress:Port           Forward Weight ActiveConn InActConn
TCP  192.168.4.5:80 wrr
  -> 192.168.2.100:80             Masq    1      0          0
  -> 192.168.2.200:80             Masq    2      0          0
5、测试
sh
[root@client1:192.168.4.100 ~]$for i in {1..10};do curl http://192.168.4.5;done
Welcome  to web2 on 192.168.2.200
Welcome  to web1 on 192.168.2.100
Welcome  to web2 on 192.168.2.200
Welcome  to web2 on 192.168.2.200
Welcome  to web1 on 192.168.2.100
Welcome  to web2 on 192.168.2.200
Welcome  to web2 on 192.168.2.200
Welcome  to web1 on 192.168.2.100
Welcome  to web2 on 192.168.2.200
Welcome  to web2 on 192.168.2.200