首先创建一个 components 文件在里面进行组件的创建

下面是 vip组件的封装 也就是图片上传组件 只是我的命名是随便起的
javascript
<template>
<!--图片 -->
<view class="up-page">
<!--图片-->
<view class="show-box" v-for="(item,index) in imageList" :key="index">
<image class="full" :src="item" :data-src="image" @tap="previewImage(item)">
</image>
<view class="delect-icon" @tap="delect(index)">
<image class="full" :src="clearIcon" mode=""></image>
</view>
</view>
<view v-if="VideoOfImagesShow" @tap="chooseVideoImage" class="box-mode">
<image class="full" :src="selectfile" mode=""></image>
</view>
</view>
</template>
<script setup>
import { ref,onUnmounted } from 'vue';
// 定义响应式数据
const clearIcon = ref('../../static/xxx.png');
const selectfile = ref('../../static/jiahao.png');
const VideoOfImagesShow = ref(true);
const imageList = ref([]);
const videoList = ref([]);
const sourceType = ref(['拍摄', '相册', '拍摄或相册']);
const sourceTypeIndex = ref(2);
const cameraList = ref([
{ value: 'back', name: '后置摄像头', checked: 'true' },
{ value: 'front', name: '前置摄像头' }
]);
const cameraIndex = ref(0);
const maxCount = ref(9);
// 生命周期钩子(onMounted, onUnmounted等)
onUnmounted(() => {
imageList.value = [];
sourceTypeIndex.value = 2;
sourceType.value = ['拍摄', '相册', '拍摄或相册'];
});
// 方法
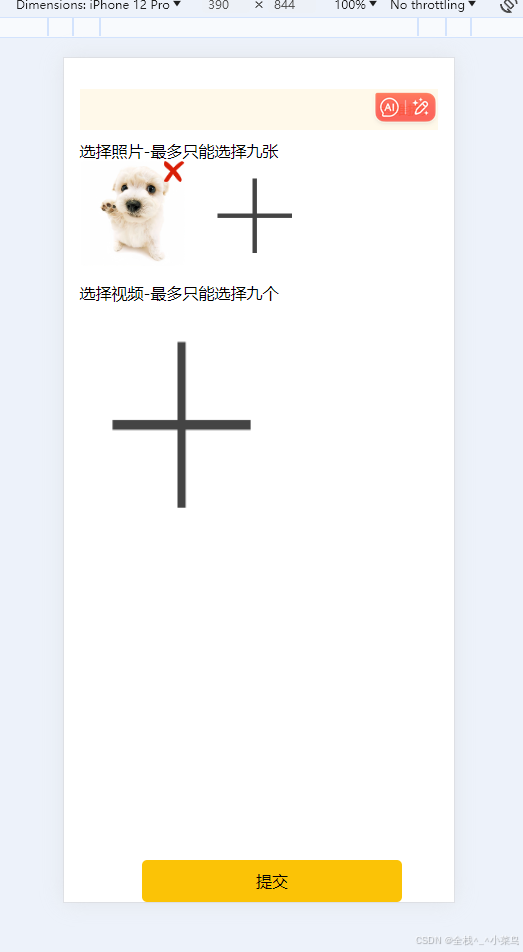
function chooseVideoImage() {
uni.showActionSheet({
title: '选择上传类型',
itemList: ['图片'], // 注意:这里只有'图片',如果需要视频应添加'视频'
success: res => {
if (res.tapIndex === 0) {
chooseImages();
}
// 注意:原代码中没有实现chooseVideo,这里未添加
}
});
}
function chooseImages() {
uni.chooseImage({
count: maxCount.value,
sizeType: ['original', 'compressed'],
sourceType: ['album', 'camera'],
success: res => {
imageList.value = [...imageList.value, ...res.tempFilePaths];
if (imageList.value.length + videoList.value.length === maxCount.value) {
VideoOfImagesShow.value = false;
}
}
});
}
function previewImage(e) {
uni.previewImage({
// current: e.currentTarget.dataset.url || e, // 假设你通过某种方式传递了图片的URL
current: e, // 假设你通过某种方式传递了图片的URL
urls: imageList.value
});
}
// 删除图片的函数
function delect(index) {
uni.showModal({
title: '提示',
content: '是否要删除该图片',
success: res => {
if (res.confirm) {
// 使用splice方法删除图片,注意需要访问.value
imageList.value.splice(index, 1);
if (imageList.value.length+videoList.value.length == maxCount.value) {
VideoOfImagesShow.value = false;
} else {
VideoOfImagesShow.value = true;
}
}
}
});
}
</script>
<style lang="scss">
/* 统一上传后显示的盒子宽高比 */
.box-mode {
width: 27vw;
height: 27vw;
border-radius: 8rpx;
overflow: hidden;
}
.full {
width: 100%;
height: 100%;
}
.up-page {
display: flex;
flex-wrap: wrap;
display: flex;
width: 100%;
.show-box:nth-child(3n){
margin-right: 0;
}
.show-box {
position: relative;
margin-bottom:4vw;
margin-right: 4vw;
@extend .box-mode;
.delect-icon {
height: 40rpx;
width: 40rpx;
position: absolute;
right: 0rpx;
top: 0rpx;
z-index: 1000;
}
}
}
</style>直接在页面引用
html
<view class="imgbox">
<view class="example-body">
<!-- <uni-file-picker limit="9" title="最多选择9张图片"></uni-file-picker> -->
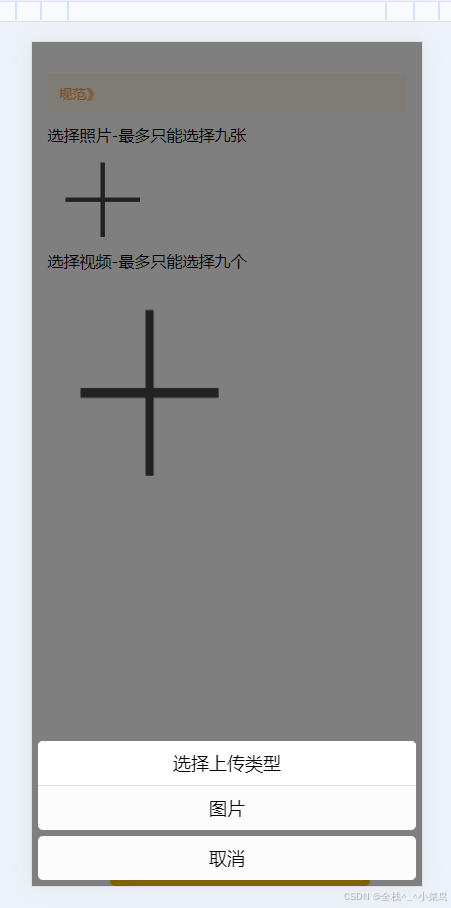
<div>选择照片-最多只能选择九张</div>
<vip></vip> //上传图片的组件
</view>
</view>最终样子