7月1日OpenSSH官方发布安全更新,忙着处理的同时记录一下升级过程。
系统环境
root@NServer:~# cat /proc/version
Linux version 3.4.113-sun8i (root@test) (gcc version 5.5.0 (Linaro GCC 5.5-2017.10) ) #40 SMP PREEMPT Tue Mar 16 14:24:14 CST 2021
root@NServer:~# lsb_release -a
No LSB modules are available.
Distributor ID:	Ubuntu
Description:	Ubuntu 16.04.7 LTS
Release:	16.04
Codename:	xenial
安装包
zlib-1.3.1.tar.gz         # https://www.zlib.net/
openssl-1.1.1w.tar.gz     # https://www.openssl.org/source/old/1.1.1/index.html
openssh-9.8p1.tar.gz      # https://cdn.openbsd.org/pub/OpenBSD/OpenSSH/portable/
升级步骤
升级顺序
openssl -> zlib -> openssh
安装openssl
tar zxvf openssl-1.1.1w.tar.gz
cd openssl-1.1.1w
./config --prefix=/usr/local/openssl shared
make
make install
#创建软连接
ln -s /usr/local/openssl/lib/libssl.so.1.1 /usr/lib/
ln -s /usr/local/openssl/lib/libcrypto.so.1.1 /usr/lib/
#查看openssl版本,能正常输出版本号表示成功
/usr/local/openssl/bin/openssl version
安装zlib
tar zxvf zlib-1.3.1.tar.gz
cd zlib-1.3.1
./configure --prefix=/usr/local/zlib
make
make install
安装openssh
#先卸载原openssh,卸载后切记不要断开ssh连接
sudo apt purge --remove "openssh*"
rm -rf /usr/local/openssh
#安装openssh
tar zxvf openssh-9.8p1.tar.gz
cd openssh-9.8p1
./configure --prefix=/usr/local/openssh --sysconfdir=/etc/ssh --with-ssl-dir=/usr/local/openssl --with-zlib=/usr/local/zlib --without-openssl-header-check
make
make install
配置openssh
重启sshd服务会提示"Privilege separation user sshd does not exist"需要再/etc/passwd最后加入一行sshd:x:74:74:Privilege-separated SSH:/var/empty/sshd:/sbin/nologin
echo 'sshd:x:74:74:Privilege-separated SSH:/var/empty/sshd:/sbin/nologin' >> /etc/passwd注册为服务,创建sshd.service文件
vim /usr/lib/systemd/system/sshd.service写入内容:
[Unit]
Description=OpenSSH serve
Documentation=man:sshd(8) man:sshd_config(5)
#After=network.target sshd-keygen.service
#Wants=sshd-keygen.service
After=network.target

[Service]
#Type=notify
#EnvironmentFile=/etc/sysconfig/sshd
#ExecStart=/usr/local/openssh/sbin/sshd -D $OPTIONS
ExecStart=/usr/local/openssh/sbin/sshd
#ExecReload=/bin/kill -HUP $MAINPID
#KillMode=process
#Restart=on-failure
#RestartSec=42s

[Install]
WantedBy=multi-user.target
重载Systemctl,并设置为自启动
systemctl daemon-reload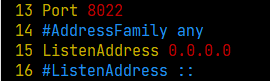
systemctl restart sshd这里会启动失败,使用systemctl status sshd查看失败原因,是因为原ssh服务占用了22端口,所以这里先把新的ssh服务修改成8022
vim /etc/ssh/sshd_config把Port和ListenAddress 0.0.0.0前面的#号去掉,并把Port 后面的22改成8022如下图所示:
同时需要将8022加入防火墙,否则ssh无法连接
ufw allow 8022改完后保存,继续重启sshd
systemctl restart sshd没报错后,查看sshd状态,Active: active (running) 表示运行中,此时可以使用putty等工具通过8022端口登录服务器。
systemctl status sshd加入开机启动
systemctl enable sshd如果提示"update-rc.d: error: sshd Default-Start contains no runlevels, aborting.",需要修改sshd
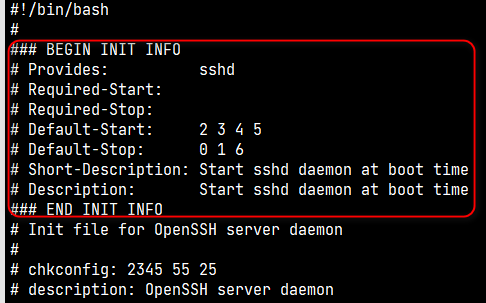
vim /etc/init.d/sshd在#!/bin/bash 下面第二行插入
### BEGIN INIT INFO
# Provides:          sshd
# Required-Start:
# Required-Stop:
# Default-Start:     2 3 4 5
# Default-Stop:      0 1 6
# Short-Description: Start sshd daemon at boot time
# Description:       Start sshd daemon at boot time
### END INIT INFO
如下图所示:
保存后重新设置开机自启:
systemctl enable sshd成功后如下图所示:

在/etc/ssh/sshd_config末尾追加三行数据
echo 'PermitRootLogin yes' >> /etc/ssh/sshd_config
echo 'PubkeyAuthentication yes' >> /etc/ssh/sshd_config
echo 'PasswordAuthentication yes' >> /etc/ssh/sshd_config
重启服务器:
reboot#查看版本:
ssh -V
至此升级成功!
附:记得将ssh端口改回22。