系列文章目录
HarmonyOS Next 系列之省市区弹窗选择器实现(一)
HarmonyOS Next 系列之验证码输入组件实现(二)
HarmonyOS Next 系列之底部标签栏TabBar实现(三)
HarmonyOS Next 系列之HTTP请求封装和Token持久化存储(四)
HarmonyOS Next 系列之从手机选择图片或拍照上传功能实现(五)
HarmonyOS Next 系列之可移动悬浮按钮实现(六)
HarmonyOS Next 系列之沉浸式状态实现的多种方式(七)
HarmonyOS Next系列之Echarts图表组件(折线图、柱状图、饼图等)实现(八)
HarmonyOS Next系列之地图组件(Map Kit)使用(九)
文章目录
- 系列文章目录
- 前言
- 一、地图组件正确渲染步骤总结
- 二、详细步骤
-
- 1、手动新建私钥和证书请求文件
- [2、AppGallery 网站上创建项目和应用、申请调试证书或生产证书和Profile文件,并开通地图服务](#2、AppGallery 网站上创建项目和应用、申请调试证书或生产证书和Profile文件,并开通地图服务)
- [3 、项目代码中修改包名和配置client_id](#3 、项目代码中修改包名和配置client_id)
- 4、手动修改签名配置
- [5、AppGallery 添加证书指纹、添加公钥指纹](#5、AppGallery 添加证书指纹、添加公钥指纹)
- 6、引入组件渲染
- 三、地图组件常用功能
- 总结
前言
HarmonyOS Next(基于API12)自带地图Map Kit使用------本文将讲述如何通过手动生成签名证书、申请地图权限、地图展示和地图常用功能示例讲解。
一、地图组件正确渲染步骤总结
1、手动新建私钥和证书请求文件
2、AppGallery 网站上创建项目和应用、申请调试/生产证书、Profile文件,并开通地图服务
3、项目代码中修改包名、配置client_id
4、手动修改签名配置
5、AppGallery 添加证书指纹、公钥指纹
6、引入组件渲染
以上缺少任何步骤地图都无法正常显示,很多人没去手动创建签名证书或者未去AppGallery 申请地图服务,直接引用map组件导致渲染出来空白
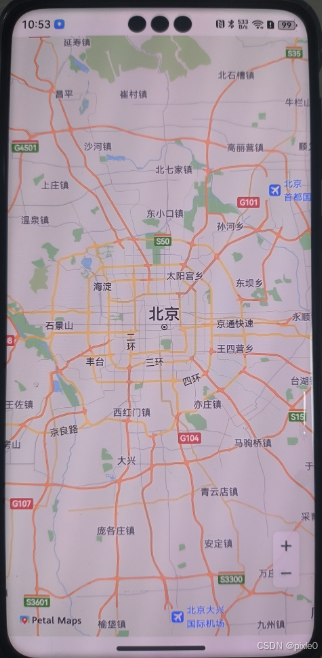
空白示例:

二、详细步骤
1、手动新建私钥和证书请求文件
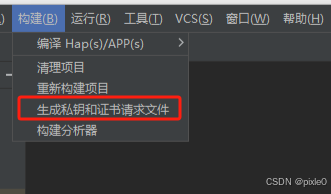
(1)开发工具---构建---生成私钥和证书请求文件
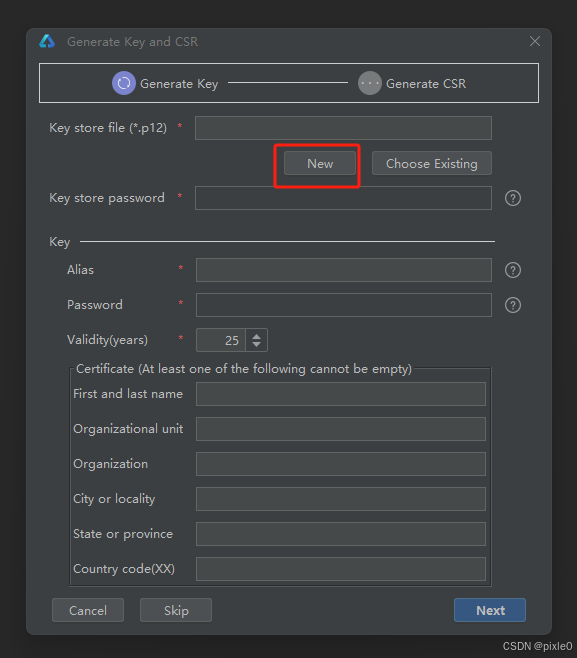
(2)点击New
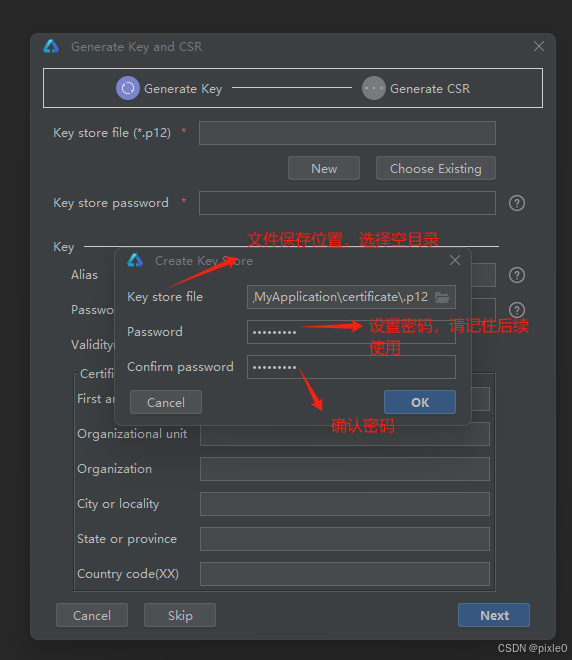
(3)选择文件保存目录,设置密码后点击OK
(4)如下图设置alias、个人信息后点击Next
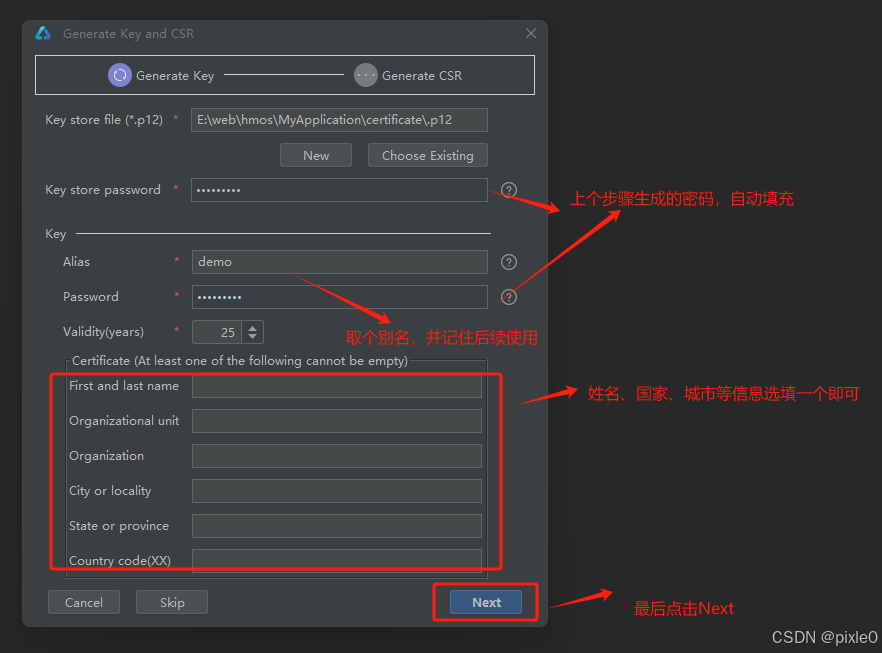
(5)弹出如下确认框,选择csr file文件保存目录后点击Finish
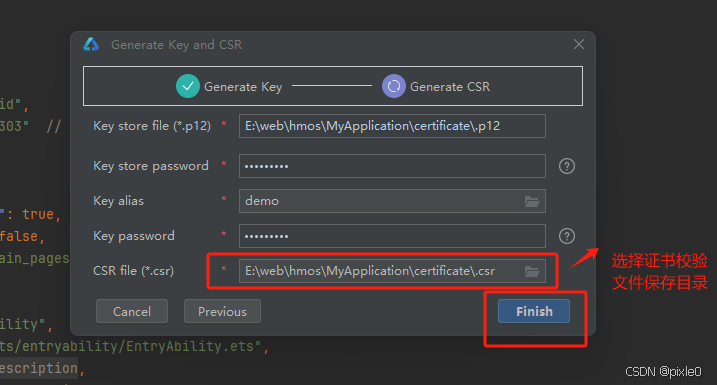
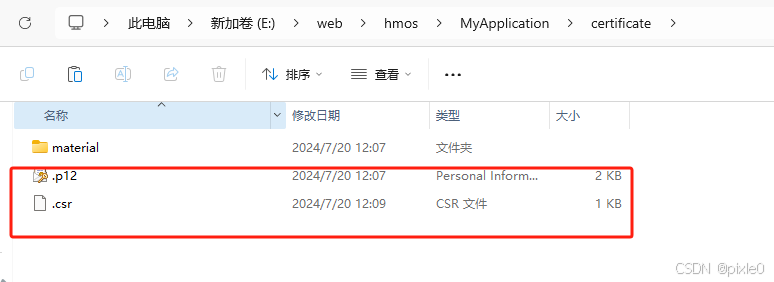
此时在第三小步选择的目录下生成了证书请求文件(.csr格式)和证书文件(.p12格式),记住位置后续需要使用
2、AppGallery 网站上创建项目和应用、申请调试证书或生产证书和Profile文件,并开通地图服务
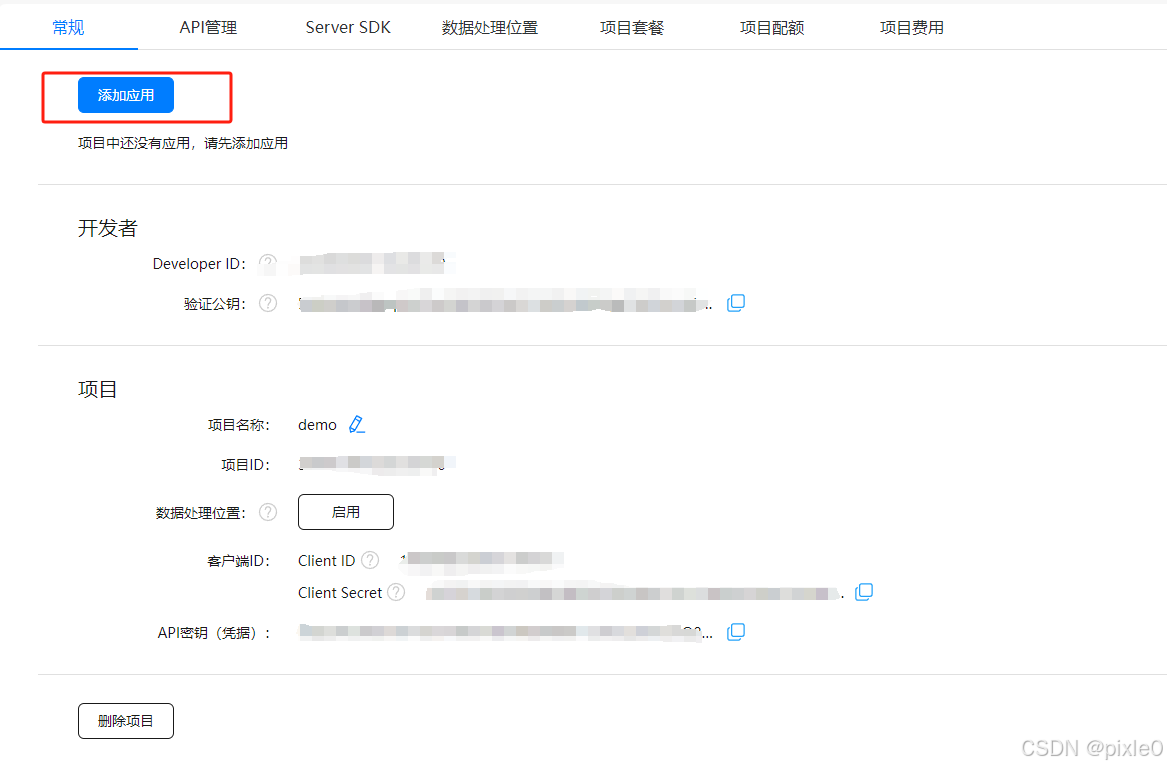
(1)AppGallery 网站,我的项目-添加项目


(2)在项目里面添加应用,设置应用包名和名称


(3)开通地图服务
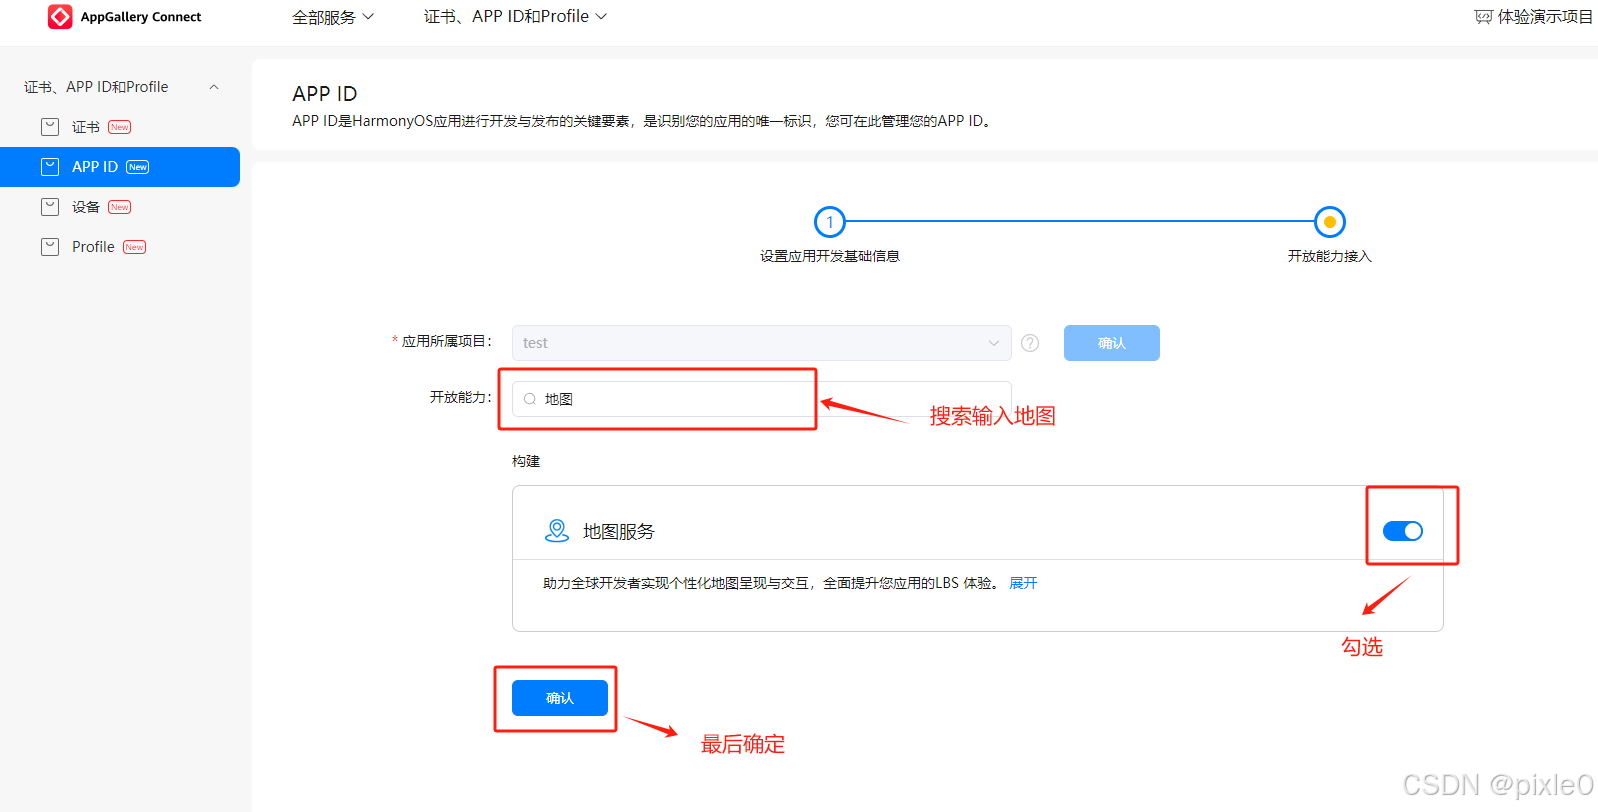
如下图,成功开通

3 、项目代码中修改包名和配置client_id
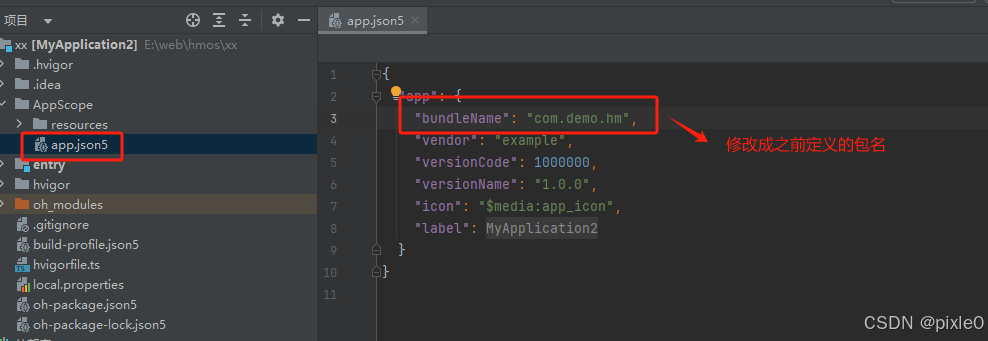
(1)包名修改
AppScope/app.json5
(2)配置client_id
entry/src/main/module.json5,module下
添加:
javascript
 "metadata": [
      {
        "name": "client_id",
        "value": "111xxxxxxx"  // 配置Client ID,从AppGallery 网站获取
      }
    ]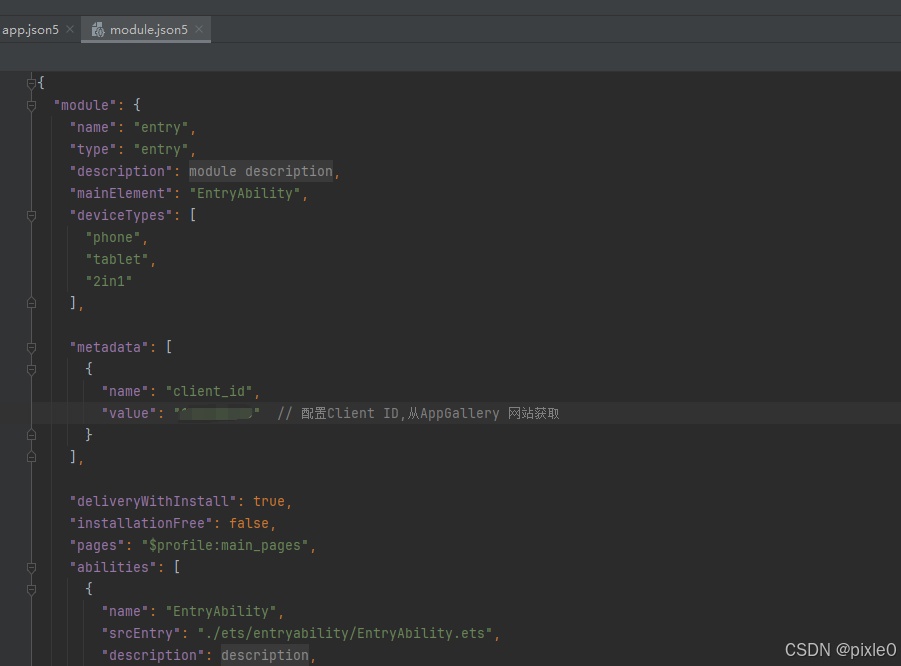
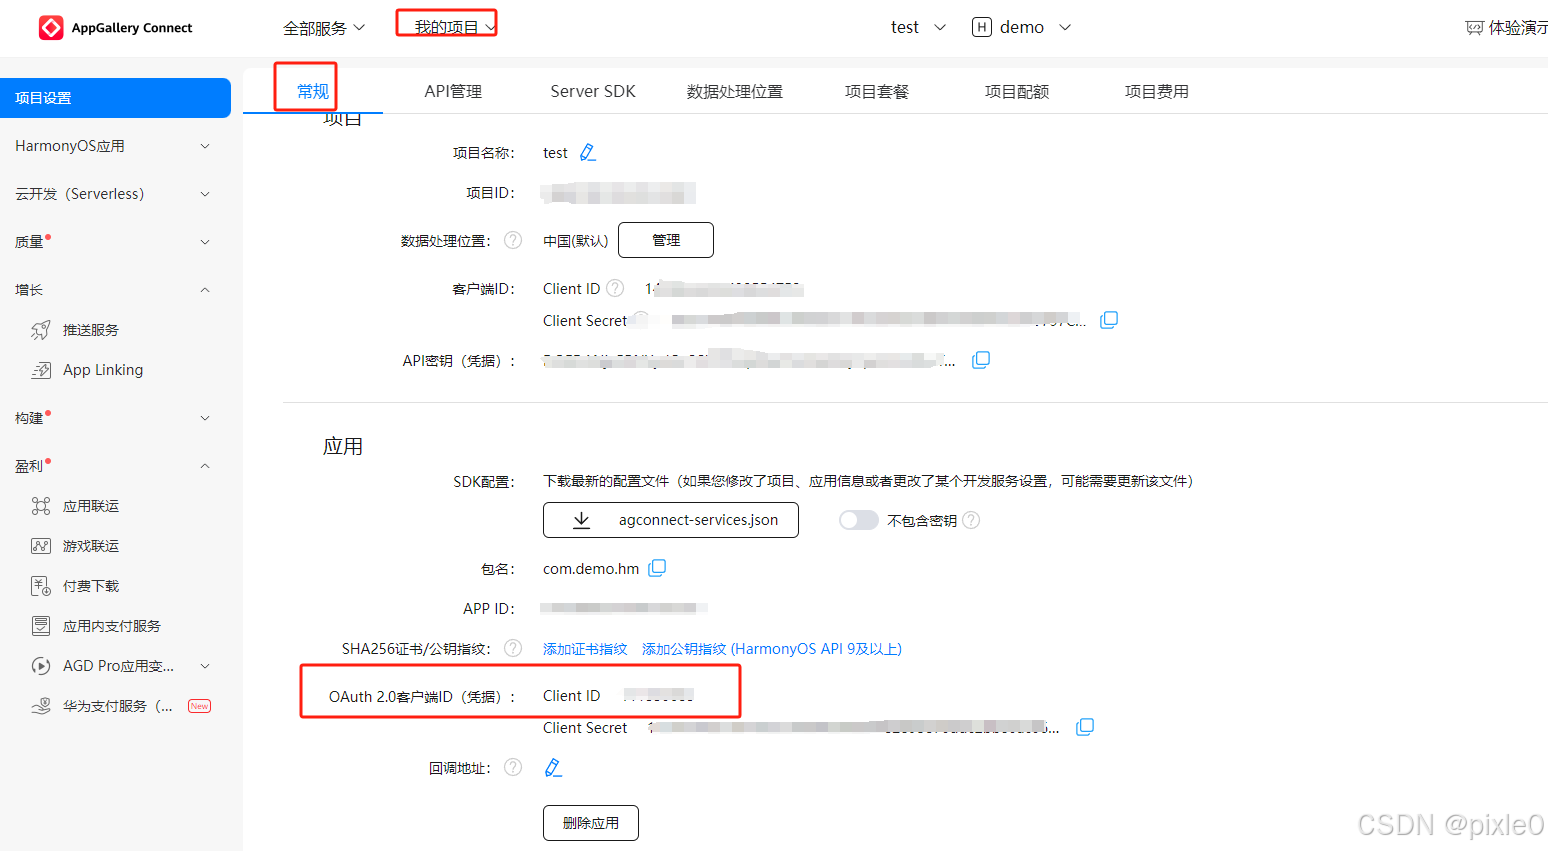
其中 Client ID从AppGallery 我的项目里面获取
4、手动修改签名配置
(1)从AppGallery 新建并下载调试证书或发布证书(调试下载调试证书,上线下载开发证书)


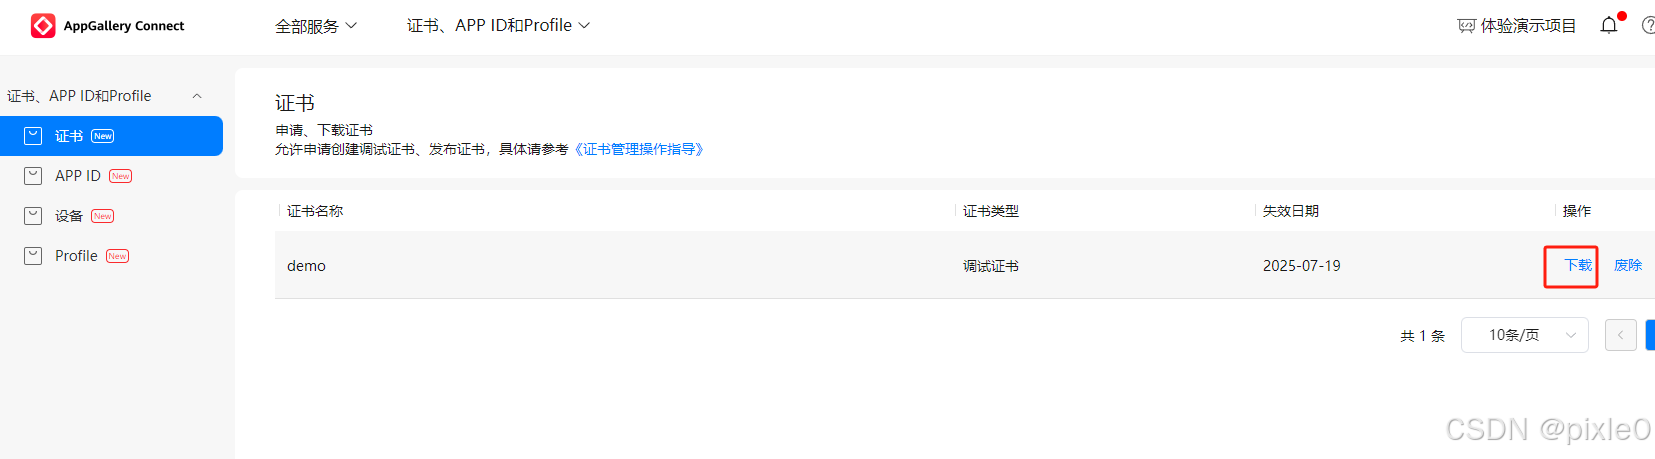
成功后下载,文件格式为(.cer)
(2)从AppGallery 新建并下载Profile文件


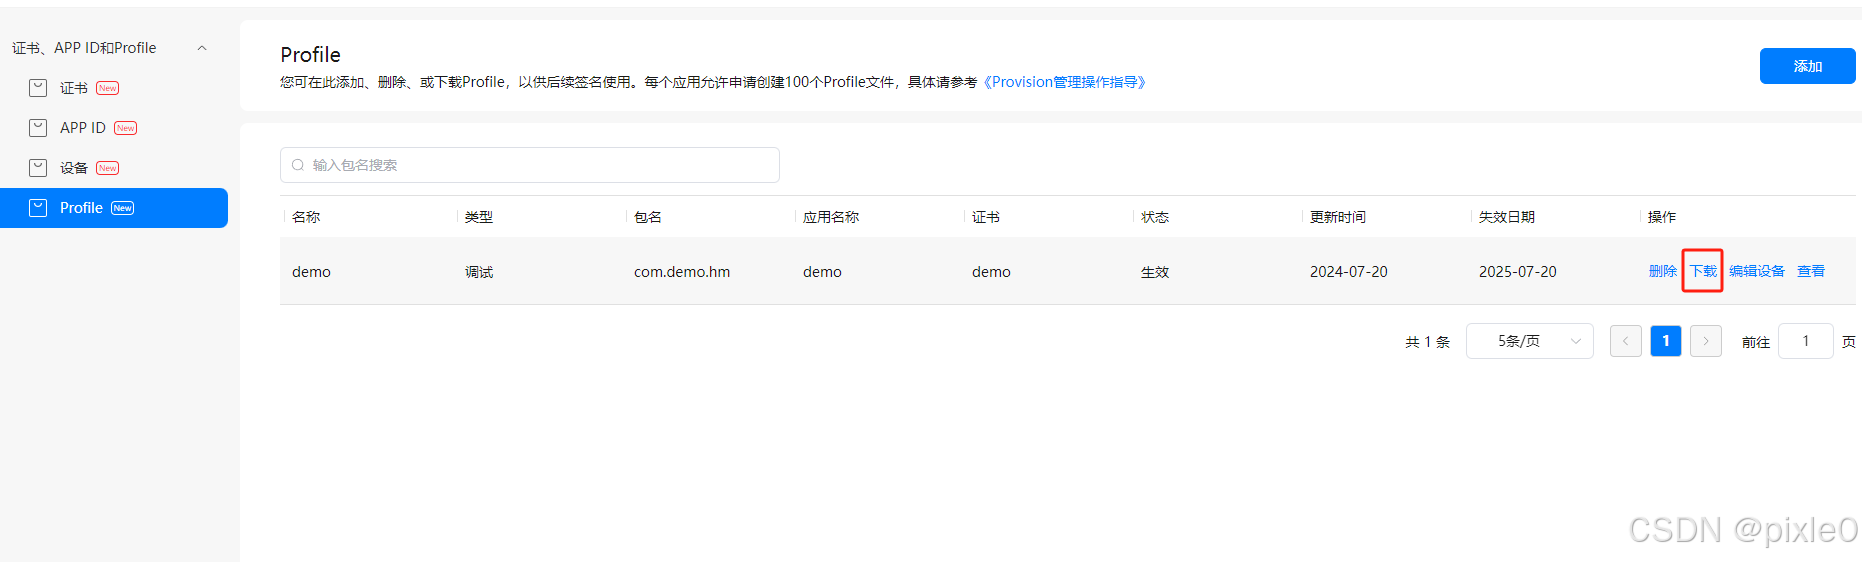
成功后下载,文件格式为(.p7b)
(3)修改签名配置
删除原来的签名配置:项目根目录/build-profile.json5 打开删除app下signingConfigs字段内容

开发工具---文件---项目结构---Signing Configs ,只勾选SupportHarmonyOS,进行手动签名
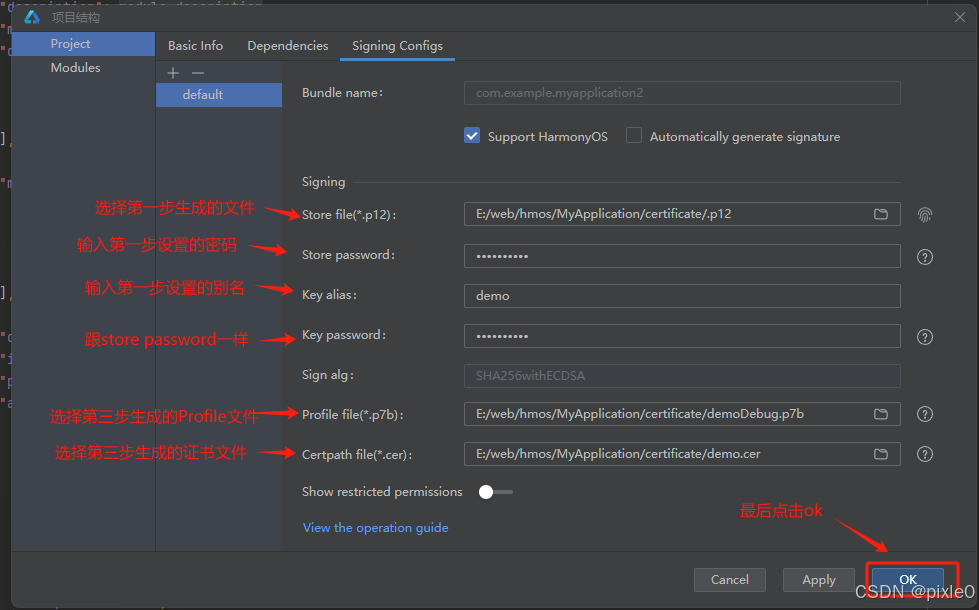
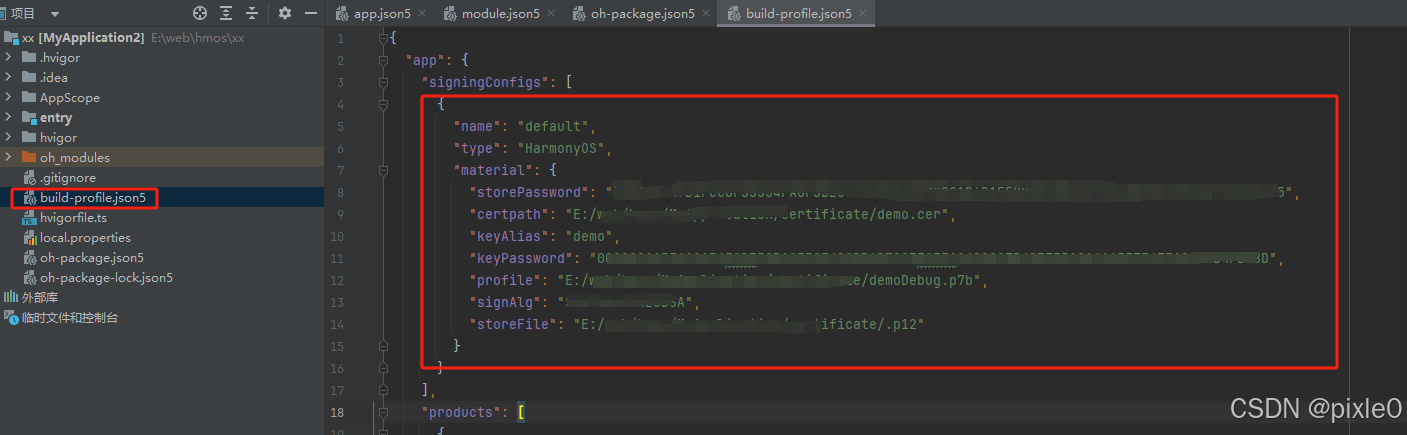
点击ok后build-profile.json5签名配置已更新
5、AppGallery 添加证书指纹、添加公钥指纹
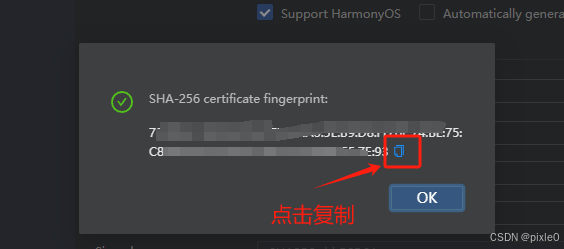
开发工具---文件---项目结构---Signing Configs
点击右边指纹图标

复制证书指纹
在AppGallery---我的项目下添加证书指纹
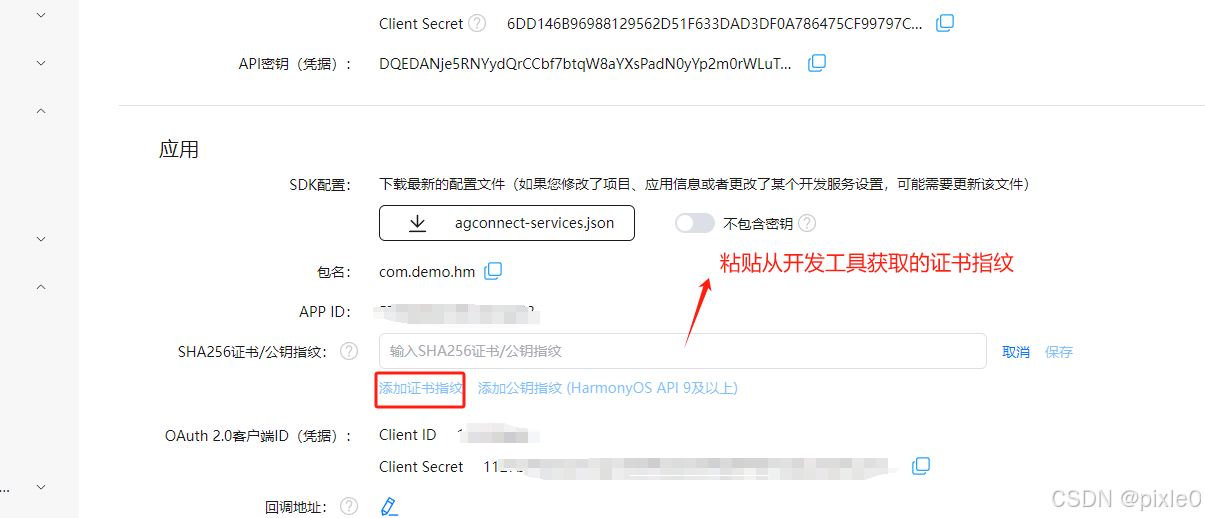
添加公钥指纹


至此所有设置已完成(设置完可能有几分钟的延迟生效),之后就可以愉快开发了
6、引入组件渲染
核心提炼:
组件:
MapComponent({ mapOptions,mapCallback })
其中mapOptions地图初始化配置参数,mapCallback 地图初始化完成回调,回调函数返回mapController(地图控制器),后续其他功能将通过调用mapController API实现
javascript
import { MapComponent, mapCommon, map } from '@kit.MapKit';
import { AsyncCallback } from '@kit.BasicServicesKit';
@Entry
@Component
struct Index{
  private mapOption?: mapCommon.MapOptions; //地图配置
  private callback?: AsyncCallback<map.MapComponentController>; //初始化完成回调
  private mapController?: map.MapComponentController; //地图控制器

  aboutToAppear(): void {
    // 地图初始化参数,设置地图中心点坐标及层级
    this.mapOption = {
      position: {
        target: {
          latitude: 39.9, //纬度
          longitude: 116.4  //经度
        },
        zoom: 10, //缩放层级
        //compassControlsEnabled:true,//是否显示指南针
        //zoomControlsEnabled:true,//是否展示缩放按钮
        //myLocationControlsEnabled:fasle,//是否展示我的位置按钮
        //scaleControlsEnabled:false,//是否展示比例尺
      }
    };

    // 地图初始化的回调
    this.callback = async (err, mapController) => {
      if (!err) {
        // 获取地图的控制器类,用来操作地图
        this.mapController = mapController;
      }
    };
  }

  build() {
    Stack() {
        // 调用MapComponent组件初始化地图
        MapComponent({ mapOptions: this.mapOption, mapCallback: this.callback }).width('100%').height('100%');
    }.height('100%')
  }
}
运行效果:

更多的mapOption属性请 查看官网文档
三、地图组件常用功能
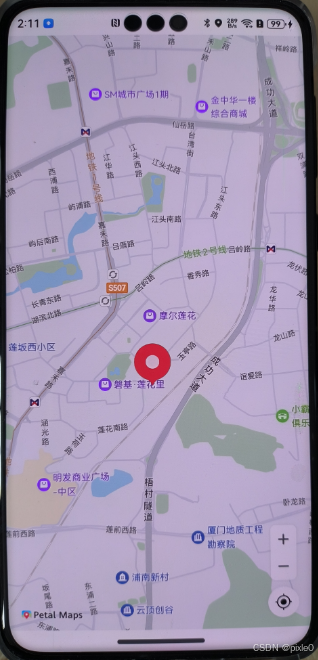
1.开启我的位置
我的位置按钮位于地图右下角默认未开启

关键代码:
javascript
// 启用我的位置图层
this.mapController.setMyLocationEnabled(true);
// 启用我的位置按钮
this.mapController.setMyLocationControlsEnabled(true)
开启我的位置功能需要用到定位权限如下:
javascript
ohos.permission.APPROXIMATELY_LOCATION和ohos.permission.LOCATION使用前需要先申请权限,申请成功后再调用上述代码,地图初始化后定位功能才能生效
entry/src/module.json5添加权限
javascript
requestPermissions: [
      {
        "name": "ohos.permission.INTERNET",
      },
      {
        "name": "ohos.permission.APPROXIMATELY_LOCATION",
        "reason": "$string:reason",
        "usedScene": {
          "abilities": [
            "EntryAbility"
          ],
          "when": "inuse"
        }
      },{
        "name": "ohos.permission.LOCATION",
        "reason": "$string:reason",
        "usedScene": {
          "abilities": [
            "EntryAbility"
          ],
          "when": "inuse"
        }
      }]
Index.ets
javascript
import { MapComponent, mapCommon, map } from '@kit.MapKit';
import { AsyncCallback } from '@kit.BasicServicesKit';
import abilityAccessCtrl, { Permissions } from '@ohos.abilityAccessCtrl';
@Entry
@Component
struct Index {
  private mapOption?: mapCommon.MapOptions; //地图配置
  private callback?: AsyncCallback<map.MapComponentController>; //初始化完成回调
  private mapController?: map.MapComponentController; //地图控制器

  aboutToAppear(): void {
    // 地图初始化参数,设置地图中心点坐标及层级
    this.mapOption = {
      position: {
        target: {
          latitude: 39.9, //纬度
          longitude: 116.4 //经度
        },
        zoom: 10 //缩放级别
      }
    };

    // 地图初始化的回调
    this.callback = async (err, mapController) => {
      if (!err) {
        // 获取地图的控制器类,用来操作地图
        this.mapController = mapController;
        //申请权限
        let list:Array<Permissions>=['ohos.permission.APPROXIMATELY_LOCATION','ohos.permission.LOCATION']
        try {
          await this.applyPermission(getContext(this), list)
         //以下2句启用需在权限申请完后调用,否则首次定位功能不生效
          // 启用我的位置图层
          this.mapController.setMyLocationEnabled(true);
          // 启用我的位置按钮
          this.mapController.setMyLocationControlsEnabled(true)
        }
        catch (e){

        }
      }
    };
  }
  //申请权限
  applyPermission(context: Context,
    permissions: Array<Permissions>): Promise<boolean> {
    let atManager = abilityAccessCtrl.createAtManager();
    return new Promise((resolve: (res: boolean) => void, reject: (e: ESObject) => void) => {
      atManager.requestPermissionsFromUser(context, permissions).then((data) => {
        let grantStatus: Array<number> = data.authResults;
        resolve(grantStatus.every(item => item === 0))
      }).catch((err: ESObject) => {
        reject(err)
      })

    })
  }


  build() {
    Stack() {
      // 调用MapComponent组件初始化地图
      MapComponent({ mapOptions: this.mapOption, mapCallback: this.callback }).width('100%').height('100%');
    }.height('100%')
  }
}
说明:地图初始化回调函数内进行定位权限申请,申请成功后启用我的位置图层和启用我的位置按钮,权限申请只会首次弹窗提示,允许后再次运行不会弹窗
运行效果:

2.移动地图位置
api:
// 以非动画方式移动地图相机
mapController.moveCamera(cameraUpdate);
// 以动画方式移动地图相机
mapController.animateCamera(cameraUpdate, 1000);
示例:
javascript
 // 创建CameraUpdate对象
        let cameraPosition: mapCommon.CameraPosition = {
          target: {//地图中心点经纬度
            latitude: 32.0,
            longitude: 118.0
          },
          zoom: 15,//缩放等级
        };
        let cameraUpdate = map.newCameraPosition(cameraPosition);
        // 以非动画方式移动地图相机
        this.mapController?.moveCamera(cameraUpdate);
        // 以动画方式移动地图相机
        this.mapController?.animateCamera(cameraUpdate, 1000);
3.地图标点
api:
mapController.addMarker(markerOptions);
示例:
默认图标
javascript
        let markerOptions: mapCommon.MarkerOptions = {
            position: {//标点经纬度
              latitude: 24.2646,
              longitude: 118.0404
            },
           // rotation: 0,//标记旋转角度
          //  alpha: 1,//标记透明度
           // clickable: true,//是否可点击
           // draggable: true, //是否可拖拽
           // icon:'xxxxx'//自定义图标,不设显示默认图标
          };
        // 创建Marker
        this.marker = await this.mapController.addMarker(markerOptions);
加载本地自定义图标:
javascript
     let markerOptions: mapCommon.MarkerOptions = {
          position: {//标点经纬度
            latitude: 24.4846,
            longitude: 118.1304
          },
          icon:$r('app.media.remark')//自定义图标,不设显示默认图标
        }
      // 创建Marker
this.marker = await this.mapController.addMarker(markerOptions); 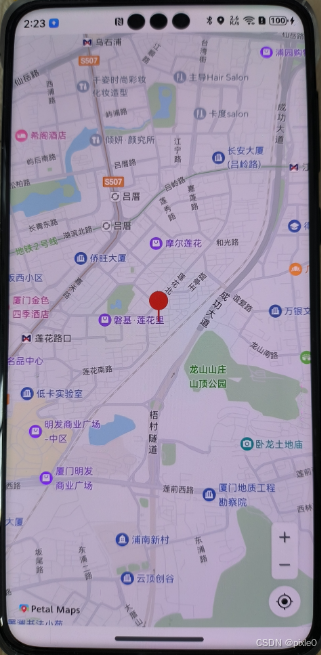
本地图标存放在resources/rawfile或者resources/base/media
加载网络图标:
icon属性不支持直接引用在线图片url,但支持base64或者PixleMap类型,所以想要显示网络图片需要把图片转为base64或者PixelMap。
从官方文档看markerOptions属性未找到icon尺寸设置,像默认图标和本地图标和base64图标无法设置大小,想设置图标大小只能从PixelMap入手
代码示例:
javascript
import { MapComponent, mapCommon, map } from '@kit.MapKit';
import { AsyncCallback, BusinessError } from '@kit.BasicServicesKit';
import http from '@ohos.net.http';
import { image } from '@kit.ImageKit';


@Entry
@Component
struct Index {
  @State markerIcon: PixelMap | null = null//标点图标
  private mapOption?: mapCommon.MapOptions; //地图配置
  private callback?: AsyncCallback<map.MapComponentController>; //初始化完成回调
  private mapController?: map.MapComponentController; //地图控制器

  /**
   * //在线图片转PixelMap
   * @param imageUrl:在线图片链接
   * @param opt:图像解码设置选项
   * @returns Promise<PixelMap>
   */
  imageToPixelMap(imageUrl: string, opt: image.DecodingOptions): Promise<PixelMap> {
    let httpRequest = http.createHttp()
    return new Promise((resolve: (pixleMap: PixelMap) => void, reject: (err: BusinessError) => void) => {
      httpRequest.request(imageUrl,
        (err, data) => {
          if (!err) {
            let arrayBuffer: ArrayBuffer = data.result as ArrayBuffer
            let imageSource: image.ImageSource = image.createImageSource(arrayBuffer);
            imageSource.createPixelMap(opt).then((pixelMap: image.PixelMap) => {
              resolve(pixelMap)
            }).catch((error: BusinessError) => {
              reject(error)
            })
          } else {
            reject(err)
          }
        })

    })

  }

  async aboutToAppear() {
    // 地图初始化参数,设置地图中心点坐标及层级
    this.mapOption = {
      position: {
        target: {
          latitude: 24.4846,
          longitude: 118.1304
        },
        zoom: 15, //缩放层级
      }
    };

    // 地图初始化的回调
    this.callback = async (err, mapController) => {
      if (!err) {
        // 获取地图的控制器类,用来操作地图
        this.mapController = mapController;

        let markerOptions: mapCommon.MarkerOptions = {
          position: {
            //标点经纬度
            latitude: 24.4846,
            longitude: 118.1304
          },
          icon: this.markerIcon ?? ''
        }
        // 创建Marker
        await this.mapController?.addMarker(markerOptions);

      }
    };

    //设置图片120x120尺寸,单位px
    let opt: image.DecodingOptions = { desiredSize: { height: 120, width: 120 } }
    this.markerIcon = await this.imageToPixelMap('https://img2.baidu.com/it/u=2105446738,2493267053&fm=253&fmt=auto&app=138&f=JPEG?w=800&h=800', opt)

  }

  build() {
    Stack() {
      //防止异步问题
      if(this.markerIcon ){
        MapComponent({ mapOptions: this.mapOption, mapCallback: this.callback }).width('100%').height('100%');
      }
    }.height('100%')
  }
}
运行效果:

更多markerOptions属性请查看官网文档
4.信息窗口
默认信息窗口
javascript
      //标点
        let markerOptions: mapCommon.MarkerOptions = {
          position: {//标点经纬度
            latitude: 24.4846,
            longitude: 118.1304
          },
        };

        // 创建Marker
        this.marker = await this.mapController.addMarker(markerOptions);
        // 设置信息窗的标题
        this.marker.setTitle('厦门');
        // 设置信息窗的子标题
        this.marker.setSnippet('湖里区店');
        // 设置信息窗可点击
        this.marker.setClickable(true);
        // 设置信息窗的锚点位置
        this.marker.setInfoWindowAnchor(1,1);
        // 设置信息窗可见
        this.marker.setInfoWindowVisible(true);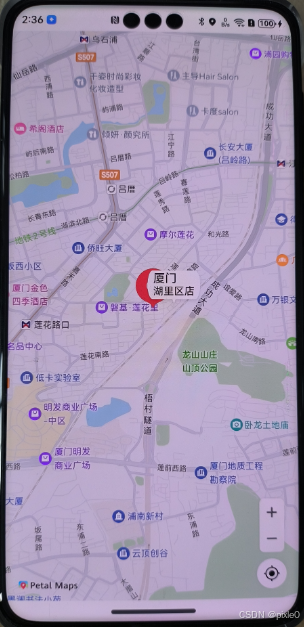
自定义信息窗口
api提炼:
//MapComponent组件第三个参数传入自定义信息窗Builder
MapComponent({ mapOptions,mapCallback,customInfoWindow })
// 设置信息窗可见marker.setInfoWindowVisible(true);
//监听标记点击事件mapController.on("markerClick", (marker) => {
})
点击标点显示自定义信息窗示例:
javascript
import { MapComponent, mapCommon, map } from '@kit.MapKit';
import { AsyncCallback } from '@kit.BasicServicesKit';

@Entry
@Component
struct Index {
  private mapOption?: mapCommon.MapOptions; //地图配置
  private callback?: AsyncCallback<map.MapComponentController>; //初始化完成回调
  private mapController?: map.MapComponentController; //地图控制器
  private marker?: map.Marker

  aboutToAppear(): void {
    // 地图初始化参数,设置地图中心点坐标及层级
    this.mapOption = {
      position: {
        target: {
          latitude: 24.4846,
          longitude: 118.1304
        },
        zoom: 15 //缩放级别
      }
    };

    // 地图初始化的回调
    this.callback = async (err, mapController) => {
      if (!err) {
        // 获取地图的控制器类,用来操作地图
        this.mapController = mapController;
        //标点
        let markerOptions: mapCommon.MarkerOptions = {
          position: {
            //标点经纬度
            latitude: 24.4846,
            longitude: 118.1304
          },
          clickable: true,
          title: '自定义标题'//窗口标题必须设置,不然窗口不显示
        };

        // 创建Marker
        this.marker = await this.mapController.addMarker(markerOptions);
         //标点点击监听,点击标点显示信息窗口
        this.mapController.on("markerClick", (marker) => {
          // 设置信息窗的锚点位置
          this.marker?.setInfoWindowAnchor(2, 2);
          // 设置信息窗可见
          this.marker?.setInfoWindowVisible(true);
        });

      }
    };
  }


  // 自定义信息窗BuilderParam
  @BuilderParam customInfoWindow: ($$: map.MarkerDelegate) => void = this.customInfoWindowBuilder;

  // 自定义信息窗Builder
  @Builder
  customInfoWindowBuilder($$: map.MarkerDelegate) {
    Column() {
      Text('自定义信息窗口').fontColor(Color.White)
    }
    .width(150)
    .height(50)
    .backgroundColor(Color.Green)
    .borderRadius(10)
    .justifyContent(FlexAlign.Center)
  }

  build() {
    Stack({ alignContent: Alignment.BottomStart }) {
      // 调用MapComponent组件初始化地图
      MapComponent({
        mapOptions: this.mapOption, mapCallback: this.callback,
        customInfoWindow: this.customInfoWindow
      }).width('100%').height('100%');

    }.height('100%')
  }
}
运行效果:

ps:markerOptions的title属性必须设置,不然窗口无法正常显示
5.画路线
api提炼:
mapController.addPolyline(polylineOption);
示例:
javascript
import { MapComponent, mapCommon, map } from '@kit.MapKit';
import { AsyncCallback } from '@kit.BasicServicesKit';

@Entry
@Component
struct Index {
  private mapOption?: mapCommon.MapOptions; //地图配置
  private callback?: AsyncCallback<map.MapComponentController>; //初始化完成回调
  private mapController?: map.MapComponentController; //地图控制器
  private marker?: map.Marker

  aboutToAppear(): void {
    // 地图初始化参数,设置地图中心点坐标及层级
    this.mapOption = {
      position: {
        target: {
          latitude: 31.98,
          longitude: 118.78
        },
        zoom: 15 //缩放级别
      }
    };

    // 地图初始化的回调
    this.callback = async (err, mapController) => {
      if (!err) {
        // 获取地图的控制器类,用来操作地图
        this.mapController = mapController;

        // polyline初始化参数
        let polylineOption: mapCommon.MapPolylineOptions = {
          points: [{longitude:118.78,latitude:31.975}, {longitude:118.78,latitude:31.982}, {longitude:118.79,latitude:31.985}],//所有点经纬度
          clickable: true,
          jointType: mapCommon.JointType.BEVEL,//拐点样式
          width: 10,//线宽
          color:0xffff00ff,//线颜色
        }
        // 创建polyline
         await this.mapController.addPolyline(polylineOption);

      }
    };
  }


  build() {
    Stack({ alignContent: Alignment.BottomStart }) {
      // 调用MapComponent组件初始化地图
      MapComponent({ mapOptions: this.mapOption, mapCallback: this.callback,  }).width('100%').height('100%');
    }.height('100%')
  }
}
运行效果:

6.标点聚合
api提炼:
mapController.addClusterOverlay(mapCommon.ClusterOverlayParams)
mapCommon.ClusterOverlayParams = { distance: Number, clusterItems: array },其中distance 表示2点之间距离多少vp开始聚合,clusterItems:带聚合点坐标
示例:
javascript
import { MapComponent, mapCommon, map } from '@kit.MapKit';
import { AsyncCallback } from '@kit.BasicServicesKit';

@Entry
@Component
struct Index {
  private mapOption?: mapCommon.MapOptions;
  private mapController?: map.MapComponentController;
  private callback?: AsyncCallback<map.MapComponentController>;

  aboutToAppear(): void {
    this.mapOption = {
      position: {
        target: {
          latitude: 31.98,
          longitude: 118.7
        },
        zoom: 7
      }
    }

    this.callback = async (err, mapController) => {
      if (!err) {
        this.mapController = mapController;
        // 生成待聚合点
        let clusterItem1: mapCommon.ClusterItem = {
          position: {
            latitude: 31.98,
            longitude: 118.7
          }
        };
        let clusterItem2: mapCommon.ClusterItem = {
          position: {
            latitude: 32.99,
            longitude: 118.9
          }
        };
        let clusterItem3: mapCommon.ClusterItem = {
          position: {
            latitude: 31.5,
            longitude: 118.7
          }
        };
        let clusterItem4: mapCommon.ClusterItem = {
          position: {
            latitude: 30,
            longitude: 118.7
          }
        };
        let clusterItem5: mapCommon.ClusterItem = {
          position: {
            latitude: 29.98,
            longitude: 117.7
          }
        };
        let clusterItem6: mapCommon.ClusterItem = {
          position: {
            latitude: 31.98,
            longitude: 120.7
          }
        };
        let clusterItem7: mapCommon.ClusterItem = {
          position: {
            latitude: 25.98,
            longitude: 119.7
          }
        };
        let clusterItem8: mapCommon.ClusterItem = {
          position: {
            latitude: 30.98,
            longitude: 110.7
          }
        };
        let clusterItem9: mapCommon.ClusterItem = {
          position: {
            latitude: 30.98,
            longitude: 115.7
          }
        };
        let clusterItem10: mapCommon.ClusterItem = {
          position: {
            latitude: 28.98,
            longitude: 122.7
          }
        };
        let array: Array<mapCommon.ClusterItem> = [
          clusterItem1,
          clusterItem2,
          clusterItem3,
          clusterItem4,
          clusterItem5,
          clusterItem6,
          clusterItem7,
          clusterItem8,
          clusterItem9,
          clusterItem10
        ]
        //模拟更多点
        for(let index = 0; index < 100; index++){
          array.push(clusterItem1)
        }
        //模拟更多点
        for(let index = 0; index < 10; index++){
          array.push(clusterItem2)
        }
        // 生成聚合图层的入参 聚合distance设置为100vp
        let clusterOverlayParams: mapCommon.ClusterOverlayParams = { distance: 100, clusterItems: array };
        // 调用addClusterOverlay生成聚合图层
        await this.mapController.addClusterOverlay(clusterOverlayParams);

      }
    }
  }

  build() {
    Stack() {
      Column() {
        MapComponent({ mapOptions: this.mapOption, mapCallback: this.callback })
          .width('100%')
          .height('100%');
      }.width('100%')
    }.height('100%')
  }
}
运行效果:

总结
以上就是地图组件加载和最常用的功能示例讲解,官方地图组件还有很多其他功能诸如画圆形区域、点注释、覆盖物、动态轨迹等,更多使用请查看官方文档