一、配置一主两从mysql服务器(mysql5.7)
1.主服务器master
下载mysql5.7的包
root@Mysql \~# rz -E
rz waiting to receive.
root@Mysql \~# ls
anaconda-ks.cfg mysql-5.7.44-linux-glibc2.12-x86_64.tar.gz
#解压
root@Mysql \~# tar -zxf mysql-5.7.44-linux-glibc2.12-x86_64.tar.gz
#复制
root@Mysql \~# cp -r mysql-5.7.44-linux-glibc2.12-x86_64 /usr/local/mysql
#清理环境
root@Mysql \~# rm -rf /etc/my.cnf
#创建mysql-files
root@Mysql \~# mkdir /usr/local/mysql/mysql-files
#创建账户
root@Mysql \~# useradd -r -s /sbin/nologin mysql
#更改用户和组
root@Mysql \~# chown mysql:mysql /usr/local/mysql/mysql-files/
#修改权限
root@Mysql \~# chmod 750 /usr/local/mysql/mysql-files/
#初始化
root@Mysql \~# /usr/local/mysql/bin/mysqld --initialize --user=mysql --basedir=/usr/local/mysql
2024-08-20T07:25:10.817991Z 1 Note A temporary password is generated for root@localhost: t6>CSyHJe/s?
#查看mysql目录,看是否有data,有data表明初始化成功
root@Mysql \~# ls /usr/local/mysql/
bin data docs include lib LICENSE man mysql-files README share support-files
#复制mysql.server,方便启动服务
root@Mysql \~# cp /usr/local/mysql/support-files/mysql.server /etc/init.d/mysql57
#启动服务
root@Mysql \~# service mysql57 start
Starting MySQL.Logging to '/usr/local/mysql/data/Mysql.err'.
SUCCESS!
#编辑mysql.conf配置文件
root@Mysql \~# vim /usr/local/mysql/my.cnf
#重新启动服务
root@Mysql \~# service mysql57 restart
Shutting down MySQL.. SUCCESS!
Starting MySQL.Logging to '/usr/local/mysql/data/db01-master.err'.
SUCCESS!
#写入环境变量,方便登录
root@Mysql \~# sed -i 'aexport PATH=/usr/local/mysql/bin:PATH' /etc/profile
root@Mysql \~# source /etc/profile
#若在写入环境变量时出错,可运行下面指令进行恢复,随后再次执行写入环境变量的指令即可
root@Mysql \~# export PATH=/usr/local/sbin:/usr/local/bin:/sbin:/bin:/usr/sbin:/us
root@Mysql \~# source /etc/profile
#登录mysql
#注意这里的密码是前面自动生成的:t6>CSyHJe/s
root@Mysql \~# mysql -uroot -p
Enter password:
Welcome to the MySQL monitor. Commands end with ; or \g.
#修改密码
mysql> set password='1';
Query OK, 0 rows affected (0.00 sec)
#退出,使用新密码登录
mysql> quit
Bye
#登录
root@Mysql \~# mysql -uroot -p1
#创建eleme数据库
mysql> create database if not exists eleme charset utf8mb4;
Query OK, 1 row affected (0.00 sec)
#使用数据库
mysql> use eleme;
Database changed
#创建表t_user
mysql> create table t_user(id int primary key auto_increment,name varchar(45) not null,
username varchar(45) not null,password varchar(45) not null,remark varchar(45) not null);
Query OK, 0 rows affected (0.01 sec)
#查看表
mysql> desc t_user;
+----------+-------------+------+-----+---------+----------------+
| Field | Type | Null | Key | Default | Extra |
+----------+-------------+------+-----+---------+----------------+
| id | int(11) | NO | PRI | NULL | auto_increment |
| name | varchar(45) | NO | | NULL | |
| username | varchar(45) | NO | | NULL | |
| password | varchar(45) | NO | | NULL | |
| remark | varchar(45) | NO | | NULL | |
+----------+-------------+------+-----+---------+----------------+
5 rows in set (0.01 sec)
#向表中添加数据
mysql>insert into t_user (id,name,username,password,remark)values
("1","超级管理员","admin","admin","超级管理员");
Query OK, 1 row affected (0.00 sec)
mysql>insert into t_user (id,name,username,password,remark)values
("2","普通用户","guest","guest","普通用户");
Query OK, 1 row affected (0.01 sec)
#查看表中数据
mysql> select * from t_user;
+----+-----------------+----------+----------+-----------------+
| id | name | username | password | remark |
+----+-----------------+----------+----------+-----------------+
| 1 | 超级管理员 | admin | admin | 超级管理员 |
| 2 | 普通用户 | guest | guest | 普通用户 |
+----+-----------------+----------+----------+-----------------+
2 rows in set (0.00 sec)
#为从服务器添加用户
mysql> create user 'Slave01'@'%' identified by '1';
mysql> create user 'Slave02'@'%' identified by '1';
#授权
mysql> grant replication slave on *.* to 'Slave01'@'%';
mysql> grant replication slave on *.* to 'Slave02'@'%';
#刷新
mysql> flush privileges;
#查看
mysql> select host,user from mysql.user;
+-----------+---------------+
| host | user |
+-----------+---------------+
| % | Slave01 |
| % | Slave02 |
| localhost | mysql.session |
| localhost | mysql.sys |
| localhost | root |
+-----------+---------------+
5 rows in set (0.00 sec)
#锁表
mysql> flush tables with read lock;
Query OK, 0 rows affected (0.00 sec)
#查看二进制文件
mysql> show master status;
+---------------+----------+--------------+------------------+-------------------+
| File | Position | Binlog_Do_DB | Binlog_Ignore_DB | Executed_Gtid_Set |
+---------------+----------+--------------+------------------+-------------------+
| binlog.000001 | 2594 | | | |
+---------------+----------+--------------+------------------+-------------------+
1 row in set (0.00 sec)
2.从服务器Slave01
#使用scp将master上的mysql5.7包传给slave
root@Slave01 \~# scp root@192.168.1.29:~/mysql-5.7.44-linux-glibc2.12-x86_64.tar.gz ./
#解压
root@Slave01 \~# tar -xvf mysql-5.7.44-linux-glibc2.12-x86_64.tar.gz
#复制目录
root@Slave01 \~# cp -r mysql-5.7.44-linux-glibc2.12-x86_64 /usr/local/mysql
#在master和slave上下载rsync
root@Slave01 \~# yum -y install rsync
#在master操作:
root@Mysql \~# yum -y install rsync
#删除auto.cnf
root@Mysql \~# cd /usr/local/mysql/data/
root@Mysql data# ls
auto.cnf ca.pem eleme ib_logfile1 Mysql.pid server-cert.pem
binlog.000001 client-cert.pem ib_buffer_pool ibtmp1 performance_schema server-key.pem
binlog.index client-key.pem ibdata1 mysql private_key.pem sys
ca-key.pem db01-master.err ib_logfile0 Mysql.err public_key.pem
删除文件
root@Mysql data# rm -rf auto.cnf
#同步数据
root@Mysql \~# rsync -av /usr/local/mysql/data root@192.168.1.30:/usr/local/mysql/
#回到slave操作:
root@Slave01 \~# #查看同步
root@Slave01 \~# ls /usr/local/mysql/
bin data docs include lib LICENSE man README share support-files
#若存在data目录,则同步成功
root@Slave01 \~# #清理环境
root@Slave01 \~# rm -rf /etc/my.cnf
root@Slave01 \~# mkdir /usr/local/mysql/mysql-files
root@Slave01 \~# useradd -r -s /sbin/nologin mysql
root@Slave01 \~# chown mysql:mysql /usr/local/mysql/mysql-files/
root@Slave01 \~# chmod 750 /usr/local/mysql/mysql-files/
root@Slave01 \~# cp /usr/local/mysql/support-files/mysql.server /etc/init.d/mysql57
root@Slave01 \~# service mysql57 start
Starting MySQL.Logging to '/usr/local/mysql/data/Slave01.err'.
SUCCESS!
#编辑配置文件
root@Slave01 \~# vim /usr/local/mysql/my.cnf
mysqld
basedir=/usr/local/mysql
datadir=/usr/local/mysql/data
socket=/tmp/mysql.sock
port=3310
log-error=/usr/local/mysql/data/db01-slave.err
relay-log=/usr/local/mysql/data/relaylog
server-id=11
character_set_server=utf8mb4
#重启
root@Slave01 \~# service mysql57 restart
Shutting down MySQL.. SUCCESS!
Starting MySQL.Logging to '/usr/local/mysql/data/db01-slave.err'.
SUCCESS!
#修改环境变量
root@Slave01 \~# sed -i 'aexport PATH=/usr/local/mysql/bin:PATH' /etc/profile
#让配置文件生效
root@Slave01 \~# source /etc/profile
root@Slave01 \~# mysql -uroot -p
#指定主服务器,实现数据同步
mysql> change master to
-> master_host='192.168.1.29',
-> master_user='Slave01',
-> master_password='1',
-> master_port=3306,
-> master_log_file='binlog.000001',
-> master_log_pos=2594;
Query OK, 0 rows affected, 2 warnings (0.27 sec)
#启动slave
mysql> start slave;
Query OK, 0 rows affected (0.00 sec)
#查看slave状态
mysql> show slave status\G;
*************************** 1. row ***************************
Slave_IO_State: Connecting to master
Master_Host: 192.168.1.29
Master_User: Slave01
Master_Port: 3306
Connect_Retry: 60
Master_Log_File: binlog.000001
Read_Master_Log_Pos: 2594
Relay_Log_File: relaylog.000001
Relay_Log_Pos: 4
Relay_Master_Log_File: binlog.000001
Slave_IO_Running: Connecting
Slave_SQL_Running: Yes
#发现为连接状态,退出
mysql> quit
#回到master,解锁
root@Mysql \~# service mysql57 restart
root@Mysql \~# mysql -uroot -p1
#解锁
mysql> unlock tables;
Query OK, 0 rows affected (0.00 sec)
#重新获取二进制文件
mysql> show master status;
+---------------+----------+--------------+------------------+-------------------+
| File | Position | Binlog_Do_DB | Binlog_Ignore_DB | Executed_Gtid_Set |
+---------------+----------+--------------+------------------+-------------------+
| binlog.000002 | 458 | | | |
+---------------+----------+--------------+------------------+-------------------+
1 row in set (0.00 sec)
#回到slave操作
#获得公钥
root@Slave01 \~# mysql -uSlave01 -p1 -h 192.168.1.29 -P3306 --get-server-public-key
mysql> quit
Bye
#登录
root@Slave01 \~# mysql -uroot -p
#停止slave
mysql> stop slave;
Query OK, 0 rows affected (0.00 sec)
#与master建立连接
mysql> change master to
-> master_host='192.168.1.29',
-> master_user='Slave01',
-> master_password='1',
-> master_port=3306,
-> master_log_file='binlog.000002',
-> master_log_pos=458;
Query OK, 0 rows affected, 2 warnings (0.02 sec)
#启动slave
mysql> start slave;
Query OK, 0 rows affected (0.01 sec)
#查看
mysql> show slave status\G;
*************************** 1. row ***************************
Slave_IO_State: Waiting for master to send event
Master_Host: 192.168.1.29
Master_User: Slave01
Master_Port: 3306
Connect_Retry: 60
Master_Log_File: binlog.000002
Read_Master_Log_Pos: 458
Relay_Log_File: relaylog.000002
Relay_Log_Pos: 317
Relay_Master_Log_File: binlog.000002
Slave_IO_Running: Yes
Slave_SQL_Running: Yes
#发现为ok状态,连接成功
#验证同步数据
mysql> show databases;
+--------------------+
| Database |
+--------------------+
| information_schema |
| eleme |
| mysql |
| performance_schema |
| sys |
+--------------------+
5 rows in set (0.01 sec)
mysql> use eleme;
Reading table information for completion of table and column names
You can turn off this feature to get a quicker startup with -A
Database changed
mysql> select * from t_user;
+----+-----------------+----------+----------+-----------------+
| id | name | username | password | remark |
+----+-----------------+----------+----------+-----------------+
| 1 | 超级管理员 | admin | admin | 超级管理员 |
| 2 | 普通用户 | guest | guest | 普通用户 |
+----+-----------------+----------+----------+-----------------+
2 rows in set (0.00 sec)
3.从服务器Slave02
配置步骤与Slave01一样
二、搭建mycat
首先下载并且解压安装包

然后复制目录并且改名
root@mycat \~# cp -r jdk1.8.0_192/ /usr/local/jdk
root@mycat \~# cp -r mycat/ /usr/local/
查看并且配置jdk环境
root@mycat \~# sed -i '$aexport JAVA_HOME=/usr/local/jdk' /etc/profile
root@mycat \~# source /etc/profile
root@mycat \~# sed -i 'aexport PATH=PATH:$JAVA_HOME/bin' /etc/profile
root@mycat \~# source /etc/profile
#配置文件
vim /usr/local/mycat/conf/server.xml
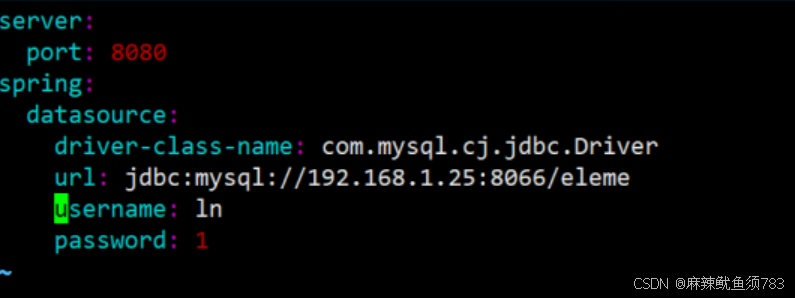
"ln"是master创建用于被访问的
去master机器创建
create user 'ln'@'%' identified by '1';
grant all on *.* to 'ln'@'%';
flush privileges;
#编辑配置文件
vim /usr/local/mycat/conf/schema.xml
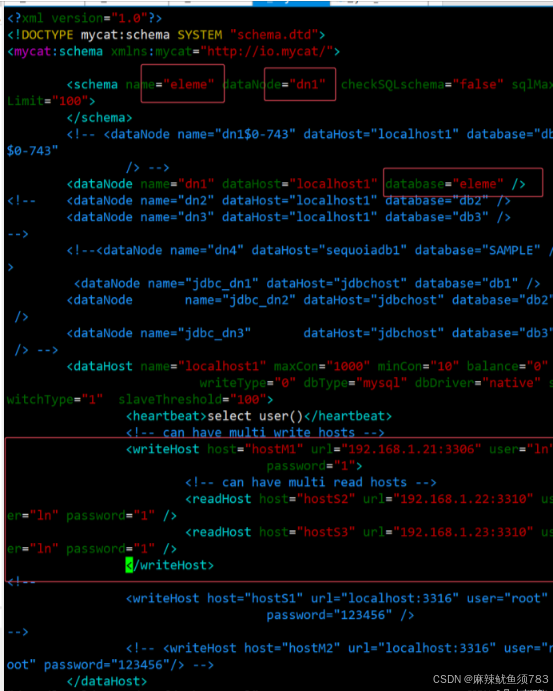
#启动服务
/usr/local/mycat/bin/mycat start
#检查启动的是否成功
root@mycat ~]# netstat -lnput|grep 8066
tcp6 0 0 :::8066 :::* LISTEN 4547/java
#开启8080端口和3310端口
firewall-cmd --zone=public --add-port=8080/tcp --permanent
firewall-cmd --zone=public --add-port=3310/tcp --permanent
firewall-cmd --reload
三、搭建Java_static
下载下图软件包并且解压jdk包
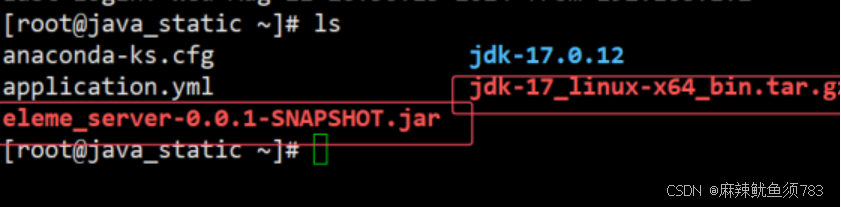
解压完成以后cp jdk 目录,复制到/usr/local底下
cp -r jdk-17.0.12/ /usr/local/jdk
再部署环境变量
vim /etc/profile
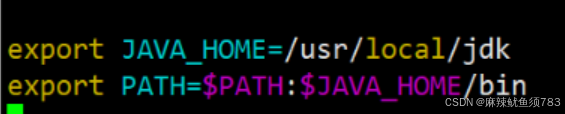
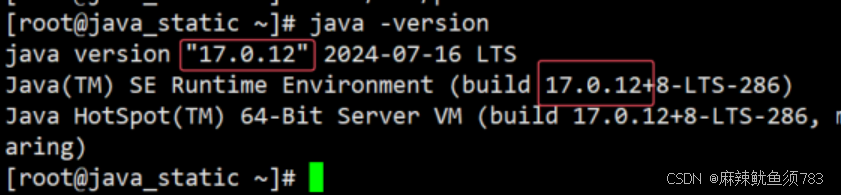
检验Java版本
然后创建一个文件
vim application.yml
再上传一个包直接用Java运行它
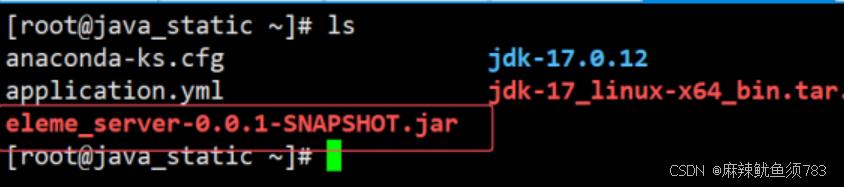
java -jar eleme_server-0.0.1-SNAPSHOT.jar
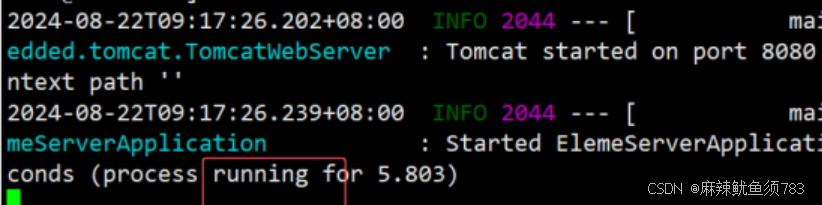
然后去浏览器访问Java_static的地址加8080端口

账户密码都用admin测试

登录成功!
四、使⽤lvs代理java服务
- ds
(1) 挂载vip
ifconfig ens33:0 192.168.1.41 broadcast 192.168.1.41 netmask 255.255.255.255 up
(2) 为vip添加路由
route add 192.168.1.41 dev ens33:0
(3)安装ipvsadm
yum -y install ipvsadm
ipvsadm -Ln
ipvsadm -C
(4) 设置负载均衡规则
ipvsadm -A -t 192.168.1.41:8080 -s rr
ipvsadm -a -t 192.168.1.41:8080 -r
192.168.1.26 -g
ipvsadm -a -t 192.168.1.41:8080 -r
192.168.1.27 -g
- rs
(1)挂载vip
ifconfig lo:0 192.168.1.41 broadcast 192.168.1.41 netmask 255.255.255.255 up
(2)为vip 添加路由
route add 192.168.1.41 dev lo:0
(3)抑制接受请求
echo 1 > /proc/sys/net/ipv4/conf/lo/arp_ignore
echo 2 > /proc/sys/net/ipv4/conf/lo/arp_announce
echo 1 > /proc/sys/net/ipv4/conf/all/arp_ignore
echo 2 >/proc/sys/net/ipv4/conf/all/arp_announce
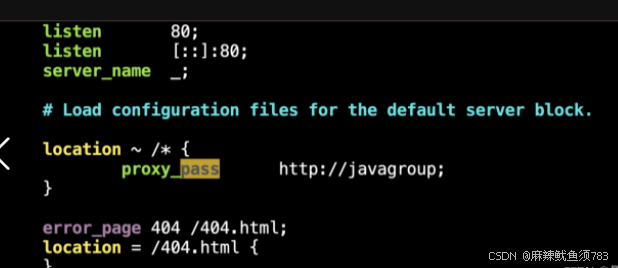
五、Nginx 代理端⼝
#设置权重
upstream javagroup {
Server localhost:8080 weight=95;
Server 192 168.71.15:8080 weight=3
Server 192.168.71.16:8080 weight=2;
}
#进入配置文件修改下图内容