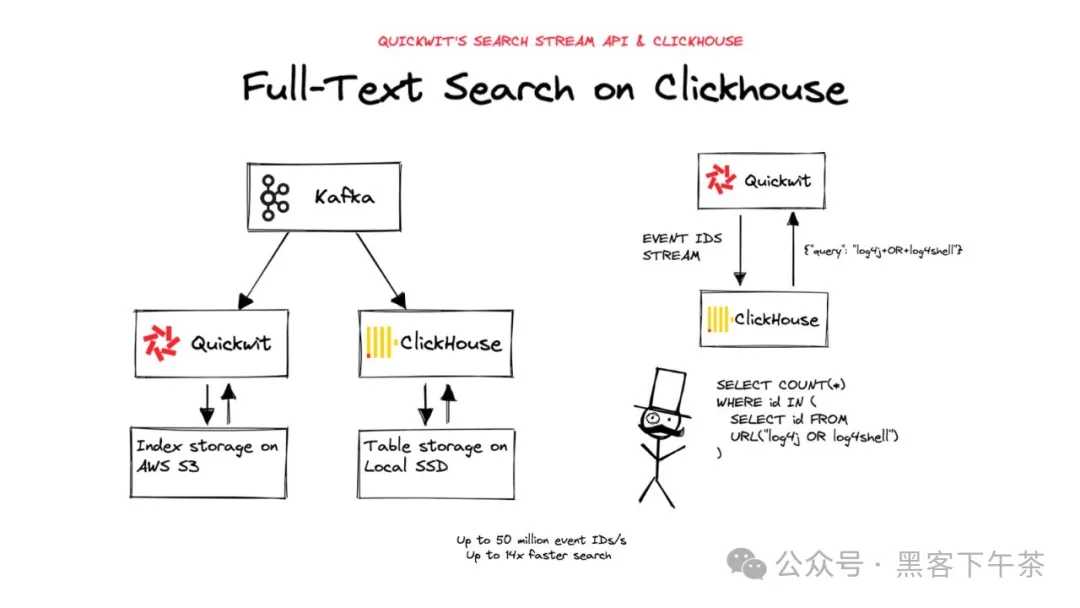
本指南将帮助您使用 Quickwit 的搜索流功能为知名的 OLAP 数据库 ClickHouse 添加全文搜索。Quickwit 暴露了一个 REST 端点,可以极快地(每秒最多 5000 万条)流式传输匹配搜索查询的 ID 或其他属性,ClickHouse 可以轻松地使用它们进行连接查询。
我们将采用 GitHub 存档数据集,该数据集收集了超过 30 亿条 GitHub 事件:PullRequestEvent、IssuesEvent 等。您可以深入阅读 ClickHouse 制作的这个 优秀分析,以更好地理解数据集。我们从中获得了大量灵感,并非常感谢他们分享这些内容。
安装
bash
curl -L https://install.quickwit.io | sh
cd quickwit-v*/
启动 Quickwit server
bash
./quickwit run创建 Quickwit index
在 [启动 Quickwit] 之后,我们需要创建一个配置好的索引以接收这些事件。首先让我们看一下要导入的数据。以下是一个事件示例:
JSON
{
  "id": 11410577343,
  "event_type": "PullRequestEvent",
  "actor_login": "renovate[bot]",
  "repo_name": "dmtrKovalenko/reason-date-fns",
  "created_at": 1580515200000,
  "action": "closed",
  "number": 44,
  "title": "Update dependency rollup to ^1.31.0",
  "labels": [],
  "ref": null,
  "additions": 5,
  "deletions": 5,
  "commit_id": null,
  "body":"This PR contains the following updates..."
}我们不需要索引上面描述的所有字段,因为对于我们的全文搜索教程来说,title 和 body 是我们感兴趣的字段。id 对于在 ClickHouse 中执行 JOIN 操作很有帮助,而 created_at 和 event_type 也可能对时间戳修剪和过滤有好处。
yaml
version: 0.7
index_id: gh-archive
# 默认情况下,索引将存储在您的数据目录中,
# 但您可以将其存储在 s3 或自定义路径上,如下所示:
# index_uri: s3://my-bucket/gh-archive
# index_uri: file://my-big-ssd-harddrive/
doc_mapping:
  store_source: false
  field_mappings:
    - name: id
      type: u64
      fast: true
    - name: created_at
      type: datetime
      input_formats:
        - unix_timestamp
      output_format: unix_timestamp_secs
      fast_precision: seconds
      fast: true
    - name: event_type
      type: text
      tokenizer: raw
    - name: title
      type: text
      tokenizer: default
      record: position
    - name: body
      type: text
      tokenizer: default
      record: position
  timestamp_field: created_at

search_settings:
  default_search_fields: [title, body]
bash
curl -o gh-archive-index-config.yaml https://raw.githubusercontent.com/quickwit-oss/quickwit/main/config/tutorials/gh-archive/index-config-for-clickhouse.yaml
./quickwit index create --index-config gh-archive-index-config.yaml
索引事件
数据集是一个压缩的 NDJSON 文件。让我们将其索引。
bash
wget https://quickwit-datasets-public.s3.amazonaws.com/gh-archive/gh-archive-2021-12-text-only.json.gz
gunzip -c gh-archive-2021-12-text-only.json.gz | ./quickwit index ingest --index gh-archive
您可以使用 search 命令并查找 tantivy 单词来检查它是否正常工作:
bash
./quickwit index search --index gh-archive --query "tantivy"流式传输 ID
我们现在可以使用搜索流端点获取一些 ID。让我们先用一个简单的查询和 csv 输出格式开始流式传输。
bash
curl "http://127.0.0.1:7280/api/v1/gh-archive/search/stream?query=tantivy&output_format=csv&fast_field=id"在接下来的部分中,我们将使用 click_house 二进制输出格式来加速查询。
ClickHouse
让我们暂时离开 Quickwit 并 安装 ClickHouse。启动一个 ClickHouse 服务器。
创建数据库和表
安装完成后,启动一个客户端并执行以下 SQL 语句:
SQL
CREATE DATABASE "gh-archive";
USE "gh-archive";


CREATE TABLE github_events
(
    id UInt64,
    event_type Enum('CommitCommentEvent' = 1, 'CreateEvent' = 2, 'DeleteEvent' = 3, 'ForkEvent' = 4,
                    'GollumEvent' = 5, 'IssueCommentEvent' = 6, 'IssuesEvent' = 7, 'MemberEvent' = 8,
                    'PublicEvent' = 9, 'PullRequestEvent' = 10, 'PullRequestReviewCommentEvent' = 11,
                    'PushEvent' = 12, 'ReleaseEvent' = 13, 'SponsorshipEvent' = 14, 'WatchEvent' = 15,
                    'GistEvent' = 16, 'FollowEvent' = 17, 'DownloadEvent' = 18, 'PullRequestReviewEvent' = 19,
                    'ForkApplyEvent' = 20, 'Event' = 21, 'TeamAddEvent' = 22),
    actor_login LowCardinality(String),
    repo_name LowCardinality(String),
    created_at Int64,
    action Enum('none' = 0, 'created' = 1, 'added' = 2, 'edited' = 3, 'deleted' = 4, 'opened' = 5, 'closed' = 6, 'reopened' = 7, 'assigned' = 8, 'unassigned' = 9,
                'labeled' = 10, 'unlabeled' = 11, 'review_requested' = 12, 'review_request_removed' = 13, 'synchronize' = 14, 'started' = 15, 'published' = 16, 'update' = 17, 'create' = 18, 'fork' = 19, 'merged' = 20),
    comment_id UInt64,
    body String,
    ref LowCardinality(String),
    number UInt32,
    title String,
    labels Array(LowCardinality(String)),
    additions UInt32,
    deletions UInt32,
    commit_id String
) ENGINE = MergeTree ORDER BY (event_type, repo_name, created_at);
导入事件
我们创建了第二个数据集 gh-archive-2021-12.json.gz,其中收集了所有事件,即使是没有文本的事件。因此最好将其插入 ClickHouse,但如果您没有时间,可以使用 Quickwit 使用的数据集 gh-archive-2021-12-text-only.json.gz。
bash
wget https://quickwit-datasets-public.s3.amazonaws.com/gh-archive/gh-archive-2021-12.json.gz
gunzip -c gh-archive-2021-12.json.gz | clickhouse-client -d gh-archive --query="INSERT INTO github_events FORMAT JSONEachRow"
让我们检查一下是否正常工作:
SQL
# Top repositories by stars
SELECT repo_name, count() AS stars
FROM github_events
GROUP BY repo_name
ORDER BY stars DESC LIMIT 5

┌─repo_name─────────────────────────────────┬─stars─┐
│ test-organization-kkjeer/app-test-2       │ 16697 │
│ test-organization-kkjeer/bot-validation-2 │ 15326 │
│ microsoft/winget-pkgs                     │ 14099 │
│ conda-forge/releases                      │ 13332 │
│ NixOS/nixpkgs                             │ 12860 │
└───────────────────────────────────────────┴───────┘
在 ClickHouse 中使用 Quickwit 搜索
ClickHouse 有一个名为 URL 表引擎 的有趣功能,可以从远程 HTTP/HTTPS 服务器查询数据。
这正是我们所需要的:通过创建指向 Quickwit 搜索流端点的表,我们可以从 ClickHouse 获取匹配查询的 ID。
SQL
SELECT count(*) FROM url('http://127.0.0.1:7280/api/v1/gh-archive/search/stream?query=log4j+OR+log4shell&fast_field=id&output_format=click_house_row_binary', RowBinary, 'id UInt64')

┌─count()─┐
│  217469 │
└─────────┘

1 row in set. Elapsed: 0.068 sec. Processed 217.47 thousand rows, 1.74 MB (3.19 million rows/s., 25.55 MB/s.)
我们在 0.068 秒内获取了 217,469 个 u64 ID。这是每秒 319 万行,还不错。如果快速字段已经被缓存,还可以提高吞吐量。
让我们再做一个更有趣的查询示例,匹配 log4j 或 log4shell 并按天统计事件数:
SQL
SELECT
    count(*),
    toDate(fromUnixTimestamp64Milli(created_at)) AS date
FROM github_events
WHERE id IN (
    SELECT id
    FROM url('http://127.0.0.1:7280/api/v1/gh-archive/search/stream?query=log4j+OR+log4shell&fast_field=id&output_format=click_house_row_binary', RowBinary, 'id UInt64')
)
GROUP BY date

Query id: 10cb0d5a-7817-424e-8248-820fa2c425b8

┌─count()─┬───────date─┐
│      96 │ 2021-12-01 │
│      66 │ 2021-12-02 │
│      70 │ 2021-12-03 │
│      62 │ 2021-12-04 │
│      67 │ 2021-12-05 │
│     167 │ 2021-12-06 │
│     140 │ 2021-12-07 │
│     104 │ 2021-12-08 │
│     157 │ 2021-12-09 │
│   88110 │ 2021-12-10 │
│    2937 │ 2021-12-11 │
│    1533 │ 2021-12-12 │
│    5935 │ 2021-12-13 │
│  118025 │ 2021-12-14 │
└─────────┴────────────┘

14 rows in set. Elapsed: 0.124 sec. Processed 8.35 million rows, 123.10 MB (67.42 million rows/s., 993.55 MB/s.)
我们可以看到 2021-12-10 和 2021-12-14 有两个峰值。
总结
我们仅通过这个小部分的 GitHub 存档数据集初步了解了从 ClickHouse 进行全文搜索的功能。
您可以从我们的公共 S3 存储桶下载完整数据集进行尝试。
我们提供了从 2015 年到 2021 年的每月压缩 ndjson 文件。以下是 2015-01 的链接:
- 完整 JSON 数据集 https://quickwit-datasets-public.s3.amazonaws.com/gh-archive/gh-archive-2015-01.json.gz
- 仅文本 JSON 数据集 https://quickwit-datasets-public.s3.amazonaws.com/gh-archive/gh-archive-2015-01-text-only.json.gz
搜索流端点功能强大,可以在多 TB 数据集上在不到 2 秒的时间内向 ClickHouse 流式传输 1 亿个 ID。
您可以放心地在更大的数据集上使用搜索流功能。