
Quickwit 从底层构建,旨在 高效地索引非结构化数据,并在云存储上轻松搜索这些数据。
此外,Quickwit 开箱即支持 OpenTelemetry gRPC 和 HTTP(仅 protobuf)协议,并提供了一个 REST API,可以接收任何 JSON 格式的日志。这让 Quickwit 成为了日志的理想选择!.

使用 OTEL Collector 发送日志
如果您已经有了自己的 OpenTelemetry Collector 并希望将日志导出到 Quickwit,您需要在 config.yaml 中配置一个新的 OLTP gRPC exporter:
macOS/Windows
yaml
receivers:
  otlp:
    protocols:
      grpc:
      http:

processors:
  batch:

exporters:
  otlp/quickwit:
    endpoint: host.docker.internal:7281
    tls:
      insecure: true
    # By default, logs are sent to the otel-logs-v0_7.
    # You can customize the index ID By setting this header.
    # headers:
    #   qw-otel-logs-index: otel-logs-v0_7
service:
  pipelines:
    logs:
      receivers: [otlp]
      processors: [batch]
      exporters: [otlp/quickwit]
Linux
yaml
receivers:
  otlp:
    protocols:
      grpc:
      http:

processors:
  batch:

exporters:
  otlp/quickwit:
    endpoint: 127.0.0.1:7281
    tls:
      insecure: true
    # By default, logs are sent to the otel-logs-v0_7.
    # You can customize the index ID By setting this header.
    # headers:
    #   qw-otel-logs-index: otel-logs-v0_7

service:
  pipelines:
    logs:
      receivers: [otlp]
      processors: [batch]
      exporters: [otlp/quickwit]
测试您的 OTEL 配置
- 安装 并启动一个 Quickwit server:
bash
./quickwit run- 使用之前的配置启动一个 collector:
macOS/Windows
bash
docker run -v ${PWD}/otel-collector-config.yaml:/etc/otelcol/config.yaml -p 4317:4317 -p 4318:4318 -p 7281:7281 otel/opentelemetry-collectorLinux
bash
docker run -v ${PWD}/otel-collector-config.yaml:/etc/otelcol/config.yaml --network=host -p 4317:4317 -p 4318:4318 -p 7281:7281 otel/opentelemetry-collector- 使用 cURL 向您的 collector 发送一条日志:
bash
curl -XPOST "http://localhost:4318/v1/logs" -H "Content-Type: application/json" \
--data-binary @- << EOF
{
 "resource_logs": [
   {
     "resource": {
       "attributes": [
         {
           "key": "service.name",
           "value": {
             "stringValue": "test-with-curl"
           }
         }
       ]
     },
     "scope_logs": [
       {
         "scope": {
           "name": "manual-test"
         },
         "log_records": [
           {
             "time_unix_nano": "1678974011000000000",
             "observed_time_unix_nano": "1678974011000000000",
             "name": "test",
             "severity_text": "INFO"
           }
         ]
       }
     ]
   }
 ]
}
EOF
您应该会在 Quickwit 服务器上看到类似以下的日志:
bash
2023-03-16T13:44:09.369Z INFO quickwit_indexing::actors::indexer: new-split split_id="01GVNAKT5TQW0T2QGA245XCMTJ" partition_id=6444214793425557444这意味着 Quickwit 已经收到了日志并创建了一个新的分片。在搜索日志之前,请等待分片被发布。
通过 OTEL 发送 K8s 日志
本指南将帮助您解锁 Kubernetes 集群日志上的日志搜索功能。我们首先使用 Helm 部署 Quickwit 和 OTEL 收集器,然后了解如何索引和搜索这些日志。
前提条件
完成本教程,您需要以下工具:
- 一个 Kubernetes 集群。
- 命令行工具 kubectl。
- 命令行工具 Helm。
- 对象存储(如 AWS S3、GCS、Azure Blob 存储或 Scaleway)的访问权限,用于存储索引数据。
使用 Helm 安装
首先,让我们创建一个命名空间来隔离我们的实验,并将其设置为默认命名空间。
bash
kubectl create namespace qw-tutorial
kubectl config set-context --current --namespace=qw-tutorial- https://github.com/quickwit-oss/helm-charts
- https://github.com/open-telemetry/opentelemetry-helm-charts
bash
helm repo add quickwit https://helm.quickwit.io
helm repo add open-telemetry https://open-telemetry.github.io/opentelemetry-helm-charts
现在您应该能在 Helm 中看到这两个仓库:
bash
helm repo list
NAME                	URL
quickwit            	https://helm.quickwit.io
open-telemetry      	https://open-telemetry.github.io/opentelemetry-helm-charts
部署 Quickwit
让我们创建一个基本的 chart 配置:
bash
export AWS_REGION=us-east-1
export AWS_ACCESS_KEY_ID=XXXX
export AWS_SECRET_ACCESS_KEY=XXXX
export DEFAULT_INDEX_ROOT_URI=s3://your-bucket/indexes
bash
# Create Quickwit config file.
echo "
searcher:
  replicaCount: 1
indexer:
  replicaCount: 1
metastore:
  replicaCount: 1
janitor:
  enabled: true
control_plane:
  enabled: true

environment:
  # Remove ANSI colors.
  NO_COLOR: 1

# Quickwit configuration
config:
  storage:
    s3:
      region: ${AWS_REGION}
      access_key_id: ${AWS_ACCESS_KEY_ID}
      secret_access_key: ${AWS_SECRET_ACCESS_KEY}
      # If you are not on AWS S3, you can define a flavor (gcs, minio, garage...)
      # and additional variables for your object storage.
      # flavor: gcs
      # endpoint: https://storage.googleapis.com

  # Metastore on S3.
  metastore_uri: ${DEFAULT_INDEX_ROOT_URI}

  default_index_root_uri: ${DEFAULT_INDEX_ROOT_URI}

  # Indexer settings
  indexer:
    # By activating the OTEL service, Quickwit will be able
    # to receive gRPC requests from OTEL collectors.
    enable_otlp_endpoint: true
" > qw-tutorial-values.yaml
在安装 Quickwit chart 之前,请确保您能访问 S3 并且 default_index_root_uri 中没有拼写错误。这可以通过 aws CLI 使用简单的 ls 命令轻松完成:
bash
aws s3 ls ${DEFAULT_INDEX_ROOT_URI}如果 CLI 没有返回错误,那么您就可以安装 chart 了:
bash
helm install quickwit quickwit/quickwit -f qw-tutorial-values.yaml过一会儿,您会看到正在运行 Quickwit 服务的 pod:
bash
kubectl get pods
NAME                                      READY   STATUS    RESTARTS      AGE
quickwit-control-plane-7fc495f4c4-slqv4   1/1     Running   2 (84s ago)   87s
quickwit-indexer-0                        1/1     Running   2 (84s ago)   87s
quickwit-janitor-7f75f4bc8-jrfv6          1/1     Running   2 (84s ago)   87s
quickwit-metastore-6989978fc-9s82j        1/1     Running   2 (85s ago)   87s
quickwit-searcher-0                       1/1     Running   2 (84s ago)   87s
让我们检查 Quickwit 是否正常工作:
bash
kubectl port-forward svc/quickwit-searcher 7280然后在浏览器中打开 http://localhost:7280/ui/indexes。您应该能看到索引列表。如果一切正常,请继续运行 kubectl 命令,并打开一个新的终端。
部署 OTEL 收集器
我们需要对收集器进行一些配置,以便:
- 从 Kubernetes 收集日志
- 用 Kubernetes 属性丰富日志
- 将日志导出到 Quickwit 索引器。
bash
echo "
mode: daemonset
presets:
  logsCollection:
    enabled: true
  kubernetesAttributes:
    enabled: true
config:
  exporters:
    otlp:
      endpoint: quickwit-indexer.qw-tutorial.svc.cluster.local:7281
      tls:
        insecure: true
      # By default, logs are sent to the otel-logs-v0_7.
      # You can customize the index ID By setting this header.
      # headers:
      #   qw-otel-logs-index: otel-logs-v0_7
  service:
    pipelines:
      logs:
        exporters:
          - otlp
" > otel-values.yamlhelm install otel-collector open-telemetry/opentelemetry-collector -f otel-values.yaml几秒钟后,您应该会在索引器上看到显示索引已开始的日志。看起来像这样:
2022-11-30T18:27:37.628Z  INFO spawn_merge_pipeline{index=otel-log-v0 gen=0}: quickwit_indexing::actors::merge_pipeline: Spawning merge pipeline. index_id=otel-log-v0 source_id=_ingest-api-source pipeline_ord=0 root_dir=/quickwit/qwdata/indexing/otel-log-v0/_ingest-api-source merge_policy=StableLogMergePolicy { config: StableLogMergePolicyConfig { min_level_num_docs: 100000, merge_factor: 10, max_merge_factor: 12, maturation_period: 172800s }, split_num_docs_target: 10000000 }
2022-11-30T18:27:37.628Z  INFO quickwit_serve::grpc: Starting gRPC server. enabled_grpc_services={"otlp-log", "otlp-trace"} grpc_listen_addr=0.0.0.0:7281
2022-11-30T18:27:37.628Z  INFO quickwit_serve::rest: Starting REST server. rest_listen_addr=0.0.0.0:7280
2022-11-30T18:27:37.628Z  INFO quickwit_serve::rest: Searcher ready to accept requests at http://0.0.0.0:7280/
2022-11-30T18:27:42.654Z  INFO quickwit_indexing::actors::indexer: new-split split_id="01GK4WPTXK8GH3AGTRNBN9A8YG" partition_id=0
2022-11-30T18:27:52.643Z  INFO quickwit_indexing::actors::indexer: send-to-index-serializer commit_trigger=Timeout split_ids=01GK4WPTXK8GH3AGTRNBN9A8YG num_docs=22
2022-11-30T18:27:52.652Z  INFO index_batch{index_id=otel-log-v0 source_id=_ingest-api-source pipeline_ord=0}:packager: quickwit_indexing::actors::packager: start-packaging-splits split_ids=["01GK4WPTXK8GH3AGTRNBN9A8YG"]
2022-11-30T18:27:52.652Z  INFO index_batch{index_id=otel-log-v0 source_id=_ingest-api-source pipeline_ord=0}:packager: quickwit_indexing::actors::packager: create-packaged-split split_id="01GK4WPTXK8GH3AGTRNBN9A8YG"
2022-11-30T18:27:52.653Z  INFO index_batch{index_id=otel-log-v0 source_id=_ingest-api-source pipeline_ord=0}:uploader: quickwit_indexing::actors::uploader: start-stage-and-store-splits split_ids=["01GK4WPTXK8GH3AGTRNBN9A8YG"]
2022-11-30T18:27:52.733Z  INFO index_batch{index_id=otel-log-v0 source_id=_ingest-api-source pipeline_ord=0}:uploader:stage_and_upload{split=01GK4WPTXK8GH3AGTRNBN9A8YG}:store_split: quickwit_indexing::split_store::indexing_split_store: store-split-remote-success split_size_in_megabytes=0.018351 num_docs=22 elapsed_secs=0.07654519 throughput_mb_s=0.23974074 is_mature=false
如果您在此处看到一些错误,可能是由于对象存储配置错误导致的。如果您需要帮助,请在 GitHub 上提交问题或加入我们的 Discord 服务器。
准备好搜索日志
现在您可以开始搜索了,等待 30 秒,您将看到第一批索引的日志:只需 打开 UI 并开始使用。有趣的是,您会在这个 UI 中看到 Quickwit 的日志 😃.
示例查询:
- body.message:quickwit
- resource_attributes.k8s.container.name:quickwit
- resource_attributes.k8s.container.restart_count:1

就这样,朋友们!
清理
首先删除索引,然后卸载 charts。
bash
# Delete the index. The command will return the list of delete split files.
curl -XDELETE http://127.0.0.1:7280/api/v1/indexes/otel-logs-v0

# Uninstall charts
helm uninstall otel-collector
helm uninstall quickwit

# Delete namespace
kubectl delete namespace qw-tutorial
Finally, you need to delete three JSON files created by Quickwit on your object storage:
bash
# if your version <= 0.7.1
aws s3 rm ${DEFAULT_INDEX_ROOT_URI}/indexes_states.json
# if your version > 0.7.1
aws s3 rm ${DEFAULT_INDEX_ROOT_URI}/manifest.json
# the metastore file of the logs index
aws s3 rm ${DEFAULT_INDEX_ROOT_URI}/otel-logs-v0_7/metastore.json
# the metastore file of the traces index
aws s3 rm ${DEFAULT_INDEX_ROOT_URI}/otel-traces-v0_7/metastore.json
下一步
按照我们的 教程 安装 Quickwit Grafana 插件以探索您的日志、创建仪表板和警报。
使用 Vector 发送日志
Vector 是一款出色的软件(显然用 Rust 编写),为可观测性领域带来了新的清新之风,
它以从基础设施的各个部分收集日志、转换和聚合日志以及最终将日志转发到接收端而闻名。
在本指南中,我们将向您展示如何将其连接到 Quickwit。
启动 Quickwit 服务器
CLI
bash
# Create Quickwit data dir.
mkdir qwdata
./quickwit run
Docker
bash
# Create Quickwit data dir.
mkdir qwdata
docker run --rm -v $(pwd)/qwdata:/quickwit/qwdata -p 7280:7280 quickwit/quickwit run
利用 Quickwit 对日志的原生支持
让我们拥抱 OpenTelemetry 标准并利用 Quickwit 的功能。借助对 OpenTelemetry 标准的原生支持,Quickwit 已经带有一个名为 otel-logs_v0_7 的索引,与 OpenTelemetry 日志数据模型兼容。这意味着我们可以开始推送日志数据,无需通常的索引设置。
OpenTelemetry 索引配置可以在 quickwit-opentelemetry/src/otlp/logs.rs 源文件中找到。
设置 Vector
我们的接收端将是 Quickwit 的摄入 API http://127.0.0.1:7280/api/v1/otel-logs-v0_7/ingest。
为了简化本教程,我们将使用一个名为 demo_logs 的日志源,该日志源以给定格式生成日志。让我们选择常见的 syslog 格式
(Vector 不直接生成 OpenTelemetry 格式的日志!)并使用转换功能将 syslog 格式映射到 OpenTelemetry 格式。
toml
[sources.generate_syslog]
type = "demo_logs"
format = "syslog"
count = 100000
interval = 0.001

[transforms.remap_syslog]
inputs = [ "generate_syslog"]
type = "remap"
source = '''
  structured = parse_syslog!(.message)
  .timestamp_nanos = to_unix_timestamp!(structured.timestamp, unit: "nanoseconds")
  .body = structured
  .service_name = structured.appname
  .resource_attributes.source_type = .source_type
  .resource_attributes.host.hostname = structured.hostname
  .resource_attributes.service.name = structured.appname
  .attributes.syslog.procid = structured.procid
  .attributes.syslog.facility = structured.facility
  .attributes.syslog.version = structured.version
  .severity_text = if includes(["emerg", "err", "crit", "alert"], structured.severity) {
    "ERROR"
  } else if structured.severity == "warning" {
    "WARN"
  } else if structured.severity == "debug" {
    "DEBUG"
  } else if includes(["info", "notice"], structured.severity) {
    "INFO"
  } else {
   structured.severity
  }
  .scope_name = structured.msgid
  del(.message)
  del(.timestamp)
  del(.service)
  del(.source_type)
'''

# useful to see the logs in the terminal
# [sinks.emit_syslog]
# inputs = ["remap_syslog"]
# type = "console"
# encoding.codec = "json"

[sinks.quickwit_logs]
type = "http"
method = "post"
inputs = ["remap_syslog"]
encoding.codec = "json"
framing.method = "newline_delimited"
uri = "http://127.0.0.1:7280/api/v1/otel-logs-v0_7/ingest"
下载上述 Vector 配置文件。
bash
curl -o vector.toml https://raw.githubusercontent.com/quickwit-oss/quickwit/main/config/tutorials/vector-otel-logs/vector.toml现在让我们启动 Vector,以便我们能够开始将日志发送到 Quickwit。
bash
docker run -v $(pwd)/vector.toml:/etc/vector/vector.toml:ro -p 8383:8383 --net=host timberio/vector:0.25.0-distroless-libc搜索日志
Quickwit 现在正在从 Vector 接收日志,并且您可以使用 curl 或通过 UI 进行搜索:
curl -XGET http://127.0.0.1:7280/api/v1/otel-logs-v0_7/search?query=severity_text:ERROR- 在浏览器中打开
http://127.0.0.1:7280/ui/search?query=severity_text:ERROR&index_id=otel-logs-v0_7&max_hits=10并开始使用!
对 severity_text 计算聚合
对于聚合,我们暂时还不能使用 Quickwit UI,但我们可以通过 curl 使用。
让我们构造一个漂亮的聚合查询,计算每分钟有多少条 INFO、DEBUG、WARN 和 ERROR(所有日期时间都以微秒存储,因此间隔为 60_000_000 微秒):
json
{
  "query": "*",
  "max_hits": 0,
  "aggs": {
    "count_per_minute": {
      "histogram": {
          "field": "timestamp_nanos",
          "interval": 60000000
      },
      "aggs": {
        "severity_text_count": {
          "terms": {
            "field": "severity_text"
          }
        }
      }
    }
  }
}
bash
curl -XPOST -H "Content-Type: application/json" http://127.0.0.1:7280/api/v1/otel-logs-v0_7/search --data @aggregation-query.json进一步操作
现在您还可以部署 Grafana 并将 Quickwit 作为数据源用于查询、仪表板、警报等!
使用 Fluentbit 发送日志
Fluent Bit 是一个开源的日志和指标处理器及转发器,可转发到多个目的地。
在本指南中,我们将向您展示如何将其连接到 Quickwit。
先决条件
- 安装 Quickwit
- 使用
./quickwit run启动一个 Quickwit 实例 - 安装 Fluentbit
为 Fluentbit 日志创建一个简单的索引
让我们创建一个只有一个字段 timestamp 的无模式索引。模式 dynamic 表示 Quickwit 将索引所有字段,即使它们未在文档映射中定义。
yaml
version: 0.7

index_id: fluentbit-logs

doc_mapping:
  mode: dynamic
  field_mappings:
    - name: timestamp
      type: datetime
      input_formats:
        - unix_timestamp
      output_format: unix_timestamp_secs
      fast: true
  timestamp_field: timestamp

indexing_settings:
  commit_timeout_secs: 10
bash
curl -o fluentbit-logs.yaml https://raw.githubusercontent.com/quickwit-oss/quickwit/main/config/tutorials/fluentbit-logs/index-config.yaml然后使用 cURL 或 CLI 创建索引:
cURL
bash
curl -XPOST http://localhost:7280/api/v1/indexes -H "content-type: application/yaml" --data-binary @fluentbit-logs.yamlCLI
bash
./quickwit index create --index-config fluentbit-logs.yaml设置 Fluentbit
Fluentbit 配置文件由输入和输出组成。对于本教程,我们将使用一个虚拟配置:
title=fluent-bit.conf
[INPUT]
  Name   dummy
  Tag    dummy.log

[OUTPUT]
  Name http
  Match *
  URI   /api/v1/fluentbit-logs/ingest
  Host  localhost
  Port  7280
  tls   Off
  Format json_lines
  Json_date_key    timestamp
  Json_date_format epoch
Fluentbit 将把 dummy 日志发送到 Quickwit 的端点 /api/v1/fluentbit-logs/ingest。
让我们启动 Fluentbit。
bash
fluent-bit -c fluent-bit.conf搜索日志
Quickwit 现在正在从 Fluentbit 接收日志,并且您可以使用 cURL 或通过 UI 进行搜索:
curl "http://127.0.0.1:7280/api/v1/fluentbit-logs/search?query=severity:DEBUG"- 在浏览器中打开
http://127.0.0.1:7280/ui/search?query=severity:DEBUG&index_id=fluentbit-logs&max_hits=10.
进一步改进
您很快就能对动态字段执行聚合操作(计划在 0.7 版本中实现)。
将 Docker 容器日志发送到 Quickwit
要将 Docker 容器日志发送到 Quickwit,您只需要设置一个带有文件日志接收器的 OpenTelemetry Collector。在本教程中,我们将使用 docker compose 来启动收集器和 Quickwit。
您只需要一分钟即可获得 Quickwit 日志 UI!
OTEL collector 配置
以下 collector 配置将收集位于 /var/lib/docker/containers/*/*-json.log 的 Docker 日志(根据您的系统,日志文件可能位于其他位置),添加一些属性并通过 gRPC 发送到 Quickwit 的 http://quickwit:7281。
yaml
receivers:
  filelog:
    include:
      - /var/lib/docker/containers/*/*-json.log
    operators:
     - id: parser-docker
       timestamp:
         layout: '%Y-%m-%dT%H:%M:%S.%LZ'
         parse_from: attributes.time
       type: json_parser
     - field: attributes.time
       type: remove
     - id: extract_metadata_from_docker_tag
       parse_from: attributes.attrs.tag
       regex: ^(?P<name>[^\|]+)\|(?P<image_name>[^\|]+)\|(?P<id>[^$]+)$
       type: regex_parser
       if: 'attributes?.attrs?.tag != nil'
     - from: attributes.name
       to: resource["docker.container.name"]
       type: move
       if: 'attributes?.name != nil'
     - from: attributes.image_name
       to: resource["docker.image.name"]
       type: move
       if: 'attributes?.image_name != nil'
     - from: attributes.id
       to: resource["docker.container.id"]
       type: move
       if: 'attributes?.id != nil'
     - from: attributes.log
       to: body
       type: move

processors:
  batch:
    timeout: 5s

exporters:
  otlp/qw:
    endpoint: quickwit:7281
    tls:
      insecure: true

service:
  pipelines:
    logs:
      receivers: [filelog]
      processors: [batch]
      exporters: [otlp/qw]
启动 OTEL collector 和 Quickwit 实例
让我们使用以下配置的 docker compose:
yaml
version: "3"

x-default-logging: &logging
 driver: "json-file"
 options:
   max-size: "5m"
   max-file: "2"
   tag: "{{.Name}}|{{.ImageName}}|{{.ID}}"

services:
  quickwit:
    image: quickwit/quickwit:${QW_VERSION:-0.8.1}
    volumes:
      - ./qwdata:/quickwit/qwdata
    ports:
      - 7280:7280
    environment:
      - NO_COLOR=true
    command: ["run"]
    logging: *logging

  otel-collector:
    user: "0" # Needed to access the directory /var/lib/docker/containers/
    image: otel/opentelemetry-collector-contrib:${OTEL_VERSION:-0.87.0}
    volumes:
      - ./otel-collector-config.yaml:/etc/otel-collector-config.yaml
      - /var/lib/docker/containers:/var/lib/docker/containers:ro
    command: ["--config=/etc/otel-collector-config.yaml"]
    logging: *logging
您会注意到自定义的 logging,OTEL collector 将使用这些额外的信息来丰富日志。
运行并搜索
下载配置文件并启动容器:
bash
mkdir qwdata
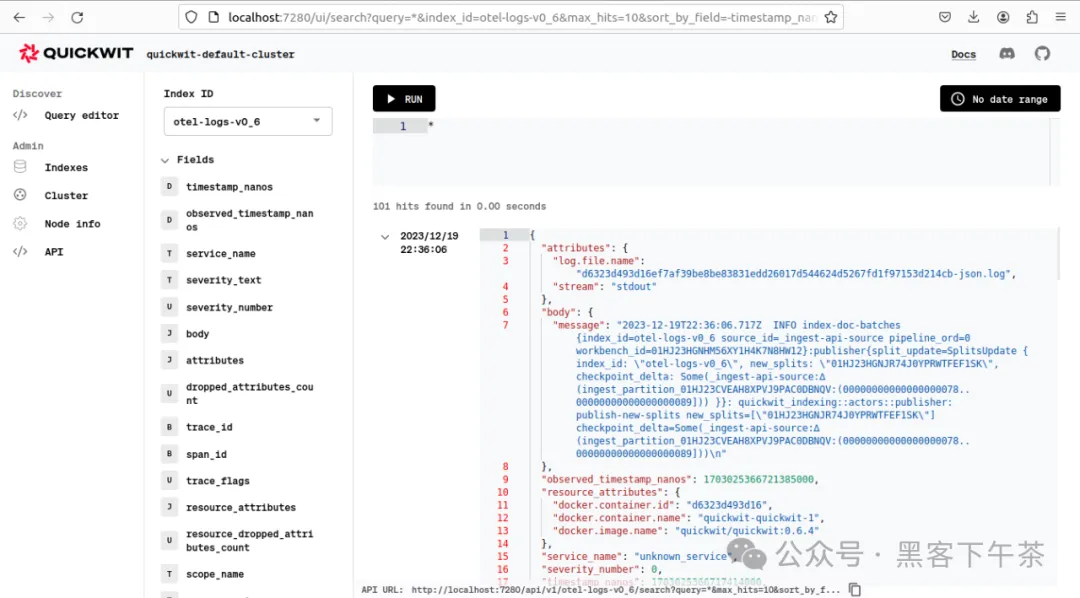
docker compose up几秒钟后,您将在 Quickwit UI http://localhost:7280 中看到日志。
它看起来应该是这样的:
json
{
  "attributes": {
    "log.file.name": "34ad1a84c71de1d29ad75f99b56d01205e2976440f2398734037151ba2bcde1a-json.log",
    "stream": "stdout"
  },
  "body": {
    "message": "2023-10-23T16:39:57.892  INFO --- [   asgi_gw_1] localstack.request.aws     : AWS s3.ListObjects => 200\n"
  },
  "observed_timestamp_nanos": 1698079197979435000,
  "service_name": "unknown_service",
  "severity_number": 0,
  "timestamp_nanos": 1698079197892726000,
  "trace_flags": 0
}
故障排除
有可能您在 UI 中看不到任何日志。在这种情况下,请检查 docker compose 的日志。问题通常来自 OTEL 收集器的错误配置。
支持的代理
Quickwit 与以下代理兼容:
OpenTelemetry 代理
在使用 OpenTelemetry 收集器 之前,请确保 Quickwit OpenTelemetry 服务 已启用。
一旦启动,Quickwit 就准备好接收并处理 OpenTelemetry gRPC 请求。
这是一个 OpenTelemetry 代理将日志发送到 Quickwit 的配置示例:
yaml
mode: daemonset
presets:
  logsCollection:
    enabled: true
  kubernetesAttributes:
    enabled: true
config:
  exporters:
    otlp:
      # Replace quickwit-host with the hostname of your Quickwit node/service.
      # On k8s, it should be of the form `{quickwit-indexer-service-name}.{namespace}.svc.cluster.local:7281
      endpoint: quickwit-host:7281
      tls:
        insecure: true
  service:
    pipelines:
      logs:
        exporters:
          - otlp
更多配置详情请参见 OpenTelemetry 文档。您也可以查看我们的 教程 如何使用 OTEL 收集器将日志发送到 Quickwit。
- https://opentelemetry.io/docs/collector/configuration/
- https://quickwit.io/docs/log-management/send-logs/using-otel-collector
基于 HTTP 的代理
也可以使用其他代理,这些代理通过 HTTP 请求向 Quickwit 摄入 API 发送数据。Quickwit 还部分支持 Elasticsearch _bulk API。因此,您的代理很可能已经与 Quickwit 兼容。
目前,我们已测试了以下基于 HTTP 的代理:
- Vector
- Fluentbit
- FluentD(教程即将发布)
- Logstash:Quickwit 不支持 Elasticsearch 输出。但是,可以使用 HTTP 输出发送日志,但仅限
json格式。
Quickwit 原生支持 OpenTelemetry 协议 (OTLP),并默认提供了 gRPC 端点来接收来自 OpenTelemetry 收集器的日志。
通过此端点接收的日志默认被索引在 otel-logs-v0 索引中。如果不存在此索引,则会自动创建。索引的文档映射在本 章节 中描述。
您也可以使用 ingest API 直接将日志发送到此索引。
OpenTelemetry 服务
Quickwit 原生支持 OpenTelemetry 协议 (OTLP),并默认提供了 gRPC 端点来接收来自 OpenTelemetry 收集器的跨度。
此端点默认启用。
当启用时,Quickwit 将启动 gRPC 服务,准备接收来自 OpenTelemetry 收集器的跨度。跨度默认被索引在 otel-trace-v0_7 索引中,如果不存在此索引,则会自动创建。索引的文档映射在下一个 章节 中描述。
如果出于任何原因,您想要禁用此端点,您可以:
- 在启动 Quickwit 时将环境变量
QW_ENABLE_OTLP_ENDPOINT设置为false。 - 或者 配置节点配置,将索引器设置
enable_otlp_endpoint设置为false。
yaml
# ... Indexer configuration ...
indexer:
    enable_otlp_endpoint: false
OTEL service
Quickwit 原生支持 OpenTelemetry 协议 (OTLP),并提供了一个 gRPC 端点来接收来自 OpenTelemetry 收集器的跨度。此端点默认启用。
当启用时,Quickwit 将启动 gRPC 服务,准备接收来自 OpenTelemetry 收集器的日志。日志默认被索引在 otel-logs-v0_7 索引中,如果不存在此索引,则会自动创建。索引的文档映射在下一个 章节 中描述。
如果出于任何原因,您想要禁用此端点,您可以:
- 在启动 Quickwit 时将环境变量
QW_ENABLE_OTLP_ENDPOINT设置为false。 - 或者 配置节点配置,将索引器设置
enable_otlp_endpoint设置为false。
yaml
# ... Indexer configuration ...
indexer:
    enable_otlp_endpoint: false
在您自己的索引中发送日志
您可以通过将 gRPC 请求的头 qw-otel-logs-index 设置为目标索引 ID 来将日志发送到您选择的索引中。
OpenTelemetry 日志数据模型
Quickwit 默认将 OpenTelemetry 日志发送到 otel-logs-v0_7 索引中,如果您启用了 OpenTelemetry 服务,此索引将自动创建。
下面描述的此索引的文档映射来源于 OpenTelemetry 日志数据模型。
yaml
version: 0.7

index_id: otel-logs-v0_7

doc_mapping:
  mode: strict
  field_mappings:
    - name: timestamp_nanos
      type: datetime
      input_formats: [unix_timestamp]
      output_format: unix_timestamp_nanos
      indexed: false
      fast: true
      fast_precision: milliseconds
    - name: observed_timestamp_nanos
      type: datetime
      input_formats: [unix_timestamp]
      output_format: unix_timestamp_nanos
    - name: service_name
      type: text
      tokenizer: raw
      fast: true
    - name: severity_text
      type: text
      tokenizer: raw
      fast: true
    - name: severity_number
      type: u64
      fast: true
    - name: body
      type: json
      tokenizer: default
    - name: attributes
      type: json
      tokenizer: raw
      fast: true
    - name: dropped_attributes_count
      type: u64
      indexed: false
    - name: trace_id
      type: bytes
      input_format: hex
      output_format: hex
    - name: span_id
      type: bytes
      input_format: hex
      output_format: hex
    - name: trace_flags
      type: u64
      indexed: false
    - name: resource_attributes
      type: json
      tokenizer: raw
      fast: true
    - name: resource_dropped_attributes_count
      type: u64
      indexed: false
    - name: scope_name
      type: text
      indexed: false
    - name: scope_version
      type: text
      indexed: false
    - name: scope_attributes
      type: json
      indexed: false
    - name: scope_dropped_attributes_count
      type: u64
      indexed: false

  timestamp_field: timestamp_nanos

indexing_settings:
  commit_timeout_secs: 10

search_settings:
  default_search_fields: [body.message]
UI 集成
目前,Quickwit 提供了一个简化的 UI 来获取集群、索引和搜索文档的基本信息。
如果简单的 UI 对您来说不够用并且您需要更多功能,Grafana 和 Elasticsearch 查询 API 支持计划于 2023 年第二季度推出,请持续关注!
您也可以将追踪数据发送到 Quickwit,在 Jaeger UI 中查看,具体步骤请参阅以下 教程。
已知限制
在 Quickwit 0.7 中的日志管理设置存在一些限制:
- 摄入 API 不提供高可用性和高持久性,这将在 0.8 版本中修复。
- OTLP HTTP 只支持二进制 Protobuf 编码。OTLP HTTP 使用 JSON 编码尚未计划,但这可以在下一个版本中轻松解决。如果您需要此功能,请提交一个 Issue。
如果您对新功能感兴趣或发现了其他限制,请在 GitHub 上提交一个 Issue。