【写在前面】
经常接触前端的朋友应该经常见到下面的控件:
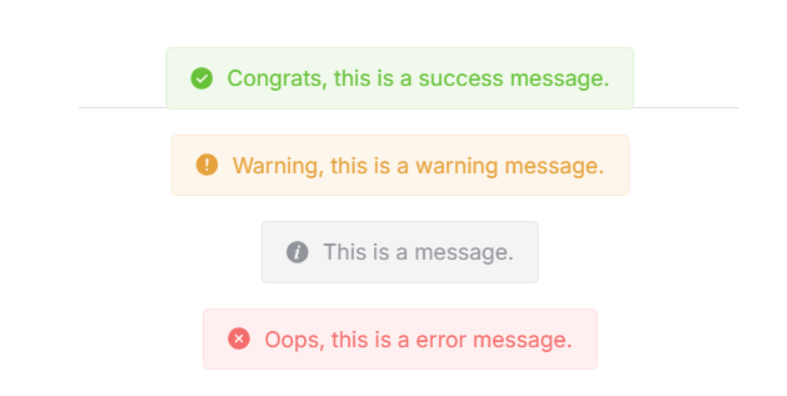
在前端中一般称它为 Notification 或 Message,但本质是一种东西,即:悬浮弹出式的消息提醒框。
这种组件一般具有以下特点:
1、全局/局部显示:它不依赖于具体的页面元素,可以在整个页面的任意位置显示。
2、自动消失:默认情况下,消息会在一定时间后自动消失,也可以设置为不自动消失。
3、多种类型 :支持多种类型的消息,如成功(Success)、警告(Warning)、错误(Error)和 消息(Message)等。
4、可配置:可以自定义消息的显示位置、持续时间、内容等。
然鹅 Qml 中并未提供类似的组件,因此我便仿照前端实现了出来,并且更加简单易用。
【正文开始】
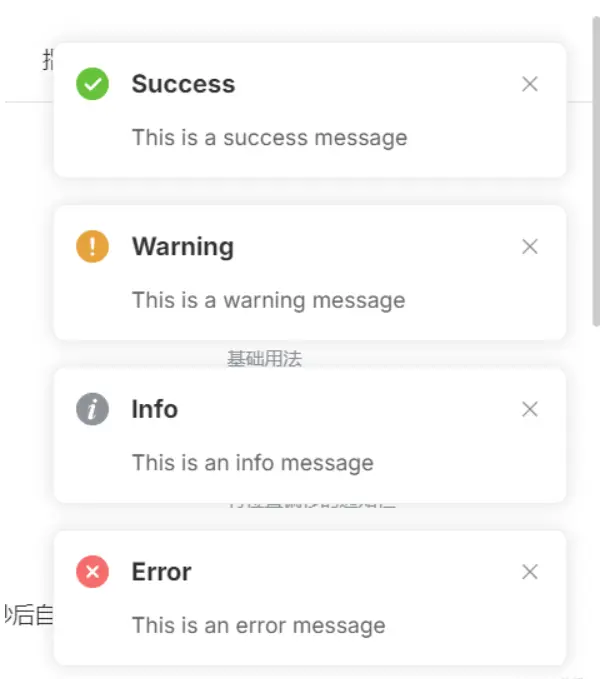
先来看看 Qml Notification 效果图:
实现起来相当简单,只需要 Column + Repeater 即可:
javascript
    Column {
        anchors.top: parent.top
        anchors.topMargin: 10
        anchors.horizontalCenter: parent.horizontalCenter
        spacing: 10

        Repeater {
            id: repeater
            model: ListModel {
                id: listModel
            }
            delegate: Rectangle {
                width: root.backgroundWidth
                height: __column.height + root.topMargin + root.bottomMargin
                radius: root.backgroundRadius
                color: root.backgroundColor
                clip: true

                Component.onCompleted: {
                    __timer.interval = timeout;
                    __timer.start();
                }

                NumberAnimation on height {
                    id: __removeAniamtion
                    to: 0
                    running: false
                    duration: 500
                    alwaysRunToEnd: true
                    onFinished: {
                        listModel.remove(index);
                    }
                }

                Timer {
                    id: __timer
                    onTriggered: {
                        __removeAniamtion.start();
                    }
                }

                Column {
                    id: __column
                    width: parent.width
                    anchors.centerIn: parent
                    spacing: root.titleSpacing

                    Row {
                        anchors.horizontalCenter: parent.horizontalCenter
                        spacing: 5

                        Text {
                            id: __icon
                            font.family: fontAwesome.name
                            font.pointSize: root.titleFont.pointSize
                            color: {
                                switch (type) {
                                case Notification.Success: return "green";
                                case Notification.Warning: return "orange";
                                case Notification.Message: return "gray";
                                case Notification.Error: return "red";
                                default: return "";
                                }
                            }
                            text: {
                                switch (type) {
                                case Notification.Success: return "\uf058";
                                case Notification.Warning: return "\uf071";
                                case Notification.Message: return "\uf05a";
                                case Notification.Error: return "\uf057";
                                default: return "";
                                }
                            }
                        }

                        Text {
                            id: __title
                            font: root.titleFont
                            color: root.titleColor
                            text: title
                            wrapMode: Text.WrapAnywhere
                        }
                    }

                    Text {
                        id: __message
                        width: parent.width - 16
                        anchors.horizontalCenter: parent.horizontalCenter
                        font: root.messageFont
                        color: root.messageColor
                        text: message
                        horizontalAlignment: Text.AlignHCenter
                        wrapMode: Text.WrapAnywhere
                    }
                }

                Text {
                    anchors.right: parent.right
                    anchors.top: parent.top
                    anchors.margins: 6
                    text: "×"
                    font.bold: true

                    MouseArea {
                        anchors.fill: parent
                        onClicked: {
                            __timer.stop();
                            __removeAniamtion.restart();
                        }
                    }
                }
            }
        }
    }
然后使用 notify() 来添加通知消息:
javascript
    function notify(title, message, type = Notification.None, timeout = 3000) {
        listModel.append({
                             title: title,
                             message: message,
                             type: type,
                             timeout: timeout
                         });
    }
其中参数说明:
-
title:标题,即通知顶端的标题。 -
message:消息,即通知中间的内容。 -
type:类型,即该通知的类型。 -
timeout:超时,即该通知显示的时长,-1 则是无限。
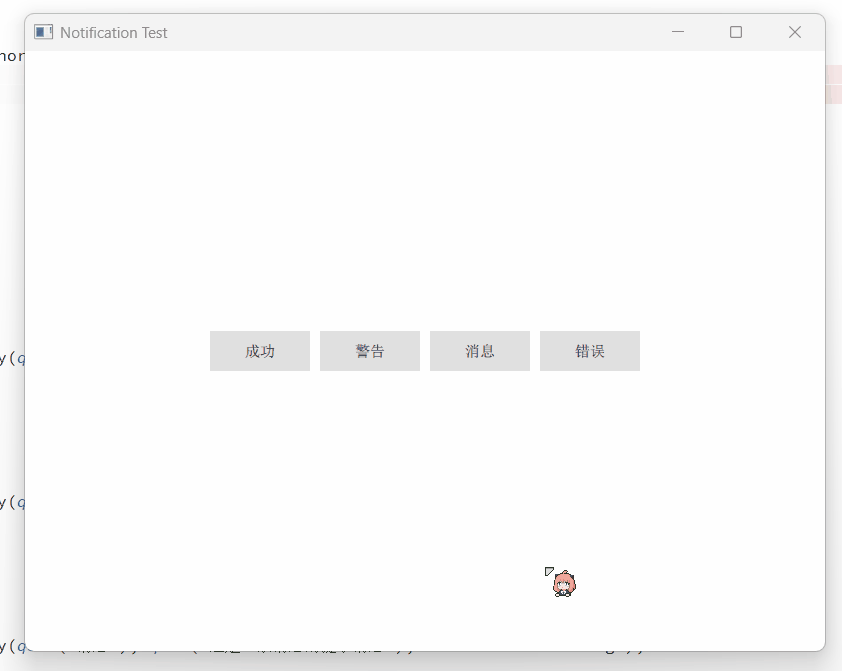
【如何使用】
javascript
import QtQuick 2.15
import QtQuick.Controls 2.15
import QtQuick.Window 2.15

Window {
    width: 800
    height: 600
    visible: true
    title: qsTr("Notification Test")

    Notification {
        id: topNotification
        z: 100
        backgroundWidth: 240
        anchors.top: parent.top
        anchors.horizontalCenter: parent.horizontalCenter
        titleFont.pointSize: 11
        messageFont.pointSize: 11
    }

    Column {
        anchors.centerIn: parent
        spacing: 10

        Row {
            spacing: 10

            Button {
                text: qsTr("成功")
                onClicked: {
                    topNotification.notify(qsTr("成功"), qsTr("这是一条成功的提示消息"), Notification.Success);
                }
            }

            Button {
                text: qsTr("警告")
                onClicked: {
                    topNotification.notify(qsTr("警告"), qsTr("这是一条警告的提示消息"), Notification.Warning);
                }
            }

            Button {
                text: qsTr("消息")
                onClicked: {
                    topNotification.notify(qsTr("消息"), qsTr("这是一条消息的提示消息"), Notification.Message);
                }
            }

            Button {
                text: qsTr("错误")
                onClicked: {
                    topNotification.notify(qsTr("错误"), qsTr("这是一条错误的提示消息"), Notification.Error);
                }
            }
        }
    }
}
Notification 可放置在任意位置,然后设置字体背景等等即可。
当然,这种方式是悬浮在当前页面的,如果想要悬浮在全局页面,则必须将其置于主窗口的顶部,具体方法如下:
javascript
import QtQuick 2.15
import QtQuick.Controls 2.15
import QtQuick.Window 2.15

Window {
    width: 800
    height: 600
    visible: true
    title: qsTr("Notification Test")

    Page { z: 1 }

    Page { z: 1 }

    Notification {
        id: topNotification
        z: 100
        backgroundWidth: 240
        anchors.top: parent.top
        anchors.horizontalCenter: parent.horizontalCenter
        titleFont.pointSize: 11
        messageFont.pointSize: 11
    }
}
需要保证其他页面 z-order 小于 Notification 组件。
【结语】
最后:项目链接(多多star呀..⭐_⭐):
Github 地址:https://github.com/mengps/QmlControls/tree/master/Notification