「OC」事件点击demo合集
文章目录
前言
在前面通过学习事件响应流程,学习了许多新的内容,当然也学习了许多不同的用法,但在之前的文章之中并没有将运用到事件响应链的demo写在文章当中,所以这篇文章总结了我学习事件点击写的一些小demo
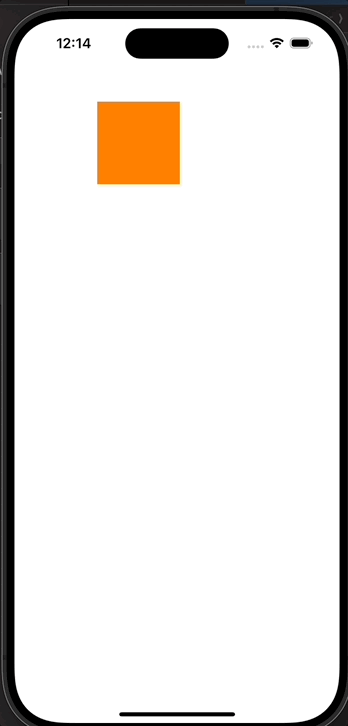
可用鼠标移动的UIview
我们可以重写UIView之中的- (void)touchesMoved:(NSSet<UITouch *> *)touches withEvent:(UIEvent *)event,实现一个可供鼠标点击移动的UIview
- (void)touchesMoved:(NSSet<UITouch *> *)touches withEvent:(UIEvent *)event
{
    //获取触摸对象
    UITouch *touch = [touches anyObject];
    //获取前一个触摸点位置
    CGPoint prePoint = [touch previousLocationInView:self];
    //获取当前触摸点位置
    CGPoint curPoint = [touch locationInView:self];
    //计算偏移量
    CGFloat offsetX = curPoint.x - prePoint.x;
    CGFloat offsetY = curPoint.y - prePoint.y;
    //相对之前的位置偏移视图
    self.transform = CGAffineTransformTranslate(self.transform, offsetX, offsetY);
}
突出的tabBar按钮
我们通过重写tabBar的子类可以做出以下内容,但是我们发现点击超出tabBar范围的按钮部分并不会响应
objc
//写tabBar的子类
#import "JCTabBar.h"
@implementation JCTabBar

- (instancetype)initWithFrame:(CGRect)frame {
    self = [super initWithFrame:frame];
    if (self) {
        [self setupCenterButton];
    }
    return self;
}

- (UIImage *)rotateImage:(UIImage *)image byDegrees:(CGFloat)degrees {
    CGSize size = image.size;
    UIGraphicsBeginImageContextWithOptions(size, NO, 0);
    CGContextRef context = UIGraphicsGetCurrentContext();

    // 计算旋转角度
    CGContextTranslateCTM(context, size.width / 2, size.height / 2);
    CGContextRotateCTM(context, degrees * M_PI / 180);


    [image drawInRect:CGRectMake(-size.width / 2, -size.height / 2, size.width, size.height)];
    UIImage *rotatedImage = UIGraphicsGetImageFromCurrentImageContext();
    UIGraphicsEndImageContext();

    return rotatedImage;
}

- (void)setupCenterButton {
    self.centerButton = [UIButton buttonWithType:UIButtonTypeCustom];
    self.centerButton.backgroundColor = [UIColor whiteColor];

    [self.centerButton setImage:[UIImage imageNamed:@"jiahao.png"] forState:UIControlStateNormal];
    [self.centerButton setImage:[self rotateImage:[UIImage imageNamed:@"jiahao.png"] byDegrees:45] forState:UIControlStateSelected];
    [self addSubview:self.centerButton];
}

- (void)layoutSubviews {
    [super layoutSubviews];

    [self bringSubviewToFront:self.centerButton];

    CGFloat width = self.frame.size.width;

    self.backgroundColor = [UIColor whiteColor];
    CGFloat centerButtonSize = 60; // 中间按钮的大小
    self.centerButton.frame = CGRectMake((width - centerButtonSize) / 2,
                                         -centerButtonSize / 2,
                                         centerButtonSize ,
                                         centerButtonSize);
    self.centerButton.layer.cornerRadius = (centerButtonSize) / 2;
    self.centerButton.clipsToBounds = YES;
    [self.centerButton addTarget:self action:@selector(centerButtonAction:) forControlEvents:UIControlEventTouchUpInside];
    // 调整其他 TabBar 项的位置
    CGFloat tabBarItemWidth = width / 5;
    NSInteger index = 0;
    for (UIView *subview in self.subviews) {
        if ([subview isKindOfClass:NSClassFromString(@"UITabBarButton")]) {
            if (index == 2) {
                // 跳过中间位置
                index++;
            }
            CGRect frame = subview.frame;
            frame.origin.x = index * tabBarItemWidth;
            subview.frame = frame;
            index++;
        }
    }
}

- (void)centerButtonAction:(UIButton *)sender {
    self.centerButton.selected = !self.centerButton.selected;


}

@end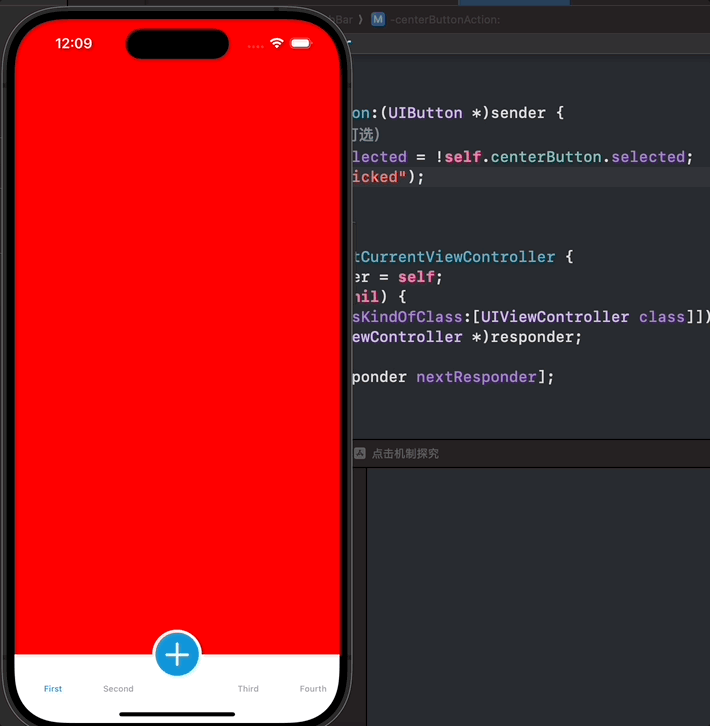
在这个demo之中我们主要是运用了在寻找最佳响应者之中的相关内容,我们先画出以下图片。
我们通过分析可以得出视图层次
RootView
└── TableView
└── TabBar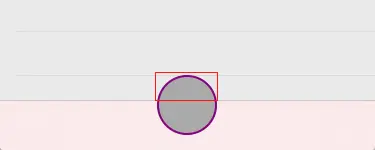
└── CircleButton如果我们点击按钮区域后,我们自己料想的应该是,生成的触摸事件首先传到UIWindow,然后传到控制器的根视图即RootView。RootView经判断可以响应触摸事件,而后将事件传给了子控件TabBar。但是问题就出在这里,如果我们点击红色方框的部分触摸点不在TabBar的坐标范围内,因此TabBar无法响应该触摸事件,hitTest:withEvent: 直接返回了nil。
既然如此,问题是出现在hitTest:withEvent: 的判断逻辑之上,我们只要重写TabBar的 pointInside:withEvent: 当我们点击到按钮的范围就返回YES,如果没有点击到按钮的范围之中,那么就按照之前的点击方式进行判断即可。
objc
- (BOOL)pointInside:(CGPoint)point withEvent:(UIEvent *)event
{
    //将触摸点坐标转换到在CircleButton上的坐标
    CGPoint pointTemp = [self convertPoint:point toView:_centerButton];
    //若触摸点在CricleButton上则返回YES
    if ([_centerButton pointInside:pointTemp withEvent:event]) {
        return YES;
    }
    //否则返回默认的操作
    return [super pointInside:point withEvent:event];
}修改pointInside的方法后我们得到的程序如下
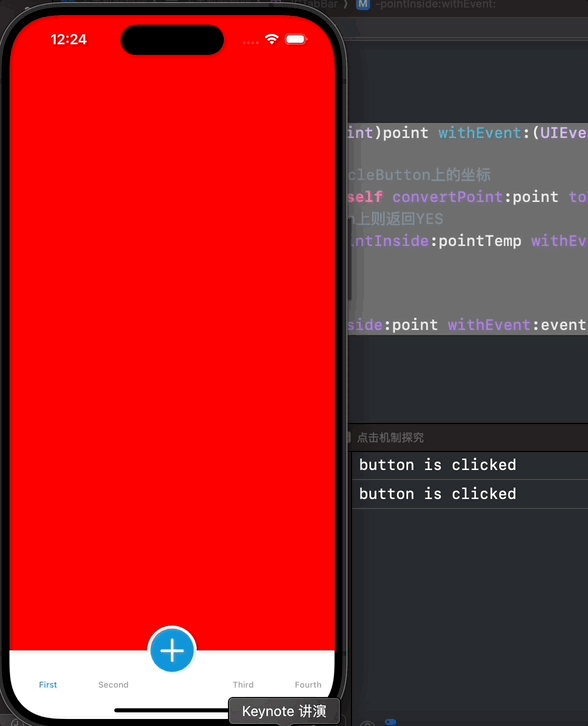
无论我们点击按钮的哪个位置,按钮都可以正常响应啦。但是这个demo存在另外一个问题,如果给按钮添加旋转45度的动画的话,按钮会直接消失,可能是这个button旋转45度之后超出了正常下时的。所以我只能使用Core Graphics对图像进行旋转,关于Core Graphics框架的内容感觉后面会再进行学习,整理为一篇博客。
扩大按钮的响应范围
如果我们需要使用按钮来扩大它的响应范围10个像素,我们可以修改hitText的方法
objc
- (BOOL)pointInside:(CGPoint)point withEvent:(UIEvent *)event {
    CGRect extendedBounds = CGRectInset(self.bounds, -10, -10); // 扩大点击区域
    return CGRectContainsPoint(extendedBounds, point);
}
通过扩大button的原有范围,进行判断即可轻松的实现