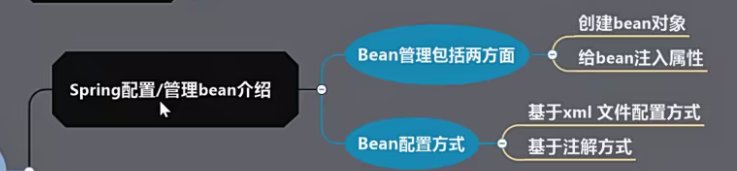
4,Spring 内容
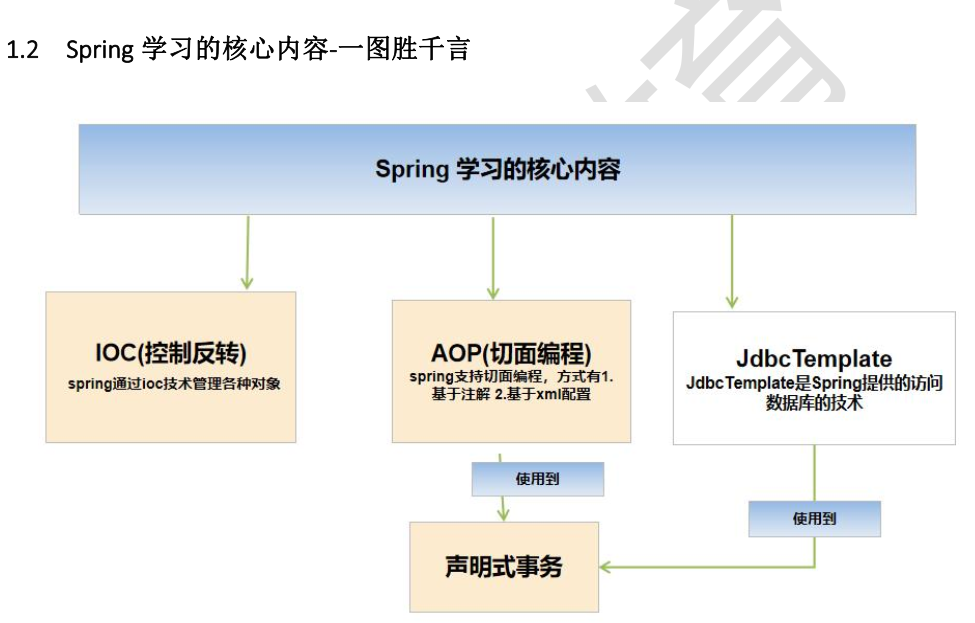

7,快速入门
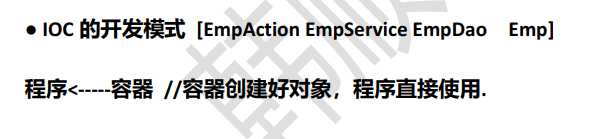
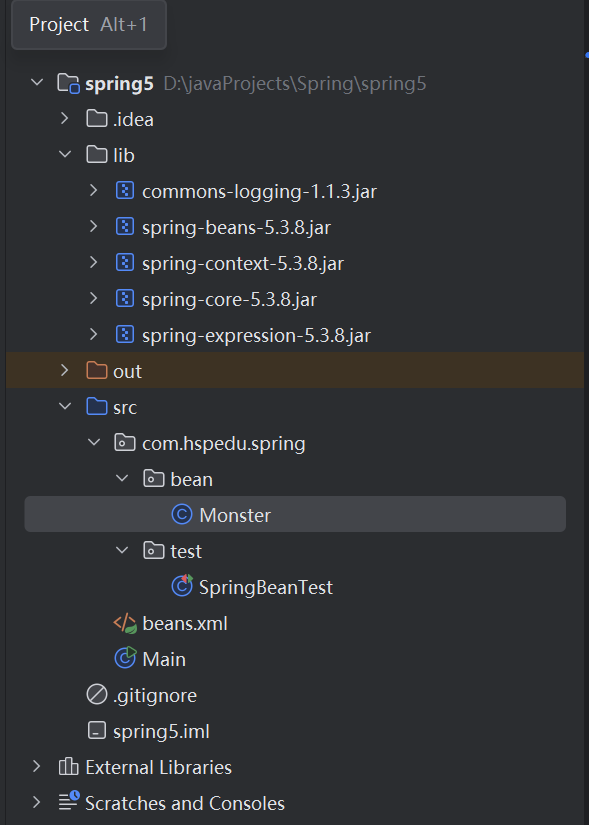
需求:通过 Spring 的方式配置文件, 获取 JavaBean: Monster 的对象, 并给该的对象属性赋值, 输出该对象信息.

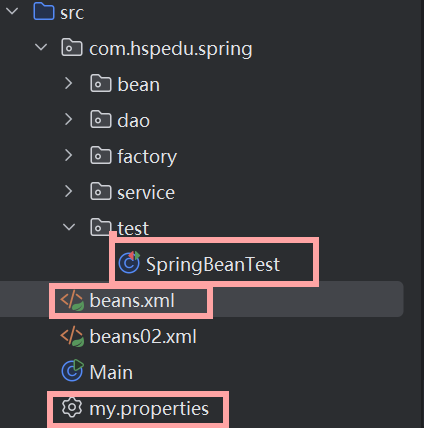
代码结构:
lib 目录是自己创建的,然后再引入5个jar包
源码:
beans.xml
<?xml version="1.0" encoding="UTF-8"?>
<beans xmlns="http://www.springframework.org/schema/beans"
       xmlns:xsi="http://www.w3.org/2001/XMLSchema-instance"
       xsi:schemaLocation="http://www.springframework.org/schema/beans http://www.springframework.org/schema/beans/spring-beans.xsd">
    <!--
            老韩解读
            1. 配置monster对象/javabean
            2. 在beans中可以配置多个bean
            3. bean表示就是一个java对象
            4. class属性是用于指定类的全路径->spring底层使用反射创建
            5. id属性表示该java对象在spring容器中的id, 通过id可以获取到对象
            6. <property name="monsterId" value="100"> 用于给该对象的属性赋值,没有给就是默认值
        -->
    <bean class="com.hspedu.spring.bean.Monster" id="monster01">
        <property name="monsterID" value="100"/>
        <property name="name" value="牛魔王"/>
        <property name="skill" value="芭蕉扇"/>
    </bean>
</beans>
Monster.java
package com.hspedu.spring.bean;

public class Monster {
    private Integer monsterID;
    private String name;
    private String skill;

    //全参构造器
    public Monster(Integer monsterID, String name, String skill) {
        this.monsterID = monsterID;
        this.name = name;
        this.skill = skill;
    }

    //无参构造器一定要写,Spring反射创建对象时,需要使用
    public Monster() {

    }

    public Integer getMonsterID() {
        return monsterID;
    }

    public void setMonsterID(Integer monsterID) {
        this.monsterID = monsterID;
    }

    public String getName() {
        return name;
    }

    public void setName(String name) {
        this.name = name;
    }

    public String getSkill() {
        return skill;
    }

    public void setSkill(String skill) {
        this.skill = skill;
    }

    @Override
    public String toString() {
        return "Monster{" +
                "monsterID=" + monsterID +
                ", name='" + name + '\'' +
                ", skill='" + skill + '\'' +
                '}';
    }
}
SpringBeanTest.java
package com.hspedu.spring.test;

import com.hspedu.spring.bean.Monster;
import org.junit.Test;
import org.springframework.context.ApplicationContext;
import org.springframework.context.support.ClassPathXmlApplicationContext;

public class SpringBeanTest {

    @Test
    public void getMonster() {
        //1. 创建容器 ApplicationContext
        //2. 该容器和容器配置文件关联
        ApplicationContext ioc =
                new ClassPathXmlApplicationContext("beans.xml");

        //3. 通过getBean获取对应的对象
        //   默认返回的是Object , 但是运行类型Monster
        Object monster01 = ioc.getBean("monster01");

        //4. 输出
        System.out.println("monster01=" + monster01);
        System.out.println("运行类型=" + monster01.getClass());

        //5. 也可以再获取的时候,直接指定Class类型, 可以再次获取
        Monster monster02 = ioc.getBean("monster01", Monster.class);
        System.out.println("monster01=" + monster01);
        System.out.println("运行类型=" + monster02.getClass());
    }
}
运行结果:

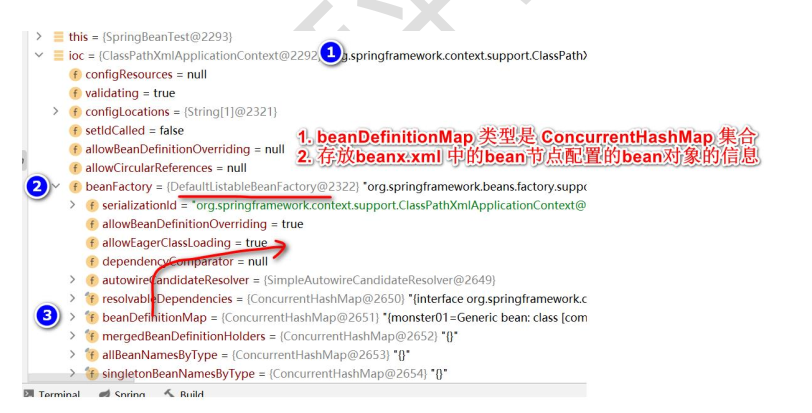
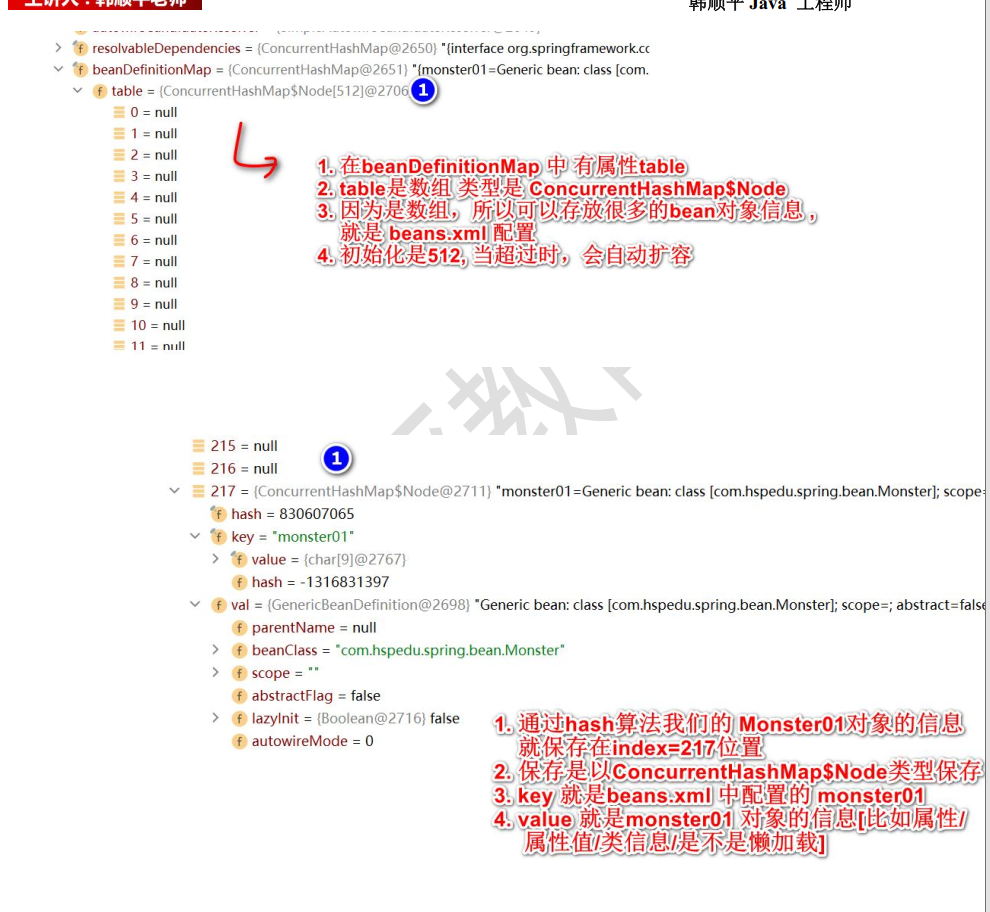
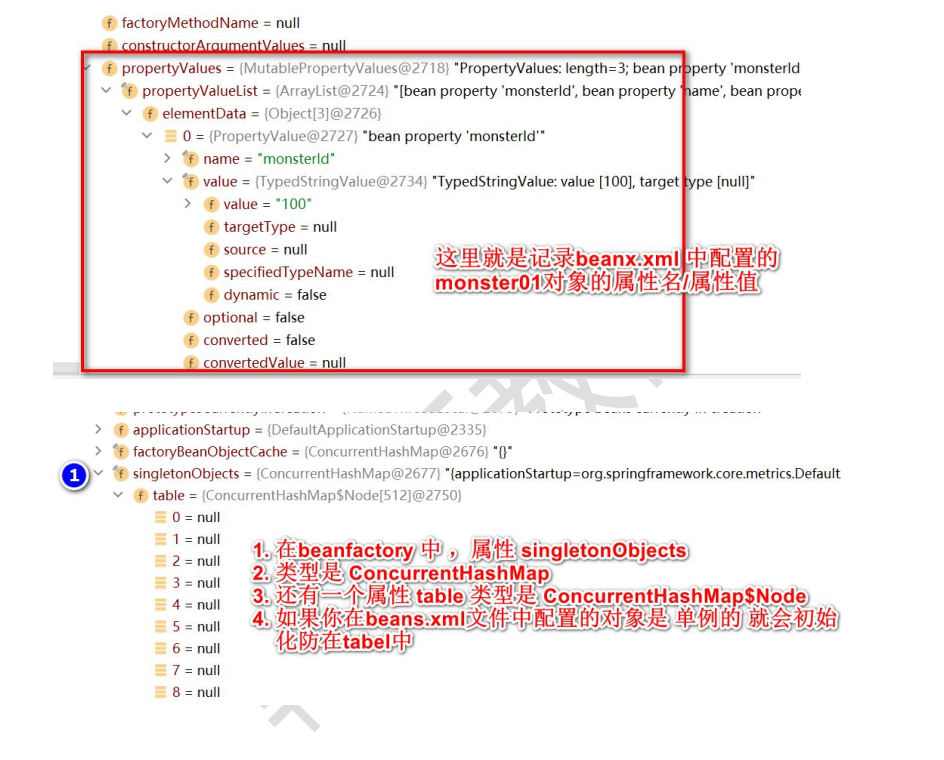
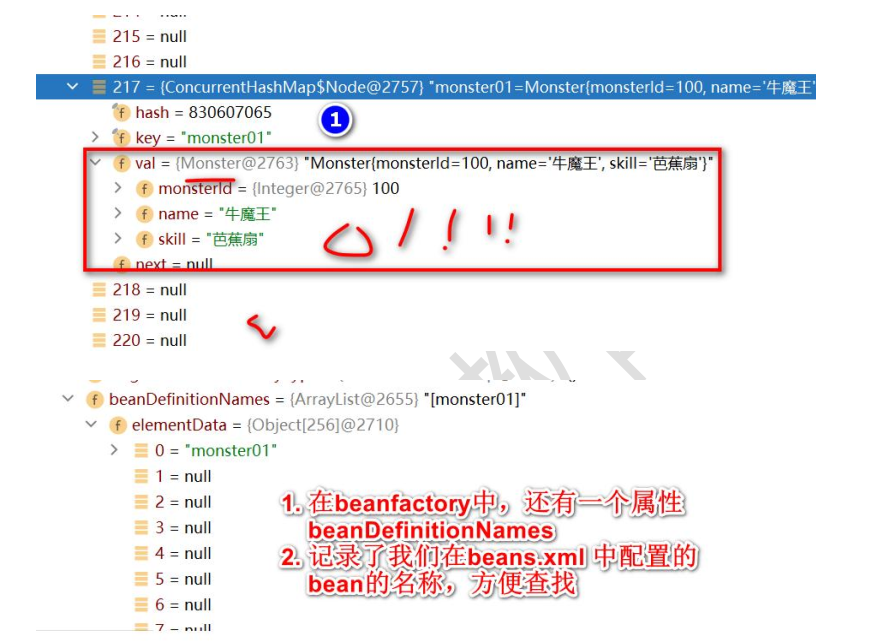
11,Spring容器结构剖析
25,Spring配置Bean的基本介绍
26,通过类型来获取Bean
之前的快速入门是通过 id 来获取Bean
代码结构,Monster.java 都没变。
beans.xml
<?xml version="1.0" encoding="UTF-8"?>
<beans xmlns="http://www.springframework.org/schema/beans"
       xmlns:xsi="http://www.w3.org/2001/XMLSchema-instance"
       xsi:schemaLocation="http://www.springframework.org/schema/beans http://www.springframework.org/schema/beans/spring-beans.xsd">
    <!--配置Monster,通过类型来获取,要求 ioc 容器中的同一个类的 bean 只能有一个, 否则会抛出异常-->
    <bean class="com.hspedu.spring.bean.Monster">
        <!--老韩解读
        1.当我们给某个bean对象设置属性的时候
        2.底层是使用对应的setter方法完成的, 比如setName()
        3.如果没有这个方法,就会报错
        -->
        <property name="monsterID" value="100"/>
        <property name="name" value="牛魔王"/>
        <property name="skill" value="芭蕉扇"/>
    </bean>
</beans>
SpringBeanTest.java
package com.hspedu.spring.test;

import com.hspedu.spring.bean.Monster;
import org.junit.Test;
import org.springframework.context.ApplicationContext;
import org.springframework.context.support.ClassPathXmlApplicationContext;

public class SpringBeanTest {

    //通过Bean的类型来获取对象
    @Test
    public void getBeanByType() {
        ApplicationContext ioc =
                new ClassPathXmlApplicationContext("beans.xml");
        //老师解读,直接传入class对象/类型
        Monster bean = ioc.getBean(Monster.class);
        System.out.println("bean=" + bean);
    }
}
运行结果:

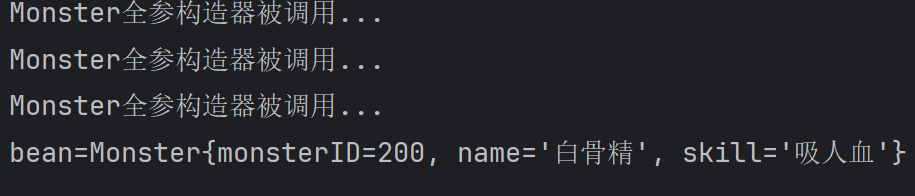
28,通过指定构造器配置Bean

代码结构不变
Monster.java
package com.hspedu.spring.bean;

public class Monster {
    private Integer monsterID;
    private String name;
    private String skill;

    //全参构造器
    public Monster(Integer monsterID, String name, String skill) {
        System.out.println("Monster全参构造器被调用...");
        this.monsterID = monsterID;
        this.name = name;
        this.skill = skill;
    }

    //无参构造器一定要写,Spring反射创建对象时,需要使用
    public Monster() {

    }

    public Integer getMonsterID() {
        return monsterID;
    }

    public void setMonsterID(Integer monsterID) {
        this.monsterID = monsterID;
    }

    public String getName() {
        return name;
    }

    public void setName(String name) {
        this.name = name;
    }

    public String getSkill() {
        return skill;
    }

    public void setSkill(String skill) {
        this.skill = skill;
    }

    @Override
    public String toString() {
        return "Monster{" +
                "monsterID=" + monsterID +
                ", name='" + name + '\'' +
                ", skill='" + skill + '\'' +
                '}';
    }
}
beans.xml
<?xml version="1.0" encoding="UTF-8"?>
<beans xmlns="http://www.springframework.org/schema/beans"
       xmlns:xsi="http://www.w3.org/2001/XMLSchema-instance"
       xsi:schemaLocation="http://www.springframework.org/schema/beans http://www.springframework.org/schema/beans/spring-beans.xsd">
    <!--配置Monster对象,并且指定构造器
    老师解读
    1. constructor-arg标签可以指定使用构造器的参数
    2. index表示构造器的第几个参数 从0开始计算的
    3. 除了可以通过index 还可以通过 name / type 来指定参数方式
    4. 解除大家的疑惑, 类的构造器,不能有完全相同类型和顺序的构造器,所以可以通过type来指定
    -->
    <bean class="com.hspedu.spring.bean.Monster" id = "monster01">
        <constructor-arg value="200" index="0"/>
        <constructor-arg value="白骨精" index="1"/>
        <constructor-arg value="吸人血" index="2"/>
    </bean>
    <bean class="com.hspedu.spring.bean.Monster" id="monster02">
        <constructor-arg value="200" name="monsterID"/>
        <constructor-arg value="白骨精" name="name"/>
        <constructor-arg value="吸人血" name="skill"/>
    </bean>
    <!--
    数据类型就是对应的 Java 数据类型, 按构造器参数顺序
    -->
    <bean class="com.hspedu.spring.bean.Monster" id="monster03">
        <constructor-arg value="200" type="java.lang.Integer"/>
        <constructor-arg value="白骨精" type="java.lang.String"/>
        <constructor-arg value="吸人血" type="java.lang.String"/>
    </bean>
</beans>
SpringBeanTest.java
package com.hspedu.spring.test;

import com.hspedu.spring.bean.Monster;
import org.junit.Test;
import org.springframework.context.ApplicationContext;
import org.springframework.context.support.ClassPathXmlApplicationContext;

public class SpringBeanTest {

    //通过构造器来设置属性
    @Test
    public void setBeanByConstructor() {
        ApplicationContext ioc =
                new ClassPathXmlApplicationContext("beans.xml");
        Monster bean = ioc.getBean("monster01", Monster.class);
        System.out.println("bean=" + bean);
    }
}
运行结果:
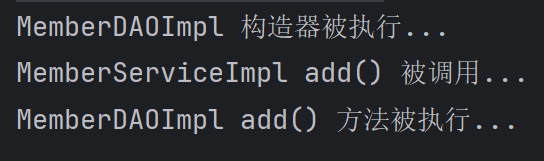
30,通过ref来配置Bean
Service 对象的dao 属性想引用 右边 容器里的dao,就是通过ref来实现bean对象的相互引用。
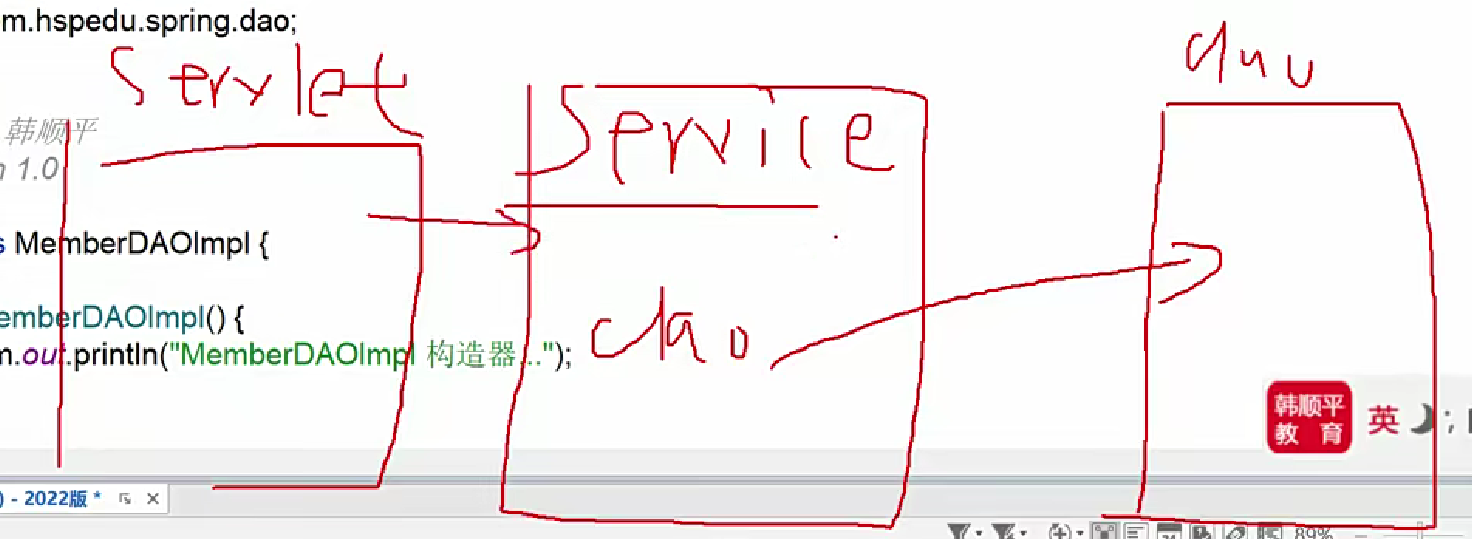
代码结构:
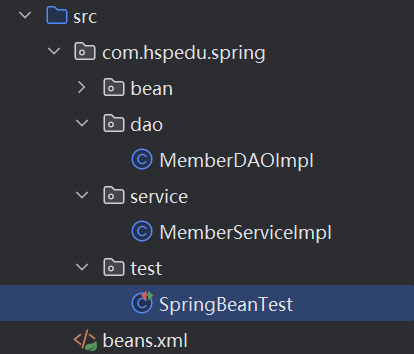
MemberDAOImpl.java
package com.hspedu.spring.dao;

//dao对象
public class MemberDAOImpl {
    //构造器
    public MemberDAOImpl() {
        System.out.println("MemberDAOImpl 构造器被执行...");
    }

    public void add() {
        System.out.println("MemberDAOImpl add() 方法被执行...");
    }
}
MemberServiceImpl.java
package com.hspedu.spring.service;

import com.hspedu.spring.dao.MemberDAOImpl;

public class MemberServiceImpl {
    private MemberDAOImpl memberDAO;

    public MemberDAOImpl getMemberDAO() {
        return memberDAO;
    }

    public void setMemberDAO(MemberDAOImpl memberDAO) {
        this.memberDAO = memberDAO;
    }

    public void add() {
        System.out.println("MemberServiceImpl add() 被调用...");
        memberDAO.add();
    }
}
beans.xml
<?xml version="1.0" encoding="UTF-8"?>
<beans xmlns="http://www.springframework.org/schema/beans"
       xmlns:xsi="http://www.w3.org/2001/XMLSchema-instance"
       xsi:schemaLocation="http://www.springframework.org/schema/beans http://www.springframework.org/schema/beans/spring-beans.xsd">
    <!--配置MemberDAOImpl对象-->
    <bean class="com.hspedu.spring.dao.MemberDAOImpl" id="memberDAO"/>
    <!--配置MemberServiceImpl对象
            老韩解读
            1. ref="memberDAO"表示  MemberServiceImpl对象属性memberDAO引用的对象是id=memberDAO
            的对象
            2. 这里就体现出spring容器的依赖注入
            3. 注意再spring容器中, 他是作为一个整体来执行的, 即如果你引用到一个bean对象, 对你配置的顺序没有要求
            4. 建议还是按顺序,好处是阅读的时候,比较方便
        -->
    <bean class="com.hspedu.spring.service.MemberServiceImpl" id="memberService">
        <property name="memberDAO" ref="memberDAO"/>
    </bean>
</beans>
SpringBeanTest.java
package com.hspedu.spring.test;

import com.hspedu.spring.bean.Monster;
import com.hspedu.spring.service.MemberServiceImpl;
import org.junit.Test;
import org.springframework.context.ApplicationContext;
import org.springframework.context.support.ClassPathXmlApplicationContext;

public class SpringBeanTest {

    //通过ref来设置bean属性
    @Test
    public void setBeanByRef() {
        ApplicationContext ioc =
                new ClassPathXmlApplicationContext("beans.xml");
        MemberServiceImpl memberService = ioc.getBean("memberService", MemberServiceImpl.class);
        memberService.add();
    }
}
运行结果:
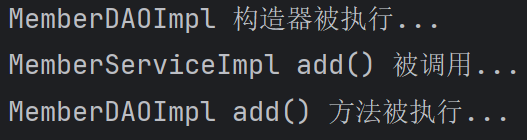
32,通过内部Bean来配置属性
上一节的代码结构不变,只修改 beans.xml 和 SpringBeanTest.java
beans.xml
<?xml version="1.0" encoding="UTF-8"?>
<beans xmlns="http://www.springframework.org/schema/beans"
       xmlns:xsi="http://www.w3.org/2001/XMLSchema-instance"
       xsi:schemaLocation="http://www.springframework.org/schema/beans http://www.springframework.org/schema/beans/spring-beans.xsd">
    <!--配置MemberServiceImpl对象-使用内部bean-->
    <bean class="com.hspedu.spring.service.MemberServiceImpl" id="memberService">
        <!--自己配置一个内部bean-->
        <property name="memberDAO">
            <bean class="com.hspedu.spring.dao.MemberDAOImpl"/>
        </property>
    </bean>

</beans>
SpringBeanTest.java
package com.hspedu.spring.test;

import com.hspedu.spring.bean.Monster;
import com.hspedu.spring.service.MemberServiceImpl;
import org.junit.Test;
import org.springframework.context.ApplicationContext;
import org.springframework.context.support.ClassPathXmlApplicationContext;

public class SpringBeanTest {

    //通过内部bean设置属性
    @Test
    public void setBeanByPro() {
        ApplicationContext ioc =
                new ClassPathXmlApplicationContext("beans.xml");
        MemberServiceImpl memberService = ioc.getBean("memberService", MemberServiceImpl.class);
        memberService.add();
    }
}
运行结果:
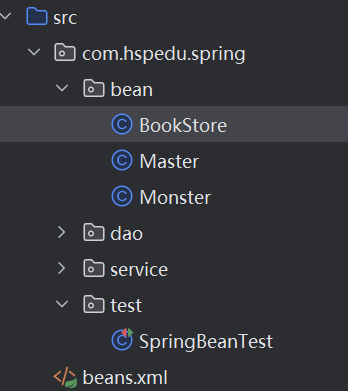
33,对List属性进行配置

代码结构:
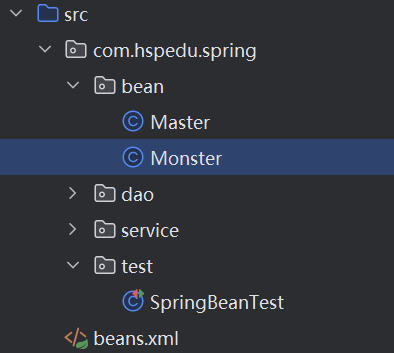
Master.java
package com.hspedu.spring.bean;

import java.util.*;

public class Master {
    private String name;

    private List<Monster> monsterList;
    private Map<String, Monster> monsterMap;
    private Set<Monster> monsterSet;

    //数组
    private String[] monsterName;

    //Java基础
    //这个 Properties 是 Hashtable 的子类 , 是 key-value 的形式
    //这里 Properties key 和 value 都是 String
    private Properties pros;

    public String getName() {
        return name;
    }

    public void setName(String name) {
        this.name = name;
    }

    public List<Monster> getMonsterList() {
        return monsterList;
    }

    public void setMonsterList(List<Monster> monsterList) {
        this.monsterList = monsterList;
    }

    public Map<String, Monster> getMonsterMap() {
        return monsterMap;
    }

    public void setMonsterMap(Map<String, Monster> monsterMap) {
        this.monsterMap = monsterMap;
    }

    public Set<Monster> getMonsterSet() {
        return monsterSet;
    }

    public void setMonsterSet(Set<Monster> monsterSet) {
        this.monsterSet = monsterSet;
    }

    public String[] getMonsterName() {
        return monsterName;
    }

    public void setMonsterName(String[] monsterName) {
        this.monsterName = monsterName;
    }

    public Properties getPros() {
        return pros;
    }

    public void setPros(Properties pros) {
        this.pros = pros;
    }

    @Override
    public String toString() {
        return "Master{" +
                "name='" + name + '\'' +
                ", \nmonsterList=" + monsterList +
                ", \nmonsterMap=" + monsterMap +
                ", \nmonsterSet=" + monsterSet +
                ", \nmonsterName=" + Arrays.toString(monsterName) +
                ", \npros=" + pros +
                '}';
    }
}
Monster.java
package com.hspedu.spring.bean;

public class Monster {
    private Integer monsterID;
    private String name;
    private String skill;

    //全参构造器
    public Monster(Integer monsterID, String name, String skill) {
        this.monsterID = monsterID;
        this.name = name;
        this.skill = skill;
    }

    //无参构造器一定要写,Spring反射创建对象时,需要使用
    public Monster() {

    }

    public Integer getMonsterID() {
        return monsterID;
    }

    public void setMonsterID(Integer monsterID) {
        this.monsterID = monsterID;
    }

    public String getName() {
        return name;
    }

    public void setName(String name) {
        this.name = name;
    }

    public String getSkill() {
        return skill;
    }

    public void setSkill(String skill) {
        this.skill = skill;
    }

    @Override
    public String toString() {
        return "Monster{" +
                "monsterID=" + monsterID +
                ", name='" + name + '\'' +
                ", skill='" + skill + '\'' +
                '}';
    }
}
beans.xml
<?xml version="1.0" encoding="UTF-8"?>
<beans xmlns="http://www.springframework.org/schema/beans"
       xmlns:xsi="http://www.w3.org/2001/XMLSchema-instance"
       xsi:schemaLocation="http://www.springframework.org/schema/beans http://www.springframework.org/schema/beans/spring-beans.xsd">
    <!--配置Master对象
    体会 spring 容器配置特点 依赖注入-非常灵活
    -->
    <bean class="com.hspedu.spring.bean.Master" id="master">
        <property name="name" value="太上老君"/>
        <!--给list属性赋值-->
        <property name="monsterList">
            <list>
                <ref bean="monster01"/>
                <bean class="com.hspedu.spring.bean.Monster">
                    <property name="monsterID" value="100"/>
                    <property name="name" value="老鼠精"/>
                    <property name="skill" value="吃粮食"/>
                </bean>
            </list>
        </property>
    </bean>

    <bean class="com.hspedu.spring.bean.Monster" id="monster01">
        <property name="monsterID" value="1001"/>
        <property name="name" value="牛魔王"/>
        <property name="skill" value="芭蕉扇"/>
    </bean>
</beans>
SpringBeanTest.java
package com.hspedu.spring.test;
import com.hspedu.spring.bean.Master;
import com.hspedu.spring.bean.Monster;
import com.hspedu.spring.service.MemberServiceImpl;
import org.junit.Test;
import org.springframework.context.ApplicationContext;
import org.springframework.context.support.ClassPathXmlApplicationContext;
public class SpringBeanTest {
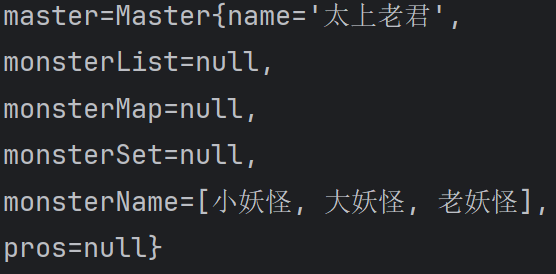
//给集合数组属性进行赋值
@Test
public void setBeanByCollection() {
ApplicationContext ioc =
new ClassPathXmlApplicationContext("beans.xml");
Master master = ioc.getBean("master", Master.class);
System.out.println("master=" + master);
}
}运行结果:

35,对Map属性进行配置
代码结构和上一节的一样,只有beans.xml 变了
beans.xml
<?xml version="1.0" encoding="UTF-8"?>
<beans xmlns="http://www.springframework.org/schema/beans"
       xmlns:xsi="http://www.w3.org/2001/XMLSchema-instance"
       xsi:schemaLocation="http://www.springframework.org/schema/beans http://www.springframework.org/schema/beans/spring-beans.xsd">
    <!--配置Master对象
    体会 spring 容器配置特点 依赖注入-非常灵活
    -->
    <bean class="com.hspedu.spring.bean.Master" id="master">
        <property name="name" value="太上老君"/>
        <!--给map属性赋值-->
        <property name="monsterMap">
            <map>
                <entry>
                    <key>
                        <value>monster01</value>
                    </key>
                    <!--这里老师使用的外部bean,引入-->
                    <ref bean="monster01"/>
                </entry>

                <entry>
                    <key>
                        <value>monster02</value>
                    </key>
                    <!--这里老师使用的外部bean,引入-->
                    <ref bean="monster02"/>
                </entry>
            </map>
        </property>
    </bean>

    <bean class="com.hspedu.spring.bean.Monster" id="monster01">
        <property name="monsterID" value="1001"/>
        <property name="name" value="牛魔王"/>
        <property name="skill" value="芭蕉扇"/>
    </bean>

    <bean class="com.hspedu.spring.bean.Monster" id="monster02">
        <property name="monsterID" value="1002"/>
        <property name="name" value="红孩儿"/>
        <property name="skill" value="玩"/>
    </bean>
</beans>
运行结果:

36,对Set属性进行配置
代码结构不变,只有 beans.xml 变了
beans.xml
<?xml version="1.0" encoding="UTF-8"?>
<beans xmlns="http://www.springframework.org/schema/beans"
       xmlns:xsi="http://www.w3.org/2001/XMLSchema-instance"
       xsi:schemaLocation="http://www.springframework.org/schema/beans http://www.springframework.org/schema/beans/spring-beans.xsd">
    <!--配置Master对象
    体会 spring 容器配置特点 依赖注入-非常灵活
    -->
    <bean class="com.hspedu.spring.bean.Master" id="master">
        <property name="name" value="太上老君"/>
        <!--给set属性赋值-->
        <property name="monsterSet">
            <set>
                <ref bean="monster01"/>
                <bean class="com.hspedu.spring.bean.Monster">
                    <property name="monsterID" value="666"/>
                    <property name="name" value="金角大王"/>
                    <property name="skill" value="吐水"/>
                </bean>
            </set>
        </property>
    </bean>

    <bean class="com.hspedu.spring.bean.Monster" id="monster01">
        <property name="monsterID" value="1001"/>
        <property name="name" value="牛魔王"/>
        <property name="skill" value="芭蕉扇"/>
    </bean>
</beans>
运行结果:

37,对Array属性进行配置
代码结构不变,只有 beans.xml 变了
beans.xml
<?xml version="1.0" encoding="UTF-8"?>
<beans xmlns="http://www.springframework.org/schema/beans"
       xmlns:xsi="http://www.w3.org/2001/XMLSchema-instance"
       xsi:schemaLocation="http://www.springframework.org/schema/beans http://www.springframework.org/schema/beans/spring-beans.xsd">
    <!--配置Master对象
    体会 spring 容器配置特点 依赖注入-非常灵活
    -->
    <bean class="com.hspedu.spring.bean.Master" id="master">
        <property name="name" value="太上老君"/>
        <!--给数组属性赋值
        老师多说一句: array标签中使用 value 还是 bean , ref .. 要根据你的业务决定,数组可以是字符串数组,也可以是Map数组
        -->
        <property name="monsterName">
            <array>
                <value>小妖怪</value>
                <value>大妖怪</value>
                <value>老妖怪</value>
            </array>
        </property>
    </bean>
</beans>
运行结果:
38,对Properties属性进行配置
代码结构不变,只有 beans.xml 变了
beans.xml
<?xml version="1.0" encoding="UTF-8"?>
<beans xmlns="http://www.springframework.org/schema/beans"
xmlns:xsi="http://www.w3.org/2001/XMLSchema-instance"
xsi:schemaLocation="http://www.springframework.org/schema/beans http://www.springframework.org/schema/beans/spring-beans.xsd">
<!--配置Master对象
体会 spring 容器配置特点 依赖注入-非常灵活
-->
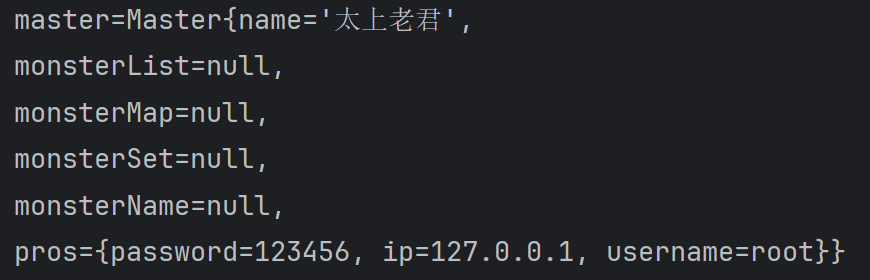
<bean class="com.hspedu.spring.bean.Master" id="master">
<property name="name" value="太上老君"/>
<!--给Properties属性赋值 结构k(String)-v(String)-->
<property name="pros">
<props>
<prop key="username">root</prop>
<prop key="password">123456</prop>
<prop key="ip">127.0.0.1</prop>
</props>
</property>
</bean>
</beans>运行结果:
39,使用util:list 进行配置
代码结构:
BookStore.java
package com.hspedu.spring.bean;

import java.util.List;

public class BookStore {
    private List<String> bookList;

    //无参构造器,如果你没有其他的构造器,该无参构造器可以不写
    //但是如果你有其他的构造器,则必须显式的定义一下无参构造器
    public BookStore() {
    }

    public BookStore(List<String> bookList) {
        this.bookList = bookList;
    }

    public List<String> getBookList() {
        return bookList;
    }

    public void setBookList(List<String> bookList) {
        this.bookList = bookList;
    }

    @Override
    public String toString() {
        return "BookStore{" +
                "bookList=" + bookList +
                '}';
    }
}
beans.xml
<?xml version="1.0" encoding="UTF-8"?>
<beans xmlns="http://www.springframework.org/schema/beans"
       xmlns:xsi="http://www.w3.org/2001/XMLSchema-instance" xmlns:util="http://www.springframework.org/schema/util"
       xsi:schemaLocation="http://www.springframework.org/schema/beans http://www.springframework.org/schema/beans/spring-beans.xsd http://www.springframework.org/schema/util https://www.springframework.org/schema/util/spring-util.xsd">
    <!--定义一个util:list 并且指定id 可以达到数据复用
    老师说明: 在使用util:list 名称空间时候,需要引入相应的标签, 一般来说通过alt+enter会自动加入
    , 如果没有就手动添加一下即可.
    -->
    <util:list id="myBookList">
        <value>三国演义</value>
        <value>红楼梦</value>
        <value>西游记</value>
        <value>水浒传</value>
    </util:list>

    <!--配置BookStore对象-->
    <bean class="com.hspedu.spring.bean.BookStore" id="bookStore">
        <property name="bookList" ref="myBookList"/>
    </bean>
</beans>
SpringBeanTest.java
package com.hspedu.spring.test;

import com.hspedu.spring.bean.BookStore;
import com.hspedu.spring.bean.Master;
import com.hspedu.spring.bean.Monster;
import com.hspedu.spring.service.MemberServiceImpl;
import org.junit.Test;
import org.springframework.context.ApplicationContext;
import org.springframework.context.support.ClassPathXmlApplicationContext;

import java.awt.print.Book;

public class SpringBeanTest {

    //使用util:list名称空间给属性赋值
    @Test
    public void setBeanByUtilList() {
        ApplicationContext ioc =
                new ClassPathXmlApplicationContext("beans.xml");
        BookStore bookStore = ioc.getBean("bookStore", BookStore.class);
        System.out.println("bookStore=" + bookStore);
    }
}
运行结果:

40,属性级联赋值配置

就是在配置A类对象的时候,A类有一个B类属性,同时给B类属性的name赋个值。
例子:员工类中有一个部门属性,在配置员工的时候,顺便指定这个员工的部门名称是什么
代码结构:
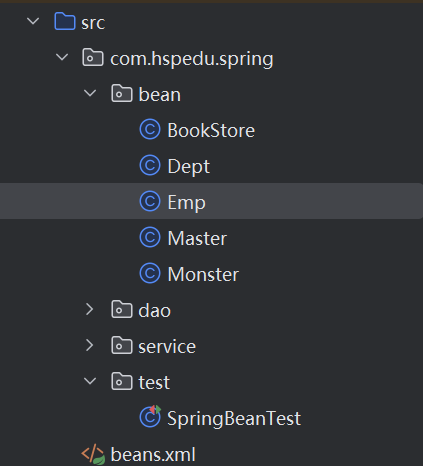
Dept.java
package com.hspedu.spring.bean;

//部门类
public class Dept {
    private String name;

    public Dept() {
    }

    public String getName() {
        return name;
    }

    public void setName(String name) {
        this.name = name;
    }

    @Override
    public String toString() {
        return "Dept{" +
                "name='" + name + '\'' +
                '}';
    }
}
Emp.java
package com.hspedu.spring.bean;

//员工类
public class Emp {
    private String name;
    private Dept dept;

    public Emp() {
    }

    public String getName() {
        return name;
    }

    public void setName(String name) {
        this.name = name;
    }

    public Dept getDept() {
        return dept;
    }

    public void setDept(Dept dept) {
        this.dept = dept;
    }

    @Override
    public String toString() {
        return "Emp{" +
                "name='" + name + '\'' +
                ", dept=" + dept +
                '}';
    }
}
beans.xml
<?xml version="1.0" encoding="UTF-8"?>
<beans xmlns="http://www.springframework.org/schema/beans"
       xmlns:xsi="http://www.w3.org/2001/XMLSchema-instance" xmlns:util="http://www.springframework.org/schema/util"
       xsi:schemaLocation="http://www.springframework.org/schema/beans http://www.springframework.org/schema/beans/spring-beans.xsd http://www.springframework.org/schema/util https://www.springframework.org/schema/util/spring-util.xsd">
    <!--配置Dept对象-->
    <bean class="com.hspedu.spring.bean.Dept" id="dept"/>
    <!--配置Emp对象-->
    <bean class="com.hspedu.spring.bean.Emp" id="emp">
        <property name="name" value="jack"/>
        <property name="dept" ref="dept"/>
        <!--这里我希望给dept的name属性指定值[级联属性赋值]-->
        <property name="dept.name" value="Java开发部门"/>
    </bean>
</beans>
SpringBeanTest.java
package com.hspedu.spring.test;

import com.hspedu.spring.bean.BookStore;
import com.hspedu.spring.bean.Emp;
import com.hspedu.spring.bean.Master;
import com.hspedu.spring.bean.Monster;
import com.hspedu.spring.service.MemberServiceImpl;
import org.junit.Test;
import org.springframework.context.ApplicationContext;
import org.springframework.context.support.ClassPathXmlApplicationContext;

import java.awt.print.Book;

public class SpringBeanTest {

    //给属性进行级联赋值
    @Test
    public void setBeanByRelation() {
        ApplicationContext ioc =
                new ClassPathXmlApplicationContext("beans.xml");
        Emp emp = ioc.getBean("emp", Emp.class);
        System.out.println("emp=" + emp);
    }
}
运行结果:

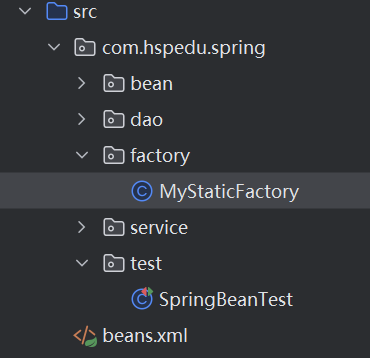
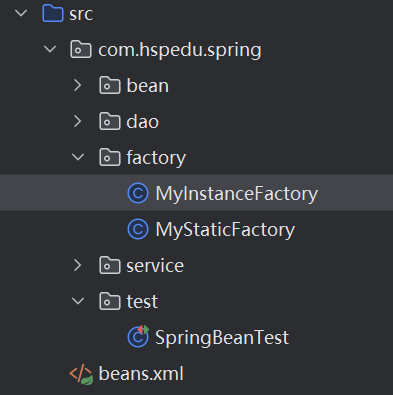
41,通过静态工厂获取Bean

代码结构:
MyStaticFactory.java
package com.hspedu.spring.factory;

import com.hspedu.spring.bean.Monster;

import java.util.HashMap;
import java.util.Map;

//静态工厂类-可以返回Monster对象
public class MyStaticFactory {
    private static Map<String, Monster> monsterMap;

    //使用 static 代码块,进行初始化
    //在 java基础的时候,讲过的
    static {
        monsterMap = new HashMap<>();
        monsterMap.put("monster01", new Monster(100, "牛魔王", "芭蕉扇"));
        monsterMap.put("monster02", new Monster(200, "狐狸精", "美人计"));
    }

    //提供一个方法,返回Monster对象
    public static Monster getMonster(String key) {
        return monsterMap.get(key);
    }
}
beans.xml
<?xml version="1.0" encoding="UTF-8"?>
<beans xmlns="http://www.springframework.org/schema/beans"
       xmlns:xsi="http://www.w3.org/2001/XMLSchema-instance" xmlns:util="http://www.springframework.org/schema/util"
       xsi:schemaLocation="http://www.springframework.org/schema/beans http://www.springframework.org/schema/beans/spring-beans.xsd http://www.springframework.org/schema/util https://www.springframework.org/schema/util/spring-util.xsd">
    <!--配置monster对象,通过静态工厂获取
    老师解读
    1. 通过静态工厂获取/配置bean
    2. class 是静态工厂类的全路径
    3. factory-method 表示是指定静态工厂类的哪个方法返回对象
    4. constructor-arg value="monster02" value是指定要返回静态工厂的哪个对象
    -->
    <bean id="my_monster01" class="com.hspedu.spring.factory.MyStaticFactory"
          factory-method="getMonster">
        <constructor-arg value="monster01"/>
    </bean>
</beans>
SpringBeanTest.java
package com.hspedu.spring.test;

import com.hspedu.spring.bean.BookStore;
import com.hspedu.spring.bean.Emp;
import com.hspedu.spring.bean.Master;
import com.hspedu.spring.bean.Monster;
import com.hspedu.spring.factory.MyStaticFactory;
import com.hspedu.spring.service.MemberServiceImpl;
import org.junit.Test;
import org.springframework.context.ApplicationContext;
import org.springframework.context.support.ClassPathXmlApplicationContext;

import java.awt.print.Book;

public class SpringBeanTest {

    //给属性进行级联赋值
    @Test
    public void setBeanByRelation() {
        ApplicationContext ioc =
                new ClassPathXmlApplicationContext("beans.xml");
        Monster monster = ioc.getBean("my_monster01", Monster.class);
        System.out.println("monster=" + monster);
    }
}
运行结果:

42,通过实例工厂获取Bean

代码结构:
SpringBeanTest.java不变
MyInstanceFactory.java
package com.hspedu.spring.factory;

import com.hspedu.spring.bean.Monster;

import java.util.HashMap;
import java.util.Map;

public class MyInstanceFactory {
    private Map<String, Monster> monster_Map;

    //通过普通代码块进行初始化
    {
        monster_Map = new HashMap<>();
        monster_Map.put("monster03", new Monster(100, "牛魔王~", "芭蕉扇~"));
        monster_Map.put("monster04", new Monster(200, "狐狸精~", "美人计~"));
    }

    //提供一个方法,返回Monster对象
    public Monster getMonster(String key) {
        return monster_Map.get(key);
    }
}
beans.xml
<?xml version="1.0" encoding="UTF-8"?>
<beans xmlns="http://www.springframework.org/schema/beans"
       xmlns:xsi="http://www.w3.org/2001/XMLSchema-instance" xmlns:util="http://www.springframework.org/schema/util"
       xsi:schemaLocation="http://www.springframework.org/schema/beans http://www.springframework.org/schema/beans/spring-beans.xsd http://www.springframework.org/schema/util https://www.springframework.org/schema/util/spring-util.xsd">
    <!--配置monster对象, 通过实例工厂
    老韩解读
    1. factory-bean 指定使用哪个实例工厂对象返回bean
    2. factory-method 指定使用实例工厂对象的哪个方法返回bean
    3. constructor-arg value="monster03" 指定获取到实例工厂中的哪个monster
    -->
    <bean class="com.hspedu.spring.factory.MyInstanceFactory" id="myInstanceFactory"/>
    <bean id="my_monster01" factory-bean="myInstanceFactory" factory-method="getMonster">
        <constructor-arg value="monster03"/>
    </bean>
</beans>
运行结果:

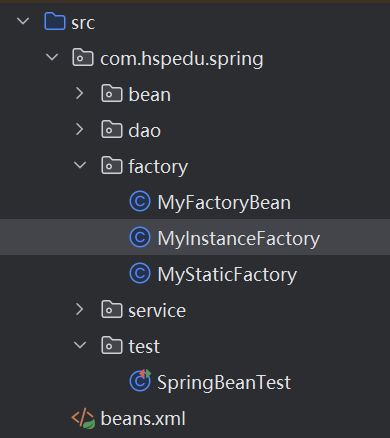
44,通过FactoryBean获取Bean

代码结构:
SpringBeanTest.java 不变
MyFactoryBean.java
package com.hspedu.spring.factory;

import com.hspedu.spring.bean.Monster;
import org.springframework.beans.factory.FactoryBean;

import java.util.HashMap;
import java.util.Map;

public class MyFactoryBean implements FactoryBean<Monster> {
    //这个 key 就是你配置的时候,指定要获取的对象对应的key
    private String key;
    private Map<String, Monster> monster_map;

    //代码块,完成初始化
    {
        monster_map = new HashMap<>();
        monster_map.put("monster03", new Monster(100, "牛魔王~", "芭蕉扇~"));
        monster_map.put("monster04", new Monster(200, "狐狸精~", "美人计~"));
    }

    public void setKey(String key) {
        this.key = key;
    }

    @Override
    public Monster getObject() throws Exception {
        return monster_map.get(key);
    }

    @Override
    public Class<?> getObjectType() {
        return Monster.class;
    }

    @Override
    public boolean isSingleton() {
        return true;
    }
}
beans.xml
<?xml version="1.0" encoding="UTF-8"?>
<beans xmlns="http://www.springframework.org/schema/beans"
       xmlns:xsi="http://www.w3.org/2001/XMLSchema-instance" xmlns:util="http://www.springframework.org/schema/util"
       xsi:schemaLocation="http://www.springframework.org/schema/beans http://www.springframework.org/schema/beans/spring-beans.xsd http://www.springframework.org/schema/util https://www.springframework.org/schema/util/spring-util.xsd">
    <!--配置monster对象,通过FactoryBean获取
    老师解读
    1. class 指定使用的FactoryBean
    2. key表示就是 MyFactoryBean 属性key
    3. value就是你要获取的对象对应key
    -->
    <bean id="my_monster01" class="com.hspedu.spring.factory.MyFactoryBean">
        <property name="key" value="monster04"/>
    </bean>
</beans>
运行结果:

45,Bean配置信息重用

代码结构不变,beans.xml,SpringBeanTest.java 变了
beans.xml
<?xml version="1.0" encoding="UTF-8"?>
<beans xmlns="http://www.springframework.org/schema/beans"
       xmlns:xsi="http://www.w3.org/2001/XMLSchema-instance" xmlns:util="http://www.springframework.org/schema/util"
       xsi:schemaLocation="http://www.springframework.org/schema/beans http://www.springframework.org/schema/beans/spring-beans.xsd http://www.springframework.org/schema/util https://www.springframework.org/schema/util/spring-util.xsd">
    <!--配置Monster对象
    1. 如果bean指定了 abstract="true", 表示该bean对象, 是专门用于被继承
    2. 本身这个bean就不能被获取/实例化
    -->
    <bean id="monster12" class="com.hspedu.spring.bean.Monster" abstract="true">
        <property name="monsterID" value="100"/>
        <property name="name" value="蜈蚣精~"/>
        <property name="skill" value="蜇人~"/>
    </bean>

    <!--配置Monster对象-->
    <bean id="monster10" class="com.hspedu.spring.bean.Monster">
        <property name="monsterID" value="10"/>
        <property name="name" value="蜈蚣精"/>
        <property name="skill" value="蜇人"/>
    </bean>
    <!--
        老韩解读
        1. 配置Monster对象
        2.但是这个对象的属性值和 id="monster10"对象属性一样
        3.parent="monster10" 指定当前这个配置的对象的属性值从 id=monster10的对象来
        -->
    <bean id="monster11" class="com.hspedu.spring.bean.Monster"
          parent="monster10"/>
</beans>
SpringBeanTest.java
package com.hspedu.spring.test;

import com.hspedu.spring.bean.BookStore;
import com.hspedu.spring.bean.Emp;
import com.hspedu.spring.bean.Master;
import com.hspedu.spring.bean.Monster;
import com.hspedu.spring.factory.MyStaticFactory;
import com.hspedu.spring.service.MemberServiceImpl;
import org.junit.Test;
import org.springframework.context.ApplicationContext;
import org.springframework.context.support.ClassPathXmlApplicationContext;

import java.awt.print.Book;

public class SpringBeanTest {

    //通过FactoryBean获取bean
    @Test
    public void getBeanByExtends() {
        ApplicationContext ioc =
                new ClassPathXmlApplicationContext("beans.xml");
        Monster monster11 = ioc.getBean("monster11", Monster.class);
        System.out.println("monster11=" + monster11);
    }
}
运行结果:

46,Bean创建顺序1

代码结构:
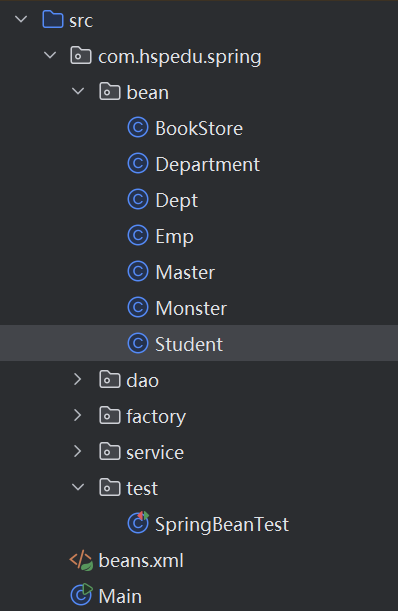
Student.java
package com.hspedu.spring.bean;

public class Student {
    public Student() {
        System.out.println("Student()构造器被执行...");
    }
}
Department.java
package com.hspedu.spring.bean;

public class Department {
    public Department() {
        System.out.println("Department()构造器被执行...");
    }
}
beans.xml
<?xml version="1.0" encoding="UTF-8"?>
<beans xmlns="http://www.springframework.org/schema/beans"
xmlns:xsi="http://www.w3.org/2001/XMLSchema-instance" xmlns:util="http://www.springframework.org/schema/util"
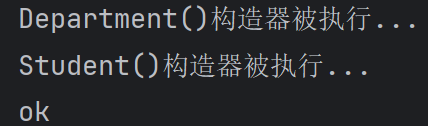
xsi:schemaLocation="http://www.springframework.org/schema/beans http://www.springframework.org/schema/beans/spring-beans.xsd http://www.springframework.org/schema/util https://www.springframework.org/schema/util/spring-util.xsd">
<!--测试bean对象的创建顺序
老师解读
1. 在默认情况下, bean创建的顺序是按照配置顺序来的
2. 但是如果我们增加了 depends-on="department01" 这时就会先创建id= department01对象
-->
<bean id="student01" class="com.hspedu.spring.bean.Student" depends-on="department01"/>
<bean id="department01" class="com.hspedu.spring.bean.Department"/>
</beans>SpringBeanTest.java
package com.hspedu.spring.test;

import com.hspedu.spring.bean.BookStore;
import com.hspedu.spring.bean.Emp;
import com.hspedu.spring.bean.Master;
import com.hspedu.spring.bean.Monster;
import com.hspedu.spring.factory.MyStaticFactory;
import com.hspedu.spring.service.MemberServiceImpl;
import org.junit.Test;
import org.springframework.context.ApplicationContext;
import org.springframework.context.support.ClassPathXmlApplicationContext;

import java.awt.print.Book;

public class SpringBeanTest {

    //测试Bean创建顺序
    @Test
    public void testBeanByCreate() {

        ApplicationContext ioc =
                new ClassPathXmlApplicationContext("beans.xml");
        System.out.println("ok");
    }
}
运行结果:
47,Bean创建顺序2
代码结构和第30节的一样,MemberServiceImpl.java , beans.xml, SpringBeanTest.java 变了
MemberServiceImpl.java
package com.hspedu.spring.service;

import com.hspedu.spring.dao.MemberDAOImpl;

public class MemberServiceImpl {
    private MemberDAOImpl memberDAO;

    public MemberServiceImpl() {
        System.out.println("MemberServiceImpl() 构造器被执行...");
    }

    public MemberDAOImpl getMemberDAO() {
        return memberDAO;
    }

    public void setMemberDAO(MemberDAOImpl memberDAO) {
        System.out.println("setMemberDAO()...");
        this.memberDAO = memberDAO;
    }

    public void add() {
        System.out.println("MemberServiceImpl add() 被调用...");
        memberDAO.add();
    }
}
beans.xml
<?xml version="1.0" encoding="UTF-8"?>
<beans xmlns="http://www.springframework.org/schema/beans"
       xmlns:xsi="http://www.w3.org/2001/XMLSchema-instance" xmlns:util="http://www.springframework.org/schema/util"
       xsi:schemaLocation="http://www.springframework.org/schema/beans http://www.springframework.org/schema/beans/spring-beans.xsd http://www.springframework.org/schema/util https://www.springframework.org/schema/util/spring-util.xsd">

    <bean class="com.hspedu.spring.service.MemberServiceImpl" id="memberService">
        <property name="memberDAO" ref="memberDAO"/>
    </bean>
    <bean class="com.hspedu.spring.dao.MemberDAOImpl" id="memberDAO"/>
</beans>
SpringBeanTest.java
package com.hspedu.spring.test;

import com.hspedu.spring.bean.BookStore;
import com.hspedu.spring.bean.Emp;
import com.hspedu.spring.bean.Master;
import com.hspedu.spring.bean.Monster;
import com.hspedu.spring.factory.MyStaticFactory;
import com.hspedu.spring.service.MemberServiceImpl;
import org.junit.Test;
import org.springframework.context.ApplicationContext;
import org.springframework.context.support.ClassPathXmlApplicationContext;

import java.awt.print.Book;

public class SpringBeanTest {

    //测试Bean创建顺序
    @Test
    public void testBeanByCreate() {

        ApplicationContext ioc =
                new ClassPathXmlApplicationContext("beans.xml");
        System.out.println("ok");
    }
}
运行结果:
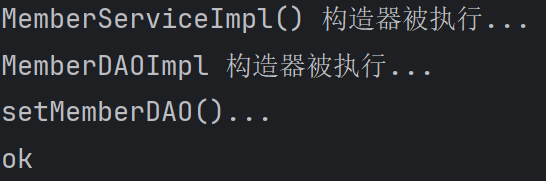
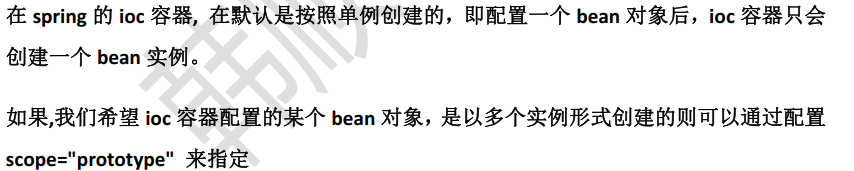
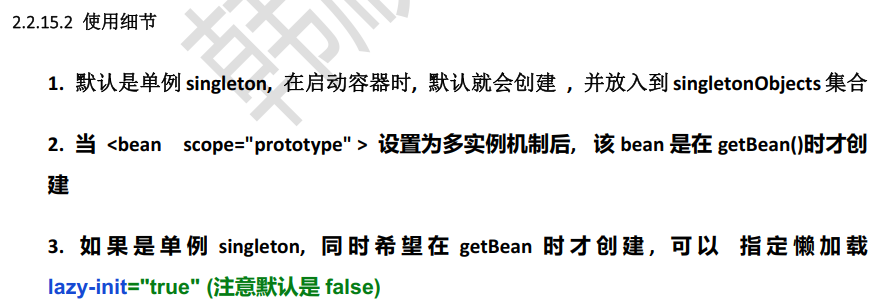
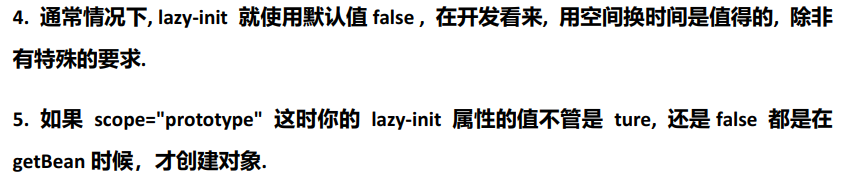
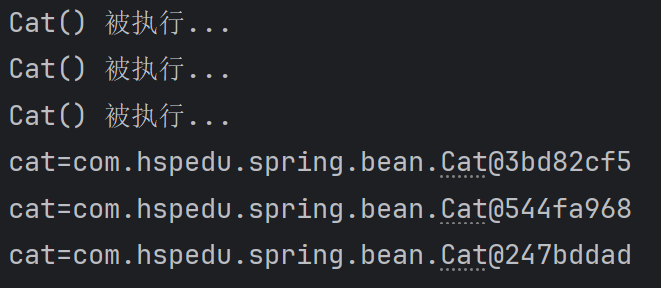
48,Bean的单例和多实例
使用细节需要 debug
代码结构:
Cat.java
package com.hspedu.spring.bean;

public class Cat {
    private Integer id;
    private String name;

    public Cat() {
        System.out.println("Cat() 被执行...");
    }

    public Integer getId() {
        return id;
    }

    public void setId(Integer id) {
        this.id = id;
    }

    public String getName() {
        return name;
    }

    public void setName(String name) {
        this.name = name;
    }
}
beans.xml
<?xml version="1.0" encoding="UTF-8"?>
<beans xmlns="http://www.springframework.org/schema/beans"
       xmlns:xsi="http://www.w3.org/2001/XMLSchema-instance" xmlns:util="http://www.springframework.org/schema/util"
       xsi:schemaLocation="http://www.springframework.org/schema/beans http://www.springframework.org/schema/beans/spring-beans.xsd http://www.springframework.org/schema/util https://www.springframework.org/schema/util/spring-util.xsd">

    <!--配置Cat对象
        老师解读
        1. 在默认情况下 scope属性是 singleton
        2. 在ioc容器中, 只要有一个这个bean对象
        3. 当程序员执行getBean时, 返回的的是同一个对象
        4. 如果我们希望每次getBean返回一个新的Bean对象,则可以scope="prototype"
        5. 如果bean的配置是 scope="singleton" lazy-init="true" 这时,ioc容器就不会提前创建该对象
           , 而是当执行getBean方法的时候,才会创建对象
    -->
    <bean id="cat" class="com.hspedu.spring.bean.Cat" scope="prototype">
        <property name="id" value="100"/>
        <property name="name" value="小花猫"/>
    </bean>
</beans>
SpringBeanTest.java
package com.hspedu.spring.test;

import com.hspedu.spring.bean.*;
import com.hspedu.spring.factory.MyStaticFactory;
import com.hspedu.spring.service.MemberServiceImpl;
import org.junit.Test;
import org.springframework.context.ApplicationContext;
import org.springframework.context.support.ClassPathXmlApplicationContext;

import java.awt.print.Book;

public class SpringBeanTest {

    //测试Scope
    @Test
    public void testBeanScope() {

        ApplicationContext ioc =
                new ClassPathXmlApplicationContext("beans.xml");

        Cat cat = ioc.getBean("cat", Cat.class);
        Cat cat2 = ioc.getBean("cat", Cat.class);
        Cat cat3= ioc.getBean("cat", Cat.class);

        System.out.println("cat=" + cat);
        System.out.println("cat=" + cat2);
        System.out.println("cat=" + cat3);
    }
}
运行结果:
50,Bean的生命周期

代码结构:
House.java
package com.hspedu.spring.bean;

public class House {
    private String name;

    public House() {
        System.out.println("House() 构造器");
    }

    public String getName() {
        return name;
    }

    public void setName(String name) {
        System.out.println("House setName()=" + name);
        this.name = name;
    }

    //下面两个方法是程序员来编写的,根据自己的业务逻辑来写,名字也不是固定的
    public void init() {
        System.out.println("House init()...");
    }

    public void destroy() {
        System.out.println("House destory()...");
    }
}
beans.xml
<?xml version="1.0" encoding="UTF-8"?>
<beans xmlns="http://www.springframework.org/schema/beans"
       xmlns:xsi="http://www.w3.org/2001/XMLSchema-instance" xmlns:util="http://www.springframework.org/schema/util"
       xsi:schemaLocation="http://www.springframework.org/schema/beans http://www.springframework.org/schema/beans/spring-beans.xsd http://www.springframework.org/schema/util https://www.springframework.org/schema/util/spring-util.xsd">

    <!--配置House对象,演示整个Bean的生命周期
    老师解读
    1. init-method="init" 指定bean的初始化方法 , 在setter方法后执行
    2. init方法执行的时机,有spring容器来控制
    3. destroy-method="destroy" 指定bean的销毁方法, 在容器关闭的时候执行
    4. destroy方法执行的时机,有spring容器来控制
    -->
    <bean class="com.hspedu.spring.bean.House" id="house" init-method="init" destroy-method="destroy">
        <property name="name" value="北京豪宅"/>
    </bean>
</beans>
SpringBeanTest.java
package com.hspedu.spring.test;

import com.hspedu.spring.bean.*;
import com.hspedu.spring.factory.MyStaticFactory;
import com.hspedu.spring.service.MemberServiceImpl;
import org.junit.Test;
import org.springframework.context.ApplicationContext;
import org.springframework.context.ConfigurableApplicationContext;
import org.springframework.context.support.ClassPathXmlApplicationContext;

import java.awt.print.Book;

public class SpringBeanTest {

    //测试Bean的生命周期
    @Test
    public void  testBeanLife() {

        ApplicationContext ioc =
                new ClassPathXmlApplicationContext("beans.xml");
        House house = ioc.getBean("house", House.class);
        System.out.println("使用house=" + house);

        //关闭容器
        //1. 这里又要考察大家的java基础,用接口的形式
        //2. ioc的编译类型 ApplicationContext , 运行类型 ClassPathXmlApplicationContext
        //3. 因为ClassPathXmlApplicationContext 实现了 ConfigurableApplicationContext
        //4. ClassPathXmlApplicationContext 是有close
        //5. 将ioc 转成ClassPathXmlApplicationContext,再调用close
        //ioc.close();
        //关闭ioc容器.
        ((ConfigurableApplicationContext)ioc).close();

    }
}
运行结果:
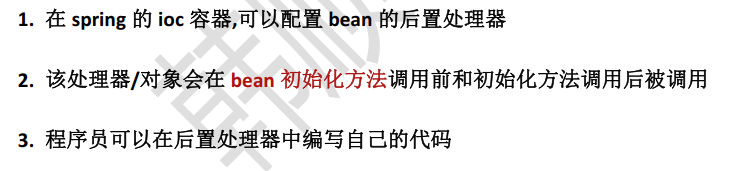
51,配置Bean后置处理器
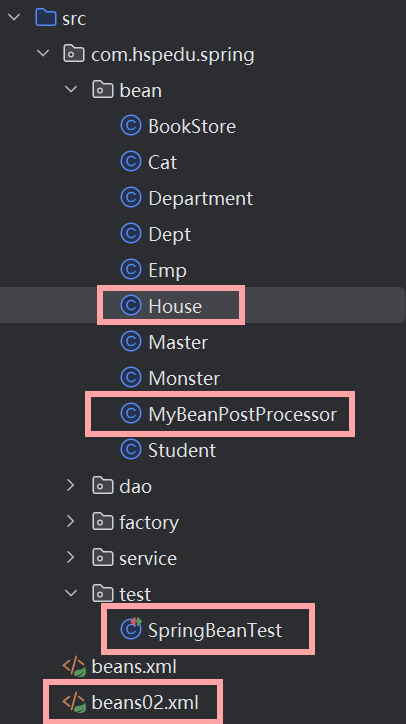
代码结构:
House.java
package com.hspedu.spring.bean;

public class House {
    private String name;

    public House() {
        System.out.println("House() 构造器");
    }

    public String getName() {
        return name;
    }

    public void setName(String name) {
        System.out.println("House setName()=" + name);
        this.name = name;
    }

    //下面两个方法是程序员来编写的,根据自己的业务逻辑来写,名字也不是固定的
    public void init() {
        System.out.println("House init()...");
    }

    public void destroy() {
        System.out.println("House destory()...");
    }

    @Override
    public String toString() {
        return "House{" +
                "name='" + name + '\'' +
                '}';
    }
}
MyBeanPostProcessor.java
package com.hspedu.spring.bean;
import org.springframework.beans.BeansException;
import org.springframework.beans.factory.config.BeanPostProcessor;
//这是一个后置处理器,需要实现 BeanPostProcessor接口
public class MyBeanPostProcessor implements BeanPostProcessor {
/**
* 什么时候被调用:在 bean 的 init方法前被调用,初始化之前完成某些任务
* @param bean : 传入的在IOC容器中创建/配置Bean
* 就是 ioc 容器返回的 bean 对象, 如果这里被替换会修改, 则返回的 bean 对象也会被修改
* @param beanName: 传入的在IOC容器中创建/配置Bean的id
* 就是 ioc 容器配置的 bean 的名称
* @return Object: 程序员对传入的bean进行修改/处理【如果有需要的话】,返回
* 就是返回的 bean 对象
*/
@Override
public Object postProcessBeforeInitialization(Object bean, String beanName) throws BeansException {
System.out.println("postProcessBeforeInitialization()... bean="
+ bean + " beanName=" + beanName);
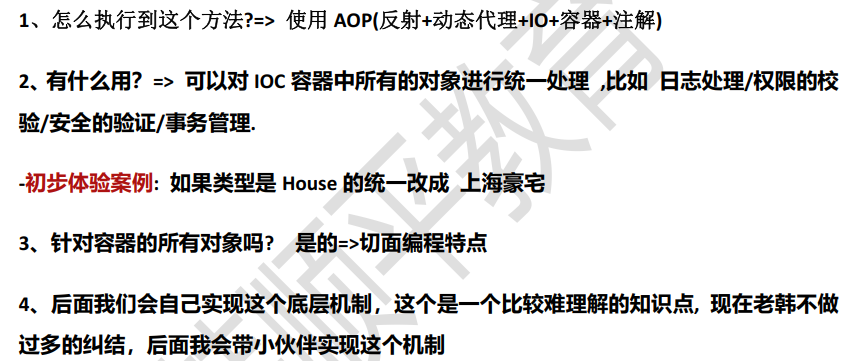
//初步体验案例:如果类型是House的统一改成 上海豪宅
//对多个对象进行处理/编程 --> 切面编程
if (bean instanceof House) {
((House)bean).setName("上海豪宅");
}
return bean;
}
/**
*什么时候被调用: 在 bean 初始化之后完成某些任务
* @param bean : 就是 ioc 容器返回的 bean 对象, 如果这里被替换会修改, 则返
回的 bean 对象也会被修改
* @param beanName: 就是 ioc 容器配置的 bean 的名称
* @return Object: 就是返回的 bean 对象
*/
@Override
public Object postProcessAfterInitialization(Object bean, String beanName) throws BeansException {
System.out.println("postProcessAfterInitialization()... bean="
+ bean + " beanName=" + beanName);
return bean;
}
}beans02.xml
<?xml version="1.0" encoding="UTF-8"?>
<beans xmlns="http://www.springframework.org/schema/beans"
       xmlns:xsi="http://www.w3.org/2001/XMLSchema-instance"
       xsi:schemaLocation="http://www.springframework.org/schema/beans http://www.springframework.org/schema/beans/spring-beans.xsd">

    <!--配置House对象-->
    <bean class="com.hspedu.spring.bean.House" id="house"
          init-method="init"
          destroy-method="destroy">
        <property name="name" value="大豪宅"/>
    </bean>

    <bean class="com.hspedu.spring.bean.House" id="house02"
          init-method="init"
          destroy-method="destroy">
        <property name="name" value="香港豪宅"/>
    </bean>

    <!--配置后置处理器对象
    老师解读
    1. 当我们在beans02.xml 容器配置文件 配置了 MyBeanPostProcessor
    2. 这时后置处理器对象,就会作用在该容器创建的Bean对象
    3. 已经是针对所有对象编程->切面编程AOP
    -->
    <bean class="com.hspedu.spring.bean.MyBeanPostProcessor" id="myBeanPostProcessor"/>
</beans>
SpringBeanTest.java
package com.hspedu.spring.test;
import com.hspedu.spring.bean.*;
import com.hspedu.spring.factory.MyStaticFactory;
import com.hspedu.spring.service.MemberServiceImpl;
import org.junit.Test;
import org.springframework.context.ApplicationContext;
import org.springframework.context.ConfigurableApplicationContext;
import org.springframework.context.support.ClassPathXmlApplicationContext;
import java.awt.print.Book;
public class SpringBeanTest {
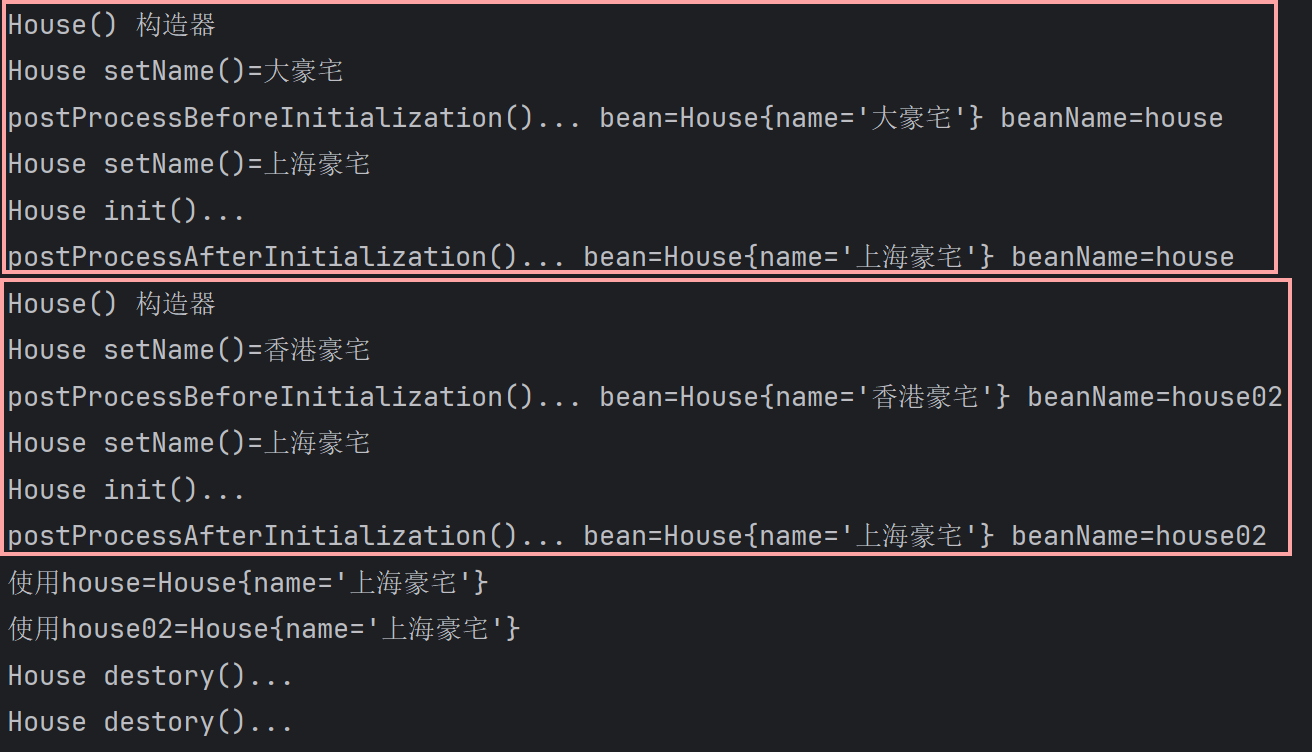
@Test
public void beanPostProcessor() {
ApplicationContext ioc =
new ClassPathXmlApplicationContext("beans02.xml");
House house = ioc.getBean("house", House.class);
System.out.println("使用house=" + house);
House house02 = ioc.getBean("house", House.class);
System.out.println("使用house02=" + house02);
((ConfigurableApplicationContext)ioc).close();
}
}运行结果:
54,通过属性文件配置Bean

代码结构:
my.properties
monsterID=1000
name=jack
skill=hello
beans.xml
<?xml version="1.0" encoding="UTF-8"?>
<beans xmlns="http://www.springframework.org/schema/beans"
       xmlns:xsi="http://www.w3.org/2001/XMLSchema-instance" xmlns:util="http://www.springframework.org/schema/util"
       xmlns:context="http://www.springframework.org/schema/context"
       xsi:schemaLocation="http://www.springframework.org/schema/beans http://www.springframework.org/schema/beans/spring-beans.xsd http://www.springframework.org/schema/util https://www.springframework.org/schema/util/spring-util.xsd http://www.springframework.org/schema/context https://www.springframework.org/schema/context/spring-context.xsd">

    <!--指定属性文件
    "location="classpath:my.properties" 表示指定属性文件的位置
    需要带上 classpath
    属性文件有中文,需要将其转为unicode编码-->使用网上的工具转
    -->
    <context:property-placeholder location="classpath:my.properties"/>
    <!--配置Monster对象
    1. 通过属性文件给monster对象的属性赋值
    2. 这时我们的属性值通过${属性名}
    3. 这里说的 属性名 就是 my.properties文件中的 k=v 的 k
    -->
    <bean class="com.hspedu.spring.bean.Monster" id="monster1000">
        <property name="monsterID" value="${monsterID}"/>
        <property name="skill" value="${skill}"/>
        <property name="name" value="${name}"/>
    </bean>
</beans>
SpringBeanTest.java
package com.hspedu.spring.test;

import com.hspedu.spring.bean.*;
import com.hspedu.spring.factory.MyStaticFactory;
import com.hspedu.spring.service.MemberServiceImpl;
import org.junit.Test;
import org.springframework.context.ApplicationContext;
import org.springframework.context.ConfigurableApplicationContext;
import org.springframework.context.support.ClassPathXmlApplicationContext;

import java.awt.print.Book;

public class SpringBeanTest {

    //通过属性文件给bean属性赋值
    @Test
    public void setBeanByFile() {
        ApplicationContext ioc =
                new ClassPathXmlApplicationContext("beans.xml");
        Monster monster1000 = ioc.getBean("monster1000", Monster.class);
        System.out.println("monster1000=" + monster1000);
    }
}
运行结果:

56,自动装配Bean

代码结构:
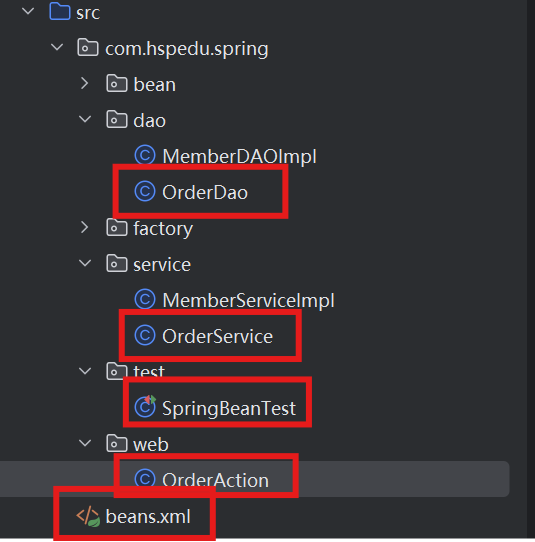
OrderDao.java
package com.hspedu.spring.dao;

public class OrderDao {
    public void saveOrder() {
        System.out.println("保存 一个订单...");
    }

}
OrderService.java
package com.hspedu.spring.service;

import com.hspedu.spring.dao.OrderDao;

public class OrderService {
    private OrderDao orderDao;

    public OrderDao getOrderDao() {
        return orderDao;
    }
    public void setOrderDao(OrderDao orderDao) {
        this.orderDao = orderDao;
    }

}
OrderAction.java
package com.hspedu.spring.web;

import com.hspedu.spring.service.OrderService;

public class OrderAction {
    private OrderService orderService;

    public OrderService getOrderService() {
        return orderService;
    }
    public void setOrderService(OrderService orderService) {
        this.orderService = orderService;
    }
}
beans.xml
<?xml version="1.0" encoding="UTF-8"?>
<beans xmlns="http://www.springframework.org/schema/beans"
       xmlns:xsi="http://www.w3.org/2001/XMLSchema-instance" xmlns:util="http://www.springframework.org/schema/util"
       xmlns:context="http://www.springframework.org/schema/context"
       xsi:schemaLocation="http://www.springframework.org/schema/beans http://www.springframework.org/schema/beans/spring-beans.xsd http://www.springframework.org/schema/util https://www.springframework.org/schema/util/spring-util.xsd http://www.springframework.org/schema/context https://www.springframework.org/schema/context/spring-context.xsd">
    <!--配置OrderDao对象-->
    <bean class="com.hspedu.spring.dao.OrderDao" id="orderDao"/>
    <!--配置OrderService对象
        老师解读
        1. autowire="byType" 表示 在创建 orderService时,通过类型的方式 给对象属性 自动完成赋值/引用
        2. 比如OrderService 对象有 private OrderDao orderDao
        3. 就会在容器中去找有没有 OrderDao类型对象
        4. 如果有,就会自动的装配, 老师提示如果是按照 byType 方式来装配, 这个容器中,不能有两个
          的OrderDao类型对象
        5. 如果你的对象没有属性,  autowire就没有必要写
        6. 其它类推..

        7. 如果我们设置的是 autowire="byName" 表示通过名字完成自动装配
        8. 比如下面的 autowire="byName" class="com.hspedu.spring.service.OrderService"
           1) 先看 OrderService 属性 private OrderDao orderDao
           2) 再根据这个属性的setXxx()方法的 xxx 来找对象id
           3) public void setOrderDao() 就会找id=orderDao对象来进行自动装配
           4) 如果没有就装配失败
    -->
    <bean autowire="byType" class="com.hspedu.spring.service.OrderService" id="orderService"/>
    <!--配置OrderAction-->
    <bean autowire="byName" class="com.hspedu.spring.web.OrderAction" id="orderAction"/>

</beans>
SpringBeanTest.java
package com.hspedu.spring.test;

import com.hspedu.spring.bean.*;
import com.hspedu.spring.factory.MyStaticFactory;
import com.hspedu.spring.service.MemberServiceImpl;
import com.hspedu.spring.web.OrderAction;
import org.junit.Test;
import org.springframework.context.ApplicationContext;
import org.springframework.context.ConfigurableApplicationContext;
import org.springframework.context.support.ClassPathXmlApplicationContext;

import java.awt.print.Book;

public class SpringBeanTest {

    //通过自动装配来对属性赋值
    @Test
    public void setBeanByAutowire() {
        ApplicationContext ioc =
                new ClassPathXmlApplicationContext("beans.xml");
        OrderAction orderAction = ioc.getBean("orderAction", OrderAction.class);

        //验证是否自动装配上OrderService
        System.out.println(orderAction.getOrderService());
        //验证是否自动装配上OrderDao
        System.out.println(orderAction.getOrderService().getOrderDao());
    }
}
运行结果:
