快速配置开启WinRM(HTTP)
quiciconfig
在目标服务器上,管理员权限启动powershell,执行指令
winrm quickconfig输入y,完整日志如下
PS C:\Windows\system32> winrm quickconfig
已在此计算机上运行 WinRM 服务。
WinRM 没有设置成为了管理此计算机而允许对其进行远程访问。
必须进行以下更改:

配置 LocalAccountTokenFilterPolicy 以远程向本地用户授予管理权限。

执行这些更改吗[y/n]? y

WinRM 已经进行了更新,以用于远程管理。

已配置 LocalAccountTokenFilterPolicy 以远程向本地用户授予管理权限。
当前默认服务配置状态
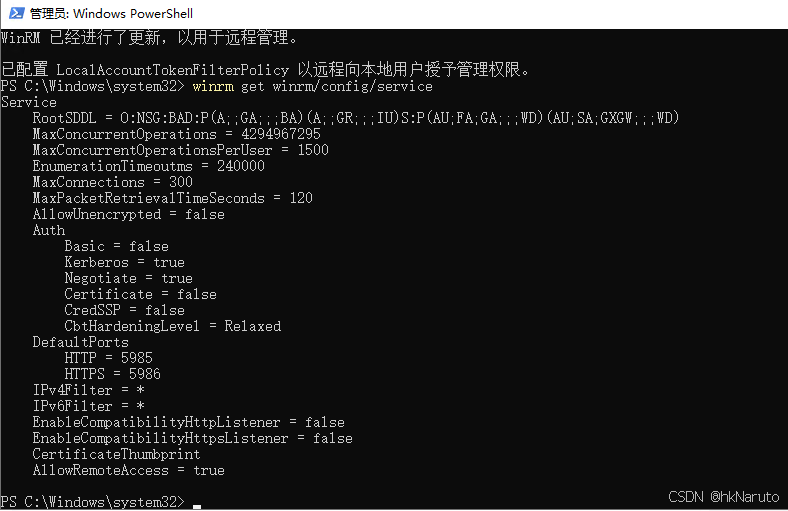
默认开启了HTTP 5985端口
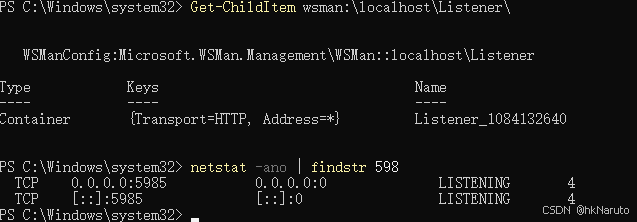
开放TCP/5985端口
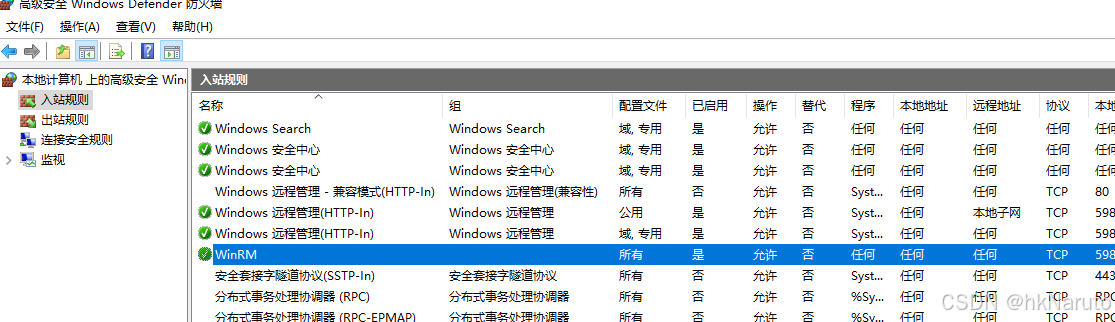
netsh advfirewall firewall add rule name="WinRM" protocol=TCP dir=in localport=5985 action=allow此时可以在防火墙规则中看到刚才添加的入站规则
客户端登陆
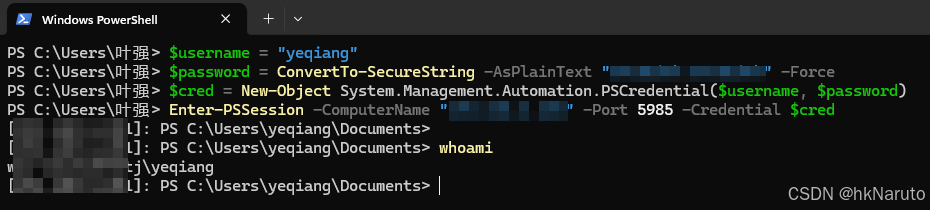
明文密码
$username = "服务器用户名"
$password = ConvertTo-SecureString -AsPlainText "服务器密码" -Force
$cred = New-Object System.Management.Automation.PSCredential($username, $password)
Enter-PSSession -ComputerName "服务器IP地址" -Port 5985 -Credential $cred
成功登陆远程powershell
交互式密码
Enter-PSSession -ComputerName "服务器IP" -Port 5985 -Credential (Get-Credential)注意:采用Get-Credential方式,需要用管理员权限打开powershell,否则会报错
Get-Credential : 无法处理命令,因为一个或多个强制参数丢失: Credential。
采用自签名证书启用WinRM的HTTPS 5986端口
以下服务器操作均在管理员权限启动的powershell中执行
查看hostname
由于证书CN需要保持与服务器主机名一致,因此,先查看主机名
hostname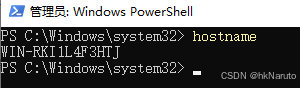
创建证书
# 生成自签名证书
$subjectName = "CN=WIN-RKI1L4F3HTJ"
$cert = New-SelfSignedCertificate -DnsName WIN-RKI1L4F3HTJ -CertStoreLocation Cert:\LocalMachine\My -Subject "CN=WIN-RKI1L4F3HTJ" -KeyUsage DigitalSignature, KeyEncipherment -NotBefore (Get-Date) -NotAfter ((Get-Date).AddYears(10))
Get-ChildItem Cert:\LocalMachine\My | Where-Object {$_.Subject -eq "CN=WIN-RKI1L4F3HTJ"}

# 获取证书的 Thumbprint
$certificates = Get-ChildItem Cert:\LocalMachine\My | Where-Object { $_.Subject -eq $subjectName }
$thumbprint = $certificates.Thumbprint

$store = New-Object System.Security.Cryptography.X509Certificates.X509Store("MY", "LocalMachine")
$store.Open([System.Security.Cryptography.X509Certificates.OpenFlags]::ReadOnly)
$certificates = $store.Certificates
$targetCert = $certificates | Where-Object { $_.Thumbprint -eq $thumbprint }

# 输出增强密钥用法
$targetCert.Extensions | Where-Object { $_.Oid.Value -eq '2.5.29.37' } | ForEach-Object {
     $_.Format([System.Security.Cryptography.X509Certificates.X509Extension]::NoFlags)
}
注意需要指定**-KeyUsage**参数
执行过程如下
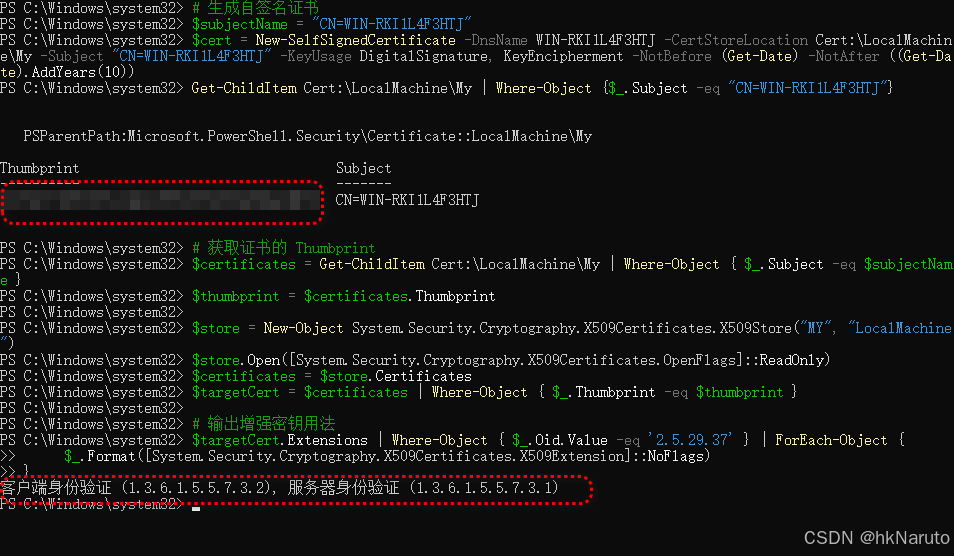
注意,必须要有增强密钥用法:
客户端身份验证 (1.3.6.1.5.5.7.3.2), 服务器身份验证 (1.3.6.1.5.5.7.3.1)
设置 WinRM 使用证书
winrm set winrm/config/service '@{CertificateThumbprint="证书指纹16进制字符串"}'此处指纹需要自行复制,不能引用$thumbprint变量(不明白)
禁用未加密连接
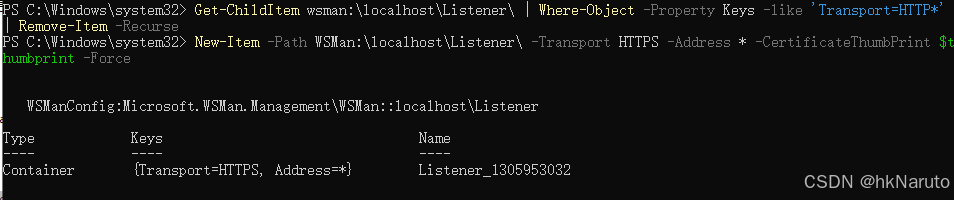
winrm set winrm/config/service '@{AllowUnencrypted="false"}'删除listener
Get-ChildItem wsman:\localhost\Listener\ | Where-Object -Property Keys -like 'Transport=HTTP*' | Remove-Item -Recurse创建新的https监听
New-Item -Path WSMan:\localhost\Listener\ -Transport HTTPS -Address * -CertificateThumbPrint $thumbprint -Force效果如下
检查配置及监听状态
winrm get winrm/config/service

Get-ChildItem wsman:\localhost\Listener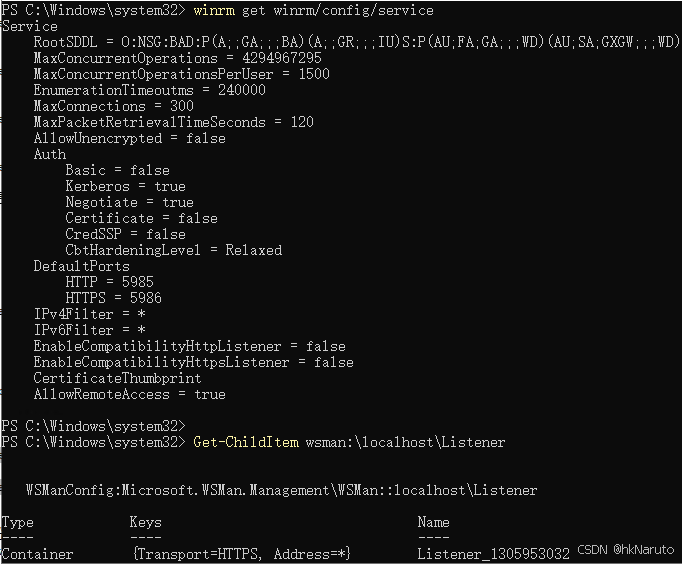
此时服务器关闭了HTTP的5985 只监听了HTTPS的5986端口

开放TCP/5986端口
netsh advfirewall firewall add rule name="WinRM" protocol=TCP dir=in localport=5986 action=allow客户端登陆
方案一(IP地址登陆)
$SessionOption = New-PSSessionOption -SkipCNCheck -SkipCACheck
Enter-PSSession -ComputerName "服务器IP" -Port 5986 -UseSSL -Credential (Get-Credential) -SessionOption $SessionOption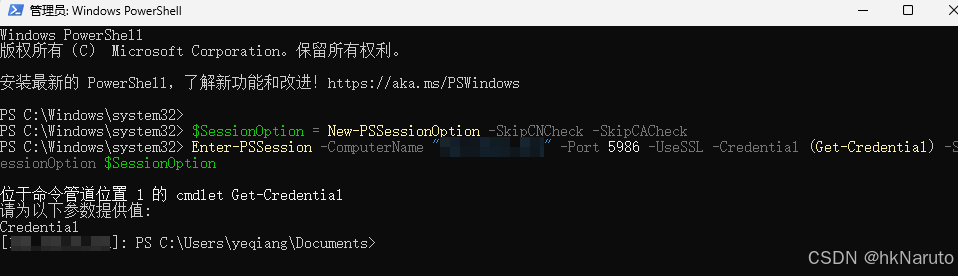
方案二(命令行明文账号密码登陆)
$username = "服务器用户名"
$password = ConvertTo-SecureString -AsPlainText "服务器用户密码" -Force
$cred = New-Object System.Management.Automation.PSCredential($username, $password)
$SessionOption = New-PSSessionOption -SkipCNCheck -SkipCACheck
Enter-PSSession -ComputerName "服务器地址" -Port 5986 -UseSSL -Credential $cred -SessionOption $SessionOption
方案三(主机名登陆,繁琐)
登陆服务器,导出服务器证书
$subjectName = "CN=WIN-RKI1L4F3HTJ"
$certificates = Get-ChildItem Cert:\LocalMachine\My | Where-Object { $_.Subject -eq $subjectName }
Export-Certificate -Cert $certificates[0] -FilePath ./WIN-RKI1L4F3HTJ.cer
将证书复制到客户端
客户端配置hosts
服务器ip WIN-RKI1L4F3HTJ登陆客户端,导入证书
管理员身份启动powershell,导入证书
Import-Certificate -FilePath D:\WIN-RKI1L4F3HTJ.cer -CertStoreLocation Cert:\LocalMachine\root\登陆
Enter-PSSession -ComputerName "WIN-RKI1L4F3HTJ" -Port 5986 -UseSSL -Credential (Get-Credential)