Now, let's use the theme we initially created in our main function for a simple login screen:
现在,让我们使用最初在主函数中创建的主题来制作一个简单的登录屏幕:
Create a Login Screen Widget: Inside the main.dartfile, create a new widget named LoginScreen thatextends StatelessWidget.
创建登录屏幕小部件: 在main.dart文件中,创建一个名为LoginScreen的新部件,它是StatelessWidget的扩展。
Import Required Libraries: Import the necessaryFlutter libraries at the top of your Dart file:
导入所需库: 在 Dart 文件顶部导入必要的 Flutter 库:
dart
import 'package:flutter/material.dart';Define the LoginScreen Widget: Design your login screen using the defined theme. You can use various widgets like TextField, ElevatedButton, and Text to build your UI. Apply the theme's attributes to achieve a consistent style. The final source should look like this:
定义登录屏幕小工具: 使用定义的主题设计登录界面。您可以使用 TextField、ElevatedButton 和 Text 等各种部件来构建用户界面。应用主题属性以实现一致的风格。最终的源文件应该是这样的
dart
import "package:flutter/material.dart";
void main() {
runApp(const MyApp());
}
class MyApp extends StatelessWidget {
const MyApp({super.key});
@override
Widget build(BuildContext context) {
return MaterialApp(
title: "用户登录",
theme: ThemeData(
brightness: Brightness.dark,
primaryColor: Colors.lightBlue[800],
fontFamily: "Georgia",
textTheme: const TextTheme(
displayLarge: TextStyle(fontSize: 70, fontWeight: FontWeight.bold),
titleLarge: TextStyle(fontSize: 34, fontStyle: FontStyle.italic),
bodyMedium: TextStyle(fontSize: 12, fontFamily: "Roboto"),
),
),
home: const LoginScreen(),
);
}
}
class LoginScreen extends StatelessWidget {
const LoginScreen({super.key});
@override
Widget build(BuildContext context) {
return Scaffold(
appBar: AppBar(
title: const Text("用户登录"),
),
body: Center(
child: Padding(
padding: const EdgeInsets.all(16),
child: Column(
mainAxisAlignment: MainAxisAlignment.center,
children: <Widget>[
Text(
"欢迎登录",
style: Theme.of(context).textTheme.titleLarge,
),
const TextField(
decoration: InputDecoration(
labelText: "账号", prefixIcon: Icon(Icons.person)),
),
const SizedBox(height: 20),
const TextField(
decoration: InputDecoration(
labelText: "密码", prefixIcon: Icon(Icons.lock)),
obscureText: true,
),
const SizedBox(height: 20),
ElevatedButton(
onPressed: () {
// Add your login logic here
},
child: const Text("登录"),
),
],
),
)),
);
}
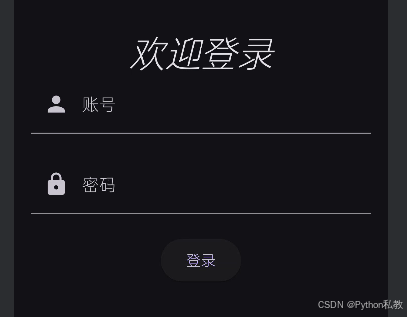
}效果预览:
Apply the Theme: Notice how we've used Theme.of(context).textTheme.titleLarge to set the style of our 'Welcome' Text widget. You can also do the same to other widgets as you desire.
应用主题: 注意我们是如何使用 Theme.of(context).textTheme.titleLarge 来设置 "欢迎 "文本部件的样式的。您也可以根据需要对其他部件进行同样的设置。
Launch the App with LoginScreen: Inside the main function, launch the app with the MaterialApp widget and the LoginScreen as the home screen: You should see the following output.
使用 LoginScreen 启动应用程序: 在主函数中,使用 MaterialApp 部件和 LoginScreen 作为主屏幕启动应用程序: 您应该会看到以下输出。
Make changes: The current theme of the login screen is dark. To make it light, you can change the 'brightness' property of ThemeData in the main function to light.
进行更改: 当前登录界面的主题是暗色。要使其变亮,可将主函数中主题数据的 "亮度 "属性更改为亮色。
dart
brightness: Brightness.light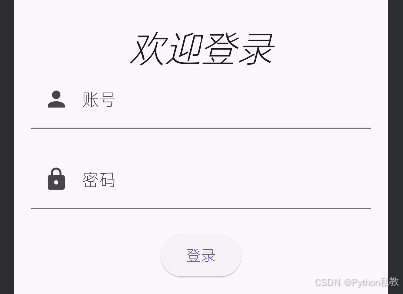
Run the app: When you run the app again, you should see this new look.
运行应用程序: 再次运行应用程序时,你应该会看到这个新外观。
As you follow these steps, you're creating a login screen with a consistent color scheme based on the defined theme. This ensures that your app's UI maintains a unified and professional appearance.
按照这些步骤操作后,您就可以根据定义的主题创建具有统一配色方案的登录屏幕。这样可以确保应用程序的用户界面保持统一和专业的外观。
At the end of this section, your main.dart file should contain the complete code for the login app with a theme. Remember that using themes in Flutter not only helps maintain a consistent look but also simplifies the process of styling your app's UI elements.
本节结束时,您的 main.dart 文件应包含登录应用程序的完整代码和主题。请记住,在 Flutter 中使用主题不仅有助于保持外观一致,还能简化应用程序 UI 元素的样式设计过程。