目录
[Guava 介绍](#Guava 介绍)
[1. 引入 Maven 依赖](#1. 引入 Maven 依赖)
[2. 自定义 Event 事件类](#2. 自定义 Event 事件类)
[3. 定义 EventListener 事件订阅者](#3. 定义 EventListener 事件订阅者)
[4. 定义 EventBus 事件总线](#4. 定义 EventBus 事件总线)
[5. 定义 Controller 进行测试](#5. 定义 Controller 进行测试)
Guava 介绍
Guava 是一组来自 Google 的核心 Java 库,里面包括新的集合 类型(例如 Multimap 和 MultiSet),不可变集合、图形库、 以及用于并发、I/O、哈希、基元、字符串,发布/订阅模式等等。接下来主要讲解 发布订阅模式。
Guava 发布订阅主要包含以下主要核心部分:
- Event 事件
- Publisher 事件发布者
- EventListener 事件订阅者
- EventBus 事件总线
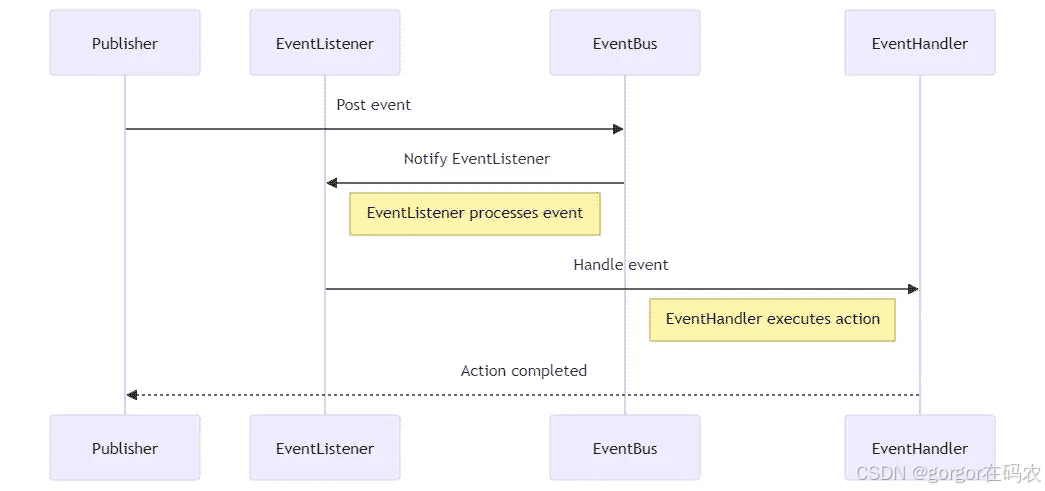
工作流程:
Publisher 事件发布者 通过 EventBus 事件总线 发布事件,然后 EventBus 事件总线 把事件传给 Subscriber 事件订阅者 消费。
工作原理图:

应用场景举例
当用户注册App后,可能会产生很多行为,比如需要发短信提醒用户,注册成功,获取100积分,又或者需要给注册成功的用户送优惠卷。如果按我们平时的写法,则需要在用户注册成功后,返回请求前,需要引入发短信和发优惠卷的逻辑,不仅使冗余在注册代码中,造成耦合度太高。职责不分离。
这时就可以引入Guava 的发布订阅模式。让发送短信的监听器 和 发优惠卷的监听器 同时监听同一个事件即可。
1. 引入 Maven 依赖
<?xml version="1.0" encoding="UTF-8"?>
<project xmlns="http://maven.apache.org/POM/4.0.0" xmlns:xsi="http://www.w3.org/2001/XMLSchema-instance"
         xsi:schemaLocation="http://maven.apache.org/POM/4.0.0 https://maven.apache.org/xsd/maven-4.0.0.xsd">
    <modelVersion>4.0.0</modelVersion>
    <parent>
        <groupId>org.springframework.boot</groupId>
        <artifactId>spring-boot-starter-parent</artifactId>
        <version>2.2.1.RELEASE</version>
    </parent>

    <groupId>com.xinxin</groupId>
    <artifactId>cyh</artifactId>
    <version>0.0.1-SNAPSHOT</version>

    <properties>
        <java.version>1.8</java.version>
    </properties>
    <dependencies>
        <dependency>
            <groupId>org.springframework.boot</groupId>
            <artifactId>spring-boot-starter-web</artifactId>
        </dependency>

        <dependency>
            <groupId>org.projectlombok</groupId>
            <artifactId>lombok</artifactId>
        </dependency>

        <dependency>
            <groupId>com.google.guava</groupId>
            <artifactId>guava</artifactId>
            <version>19.0</version>
        </dependency>
        <dependency>
            <groupId>com.alibaba</groupId>
            <artifactId>fastjson</artifactId>
            <version>1.2.70</version>
        </dependency>
    </dependencies>
</project>
2. 自定义 Event 事件类
Event 类是我们生产者和消费者 消息传播的载体,也就是发送的内容,通常我们以 Event 为后缀来命名事件类。
import lombok.AllArgsConstructor;
import lombok.Data;
import lombok.NoArgsConstructor;

import java.util.Date;

/**
 * @description: 用户注册事件
 * @author: cyh
 * @create: 2024-11-02 17:07
 **/
@AllArgsConstructor
@NoArgsConstructor
@Data
public class UserRegisterEvent {
    private Long userId;

    private Date registerTime;
}
3. 定义 EventListener 事件订阅者
事件订阅者即事件的监听者,接受事件消费的一端。监听者会一直监听他们所关注的事件。
事件订阅者的定义,需要在方法上添加@Subscribe注解声明自己为事件订阅者,然后方法参数是他们监控的 Event 事件。
一般@Subscribe可以配合@AllowConcurrentEvents注解一起使用,这个注解是用来标识当前订阅者是线程安全的,可以减少同步开销。
3.1 定义 发送短信 事件订阅者
/**
 * @description: 短信事件监听器
 * @author: cyh
 * @create: 2024-11-02 17:10
 **/
@Slf4j
@Component
public class SmsEventListener {


        @Subscribe
        @AllowConcurrentEvents
        public void recordRegisterLog(UserRegisterEvent event) {
            Long userId = event.getUserId();
            Date registerTime = event.getRegisterTime();
            log.info("短信监听器 监听到用户注册行为,用户 {} 在 {} 注册成功,事件内容为:{}", userId, registerTime, JSON.toJSONString(event));
            //发送短信通知
            log.info("发送短信通知");
        }

}
3.2 定义 发送优惠卷 事件订阅者
/**
 * @description: 优惠卷事件监听器
 * @author: cyh
 * @create: 2024-11-02 17:10
 **/
@Slf4j
@Component
public class CouponEventListener {

        @Subscribe
        @AllowConcurrentEvents
        public void recordRegisterLog(UserRegisterEvent event) {
            Long userId = event.getUserId();
            Date registerTime = event.getRegisterTime();
            log.info("优惠卷监听器 监听到用户注册行为,用户 {} 在 {} 注册成功,事件内容为:{}", userId, registerTime, JSON.toJSONString(event));
            //发送优惠卷
            log.info("发送优惠卷");
        }
}
4. 定义 EventBus 事件总线
EventBus 事件总线的作用是,将 Event 事件 转发给 EventListener 事件订阅者。所以 首先我们就要把 事件订阅者注册给总线,它才知道有哪些订阅者需要转发。 然后将不同的 Event 事件 转发给订阅了该事件的订阅者。
事件总线有两个作用:
- 发布消息
- 转发消息给订阅者
4.1 EventBus 事件总线,代码定义
/**
 * @description:  事件总线
 * @author: cyh
 * @create: 2024-11-02 17:16
 **/
@Slf4j
@Component
public class EventBusCenter {

    private static EventBus eventBus;
    private static AsyncEventBus asyncEventBus;
    private static Executor executor = new ThreadPoolExecutor(12, 12, 60,
            TimeUnit.SECONDS, new LinkedBlockingQueue<Runnable>(100000), Executors.defaultThreadFactory(), new ThreadPoolExecutor.CallerRunsPolicy());

    /**
     * 异步事件单例模式
     * @return
     */
    private static synchronized AsyncEventBus getAsyncEventBus() {
        if(asyncEventBus == null){
            asyncEventBus = new AsyncEventBus(executor);
        }
        return asyncEventBus;
    }

    /**
     * 同步事件单例模式
     * @return
     */
    private static synchronized EventBus getEventBus() {
        if(eventBus == null) {
            eventBus = new EventBus();
        }
        return eventBus;
    }

    public static void register(Object object) {
        getEventBus().register(object);
        getAsyncEventBus().register(object);
    }

    public static void unregister(Object object) {
        getEventBus().unregister(object);
        getAsyncEventBus().unregister(object);
    }


    /**
     * 同步发送事件
     * @param event
     */
    public static void post(Object event) {
        log.info("同步发送事件内容:{}", JSON.toJSONString(event));
        eventBus.post(event);
    }


    /**
     * 异步发送事件
     * @param event
     */
    public static void asyncPost(Object event) {
        log.info("异步发送事件内容:{}", JSON.toJSONString(event));
        asyncEventBus.post(event);
    }
}
4.2 将 EventListener 事件订阅者注册到总线中
@Order(1)
@Slf4j
@Component
@Configuration
public class RegisterListenerToBus implements ApplicationListener<ApplicationReadyEvent> {

    @Resource
    private SmsEventListener smsEventListener;
    @Resource
    private CouponEventListener couponEventListener;


    @Override
    public void onApplicationEvent(ApplicationReadyEvent event) {
        log.info("ApplicationReadyEvent init restTemplate.");
        try {
            //监听器注册
            EventBusCenter.register(smsEventListener);
            EventBusCenter.register(couponEventListener);
        } catch (Exception e) {
            log.error("初始化配置失败!", e);
        }
        log.info("ApplicationReadyEvent init restTemplates finished.");
    }

}
5. 定义 Controller 进行测试
/**
 * @description:
 * @author: cyh
 * @create: 2024-11-02 17:28
 **/
@RestController
public class RegisterController {

    @GetMapping("/register")
    public String register(Long userId){
        UserRegisterEvent event = new UserRegisterEvent(userId, new Date());
        //同步发送
        EventBusCenter.post(event);
//        //异步发送
//        EventBusCenter.asyncPost(event);
        return "ok";
    }
}
测试结果
同步发送事件内容:{"registerTime":1730557363231,"userId":1594}
短信监听器 监听到用户注册行为,用户 1594 在 Sat Nov 02 22:22:43 CST 2024 注册成功,事件内容为:{"registerTime":1730557363231,"userId":1594}
发送短信通知
优惠卷监听器 监听到用户注册行为,用户 1594 在 Sat Nov 02 22:22:43 CST 2024 注册成功,事件内容为:{"registerTime":1730557363231,"userId":1594}
发送优惠卷