SpringMVC数据校验、数据格式化处理、国际化设置
1.数据验证
(1)使用JSR-303验证框架
JSR(Java Specification Requests),意思是Java 规范提案。JSR-303是JAVA EE 6中的一项子规范,叫做Bean Validation。JSR 303,Bean Validation规范 ,为Bean验证定义了元数据模型和API。默认的元数据模型是通过Annotations来描述的,使用规范定义的这些注解有效的替换了if-else冗长的校验代码。
引入依赖:
•validation-api
•hibernate-validator(附加了一些验证注解)
•jakarta.validation-api(Spring6以上引入此依赖)
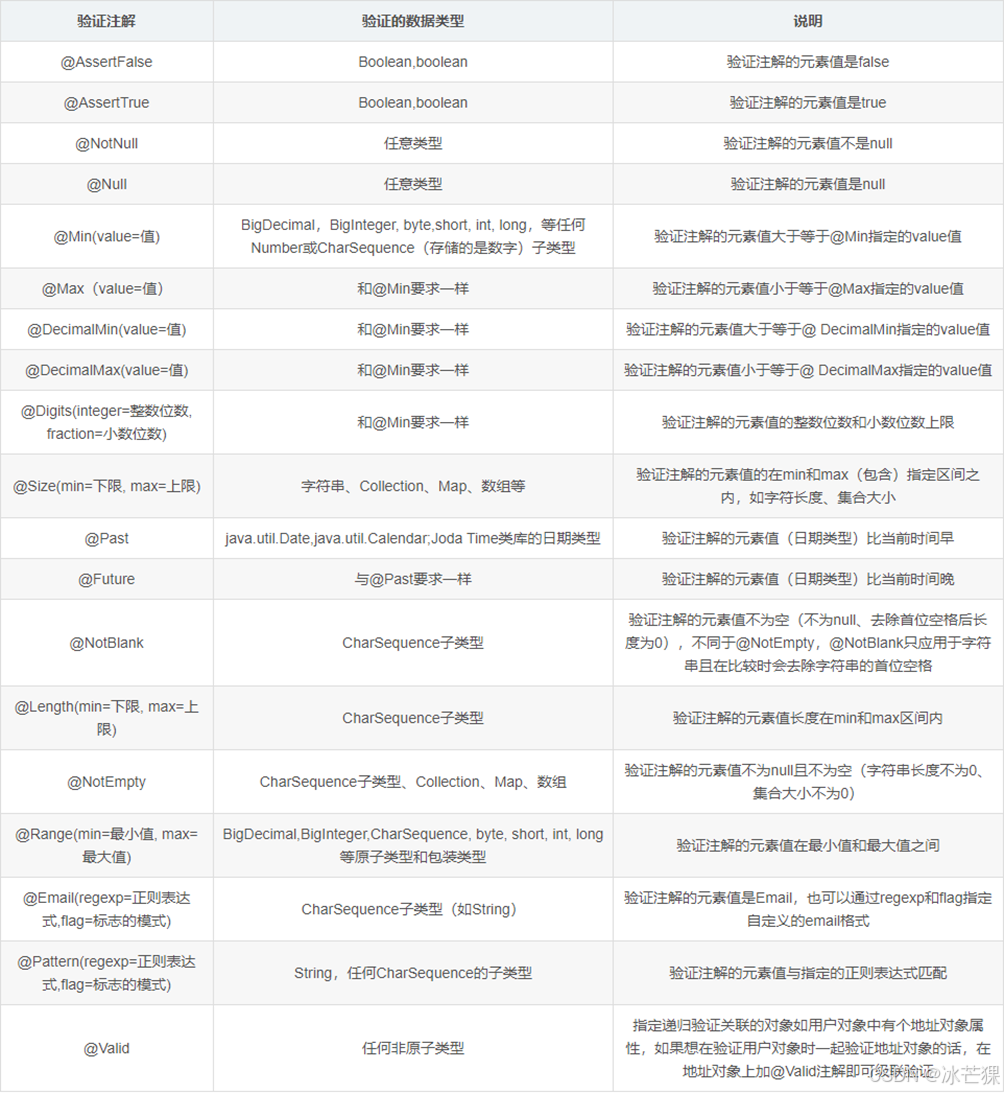
JSR-303验证框架常用注解

使用案例:
@Data
public class SysUser {
    /*** 用户ID*/
    @NotNull(message = "用户id不能为空")
    private Long userId;
    /** 用户名*/
    @NotBlank(message = "用户名不能为空")
    @Length(max = 20, message = "用户名不能超过20个字符")
    @Pattern(regexp = "^[\\u4E00-\\u9FA5A-Za-z0-9\\*]*$", message = "用户昵称限制:最多20字符,包含文字、字母和数字")
    private String username;
    /** 手机号*/
    @NotBlank(message = "手机号不能为空")
    @Pattern(regexp = "^[1][3,4,5,6,7,8,9][0-9]{9}$", message = "手机号格式有误")
    private String mobile;
    /**性别*/
    private String sex;
    /** 邮箱*/
    @NotBlank(message = "联系邮箱不能为空")
    @Email(message = "邮箱格式不对")
    private String email;
    /** 密码*/
    private String password;
    /*** 创建时间 */
    @Future(message = "时间必须是将来时间")
    private Date startTime;
}
在controller层方法参数列表前加上@Valid或@Validated注解
@PostMapping("/save/valid")
@ResponseBody
public Result save(@RequestBody @Valid User user) {
    if(userService.save(user)>0)
        return Result.ok();
    else
        return Result.fail();
}
@Valid 与 @Validated的区别 :
| 区别 | @Valid | @Validated |
|---|---|---|
| 来源 | 标准JSR-303规范 | Spring's JSR-303规范,是标准JSR-303的一个变种。 |
| 分组验证 | 不支持 | 支持(使用注解的group属性设定) |
| 声明位置 | 可以用在方法、构造函数、方法参数和成员属性(字段)上,支持嵌套验证。 | 可以用在类型、方法和方法参数上,但不能用在成员属性(字段)上,从而不支持嵌套验证功能。 |
@Valid嵌套验证
@Data
public class Food {
    @Valid
    private Drink drink;
    @NotNull
    private String type;
}

@Data
public class Drink {
    @NotNull
    private String name;

    @Size(min = 1,max = 10000)
    private String describ;

    @Digits(integer = 2,fraction = 2)
    private Double price;
}
//controller层
@PostMapping("/food")
public String addFood(@Valid Food food){
    return food.getDrink().getName();
}
数据验证全局异常定义案例:
@Component
@ResponseBody
@ControllerAdvice
public class GlobalExceptionHandler {
    /**方法参数校验(接收参数加上@RequestBody注解才会有这种异常) */
    @ExceptionHandler(MethodArgumentNotValidException.class)
    public Result handleMethodArgumentNotValidException(MethodArgumentNotValidException e) {
        log.error("方法参数校验失败", e);
        return Result.fail(Objects.requireNonNull(e.getBindingResult().getFieldError()).getDefaultMessage());
    }
    @ExceptionHandler(BindException.class)
    public Result bindException(BindException ex, HttpServletRequest request) {
        log.error("数据绑定异常", ex);
        try {// 拿到@NotNull,@NotBlank和 @NotEmpty等注解上的message值
            String msg = Objects.requireNonNull(ex.getBindingResult().getFieldError()).getDefaultMessage();
            if (StringUtils.isNotEmpty(msg)) {
           return Result.fail(msg);
            }
        } catch (Exception e) {
            e.printStackTrace();
        }
    StringBuilder msg = new StringBuilder(); // 参数类型不匹配检验
        List<FieldError> fieldErrors = ex.getFieldErrors();
        fieldErrors.forEach((oe) ->
                msg.append("参数:[").append(oe.getObjectName()).append(".").append(oe.getField())
                        .append("]的传入值:[").append(oe.getRejectedValue()).append("]与预期的字段类型不匹配.")
        );
        return Result.fail(msg.toString());
    }
    /**ConstraintViolationException */
    @ExceptionHandler(ConstraintViolationException.class)
    public Result handleConstraintViolationException(ConstraintViolationException e) {
        log.error("注解校验异常", e);
        Set<ConstraintViolation<?>> violations = e.getConstraintViolations();
        String message = violations.stream().map(ConstraintViolation::getMessage).collect(Collectors.joining(";"));
        return Result.fail(message);
    }
}
自定义验证注解的步骤案例:
•定义注解接口
@Documented
@Target({ElementType.PARAMETER, ElementType.FIELD})
@Retention(RetentionPolicy.RUNTIME)
@Constraint(validatedBy = CardNoValidator.class)
public @interface CardNo {
    String message() default "{edu.cqie.ssm.cardNoErrorMessage}";

    Class<?>[] groups() default {};

    Class<? extends Payload>[] payload() default {};
}
•创建ConstraintValidator接口实现类
public class CardNoValidator implements ConstraintValidator<CardNo, Object> {
    @Override
    public void initialize(CardNo constraintAnnotation) {
        ConstraintValidator.super.initialize(constraintAnnotation);
    }

    @Override
    public boolean isValid(Object o, ConstraintValidatorContext constraintValidatorContext) {
        if (o == null) {
            return true;//身份证号未传递时,不做校验
    }
        return IdCardValidatorUtils.isValidate18Idcard(o.toString());
    }
}
•使用注解
@Data
public class User {
    /*** 用户ID*/
    @NotNull(message = "用户id不能为空")
    private Long userId;

    /** 用户名*/
    @NotBlank(message = "用户名不能为空")
    @Length(max = 20, message = "用户名不能超过20个字符")
    @Pattern(regexp = "^[\\u4E00-\\u9FA5A-Za-z0-9\\*]*$", message = "用户昵称限制:最多20字符,包含文字、字母和数字")
    private String username;

    @CardNo
    private String cardNo;
}
2.数据格式化
SpringMVC Formatter
•SpringMVC类型转换器提供了一个统一的ConversionService API以及一个强类型的Converter SPI,用于实现从一种类型 到另一种类型 的转换逻辑。例如,将Short强制转换为Long。
•在Spring MVC中,HTTP中的源数据都是String类型,数据绑定需要将String转换为其他类型,同时也可能需要将数据转换为具有本地格式的字符串样式进行展示,而Converter SPI不能直接满足这种格式要求。
•Spring 3 引入了一个方便的Formatter SPI,当在客户端环境(如Web应用程序)中工作并且需要解析和输出本地化字段值时,可以使用Formatter SPI。
(1)使用Converter转换
public class StringToDateConverter implements Converter<String, Date> {
    private String pattern;
    public StringToDateConverter(String pattern) {
        this.pattern = pattern;
    }
    @Override
    public Date convert(String source) {
        try {
            SimpleDateFormat dateFormat = new SimpleDateFormat(pattern);
            dateFormat.setLenient(false);
            return dateFormat.parse(source);
        } catch (ParseException e) {
            throw new IllegalArgumentException("invalid date format. Please use this pattern\"" + pattern + "\"");
        }
    }
}
注册bean
<bean id="conversionService" class="org.springframework.context.support.ConversionServiceFactoryBean">
    <property name="converters">
        <set>
            <bean class="edu.cqie.ssm.converter.StringToDateConverter">
                <constructor-arg name="pattern" value="yyyy-MM-dd"/>
            </bean>
        </set>
    </property>
</bean>

<mvc:annotation-driven conversion-service="conversionService"/>(2)使用Formatter转换
public class DateFormatter implements Formatter<Date> {
    private SimpleDateFormat sdf;
    public DateFormatter(String pattern) {
        this.sdf = new SimpleDateFormat(pattern);
        sdf.setLenient(false);
    }
    @Override
    public Date parse(String s, Locale locale) throws IllegalArgumentException {
        try {
            return this.sdf.parse(s);
        } catch (ParseException e) {
            throw new IllegalArgumentException("invalid date format. Please use this pattern\"" + this.sdf.toPattern() + "\"");
        }
    }
    @Override
    public String print(Date date, Locale locale) {
        return this.sdf.format(date);
    }
}


<bean id="conversionService" class="org.springframework.format.support.FormattingConversionServiceFactoryBean">
    <property name="formatters">
        <set>
            <bean class="edu.cqie.ssm.formatter.DateFormatter">
                <constructor-arg name="pattern" value="yyyy-MM-dd"/>
            </bean>
        </set>
    </property>
</bean>
<mvc:annotation-driven conversion-service="conversionService"/>(3)内置Formatter转换器
| 类型 | 说明 |
|---|---|
| NumberFormatter | 实现 Number 与 String 之间的解析与格式化 |
| CurrencyFormatter | 实现 Number 与 String 之间的解析与格式化(带货币符号) |
| PercentFormatter | 实现 Number 与 String 之间的解析与格式化(带百分数符号) |
| DateFormatter | 实现 Date 与 String 之间的解析与格式化 |
两个格式化注解
•@NumberFormat
•@DateTimeFormat
使用注解格式化
@DateTimeFormat(pattern="yyyy/MM/dd")
private Date birthday;

@NumberFormat(style = NumberFormat.Style.CURRENCY )
private Double balance;//货币金额  ¥5000

@NumberFormat(pattern = "#,###.##")
private Double salary; //工资  10,000.00

@NumberFormat(style = NumberFormat.Style.PERCENT)
private Double percent;//不加%按p*100来显示,加上按提交精度来显示
3.国际化
什么是国际化?
国际化(也叫 i18n),由于国际化英文单词是 internationalization,在 i 和 n 之间有 18 个字母,因此国际化又叫做 i18n。国际化是指程序在不做任何修改的情况下,就可以在不同的国家或地区和不同的语言环境下,按照当地的语言和格式习惯的显示字符,例如MyBatis官方网站等。
国际化设置场景:
•Spring标签国际化
•接口方法国际化
LocaleResolver
•AcceptHeaderLocaleResolver:根据请求头中的 Accept-Language 字段来确定当前的区域语言。
•SessionLocaleResolver:根据请求参数来确定区域语言,确定后会保存在 Session 中,只要 Session不变,Locale 对象就一直有效。
•CookieLocaleResolver:根据请求参数来确定区域语言,确定后会保存在Cookie中,只要Cookie不变Locale对象就一直有效。
•FixedLocaleResolver:配置时直接提供一个 Locale 对象,以后不能修改。


(1)AcceptHeaderLocaleResolver
步骤一:添加多语言配置文件


步骤二:修改****spring-mvc.xml
<bean id="messageSource"
          class="org.springframework.context.support.ResourceBundleMessageSource">
    <property name="basename" value="i18n.message"/>
    <property name="defaultEncoding" value="UTF-8"/>
</bean>
步骤三:在页面中引用
<%@ page contentType="text/html;charset=UTF-8" language="java" %>
<%@ taglib prefix="spring" uri="http://www.springframework.org/tags" %>
<html>
<head>
    <title><spring:message code="login.title"/></title>
</head>
<body>
    <form action="toRegister" method="post">
        <div><spring:message code="login.content.title"/></div>
        <div>
            <span><spring:message code="login.account"/></span>
            <input type="tel" name="phone" maxlength="11" placeholder='<spring:message code="login.account.holder"/>'/>
        </div>
        <div>
            <span><spring:message code="login.password"/></span>
            <input type="password" name="pwd" minlength="8" maxlength="20" placeholder='<spring:message code="login.password.holder"/>'/>
        </div>
        <div>
            <input type="submit" value='<spring:message code="login.submit"/>'/>
        </div>
    </form>
</body>
</html>
步骤四:在接口中引用
@Controller
public class LoginController {
    @Autowired
    MessageSource messageSource;
    @GetMapping("/login")
    public String login() {
        String username = messageSource.getMessage("login.username", null, LocaleContextHolder.getLocale());
        String password = messageSource.getMessage("login.password", null, LocaleContextHolder.getLocale());
        System.out.println("username = " + username);
        System.out.println("password = " + password);
        return "login";
    }
}
(2)SessionLocaleResolver
**步骤一:添加多语言配置文件(与上面一样)
步骤二:修改****spring-mvc.xml
<bean id="messageSource"
          class="org.springframework.context.support.ResourceBundleMessageSource">
    <property name="basename" value="i18n.message"/>
    <property name="defaultEncoding" value="UTF-8"/>
</bean>
<mvc:interceptors>
    <mvc:interceptor>
        <mvc:mapping path="/**"/>
        <bean class="org.springframework.web.servlet.i18n.LocaleChangeInterceptor">
            <property name="paramName" value="locale"/>
        </bean>
    </mvc:interceptor>
</mvc:interceptors>
<bean id="localeResolver" class="org.springframework.web.servlet.i18n.SessionLocaleResolver">
</bean>
步骤三:在接口中使用
@Controller
public class LoginController {
    @Autowired
    MessageSource messageSource;
    @GetMapping("/login")
    public String login(String locale,HttpSession session) {
        if ("zh-CN".equals(locale)) {
            session.setAttribute(SessionLocaleResolver.LOCALE_SESSION_ATTRIBUTE_NAME, new Locale("zh", "CN"));
        } else if ("en-US".equals(locale)) {
            session.setAttribute(SessionLocaleResolver.LOCALE_SESSION_ATTRIBUTE_NAME, new Locale("en", "US"));
        }
        String username = messageSource.getMessage("login.username", null, LocaleContextHolder.getLocale());
        String password = messageSource.getMessage("login.password", null, LocaleContextHolder.getLocale());
        System.out.println("username = " + username);
        System.out.println("password = " + password);
        return "login";
    }
}
(3)CookieLocaleResolver
**步骤一:添加多语言配置文件(与上面一样)
步骤二:修改****spring-mvc.xml
<bean id="messageSource"
   class="org.springframework.context.support.ResourceBundleMessageSource">
    <property name="basename" value="i18n.message"/>
    <property name="defaultEncoding" value="UTF-8"/>
</bean>
<bean id="localeResolver" class="org.springframework.web.servlet.i18n.CookieLocaleResolver"/>
步骤三:在接口中使用
@GetMapping("/login")
public String login(String locale, HttpServletRequest req, HttpServletResponse resp) {
    CookieLocaleResolver resolver = new CookieLocaleResolver();
    if ("zh-CN".equals(locale)) {
        resolver.setLocale(req, resp, new Locale("zh", "CN"));
    } else if ("en-US".equals(locale)) {
        resolver.setLocale(req, resp, new Locale("en", "US"));
    }
    String username = messageSource.getMessage("login.username", null, LocaleContextHolder.getLocale());
    String password = messageSource.getMessage("login.password", null, LocaleContextHolder.getLocale());
    System.out.println("username = " + username);
    System.out.println("password = " + password);
    return "login";
}


    resolver.setLocale(req, resp, new Locale("zh", "CN"));
} else if ("en-US".equals(locale)) {
    resolver.setLocale(req, resp, new Locale("en", "US"));
}
String username = messageSource.getMessage("login.username", null, LocaleContextHolder.getLocale());
String password = messageSource.getMessage("login.password", null, LocaleContextHolder.getLocale());
System.out.println("username = " + username);
System.out.println("password = " + password);
return "login";
}