1. 透传attributes
在组件上使用透传attribute : 当你在父组件中使用子组件时,你可以添加一些attribute到子组件上,即使这些attribute没有在子组件的props中声明。
父组件:
<!-- 父组件,例如 ParentComponent.vue -->
<template>
  <div>
    <MyComponent
      data-id="123"
      data-user="alice"
      class="my-custom-class"
      style="color: red;"
    />
  </div>
</template>

<script>
import MyComponent from '../components/MyComponent.vue';

export default {
  components: {
    MyComponent
  }
};
</script>

<style>
/* 父组件样式 */
</style>
子组件:
<!-- MyComponent.vue -->
<template>
<div v-bind="$attrs">
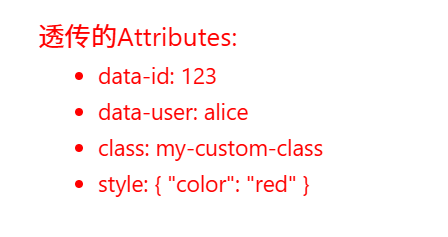
<h3>透传的Attributes:</h3>
<ul>
<li v-for="(value, name) in $attrs" :key="name">
{{ name }}: {{ value }}
</li>
</ul>
</div>
</template>
<script>
export default {
inheritAttrs: false, // 禁用默认的attribute继承行为
};
</script>
<style>
/* 组件样式 */
</style>显示效果:
当然如果你想在控制台打印出来,你可以打印 this.&attrs
  <script>
  export default {
    inheritAttrs: false, // 禁用默认的attribute继承行为,
    mounted() {
      // 在组件挂载后,打印透传的attributes
      console.log('透传的Attributes:', this.$attrs);
    },
  };
  </script>
2. 插槽
就是直接在组件中插入对应的模版
2.1 简单点的插入:
ChildComponent.vue:
<template>
    <div>
      before
      <slot></slot>
      <slot></slot>
      <slot></slot>
      after
    </div>
</template>

<script setup>


</script>

<style>
</style>
父组件:
<template>
  <div class="home">

      <ChildComponent>
        <div>{{hello}}</div>
      </ChildComponent>

  </div>
</template>

<script setup>
import { ref } from 'vue'
import ChildComponent from '../components/ChildComponent.vue'

const hello = ref('Hello world! 2024')
</script>
显示效果:就是将插入的div代替了子组件的slot位置

2.2 在插槽指定的位置,插入指定的值
ChildComponent.vue:
<template>
    <div>
      <slot name="header"></slot>
      <slot name="content"></slot>
      <slot name="footer"></slot>
    </div>
  </template>
父组件:
<template>
  <div class="home">
    <ChildComponent>
      <template #header>
        <p>This is the header slot</p>
      </template>
      <template #content>
        <p>This is the content slot with a variable: {{ contentVariable }}</p>
      </template>
      <template #footer>
        <p>This is the footer slot</p>
      </template>
    </ChildComponent>
  </div>
</template>

<script>
import { ref } from 'vue'
import ChildComponent from '../components/ChildComponent.vue'

export default {
  components: {
    ChildComponent
  },
  setup() {
    const contentVariable = ref('This is some content.')
    return { contentVariable }
  }
}
</script>
3. 依赖注入
为了便于祖孙之间数据的传输,
3.1 祖组件向子组件和孙组件传递数据示例
祖组件:
<template>
  <div>
    <h1>Ancestor Component</h1>
    <p>Providing a message: "{{ message }}"</p>
    <ChildComponent />
  </div>
</template>

<script>
import { provide, ref } from 'vue';
import ChildComponent from '../components/ChildComponent.vue';

export default {
  components: {
    ChildComponent
  },
  setup() {
    const message = ref('Hello from Ancestor!');
    provide('ancestorMessage', message);
    return { message };
  }
}
</script>
子组件:
<template>
    <div>
      <h2>Child Component</h2>
      <p>Message from Ancestor: "{{ ancestorMessage }}"</p>
      <GrandchildComponent />
    </div>
  </template>

  <script>
  import { inject } from 'vue';
  import GrandchildComponent from '../components/GrandchildComponent.vue';

  export default {
    components: {
      GrandchildComponent
    },
    setup() {
      const ancestorMessage = inject('ancestorMessage');
      return { ancestorMessage };
    }
  }
  </script>
孙组件:
<template>
    <div>
      <h3>Grandchild Component</h3>
      <p>Message from Ancestor: "{{ ancestorMessage }}"</p>
    </div>
  </template>

  <script>
  import { inject } from 'vue';

  export default {
    setup() {
      const ancestorMessage = inject('ancestorMessage');
      return { ancestorMessage };
    }
  }
  </script>
然后你会发现子和孙组件都是通过inject来接收数据,而祖组件只需要通过provide发送数据
显示效果:
